Heated rear-view mirrors are a necessary option in winter to improve driving safety and provide the driver with adequate visibility.
This feature is present in most modern cars, but owners of older vehicles should not be upset. You can make heated side mirrors yourself!
Types of heating
The need for this function became clear quite a long time ago. Just a few decades ago, some cars were equipped with simple devices designed to defrost viewing structures.
Installation involved installing incandescent lamps inside, which heated the part from the inside and the ice melted. In modern devices, the heating method has changed, but the function remains the same.
The existing types of defrosters should be considered separately:
- Wire - how heated mirrors on a wire base works is explained by its very name. Tungsten filaments are used as a heating element, placed on an insulating and heat-resistant base. When an electric current passes through them, they heat up, which leads to melting of the ice.
- Printed conductors – heated car mirrors using printed conductors are the most modern. You can buy boards at the car market or at a spare parts store. They are not made independently.
- A film heater is a film-based product with heating elements included in it.
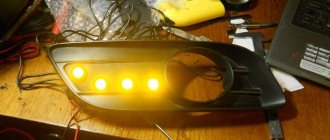
- Lamp heater - this type of heating element is a low-power (10 watt) incandescent lamp. This technology is best suited for making heated mirrors with your own hands and is often used by owners of outdated models of domestic cars.
Installation information.
Before changing your side reflectors, you should learn about the methods you can use. You can buy ready-made parts that have a heating function, but you can also start making your own reflectors. Because the price of finished parts can hit your pocket a little. You can purchase the parts individually and then assemble them into a complete complete part. But the cheapest way. this, of course, is to assemble a tuning device with your own hands. Here the price will be reduced to a minimum, and work efficiency, on the contrary, will be maximum. Moreover, by doing all the installation work yourself, you will be able to optimize the relay and all operating principles as much as possible. You can also consider installing reflectors from the VAZ 2110 on the VAZ 2114, since the standard mounts in this model are ideal for this operation. In addition, ideally they will be installed on the VAZ 2109.
Checking the presence of standard heating
The presence of a heated rear view mirror cannot always be detected at first glance. The fact is that there is often no separate button to turn it on, and many car owners wonder how the heated exterior mirrors are turned on. The function is activated automatically when the rear window heating is turned on. To check if the mirror heater is present:
- Start the engine;
- Turn on the rear window heating;
- Spray the mirrors with water or blow on them;
- Touch it with your hand.
When the heating is running, the water drops dry within 1-2 minutes; when you breathe, the mirror does not fog up, and it is warm to the touch. In the cold season, you can verify the presence of heating by simply observing how long it takes for the mirror to thaw after being parked overnight. If a heating element is located underneath, the defrosting process takes only a few minutes.
Lateral
There can also be many reasons for removing side mirrors. But mainly this is replacement, painting or installing a heating system.
Regardless of the situation specifically with your VAZ 2114, the first thing you will have to do is remove the elements. How to do it?
Side mirrors
Dismantling
Removing side mirrors is not a difficult task. Here you only need a screwdriver to work. Perhaps not alone.
- Pry off the plug located on the side mirror control knob.
- Behind the plug there is a screw that needs to be unscrewed with a Phillips screwdriver.
- Remove the triangular plug. In the case of the VAZ 2114, it is held in place by special clamps. So to remove it you need to carefully unscrew the latches. Use a flathead screwdriver to pry the plug and remove it without too much trouble.
- Next, three mounting screws appear in front of you.
- By unscrewing them, you will thereby remove the side mirror.
- Do the same procedure with the second rear view element.
As you can see, removing the components is quite simple; simple fastening is provided. This is largely why they love domestic cars, since even a person without much experience can disassemble and assemble most components.
Dismantling process
Disassembly
It is not a fact that you will need to completely change the rear view element assembly. Therefore, it is necessary to figure out how to properly and accurately disassemble the side mirror.
There are several ways to do this, each of which has its own characteristics.
- Press the inside of the plastic case and snap off the holders with a flat-head screwdriver. This method cannot be called reliable, since the probability of breaking the mirror itself is quite high.
- The second method is even more risky because it involves quickly striking the glass onto the surface. Choose a soft surface, such as rubber. This will allow you to quickly and easily remove and disassemble the element. Strike lightly but quickly.
- To replace the plastic housing or main fastener, you need to remove the adjusting rod and pin. Assembly is carried out in exactly the reverse order.
Heating
If you have driven foreign cars, especially in winter, you could appreciate all the delights of having heated exterior mirrors.
The VAZ 2114 does not have such an option, but this did not stop third-party manufacturers from producing a whole range of products equipped with heating.
Frankly speaking, it is much easier to spend about 800-900 rubles on buying a ready-made heated side mirror than to try to make the heating yourself. This is better in terms of reliability and safety.
The only peculiarity of the installation is that, unlike a conventional rear view element, you will need to not only install the housing on the seat, but also additionally connect the wiring to the power system of your car. That's all.
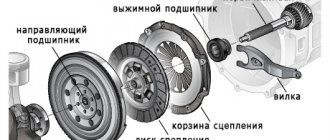
Heated mirror
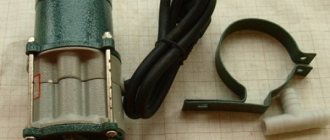
For reference, we add that today there are kits for self-insulation on the market. It consists of three components:
- Wiring;
- A light bulb (it is this that creates the effect of heating the mirror);
- Insulating material (prevents the heat from the lamp from being wasted and leaving the housing).
Adjustment
To provide yourself with the necessary level of visibility of everything that is happening behind you, you need to properly adjust the side mirrors. This is not difficult to do, since there are appropriate adjustment knobs inside the cabin. Another question is what is the correct setting?
- When set correctly, when looking in the mirror you should be able to see the entire side of the road surface.
- When driving, you should have a good view of the adjacent lane and the car that is moving next to you.
- If the mirror is positioned correctly, you will see the edge of the body of your own car in it. Due to this, the distance between you and the neighboring car is correctly determined.
- The side element should reflect no more than 5 percent of your car.
- The road surface takes up about 50 percent of the bottom of the glass when properly configured.
- If you manually lower the mirrors down for easier parking, be sure to return them to their original position.
Example of correct adjustment
Checking the adjustment should be carried out exclusively on a level road. This way you will get the most accurate tuning result.
Obviously, changing mirrors is a very simple task. In this regard, the VAZ 2114 is designed simply but reliably. A couple of bolts, several clamps, decorative plugs - these are all the elements that need to be removed to get the result. The reassembly procedure does not cause any problems. So go for it!
Instructions for installing ready-made components
Installing commercial heated mirrors is a relatively simple operation. To carry it out, it is necessary to remove the part from the car and disassemble it. Glued products are heated with a hair dryer or by soaking in boiling water, after which the reflective overlay is easily removed. Products fastened with bolts are disassembled using the appropriate tool. Do-it-yourself installation of heated rear-view mirrors purchased in a store is permissible only on clean and dry surfaces.
Before starting the procedure, it is necessary to evaluate the dimensions of the heating element and housing. If printed circuit boards are used, it is possible to remove the stiffeners. The film is cut to size while retaining the heating strips.
The boards are glued to the inside of the case with glue, the films are fixed directly to the reverse side. In both cases, wires are soldered to the contacts of the thermoelement, which go to the power source.
The connection diagram for heated exterior mirrors may vary on different cars. Usually the wires are brought out and connected to the line that supplies the heated rear window. It is possible to install separate wiring using a relay and a fuse. In some models, auto wiring for the devices in question is provided with src=»https://znanieavto.ru/wp-content/uploads/2018/02/skhema-podklyucheniya-obogreva.jpg» class=»aligncenter» width=»500″ height ="600″[/img]
How to make heated mirrors with your own hands
It’s not difficult to make heated mirrors with your own hands. Most often, incandescent lamps or a wire-based heating element system are used for this. The cost of materials is minimal, but the work will take time.
What you will need
To make heated mirrors with your own hands, you will need a set of tools and materials. The list of consumables depends on what type of device the car owner wants to see.
| Lamp | Wire |
| lamp 10 watt | the basis |
| foil | tungsten filaments |
| heat resistant material | Double-sided tape |
| cartridge | wires |
| wires | soldering iron |
| soldering iron | sealant |
| sealant | |
| disassembly tools |
Cost of materials
Do-it-yourself heated rear-view mirrors require extremely low financial costs. So, an incandescent lamp costs about 20 rubles, a cartridge - 30 rubles, wires - 25 rubles / meter, sealant - 100 rubles, adhesive tape 40 rubles. Tungsten filaments can be removed for free from an old kettle, and a soldering iron and screwdriver for disassembling a mirror can be borrowed from friends.
Procedure
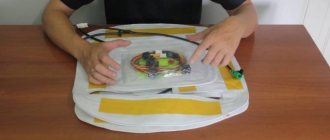
As in the case when ready-made components for heating are used, installation of the heater begins with disassembling, washing and drying the mirror. After this, the inside of the housing is lined with a heat-resistant coating and aluminum foil.
The cartridge is mounted in such a way that after installation it does not touch the structural elements.
A lamp is inserted into the socket, the wires are soldered to the contacts and insulated with sealant. Also, using sealant, insulate the holes through which the wiring comes out. The heating filaments are glued to the base, after which it is covered on both sides with heat-resistant material. The resulting structure is glued to the inner surface of the mirror, soldered to the contacts of the wires, which are brought out through specially made holes. All open heating elements are insulated with sealant.
An important question is how to turn on homemade heated mirrors. The best option is to have a separate button for this.
Connection to the rear window defrost system is not recommended, since the design should not operate for a long time. Both the lamp and the filaments become hot enough to cause overheating and damage to the housing during prolonged use.
Exterior mirrors
Model selection
News
- [17.01.2019]
ATTENTION! From January 1, 2021, due to an increase in the VAT rate, prices for products of NPK Polytech have been changed. - [10.01.2019]
Sale of interior and additional mirrors produced by 3R! - [05.06.2017]
Since May 2021, the products of NPK Polytech have been introduced with EAN-13 barcodes.
Instructions for installing mirrors: Here you can download the passport and instructions for installing mirrors of NPK "Polytech".
Installation of heated mirrors.
Here are general recommendations for installing heated mirrors that apply to all car models. Detailed installation information is contained in the operating instructions for each specific mirror (see above).
First, you need to turn off the voltage of the vehicle's on-board network (remove the battery terminals). Then, remove the existing mirrors and install heated ones instead, after passing the heating wires inside the door. For ease of operation, you should first remove the inner door trim. Next, the wires are led out of the door under the dashboard of the car. It’s good if the car already has electrical wires entering the door - the heating wires can be routed through it. If there is no input, then you will have to drill two holes: in the body pillar and at the end of the door and lay the wires through them.
To avoid accidental damage to the wires when closing the door, it is useful to install protective rubber bushings from the VAZ-2106 or Oka into the holes. Any other dense rubber bushing will do, as long as it can be securely fastened to the body pillar.
One of the wires is connected to the ground of the car in any convenient place. It is not recommended to connect to ground inside the door, since electrical contact in door hinges and other moving connections is not always reliable. The other wire connects to the power supply. It can be connected in parallel to the heated rear window or through a separate switch. The first method is the simplest. The connection is made by connecting the heated mirror wire to the output wire of the rear window heated relay.
Special clamps that have recently appeared on the market allow you to connect wires without preliminary stripping and subsequent insulation. As a result, the entire connection operation takes a few seconds. However, not all domestic cars are equipped with a heated rear window. In addition, in some cases, for example, when driving in fog, the mirrors may fog up, although the rear window remains clear. Therefore, connecting via a switch is more convenient and versatile. Standard switches from any car model will do. Just make sure that the current limit value through the switch (usually indicated on its body) is greater than the current consumed by the heating system. If the passport for heated mirrors only indicates the power of the heating system, then the amount of current consumed can be easily determined by dividing the power by the voltage of the on-board network. Connecting the heated mirror system with electric drive is carried out in the same way.
The bathroom belongs to the category of wet rooms. High humidity causes some discomfort, not to mention the formation of fungus. When planning renovation work in the bathroom, it is necessary to consider the following points:
1. Ventilation (natural or forced) 2. Room heating (warm floor; heated towel rail; radiator)
An indispensable attribute of the bathroom is a mirror, the surface of which is susceptible to fogging.
There are several ways to solve the problem of mirror fogging.
1. Wipe the surface of the mirror with your hand 2. Before taking a bath or shower, rub various gels (liquid soap, shampoo, special spray) into the surface of the mirror 3. You can install a car wiper on the mirror 4. You can install a fan with a humidity sensor 5. You can organize heating of the mirror using a special heating film.
Methods for connecting the heating film:
1. Combine with turning on the lighting above the mirror. 2. Install a separate switch for heating the mirror. 3. You can organize automatic activation of the mirror heating when the humidity in the room exceeds a preset value. For this, a signal from a fan with a humidity sensor is used (the fan circuitry requires modification)
A unique video course on apartment renovation:
My name is Alexander Smolin and for more than 17 years I have been renovating premises of any complexity. My channel on YouTube: https://www.youtube.com/user/remontkvpro is entirely devoted to such topics as high-quality do-it-yourself apartment renovation and high-quality do-it-yourself home renovation. With the help of my videos, you can quickly make repairs in your apartment with your own hands and without expensive professional tools, even if you are completely new to this matter.
At the moment, I have done QUALITY renovations in more than 50 apartments. Here are some of my works:
prev next On my channel you will find video lessons on topics such as planning an apartment renovation, electrical, plumbing, rough and fine finishing of walls and ceilings, bathroom renovation, toilet renovation, hallway renovation, living room renovation, kitchen renovation, working with different electrical tools, installation of ceilings and work with drywall.
In addition, on my channel there is a separate playlist, one might even say a whole video course, dedicated to interior and entrance doors. From the video in this playlist you will learn how to choose a door, how to install a door with your own hands, how to install extensions with your own hands (2 ways are discussed in the video), how to install platbands, how to simply and quickly install a lock and a lock mate without expensive tools, how to install door limiter and finally, you will learn about the features of interior and entrance doors.
In my master classes you will find answers to questions: how NOT to lay tiles, how NOT to flood your neighbors, how to make holes in tiles, how to make an arch from plasterboard with your own hands, how to properly hang wallpaper, how to save on materials, how to choose paint and wallpaper, how to seal cracks and cracks. You will learn how to make LED lighting with your own hands, find out what to do when the hot water is turned off, how to clean the seams between the tiles, how to choose a kitchen hood, how to repair faulty wiring, how to turn the lights on and off remotely, how to install a window sill with your own hands, and much more , much more. Don't forget to subscribe to my channel so you don't miss new videos: Keywords: diamond discs, disc review, how to choose a disc, diamond wheel, grinder disc, cutting disc, sharpening discs, grinder wheel, tile disc, tile cutting, discs for concrete, grinding diamond slides, flexible diamond slides, disc for concrete, apartment renovation, do-it-yourself, diamond tools
Malfunctions of standard heating
Possible malfunctions and repairs of standard mirror heating are in the table below:
| Possible malfunction | How to repair heating |
| Heating element burnt out | Disassemble the mirror and replace the part |
| The integrity of the wiring is broken | Check the wiring with a multitester, clean, connect and insulate the wires at the damage site |
| The power button combined with the rear window heating is faulty | Check if the rear window heating works. If not, replace the button |
| Heating relay is faulty | “Ring” and replace the faulty relay |
| Fuse burned out | Replace fuse, check wiring for short circuit |
It’s not difficult to make heated mirrors with your own hands today. Heating components are sold in stores, so all the work comes down to assembling a simple structure and connecting it to the car's electrical network. An assembled and well-functioning device will significantly increase driving comfort in winter and make life easier for owners of any type of car.
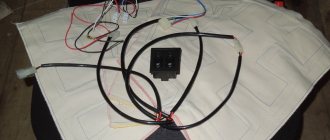
We connect the heated mirrors — Lada 2114, 1.5 l., 2005 on DRIVE2
Solina mirror elements with filter and heating were purchased about a year ago. I installed them quickly then, but I only got around to doing the heating now (but I managed to do it before winter). A connection diagram drawn by myself is attached, I’ll go over the installation steps a little. I brought the positive wires in the doors through the corrugations into the interior, and secured the masses of heating elements in the doors. I didn’t remove the front panel, it was a lot of hassle, so I did it like this. I connected the positive wires together and to the 87th contact of the relay. I secured the relay mass (pin 85) to the stand to which the front panel cover is attached. The 86th and 30th contacts of the relay are closed, a fuse is connected to them and into the button. I took the power for the button from the yellow-blue wire coming into the rear window heating button block. The logic is simple - heated mirrors are needed not only when the rear window fogs up or freezes, thus reducing the load on the wiring and the standard fuse in the mounting block. Since the button in the stash was without a power indicator, only with a glowing symbol, I connected it. Later I’ll take another one, most likely also for heating, all that remains is to add 2 wires to the indicator - I assembled the block with terminals myself. All connections are made on terminals with crimp and heat-shrink tubing, the wires are fixed with electrical tape.
Hasty field tests showed that they get hot! Within a couple of minutes the glass becomes noticeably warm.
Issue price: 100,500 ₽
Page 2
Solina mirror elements with filter and heating were purchased about a year ago. I installed them quickly then, but I only got around to doing the heating now (but I managed to do it before winter). A connection diagram drawn by myself is attached, I’ll go over the installation steps a little. I brought the positive wires in the doors through the corrugations into the interior, and secured the masses of heating elements in the doors. I didn’t remove the front panel, it was a lot of hassle, so I did it like this. I connected the positive wires together and to the 87th contact of the relay. I secured the relay mass (pin 85) to the stand to which the front panel cover is attached. The 86th and 30th contacts of the relay are closed, a fuse is connected to them and into the button. I took the power for the button from the yellow-blue wire coming into the rear window heating button block. The logic is simple - heated mirrors are needed not only when the rear window fogs up or freezes, thus reducing the load on the wiring and the standard fuse in the mounting block. Since the button in the stash was without a power indicator, only with a glowing symbol, I connected it. Later I’ll take another one, most likely also for heating, all that remains is to add 2 wires to the indicator - I assembled the block with terminals myself. All connections are made on terminals with crimp and heat-shrink tubing, the wires are fixed with electrical tape.
Hasty field tests showed that they get hot! Within a couple of minutes the glass becomes noticeably warm.
Issue price: 100,500 ₽