Finding the cause of the problem
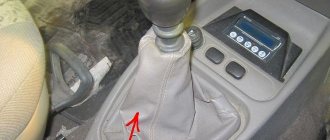
There are several reasons for a rattling shift lever. So that the motorist can understand which of them he has encountered, a simple disassembly of the mechanism will be required. First of all, you need to remove the gearbox cover (lift and pull), and then make several movements with the lever and try to determine where the rattling sound comes from.
If this does not help, then you can try knocking on the lever parts. A part that is poorly secured will make a corresponding sound. Sometimes poorly secured parts can be seen with the naked eye. If these tricks did not help, then all that remains is to remove the lever bolt and inspect the elements on it.
If the cause of the rattling is in the upper gearbox cover or nuts
In some cases, the Lada Kalina lever rattles due to the fact that the gearbox cover does not fit tightly enough to the mechanisms located under it. If this is the cause of the problem, then it is enough to remove the cap and stick a piece of electrical tape about 3 mm wide and a length corresponding to the diameter of the cap on its inner surface.
After such a DIY repair, the cap should fit tightly. If the gearshift lever is still dangling, then you should apply another circle of electrical tape and put on the cover. Sometimes the cause of an unpleasant sound is poorly tightened nuts. This problem can be easily detected by removing the cover of the device. In this case, it is enough to tighten the nuts all the way so that the noise disappears. Upon completion of the work, you need to accelerate the vehicle and release the gas pedal. If the mechanism no longer hums, then the gearbox repair is complete.
Why do you adjust the gearshift lever?
Due to the mutual displacement of parts and the occurrence of backlash in the gear selection mechanism during operation, inconvenience appears when shifting. This may result in:
- touching the driver's or passenger's seats or the elastic casing mounting frame when engaging first or reverse gears;
- looseness and rattling of the mechanism;
- uncertain grip of the selected gear.
Timely adjustment of the gearshift lever on the Kalina, which does not require excessive effort and experience, will eliminate problems in the future.
If the cause of the problem is the size of the metal sleeve
If, after manipulating with electrical tape, the problem was not eliminated, then, most likely, the noise is explained by the peculiarities of attaching the shift lever to the rod. It is precisely this kind of car flaw that Lada Kalina owners most often encounter. However, you can fix this problem yourself. This work will take a minimum of time, and no special knowledge is required.
In order for the gearbox to start working silently, you need to carry out work using a 13mm wrench, pliers and an electric sharpener. First you need to remove the lever casing, then unscrew the fastening nut, remove the bolt, all the washers, and the metal sleeve. The cause of the malfunction in this case is that there is a small gap between the structural elements, in which strong vibration occurs when the gearbox is shifted.
Accordingly, the master’s task is to eliminate the gap. In the design installed on the Lada Kalina, the washers are not compressed tightly enough due to the oversized metal sleeve. Therefore, when the mechanism is disassembled, you need to take the bushing and grind it off slightly (no more than 1 mm). Repairing the gearbox should be done with caution, since if the bushing is ground down too much, the gearbox will shift with great difficulty.
After turning, the bushing should be tightly connected to the washers, forming a single structure. As a result of these manipulations, the lever will begin to move more tightly, but this has its advantages, since it will not make any unnecessary movements. Before putting all the parts of the mechanism into place, they should be generously coated with lubricant. When the structure is assembled, the nuts must be tightened to the maximum.
One of the main problems that arise when performing this work is excessive grinding of the bushing, which may result in the need to replace this element. However, a slight loosening of the nut can save the situation. This will make the lever move less stiffly when changing gears.
There is an alternative way to solve the problem with the Lada Kalina car. It is more complex, but has also proven itself positively. The damper bushings should be glued to the gearshift lever using sealant, and the metal bushing should be wrapped in a circle in aluminum tape (this can be cut from a regular drinks can) and installed in its proper place. You also need to cut a washer out of aluminum and insert it between the metal ring and the damper bushing. Before assembly, all parts should be treated with lubricant.
When the gearbox repair is completed, it is necessary to test the mechanism. First you need to accelerate the car, and then at a speed of about 70 km/h and in third gear, release the gas pedal. If no extraneous sounds or vibrations occur, then the problem has been resolved.
Diagnosed by fixing the gearshift lever with your hand. In this case, it either disappears completely or partially (if the rattling comes from the gearbox lever bushing and the gearbox rod vibrates in this place).
Everything on the gearshift lever can rattle - from the plug on which the gearbox diagram is drawn, to the lever bushings. If today you have one part of the gear shift lever rattling, then, according to the law of meanness, after it is made noiseless, another one will definitely start to rattle tomorrow. That is why we are improving all the weak points at once.
The main itching sound comes from the junction of the gear shift lever with the gearbox control rod. For me, the rattling started when I sharply accelerated or released the gas, and when coasting in 3rd gear, even when I fixed the gear shift lever with my hand, it might not go away. For a long time I could not understand where it came from; it seemed that the rattling was coming from the center console, in the area of the stove nozzles.
The fact is that at the junction of the gearbox control rod and the gearbox gearshift lever there is play, which is why the rattling occurs. AvtoVAZ engineers installed damper bushings in this place, which in theory should dampen vibrations, but in practice, over time they wear out, their lubricant dries out, and the nastiest and loudest cricket appears in the car.
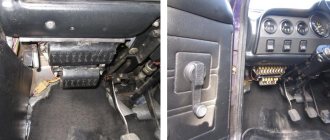
The red in the figure shows parts that are tightly tightened and fixed to each other; they cannot rattle. Green parts that can make rattling noises.
So let’s start eliminating the “cricket”. To do this, remove the frame of the gearshift lever cover and lift it up. Unscrew the nut (see item 1 in the figure above) and disassemble the sandwich. The nut is tightly tightened, sometimes it is easier to unscrew the bolt pos. 6, since it is not secured in any way against unscrewing, and the nut has an expanded contact area to protect against self-unscrewing. See photos below of all the parts removed. In the photo, a strip has already been made for “wrapping” the sleeve.
First, we eliminate the free gaps between the damper bushings (items 3, 7 in the figure) and the gear shift lever (item 8), gluing them to the gear shift lever with sealant. The photo in red shows how to apply it.
Next, from a simple aluminum can (for example, from a forfeit) we cut out a strip, which we wrap around the entire metal sleeve in a circle pos. 4. The strip must be cut carefully so that the edges of the can foil can be installed end-to-end on the sleeve. See in the photo how it is all assembled (the second damper ring has been removed for clarity).
We also cut out a washer from the same aluminum can to eliminate axial play. We insert the washer on either side between the iron ring and the damper sleeve glued to the sealant.
Lubricate everything with damper grease or sticky white (used to lubricate motorcycle chains) and put it back together.
We also lubricate the foil strip and the washer on both sides. Having suffered a little, we assemble the entire “sandwich” and tighten the “sandwich” nut (item 1) as tightly as possible, but wisely, so as not to break the thread. It is advisable to additionally lock it with a lock nut to avoid unscrewing due to vibrations.
The sleeve with foil fits as it should, without interference and without gaps. The width of the washer is also optimal - the gear shift lever does not become heavier when the nut is tightened. In cold weather everything is fine too, since the damper grease does not freeze. After this modification, the car drove more than 15,000 km - silence.
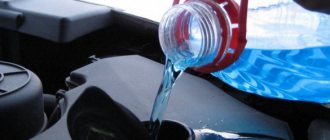
Next, we eliminate the rattling noise in the glass (maybe it wasn’t there, but it’s better to be safe, it’ll only take five minutes), where the ball joint of the gearshift lever is located. Pour a little transmission oil into it so that it barely comes out from the top. There definitely won’t be any rattling in an oil bath, the oil won’t harm anything, it’s been tested).
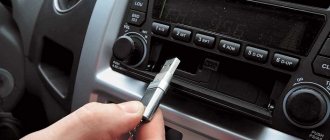
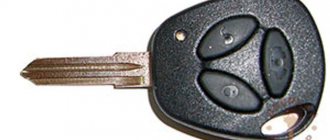
Next, we de-noise the reverse lock release sleeve. To remove it, use a sharp tool to pry up the plug on the knob of the gear shift lever (the same one on which the gear shift diagram is drawn) and remove it. Use a 13mm wrench to unscrew the nut. We unscrew the knob itself. Disconnect the connector from the sleeve and remove it along with the casing. There are different brands of cartridge cases, and all can produce rattling noise. Their design is generally similar. If a sleeve rattles, it is either its outer plastic shell vibrating against the inner one, or a spring in it (metallic ringing). The technology of the fight is simple - we eliminate excessive gaps between parts, and also prevent them from vibrating against each other by using lubricant.
If it is a spring, then it can be stretched a little and fixed to the upper ring with electrical tape. It would also be a good idea to lubricate it with damper grease, or at worst with lithol. If the outer sleeve of the sleeve itches against the inner one, we lubricate the same, and to eliminate the excessive gap between them, you can wrap the inner sleeve with electrical tape, or select a suitable rubber ring that fits onto the inner sleeve at the bottom of the collar. Assembly is carried out in reverse order.
Well, we finish with a plug for the knob of the gearbox shift lever, fixing it by gluing it for a moment. Now it won't even rotate. If necessary, it can be easily removed by prying it with a sharp object.
The vast majority of “our” cars suffer from almost the same problems, among which the rattling of the gearshift knob is one of the most annoying. Thank God, nature did not deprive our brother of intelligence and “straight hands”, and they were invented precisely by the VAZ car owners themselves.
Today I bring to your attention another solution to a pressing problem - eliminating the rattling of the VAZ 2114 gear shift knob
with your own hands