The clutch is the most important component of a car, without which it is impossible to imagine the operation of the gearbox mechanism, as well as the car’s performance of such operations as starting and braking to a final stop. In other words, the clutch is a necessary mechanism of any car, which is a kind of transfer point between the engine and the drive axles.
This unit includes:
- driven clutch disc;
- clutch basket and release bearing with clutch.
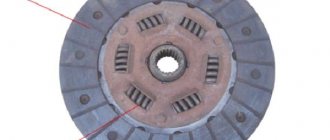
So what is this component of the clutch mechanism? This is a disc with spring plates and friction linings that are not connected to each other and are made of a material comparable to the material of the brake pads, i.e. abrasion resistant. In the center of the disk there is a hub with a splined connection.
Basic clutch elements
To replace the clutch, you should accurately understand its structure. In the VAZ-2107, this unit is controlled using a pedal located under the steering wheel. Pressing it disconnects the clutch from the gearbox, and releasing it reattaches it. The unit in question is easy to adjust and easy to change.
The VAZ-2107 model is equipped with a single-disc clutch equipped with a central spring. This scheme has a number of advantages:
- reliability;
- low cost;
- ease of care.
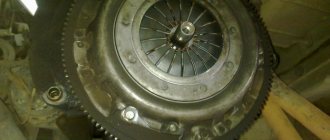
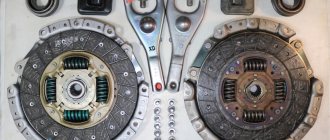
The clutch itself consists of a release bearing and a pair of discs. The first of them is the leading one, mounted on the flywheel. The slave is in the basket. It is connected to the gearbox (its input shaft) using splines.
It is not difficult to replace the “original” wheels with those that are installed on other VAZ models. Fully matched parts for:
- 2103 (engine capacity up to 1.5 liters);
- 2121 (up to 1.7 l).
The VAZ clutch driven disc is called the “drum”. It has pads and special slots on both sides that increase elasticity. There are also 8 springs that reduce dynamic load.
The gearbox is attached to the driven disk, and the basket is attached to the power unit. When moving, both parts are pressed tightly against each other and rotate synchronously.
For model 2107, driven discs from 2106 or 2103 can be used. Some craftsmen replace the drum with a part from 2121 (Niva).
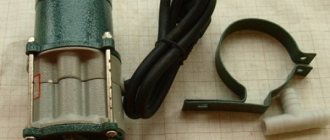
The next clutch element is the release bearing. Usually it is he who fails most often. The element is attached to the pedal using a fork. Any pressure significantly increases the load on the part, and therefore it breaks relatively quickly.
To change the bearing, in any case, you will need to disassemble the disks. Instead of the standard element (designated 2101), many take the one intended for the VAZ-2121.
Such a bearing is more reliable, but it will be necessary to change the basket, otherwise the pedal will become too hard.
The next part of the clutch is the fork. With its help, the release bearing moves and the clutch is retracted. Failure of this part makes it impossible to turn off the entire unit. It is recommended to change the fork, even if the clutch continues to work, albeit unstable, because otherwise it will soon completely fail.
labavto.com
If the car starts to slip under load, most likely the problem is in the clutch. It is dangerous to move with a faulty unit, so it should be changed as quickly as possible. The article provides detailed instructions on how to replace a VAZ 2107 clutch, which device to choose, and also includes a video demonstrating the process.
How to change the clutch
A slipping clutch indicates that it needs to be replaced. It is convenient to carry out all stages on an overpass. If this is not possible, use a jack, but be sure to place protective supports under the car.
To replace the unit in question, prepare:
- pliers;
- rags;
- mount;
- mandrel;
- set of keys and screwdrivers.
It is not at all necessary to completely remove the gearbox; changing the clutch is not difficult without this. It is enough to move it to the side so that the shaft moves out of the basket. Nevertheless, for your own convenience, it is better to dismantle the gearbox. This, by the way, will allow you to inspect the seals and crankcase along the way.
Leveling up
To bleed, you will need brake fluid and a container for draining it, as well as a transparent hose with a diameter of 5mm. and an assistant who will have to press the clutch pedal until heaviness appears in it. After this, it must be clamped, and at this time a second person must unscrew the fitting and drain all the brake fluid. Air bubbles will be visible in the hose. The procedure should be repeated until these same bubbles disappear. Also, do not forget about the fluid level in the expansion tank.
Removing the gearbox and clutch
The procedure is as follows:
- remove the starter;
- disconnect the speed switch;
- remove the muffler fasteners and underbody crossmembers.
Next you need to pull out the basket and disk. For this:
- use a pry bar to secure the flywheel;
- unscrew the bolts holding the basket;
- slide it and take out the disk;
- Lightly press the basket inward, level it and pull it out.
Now comes the turn to dismantle the release bearing:
- press the plug with a screwdriver so that it comes out of the grooves;
- guide the bearing towards you along the input shaft;
- Unclip the locking ring on its hub and remove the element.
Replacing the release bearing on a VAZ 2101-VAZ 2107
Welcome! The release bearing seems like such a small part in the clutch drive, but sometimes it causes so many problems! It even gets to this point: the clutch on the car stops working altogether. Let's look at a few main questions about this bearing and find out how to properly replace it on a car.
Note! You will need the following tools: a screwdriver and lubricant “LSTS-15” or “Litol-24” to lubricate the splines of the input shaft, but more on that a little later. Replacing the bearing requires removing the box, so the list should be supplemented with tools from the “Removal” section.
Summary:
Release bearing location
It is located in the box, or rather in the part where the box connects to the clutch. An example is shown in the photo below, the red arrow indicates the location of the bearing:
Note! The photo above shows only the approximate position of this bearing, since it is located in the inside of the box, so we will not see it from the outside. However, knowing where it is approximately located and looking at the installed box makes it easier to navigate. The location of the part in the inside of the box is shown in the photo below and indicated in red:
When to change the bearing?
Basically, when it fails, accompanied by an increase in noise when the clutch is depressed on the car. The noise of a worn bearing often comes in the form of a buzzing sound: you start to depress the pedal and then you hear extraneous noise in the place where the bearing is located - a direct sign that it has become unusable and needs to be replaced.
Note! I would like to note that the sound produced by the bearing will only appear when the clutch is depressed slightly, when the clutch is fully depressed, you will not hear any noise as such. Noise will not occur when the foot is completely removed from the pedal, unless the required clearance is not set between the clutch slave cylinder rod (red arrow in the image below) and between the clutch fork, indicated by the blue arrow. We recommend that you familiarize yourself with details about the described bearing, replacement timing, and rod clearance in the article: “Important information about the release bearing”)
Clutch installation
After dismantling the gearbox and the clutch itself, it is advisable to check all components and carry out their maintenance. So, in particular:
- the surfaces of the flywheel and discs are degreased;
- the shaft (or rather, its splines), on the contrary, is lubricated.
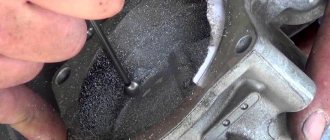
Next, the installation of the basket begins. It is important here during installation to accurately align its centering holes with the pins located on the flywheel. It is necessary to tighten all the bolts correctly - they are evenly tightened one turn at a time. If everything is mounted as it should, the mandrel will come off very easily. The disc should be inserted into the basket with the protruding side.
Replacing the release bearing on a VAZ 2101-VAZ 2107
Removal: 1) At the very beginning of the operation, you will have to remove the box from the car. (see details in the instructions: “Replacing the box on a VAZ”)
2) Now take a screwdriver in your hands and remove the springs securing the bearing to the fork.
3) Gradually pull along the shaft, in other words, pull the release lever towards you - it is removed from the shaft.
4) After removing the bearing, unclench the ends of the spring attached to the gear shift fork. After decompressing, simply remove this spring. If you find the bearing is in good condition, but the spring is not, replace the spring with a new one and continue to use your bearing. The spring is fine, but the bearing is not - take the spring and insert it into the new part.
Note! Please note that sometimes the bearing is still intact, but has already traveled quite a few kilometers, so you should not exclude the possibility of failure in the near future.
Fault diagnosis
How do you understand that the clutch release bearing (hereinafter referred to as the clutch release bearing) has already reached the end of its service life and is time to change it? This question interests many VAZ 2107 car owners. And for good reason, because although this element can be called insignificant, a lot depends on it.
The service life of the clutch device on domestic cars depends not so much on the conditions of use of the car, but on its mileage. A car owner who likes to squeeze the gas all the way down and drive on the roads will need to change clutch elements more often than a driver who prefers a measured way of driving.
When the wear of the clutch elements reaches the point of no return, the device begins to slip if the engine picks up speed. If you regularly drive with such a clutch, then in the future, and maybe even on the next trip, the driven disk of the mechanism will overheat, which will not allow the driver to continue driving. And even get moving.
A failed UPS that has exhausted its service life
Help, I have a problem! About two weeks ago, the clutch pedal in my car (VAZ 2107) failed! At first I thought that the cable was “covered”. I thought about changing it, but then I saw that the cable was intact. I’ll even say more - the cable is in excellent condition. Then I decided to adjust the rod. Having done this, I was able to travel for about five more days. The pedal has failed again, can you tell me what to do?
And there are hundreds of such questions on the Internet. As you understand, we are gradually bringing the topic to signs of a faulty clutch system. What are the signs that it is time to replace the release bearing of the mechanism? There may be several of them:
- the clutch pedal falls to the floor, although the cable is fine;
- while driving, when pressing the clutch pedal, a slight grinding noise is heard;
- first gear does not engage, therefore, movement can only be started from second speed;
- While driving, some noise appeared, which disappeared when the clutch pedal was depressed.
VPS at the installation site
If at least one sign of a malfunction appears in your car, then it’s time to change the VPS.
We repair it ourselves (VAZ classic)
We replace the DS and KS on a rear-wheel drive VAZ as follows:
When installing new parts, the disk must be centered, otherwise the manual transmission will not lock. A factory mandrel or an old “first-born” from a “classic” transmission is used as a center.
What you need to know
The release bearing is not the weakest link in the clutch system, but for some reason it is the one that causes problems and troubles.
coupling
Some car owners have gotten used to the whistle and simply ignore it. But this cannot continue for long, since untimely solution to the problem can lead to even more complex and expensive repairs. If the situation gets worse, then a simple replacement will not be enough for you.