In cars with a manual transmission, the clutch needs to be replaced periodically. To replace the mechanism with your own hands, you need to stock up on special equipment and instructions for performing the replacement. If your car's disk mileage ranges from 70 to 150 thousand kilometers, then you should replace the clutch.
But you also need to take into account the operating conditions of the car and the manufacturer of the clutch mechanism that is installed in the car. After analyzing all these factors, you can watch a video about replacing the clutch with your own hands.
Changing the clutch yourself
The cost of a complete clutch replacement can vary depending on the quality of the parts and the availability of the necessary tools for the job.
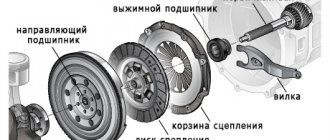
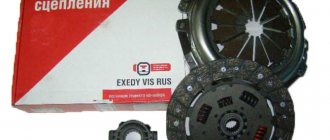
If you decide to do everything yourself, then without a new release bearing, clutch, disc and basket, cylinders, cable, you will not be able to complete the complete replacement process.
The following malfunctions may occur in the clutch basket:
- The petals (otherwise known as pressure plates) may break;
- The pressure plate may be subject to wear;
- Rivets and fasteners may become worn and play may increase.
Basically, when repairing a clutch, the faulty element is always replaced. It should be clarified that experts in this field recommend replacing the clutch basket together with the driven disk, as well as the release bearing. This must be done due to the fact that the clutch part is constantly subject to loads, as well as uniform wear. Therefore, we can conclude that if you replace only one clutch basket, you will still have to replace the driven disk, and after that the release bearing. And when any clutch repair operation is performed, removal of the gearbox is a mandatory factor for this. The only exception is adjustment work.
Thus, we can conclude that it is much wiser to replace the entire assembly at once. Of course, much depends on how the driver drives in the trouble-free operation of the clutch, as well as in correctly made adjustments. In addition, you should not install a clutch basket on your vehicle, which was produced in an unknown place, as people sometimes say, “in artisanal conditions.” You need to purchase car parts only from trusted and good companies. At the moment, the best manufacturers of clutch baskets have proven themselves to be: Kraft, MecArm, SACHS, VIS (Vazinterservice) and LuK.
How to properly remove and install a gearbox
If you have a rear-wheel drive car, first disconnect the clutch that connects the manual transmission to the driveshaft. And if your car is equipped with a front-wheel drive mechanism, then start by removing the drive shafts, do not forget to install plugs during replacement. Now disconnect the cables.
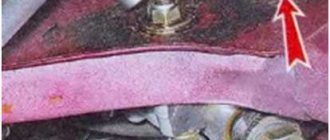
Unscrewing the nuts on the mount, remove the input shaft, which is located in the bearing inside the engine flywheel. The appearance of oil stains in the area of the rod indicates a problem with the seal.
Let's start the installation. From special equipment, you will need a winch to rotate the shaft on the gearbox during installation. This way it is guaranteed to fit into the splines that are located in the flywheel. The last stage of installation is the process of adjusting the length of the rod.
Spare parts for trucks
Full model range: GAZ-3307, 53, GAZ-3309, GAZ-66, 3308, 33081, 33086, GAZ-33104
Car clutch GAZ-3309, GAZ-3308, GAZ-33081 Sadko for diesel engine
The clutch of the GAZ-3309, GAZ-3308, GAZ-33081 Sadko (diesel engine D-245) is permanently closed, single-disk, dry, with a central pressure diaphragm spring and a damper device on the driven disk. Pressure disk 19 (Fig. 1) is connected to casing 10 by three groups of plates.
The clutch and release mechanism of the GAZ-3309, GAZ-3308, GAZ-33081 Sadko are located in the clutch housing 21, which is attached to the rear sheet of the engine with ten nuts 16 studs and a bolt, under which conical spring washers 15 are installed with the convex side to the nuts and the bolt head.
Centering the clutch housing relative to the axis of the engine crankshaft is carried out using two pins 20 pressed into the clutch housing. On the clutch housing there are 6 brackets for the rear engine mounts, which are secured with 5 bolts.
Rice. 1. Clutch GAZ-3309, GAZ-3308, GAZ-33081 Sadko (diesel engine D-245)
1 flywheel; 2, 5 - bolts; 3 - fork; 4 — rear cushion; 6 — rear engine mount bracket; 7 — protective ring; 8 — clutch; 9 — rivet of the friction lining; 10 - casing; 11 — support ring; 12, 20 — pins; 13 - bearing; 14 — gearbox input shaft; 15 — washer; 16 - nut; 17 — driven disk; 18 — disc pressure spring; 19 — pressure disk; 21 — clutch housing
There is no gap between the pressure spring 18 and the clutch bearing 8, so the inner ring of the bearing rotates at the engine crankshaft speed. During operation, the clutch does not require adjustments.
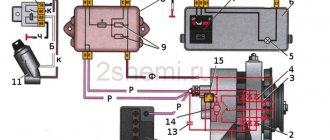
The clutch control drive for GAZ-3309, GAZ-3308, GAZ-33081 Sadko is hydraulic. The clutch master cylinder 15 (Fig. 2), mounted on the front panel of the cab, is actuated by the suspended pedal 20.
The master cylinder of the GAZ-3309, GAZ-3308, GAZ-33081 Sadko clutch is connected by a hose 2 to one of the sections of the three-section supply tank 1, equipped with an alarm sensor for an emergency drop in the brake fluid level (the other two sections of the tank supply the hydraulic drive of the dual-circuit service brake system).
Rice. 2. Clutch drive of GAZ-3309, GAZ-3308, GAZ-33081 Sadko cars
B - compensation hole; G - bypass hole; 1 - supply tank; 2 - supply hose; 3, 18 — fittings; 4, 23 — protective caps; 5, 24 — pushers; 6.33 — bushings; 7.34 - pistons; 8 — piston valve; 9, 14, 35 — cuffs; 10.32, 37 — springs; 11 - coupling; 12 - nut; 13 — thrust washer; 15 — clutch master cylinder; 16 — clutch master cylinder valve; 17 — thrust ring; 19 - pipeline; 20 - pedal; 21 - hose; 22 — clutch slave cylinder; 25 - cover; 26 — fork ring; 27 — fork support axis; 28, 30 — rollers; 29 - coupling pin; 31 — clutch bearing; 36 — spacer sleeve
The working cylinder 22, mounted on the upper part of the clutch housing, is connected to the main cylinder by a pipeline 19 and a hose 21, and is equipped with a valve to remove air from the hydraulic system. When the pedal is not pressed, the cavity under piston 7 of the main cylinder is connected to the reservoir through compensation hole B, which eliminates an increase in pressure in the hydraulic system and clutch slipping.
The bearing 31 of the GAZ-3309, GAZ-3308, GAZ-33081 clutch release clutch is pressed against the pressure spring with a force of 70-100 N (7-10 kgf) using spring 32 through piston 34, pusher 24, fork 3 (see. Fig. 1) and clutch 8. When the clutch linings wear out under the action of the pressure spring, the system takes a new position, compressing spring 32 (Fig. 2).
Excess fluid from the clutch slave cylinder GAZ-3309, GAZ-3308, GAZ-33081 Sadko enters the reservoir through a pipeline into the compensation hole in the master cylinder.
The existing bend in the length of the working cylinder for the movement of the piston provides (without adjustment) the calculated wear of the clutch linings. The position (travel) of the clutch pedal relative to the floor is regulated by changing the length of pusher 5. Repair work on the clutch can be carried out without removing the engine from the car.
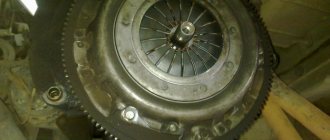
Removing the clutch of a GAZ-3309, GAZ-3308, GAZ-33081 Sadko car
To remove the clutch, you must remove the gearbox and clutch housing.
To remove the clutch housing GAZ-3309, GAZ-3308, GAZ-33081 Sadko, you must do the following:
— disconnect the exhaust system pipe from the clutch housing; — Unscrew the fastening bolts and remove the cover of the clutch slave cylinder; — unscrew the nuts of the studs securing the clutch working cylinder, lift up the working cylinder assembled with the pusher, without disconnecting the hose;
Independent work on replacing disks and baskets
You need to start the repair process by unscrewing the bolts in the basket, then you should remove all the parts that are in the flywheel. Pay attention to the surfaces of the flywheel so that there are no traces of oil there.
The driven disk must also be clean; if there are marks, the oil seal must be replaced. Also change the driven disk and basket if you find damage on them in the form of deep scratches. The flywheel and driven disc of the basket must be clean and free of grease. Cleaning can be done with gasoline.
We insert the disc into the basket and put the mount either on the manual transmission input shaft or on the mandrel. There is a hole in the flywheel where we place the entire set of parts. Insert until it stops and screw the basket onto the bolts.
This process must be done two or three times to ensure an accurate and even installation. Now you can tighten the bolts, applying a force of 2.5-3.5 kgf/m. Information about the force power is available in the repair instructions for your car brand. We change the clutch basket according to a similar scheme.
Changing the engine oil with your own hands - step-by-step instructions on how to correctly, quickly and easily change the oil in the engine and transmission (125 photos and videos)Do-it-yourself speed controller - how to make a simple adjustment device or smooth descent (120 photos)
- Can a non-owner apply for compulsory motor liability insurance?
You have replaced the clutch and feel vibration in this area - you need to adjust the centering of the disc or check the tightening power of the basket.
Replacing the cable
The mechanism, represented by a drive cable, ensures adhesion of the vehicle to the road surface. Most often, cars with a manual transmission are equipped with a clutch cable.
Signs and causes of malfunction
Failure of the clutch cable makes driving a car much more difficult. In this case, there may be a sinking of the clutch pedal, a lack of correct gear engagement when the engine is on, and a noticeable increase in the free play of the pedal.
A cable break is most often observed when the car is operated in poor conditions, but a similar situation can also occur on a vehicle with low mileage. Also, the wear of the mechanism is caused by an incorrect driving style with a sharp start at too high speeds or with slipping.
Replacement instructions
A cable is a mechanism that includes a sheath, mounting brackets, lower and upper tips, a protective cover and an adjusting nut, a thrust plate and a seal. It must be replaced if, upon inspection of the mechanism, defects are revealed, represented by a break in part of the wire or the cable itself, as well as damage to the plastic braid. To replace, you need to prepare lubricant, a set of wrenches and screwdrivers, and a new cable.
Replacement steps:
- dismantling windshield wipers;
- loosening the locknut;
- loosening the clutch adjusting nut;
- removing the cable guide on the clutch fork switch;
- removing the cover of the lower tip of the shell and unscrewing the fastening nut of the tip;
- removing the unscrewed tip;
- unscrewing a pair of bolts and dismantling the bracket;
- unscrewing the bolt on the protective cover and dismantling the holder;
- fixing the cable tip on the clutch pedal and removing the locking bracket;
- unscrewing the bolt on the cable holder and removing the cable;
- replacing the bushing and installing a pre-lubricated new cable.
The edge in the cable seal is pushed towards the engine compartment and tucked into the hole located on the front panel of the car. After installation, the clutch pedal is adjusted.
Changing cylinders
There is a reason to change the main cylindrical system if the functionality of the system does not improve after replacing the o-rings. Replacement with new clutch cylinders is installed when the brake fluid runs away even after replacing new cuffs.
Perform the process of removing the working cylinder and installing it according to the following diagram:
- We get rid of the spring near the pedal.
- We unscrew the two nuts that secure the cylinder to the gearbox;
- The process of unscrewing the rubber hose attached to the working cylinder is carried out by weight;
- We screw a new type cylinder to the hose to avoid leakage of the brake compound;
- We pump everything out of the cylinder, unscrew the fitting, close the hole;
- We unscrew the nuts that secure the master cylinder to the car body;
- To release the hinge connected to the pedal, you need to pull it towards you. Pull out the pin, this will release the cylinder from the pedal.
- Install the two cylinders in the same way as you disassembled them.
After replacing the cylinders, bleed the main clutch. When the air stops escaping, the cylinder is installed correctly.
Criterias of choice
First, pay attention to the weight and surface of the part. Inspect the item for various cracks, roughness, and other deformations. Such a ridiculous design can lead to premature failure of the entire mechanism. If the clutch basket has an unpleasant odor, know that the friction material in it is made of poor quality, and it is better to refrain from purchasing such a product. Despite the same design and operating principle, this part is distinguished by size, that is, a specific model has its own spare part. And if you think that the VAZ 2110 clutch basket you purchased will fit perfectly on the Volga, you are deeply mistaken.
The next selection criterion is the manufacturer. Here it is best to focus on reviews from automobile forums, as well as the rating and reputation of the company itself. Next, you should pay attention to the torque. Remember that it must correspond to the manufacturer’s recommendations to within one, otherwise such a clutch basket will not last you even 100 kilometers. An important point is also the springs, which should not “ride” over the entire surface - they should all be tightly secured in the disk. Avoid products with drops of machine oil on the surface.
Replacing the clutch slave cylinder
First, we disconnect the cotter pin element, which drives the hydraulic drive mechanism itself, using pliers. We use them to remove the spring. We do not scroll the fitting hose completely.
Do-it-yourself engine repair - major restoration and maintenance of an internal combustion engineDIY bumper: how to make a unique polymer bumper for a car at home (125 photos)
Do-it-yourself car painting - preparation for coating and the main stages of high-quality car painting (100 photos)
Using the 13th key, remove the 2 bolts from the crankcase. And only now we take out the pusher. Access to the cylinders is open. How to further replace the working clutch is shown in more detail in the video.
Some tricks
Experienced drivers advise, when performing the process of replacing the presented unit, to place evenly small dots of glue (moment or high-quality analogues) on the working surface of the basket. The disk is placed on the basket with the springs facing away from you and aligned along the edges. The glue will help secure the parts while they are attached.
Considering how to place the clutch disc correctly and which side, this method involves a slight continuation. After installing the gearbox, you need to engage the gear and squeeze the clutch and turn the mechanism with the starter. This method is suitable for most machines.
Replace the cable and release bearing
Replacing these parts is advisable after exceeding the 150 thousand mileage mark of the car. By freeing the fork from the spring, you can remove the cable. Unspinning the connection will make it possible to remove the cable from the clutch pedal.
If necessary, replace the entire part. To remove the spent cable, you need to pull out the pin. We install the new one using the same method as you removed it.
You know your car better than anyone, so armed with the appropriate equipment and tools, you can replace the clutch yourself without much difficulty.
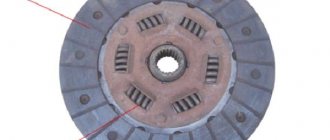
Functions and structure of the clutch disc
On the side of the casing there are three evenly spaced recesses in the shape of a rectangle. Three pressure plate hubs fit tightly into them. This structure guarantees the transmission of torque to the working disk and the ability to move it relative to the axis when the clutch is activated.
Between the pressure disk element and the casing there are 18 springs, placed in pairs, which have versatile curls to prevent the part from jamming. To counteract distortion of the working disk and obtain optimal force, spring elements are placed from the same group. The springs are protected from excessive heating in the event of clutch slipping by washers made of heat-insulating pressed asbestos material.
Spherical nuts with conical springs are attached to the ends of the tail forks of the unit in question, providing some rolling of the element required to dampen the change in the distance between the axles when the disk is retracted. In the grooves of the protrusions of the guide disk element there are three steel levers, which are connected to the disk and support forks by means of needle-type bearings and axles.