How to tighten the handbrake of a VAZ 2107. Adjusting the handbrake
Locking the wheels when parking a car is the task of the parking or hand brake. It is more often used on bumpy road sections.
A well-adjusted handbrake should lock the car in one place when tightened by 4-6 teeth with a surface slope of 25%. If this does not happen, the parking brake needs to be adjusted or repaired.
The breakdown of the handbrake is a common occurrence, since it is enough to just start the car without removing it from the handbrake. In this case, the pads will wear off and will no longer reach the brake drum.
Reasons for failure of the VAZ 2107 handbrake
Most likely, the cause of the breakdown lies in a stretched or unadjusted handbrake cable. A tightening should be performed if the car does not lock even after 5-7 clicks. This procedure on a VAZ 2107 can be done no more than 4 times, after which the brake pads will need to be replaced.
Another source of handbrake malfunction may be cable looping due to moisture, rust, or dirt that gets on the cable while moving. This can be eliminated by cleaning the cable and lubricating it. If after some time the breakdown occurs again, the handbrake cable 2107 needs to be replaced .
Replacing the hand brake cable of a VAZ 2107
The operation of replacing the cable is carried out on a lift or inspection pit.
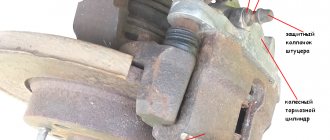
To replace the handbrake cable, it is necessary to remove the brake drums of the rear wheels. When removing them, it is possible to check the condition of the brake pads and parts of the brake mechanism, especially the working cylinders. The latter should not have any traces of brake fluid leakage, and the rubber boots should not have cracks or damage.
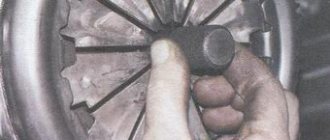
Removing brake drums is a rather complicated procedure. The work is made difficult by the wear of the brake drum, which, as a result of wear, may have a “side” that clings to the pads when removed. Another problem is corrosion, which is best combated with WD-40.
When removing the brake drum, you can use a sledgehammer or hammer, but the blows must be applied through a wooden block. Without the use of a block, the hammer may crack the aluminum edges of the drum.
When the drum is removed, the brake mechanism should be inspected and cleaned of dirt. The wheel hub should be lubricated with graphite grease. If the brake pads are on the verge of complete wear, they should be replaced.
To replace the VAZ 2107 parking brake cable, you need to unscrew the two mounting bolts, release the cable and remove it.
After removing the old cable, all that remains is to install a new one and put the brake drums and wheels in place. After which it is necessary to adjust the VAZ 2107 handbrake as described in the previous paragraph.
Now you know how to repair the VAZ 2107 handbrake.
Also check out
- Self-replacement of the VAZ 2110 CV joint
- Instructions for replacing the VAZ 2115 wheel bearing at home
- How to replace the rear wheel bearing and brake drum of a VAZ 2114
In addition, to correct the breakdown, it is necessary to remove the jamming defect of the handbrake lever, and perhaps also the ratchet mechanism of the ratchet.
Therefore, before repairing the handbrake, you should make sure that it is adjusted correctly and that the cause of the problem is not in the cable. At the same time, the technical condition of the rear brakes, cable, and handbrake drive must be good.
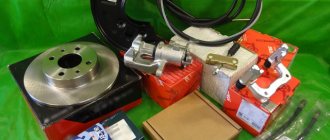
Required tools:
- 2 keys for “13”;
- pliers;
- jack.
Replacing the handbrake and front cable on a VAZ 2101-VAZ 2107
Removal
Remove the guide from the tip of our cable, for more details see the article: “Replacing the rear cable”, points 3-4.
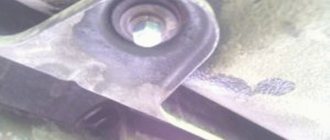
Take a wrench and remove the bolt securing the roller to the bracket (the bracket is indicated by the blue arrow). Carefully remove the roller by rolling the roller towards the tip of the front cable, as shown in the figure, and remove it from the car.
Note! Be careful: inside the roller there is a bushing (number 3 in the photo below) and a fastening bolt (number 1). Don't let the parts fall and get lost.
We recommend using Litol-24 or LSC-15 lubricant, lubricating the contacting surfaces of the bushing itself (the surface is indicated by the letter B) and the surface of the roller (the letter A). To do this, remove the bushing from the socket.
Now pull the cable to the bottom and remove the cable from the bracket and the intermediate support of the cardan drive (indicated by the blue arrow).
Get out from under the bottom of the car and move into the interior. While inside the car, remove the two screws securing the handbrake trim, remove it and set it aside.
You will see four handbrake mounting bolts. By unscrewing them, you will remove the handbrake from the car along with the attached cable (front).
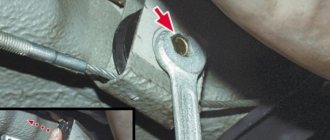
Note! If necessary, disconnect the cable from the handbrake: using pliers, remove the small cotter pin (looks like a small twisted wire inserted into the hole; a washer is placed under it, holding the parts in place) that goes into the hole indicated by the red arrow. Unfortunately, the hole is hard to see in the photo, but it is present in the so-called finger, where the cable tip is installed. Remove the cotter pin securing the end of the cable and remove the washer with the cable as shown in the figure below.
Installation
New parts are installed in the reverse order of removal. ,After installation, adjust the cable; the process is described in detail in the article: “Adjusting the cable.”
Note! Is the handbrake button stuck? Most likely the spring is to blame. It can be easily removed and replaced with a new one:
- Unscrew the handbrake button completely;
- pull out the hole button together with the spring;
- replace the spring with a new one;
- Reinstall the parts in reverse order.
How to tighten the handbrake of a VAZ 2107 yourself
- Place the car on a viewing hole or lift.
- Jack up the rear of the car, hang the rear wheels (they should rotate freely).
- Tighten the handbrake to the locking position (5-7 clicks).
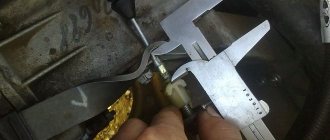
- Remove dirt from the adjusting bolt and handbrake nuts.
- Using keys “13”, tighten (or loosen) the nut that adjusts the tension of the handbrake. It is worth pulling until the free rotation of the wheels stops (at this time you can make sure that there is no play or friction).
How to tighten the handbrake of a VAZ 2107. Adjusting the handbrake
- After tightening the adjusting nut and locking the wheels, you need to tighten the adjusting nut completely. This will reduce the free play of the handbrake.
- Make sure the wheels brake, then tighten the locknut.
How to tighten the handbrake of a VAZ 2107. Adjusting the handbrake
- Lubricate the threaded holes (optionally, “Litolom” lubricant).
- Make sure that the protective sheath of the hand rope is not damaged.
This the tightening of the VAZ 2107 handbrake .
All that remains is to lower the car from the jack and check the handbrake in action.
Replacing the handbrake: instructions
- After dismantling the rear wheels and brake drums, you need to head into the pit and find the tension adjustment rod. This rod is equipped with a spring that must be unscrewed with a screwdriver.
- Next, you need to unscrew the 2 nuts and begin dismantling the adjusting bar. Then the cables (rear and front) of the parking brake are dismantled.
- Use a wrench to unscrew both nuts securing the brackets. The latter just prevent the cable from falling. There are screws under the nuts that prevent them from unscrewing unintentionally.
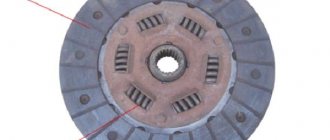
- The next step is to remove the rear drums and then remove the springs that secure the brake pads. The latter are also timely to be replaced if they are worn out excessively.
- Now you need to pull the cable. This way it will be possible to disengage it with the bracket where it rests.
- Next you need to remove the brake pads. There is no need to remove both elements on the wheel. To replace the rear cable, you only need to remove one rear block.
- On the opposite side of the brake shield of both wheels, you need to unscrew 2 mounting bolts, with which the cable tip is secured. After unscrewing both bolts, pull the cable.
- Using a 10mm wrench, you now need to unscrew the front cable fastening brackets. When the bolt is unscrewed, carefully remove the roller. To do this, you will need to roll it forward in the direction of the tip.
- To remove the front part of the mechanism, pull the device to remove it from the intermediate support and bracket structure.
- Then you can get out of the inspection hole and head to the S7’s interior. The handbrake is kept in the down position throughout the entire process. While in the cabin, you need to unscrew the 2 screws that secure the handle trim.
- So, there are 4 bolts under the cladding. They need to be unscrewed, and then proceed to dismantling the handle with the front cable.
- To disconnect the cable fastener from the handle, use pliers to remove the small cotter pin that clamps the device to the parking brake handle.
- Now the device can be removed from the car and a new cable can be installed. The installation procedure for both mechanisms is carried out in the reverse order of removal. After all, you need to fix them and move on to adjusting the tension.
Note. When installing the rear cable, it is important to remember that this part has both a right and a left side. On the right there is a rubber tube that serves as auxiliary insulation of the braid from the hot pipe of the resonator located nearby.
The procedure for adjusting and replacing the parking brake cable is not as complicated as it seems. Any VAZ-2107 car owner can cope with the task.
In conclusion, we note that the process for replacing the handbrake cable is identical for both models of the VAZ family and for most types of cars.
Dismantling and replacement
It is difficult to confuse the cable from the handbrake with anything else under the bottom of your VAZ 2114, which greatly simplifies the repair and replacement procedure.
Dismantling works
We provide detailed instructions for replacement, and additionally recommend watching the video.
- We advise you to get the car in order in terms of cleanliness in advance. This will make it easier for you to find all the nuts and fasteners.
- Additionally, treat the nuts with the almighty WD40. This will make it much easier for you to unscrew the sometimes sticking and rusting nuts.
- Place the handbrake lever all the way down.
- Start with the adjusting nut and locknut that you used recently to try to tighten a loose cable. In this situation, you should loosen the nuts and remove them from the handbrake rod.
- Remove the washers and cable equalizer. Although this can be done after you jack up the car. But be sure to do it before removing the wheels.
- Raise the rear of the car with a jack, unscrew the wheel bolts and remove them.
- Tap the brake drum locking pins. This will allow them to be removed from the brake pads.
- Remove the block.
- You now need to disconnect the ends of the two cables from the equalizer. The fasteners can be removed from their places with the simplest pliers, so don’t bother.
- The shifted spacer lever has hooks from which the cable loop can be removed.
- The cable sheath must be removed from the entire suspension of the rear of the car. To do this, the mounting bolts are first unscrewed.
- Pull the cable out of the holes through the brake flaps.
- We got rid of the old cable, so all that remains is to replace the old one with a new element. The procedure is performed exactly in reverse order.
- Thread the new cables through the washers and hook the loops. You can additionally make bosses - this is a special clamp that allows you to fix the cable even more tightly.
- Reassemble the entire disassembled wheel structure.
- Route the cable along the suspension through the sheath and secure the bolts.
- Pull the handbrake in the cabin.
- Check the correct tension and operation of the new hand brake, or rather the cable.
It is not uncommon for the parking brake to cause an unpleasant squeaking noise from the rear. By changing the cable, you can get rid of this problem at the same time. To do this, rubber seals are installed under the cable fasteners on the body frames.
Functionality check
After replacing the cable, check its operation.
- Place the car on a hill and turn on the handbrake. If the car starts to roll, the new cable needs adjustment.
- Loosen the parking brake lock nut in the handbrake, tighten the adjusting nut, and then pull the cable using the lever.
- The optimal lever stroke should include 2-4 strokes. If this happens, tighten the locknut and check it again.
- We drive up a hill and turn on the handbrake. Now the car should definitely stand still. Unless the cable turned out to be fake or an error was made during the assembly stage.
Disassembled handbrake
Before frost, it is recommended to lubricate the parking cable, which will significantly extend its service life. Under the influence of negative temperatures, the cable breaks down faster. The tips, axle and rod of the equalizer should be lubricated.
Tightening and replacing the handbrake cable is not a difficult task. Even if you don't have a lot of experience working on cars, you will be able to do this job.
But if you are not confident in your own abilities or simply do not have time to do such things on your own, contact a service station. A lift will cost about 500-700 rubles, but for a replacement they will ask for at least 1,500 rubles.
What is the principle of parking brake
The handbrake, located on the right hand of the driver, is connected directly by cables (made of metal) to the rear brakes. In turn, when the handbrake is raised, the cables are set in motion, pressing the pads to the drum or brake disc (depending on the type of rear brakes). It is worth noting that when the handbrake lever is raised, a light comes on on the instrument panel, indicating that the handbrake is currently in use.
Attention! If the handbrake is idle and the car is not locked in place by blocking the wheels, this mechanism has a malfunction. The first reason may be torn/stretched cables, the other may be worn brake pads or handbrake pads
If the handbrake lever is in the lowered position, but the dashboard still shows a light with an exclamation mark, the brake fluid level is probably at a minimum value.
To replace the cable in a VAZ-2107 car, you will first have to buy new elements, and then start the process according to the instructions, which we will present below.
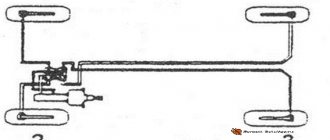
↑ Diagram of the brake system of the VAZ-2107 car
1 — brake disc; 2 — brake pedal; 3 - vacuum booster; 4 — master cylinder for hydraulic brakes; 5 — pipeline of the front brake drive circuit; 6 — front brake protective cover; 7 — front brake caliper; 8 - vacuum pipeline; 9 — master cylinder reservoir; 10 — parking brake lever button; 11 — parking brake drive lever; 12 — lever latch rod; 13 — lever latch; 14 — bracket for the parking brake drive lever; 15 — return lever; 16 — pipeline of the rear brake drive circuit; 17 — flange of the cable sheath tip; 18 — rear brake wheel cylinder; 19 — rear brake pressure regulator; 20 — pressure regulator drive lever; 21 — brake pads; 22 — lever for manual drive of the pads; 23 — rod of the pressure regulator drive lever; 24 — bracket for fastening the tip of the cable sheath; 25 — rear cable; 26 - lock nut; 27 — adjusting nut; 28 — bushing; 29 — rear cable guide; 30 — guide roller; 31 — front cable; 32 — parking brake warning lamp switch stop; 33 - brake light switch.
Features of the braking system
One of the features of the VAZ-2107 brake circuit is the presence of a dual-circuit system. The essence of a dual-circuit system is that the working drive is divided into two parts, each of which supplies fluid to only two mechanisms, while the circuits do not interact with each other.
The presence of two circuits ensures the operability of the brakes of at least two wheels in the event of depressurization of one of the circuits. That is, even if the pipelines of one circuit are punctured, the second will remain fully operational, which will ensure the functioning of the brakes.
In the VAZ-2107, the circuits are divided in such a way that the drive of the front axle mechanisms is separated from the drive of the rear mechanisms. This allows you not only to maintain the functionality of the system when one of the circuits fails, but also to pump each circuit separately. That is, if one of the circuits is airy, then it needs to be pumped, but it is not necessary to service the second one.
This is only general information about how the VAZ-2107 brake system works, and does not include all the details on its maintenance and repair. In general, the brakes of this car work quite well, although some elements of it cause complaints from car owners.
Why the handbrake does not work on the VAZ 2107
Like any other part or mechanism, the handbrake cable tends to wear out and become unusable. The parking brake on the VAZ 2107 is activated using a lever located in the middle part of the car between the driver and passenger seats.
Periodically, the handbrake cable should be tightened, as it becomes weakened, which leads to a decrease in the efficiency of the device. The reasons why the handbrake on the “seven” may not function are due to the following factors:
- Excessive cable stretch.
- Damage to the cable.
- Malfunction of the brake mechanism in the rear wheel drums.
During prolonged use of the car, when the handbrake is constantly used, owners are faced with the need to periodically restore the cable tension. Over time, the device in question stretches, and there is nowhere to tighten it. The only way out of the situation is to exchange the product for a new one. It is recommended to carry out work on replacing the handbrake cable in an inspection hole, but you can do without it.
Changing the handbrake cable
Replacing the handbrake cable on a VAZ 2107 car begins with the fact that it is first necessary to dismantle the brake drums of the rear wheels. After dismantling the brake drums, you should pay attention to the condition of the rear brake pads and working cylinders. The presence of traces of fluid leakage will indicate that the mechanisms also need repair.
Each owner of his car decides individually when it is necessary to change the handbrake cable. It all depends on the degree of wear of the cable. The procedure for replacing the parking brake cable is divided into 2 stages: dismantling and installation, as well as adjusting the tension.
The replacement algorithm is as follows:
- After the rear wheels and brake drums are removed, you need to go down into the inspection hole and find the tension adjusting rod. This rod is equipped with a spring, which must be removed using a screwdriver.
- Both nuts are unscrewed, after which the adjustment bar is removed. Next, the rear and front handbrake cables are dismantled.
Using a 10mm wrench, you need to unscrew the front cable mounting brackets. After unscrewing the bolt, carefully remove the roller. To remove the roller, you need to roll it forward in the direction of the tip.
It is important to know! When installing the rear cable, it is important to know the following: this element has right and left sides. On the right side there is a rubber tube, which acts as additional insulation of the braid from the nearby hot resonator pipe.
Adjusting the hand brake VAZ 2107
Adjustment of the handbrake should be performed not only periodically when the parking brake is lost, but also after replacing the cable. In order to adjust the cable tension, you will need to take the following tools:
- pliers;
- two keys for 13;
- a can of WD-40 lubricant.
Adjustment
Tightening a cable is much easier than replacing it. The VAZ 2110 must be placed on a jack. The handbrake must be locked, after which you should find the adjusting bolt and nut - the work is done using two “13” keys.
Twist the nut until the cable is taut
The nut must be tightened until the rear wheelset stops moving. Next, you need to tighten the locknut. After this, you need to return the car to its original position, unlock it and check its operation.