Welcome, friends, to the DIY car repair website. Many new drivers believe that the only source of energy in a car is the battery. But that's not true. The task of this device is to provide the necessary current at the initial stage of starting the engine, power the starter and allow it to crank the crankshaft.
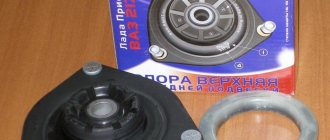
Generator bearings
As soon as the engine starts, the functions of powering the electrical equipment are transferred to the generator. Moreover, it is he who bears full responsibility for high-quality and timely battery recharging.
A generator failure can cause many problems. For example, the first thing that happens is the transfer of the entire load to the battery. As soon as the battery is discharged, the car will be immobilized, because the ignition and other systems will remain without power.
Therefore, the task of the car owner is to carefully monitor the condition of the generator and make timely repairs. What breaks most often? — In 90% of cases, the front bearing of the VAZ 2110 generator fails. It is its replacement that we will pay attention to.
Purpose of VAZ-2110 generator bearings
First, let's look at the purpose of the devices; there is nothing complicated about it. Bearings of the VAZ 2110 generator are used to ensure smooth and uniform rotation of the rotor of the unit. The "ten" generator sets use two bearing devices - front and rear, they are located under protective covers. To get to the devices, you will need to remove the assembly and remove the covers.
Front and rear bearings of the VAZ 2110 generator
Expert opinion
Nikolay Gray
More than 5 years of experience Specialization: body repair, customization, preparation for painting, detailing
The purpose of generator bearings is very simple: to ensure smooth and uniform rotation of the generator rotor. Both bearings: front and rear are under protective covers. And you can get to them only after dismantling the generator and removing the protective elements.
When is it necessary to change?
If a car generator begins to creak and howl during operation, this is the main sign that the bearings need to be urgently replaced. Howling, as a rule, occurs due to the lack of lubrication in the separators of these parts. Alternatively, the bearing cage may simply fail due to wear or fatigue stress.
There is one nuance here that should definitely be mentioned. Sometimes on a VAZ 2110, what is heard from the generator area is not a howl, but a thin, barely audible creak, which the car owner can mistake for the creak of a failed bearing. But most often it’s the pump creaking or the sound coming from the pulley on the timing belt. To understand that it is the generator bearing that is creaking, you should remove the belt. If the sound does not disappear, then the problem is in the bearings.
Replacing a VAZ 2110 generator bearing with your own hands is an operation that should be performed by every average motorist independently, since a car service center will charge from 2,000 rubles for such a service.
A generator is a device for renewing energy in a car, converting mechanical energy into electrical energy. On VAZs, generators require increased attention during operation. Problematic elements of the mechanism: terminals, stator winding, brushes, pulley, armature, as well as bearings.
The design of the VAZ 2110 (2114, 2112, 2111, 2115) generator has two bearings - rear and front, wear of which occurs in case of long-term use of the car, as well as when exposed to internal and external factors.
Some novice motorists are sure that the source of energy in a car is exclusively the battery. But this is not so. The battery's job is to supply the necessary current to start the engine and provide power to the starter so that it turns the crankshaft.
The engine starts, and at this moment the electrical equipment begins to be powered by the generator. The quality of operation of electrically dependent equipment and timely recharging of the battery depend on the generator. If the generator breaks down, the entire load goes to the battery. Once it runs out of power, the entire car will be left without power.
In almost 90% of cases, generator failure is associated with its bearings. That’s why we’ll talk about them in more detail today.
Element appearance
When replacement is required
If you hear creaking and howling while the generator is running, then you have discovered the main sign of bearing failure. The only correct solution is replacement.
Creaking and howling occur due to the fact that the bearing separators lose lubrication, they wear out, and are destroyed as a result of prolonged use under heavy loads.
Sometimes a thin creaking sound can be heard from the generator, which is often confused with bearing failure. In fact, it could be the timing belt pulley or the water pump. Because to make sure, just remove the belt. If the sound remains, then the culprit is the bearing.
What to use
Before you start replacing the bearings on the generator, you need to determine what elements are on your car, as well as what they can be replaced with.
| Bearing | Number | |
| Old generators | New generators | |
| Front | 6302 | 6303 |
| Rear | 6202 | 6203 |
When choosing bearings, pay attention to the hub manufacturers. For VAZ 2110, bearing hubs are produced in the city of Samara and are marked SPZ-4. But there are also Vologda and Saratov hubs marked 23 GPZ and 3 GPZ, respectively. It is not recommended to purchase bearings with unmarked hubs, much less use Chinese generator elements.
Dimensions
It will not be superfluous to know what dimensions the standard front and rear generator bearings for your “ten” should have in order to make sure that the spare parts are selected correctly.
The rear bearings of the new type, marked 6203, have the following dimensions:
- Inner diameter - 17 millimeters
- External diameter - 40 millimeters
- Width - 12 millimeters.
We recommend: Why do the spark plugs on the injector flood and how to deal with it?
The front bearings marked 6303 have the following dimensions:
- Inner diameter - 17 millimeters
- External diameter - 47 millimeters
- Width - 14 millimeters.
Based on the dimensions, you can understand why rear and front bearings are often called small and large, respectively. It’s easy to visually distinguish them from each other, so you definitely won’t confuse the elements when replacing them.
Disassembled device
What are VAZ-2110 generator bearings
The parts consist of two – front and rear, respectively – metal rings with a relief surface and a small hole diameter (see photo below). Their purpose is to ensure uniform and smooth rotation of the generator rotor. Each bearing is located under a special sealed cover - thus, it is not possible to get to them without removing the generator itself and the covers.
Generators on the “tens” are always equipped with closed-type single-row ball bearings with a double-sided seal:
- front marking – 6202 2RS (in domestic catalogs under number 180202);
- rear bearing - 6103 2RS (aka - 24940220).
The first sign that the bearings are clearly not functioning as they should is a sharp, unpleasant sound, similar to a howl, that comes from the generator when you turn on the car's ignition. This will mean that there is no longer any lubrication in the bearing cages, which means that wear is tens of times greater due to the interaction of several hard, non-lubricated surfaces.
Important! It is necessary to distinguish between problems associated with the generator and failures of other spare parts. So, for example, if instead of a howl in a VAZ-2110 you hear a sound similar to a grinding sound, this is either a pump or a pulley on the timing belt. Of course, it’s always worth checking once again what exactly the problem is, because the likelihood that a failed bearing is to blame, although small in this case, does exist. To do this, you need to remove the belt and start the car again to see if the annoying sound goes away.
- the appearance of an uncharacteristic hum and whistle after starting the engine;
- the battery has become unstable in charging, this is due to problems in the operation of the shaft;
- turning the pulley;
- overheating of devices as a result of friction of worn elements.
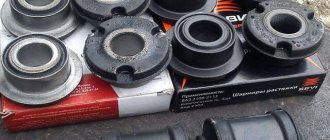
Worn and new bearings for the “ten”
If these symptoms appear, it is quite possible that the cause lies precisely in the bearing device.
If you have suspicions regarding the performance of this part, we recommend that you perform a simple check of the devices by performing the following steps:
- First of all, the belt must be removed from the assembly pulley.
- Then the car engine starts.
- If, after startup, the hum and whistle, as well as other symptoms of a malfunction, disappear, this indicates the need to replace the device.
For what reasons could this part fail:
- Some components of the structure have worn out as a result of long-term use. In particular, we can talk about the surfaces of the raceways, the rolling elements themselves, the separator, and the sealing component.
- The bearing device has run out of lubricant; this may be due to leakage.
- Wear of devices, as well as low accuracy of the manufactured product, can lead to rotation of the outer race on the housing or the inner race on the shaft of the rotor itself.
- Also, malfunctions in the operation of parts can be caused by abrasive elements getting inside the device. This problem leads to increased squeaking.
- Perhaps the failure of the bearing is due to the fact that it has simply exhausted its service life.
- Another possible reason is an imbalance of the pulley itself or wear of the strap (the author of the video is Anton Volokhovich).
Signs that indicate that the VAZ 2110 generator bearings are faulty:
- Whistle, hum when the rotor rotates in the generator;
- Instability of battery charging due to problems with shaft rotation;
- The pulley turns;
- Intense heating due to friction of worn parts;
- See the generator noise in the video.
Noise from the front bearing of the VAZ 2110 generator
If the listed symptoms appear and you suspect that the bearing is faulty, then carry out a simple diagnosis:
- Remove the belt from the pulley;
- Start the car;
- If the whistle, hum, and other signs disappear, this means that a new generator bearing needs to be installed.
- Next, we move on to repairing the VAZ generator.
- Watch how to check the node yourself in the video.
How to check the bearings of a VAZ generator
Reasons why a bearing fails:
- Wear of rolling parts (raceways, rolling bodies, cage, seals).
- Insufficient quantity or leakage of lubricant.
- Rotation of the outer race in the housing or the inner race on the rotor shaft (due to low accuracy of the product or when parts are worn).
- If abrasive particles get inside the element, a squeak appears.
- Expiration of service life before failure.
- Pulley imbalance, belt fault.
- Rotating the pulley.
Before you start replacing the bearing, watch a detailed video of removing the generator and disassembling it.
How to remove and disassemble VAZ 2010 generators
The replacement process is divided into operations:
- Preparatory activities;
- Removal and further analysis of the mechanism;
- Dismantling of old parts;
- Repair and installation of new parts, replacement, assembly, installation, testing the functionality of the unit.
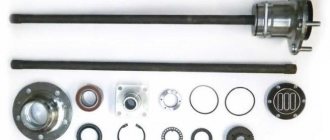
The detail of the unit is presented in two diagrams, assembled and disassembled.
To install the bearings, prepare a set of tools:
- Heads with ratchet, keys (27, 13, 10, 8, and for 17 - preferably two);
- Minus, Phillips screwdrivers;
- Vise;
- Hammer;
- Pliers;
- Two-pin puller with claws;
- WD-40 liquid and marker.
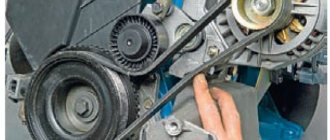
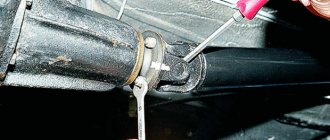
Next, place the car in a place with good lighting above the hood to remove the mechanism without difficulty, open the hood, find the belt on the pulleys, as well as the terminals. Now we move on to removing the generator and dismantling the bearing.
- First, disconnect the negative terminal of the battery, then the terminals of the device itself. To do this, you need to unscrew the fastenings of these terminals.
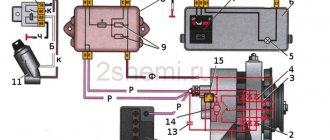
- Study the fastener diagram to begin dismantling the mechanism.
- Next, remove the crankcase protection, then climb under the car. Next, unscrew the fasteners that secure the generator to the frame (positions 5, 2 in the diagram). The process is shown in detail in the photo.
- We hold the mechanism with our hands when unscrewing the last fastener.
- We take out the unit, remove the dirt, and wipe it with a rag. Lubricate the threaded connections with WD-40.
- Now we move on to removing the protective plastic back cover on the generator; we do this carefully with a screwdriver.
- We unscrew the fastenings of the brush holders and the voltage regulator with a Phillips screwdriver. The sequence is shown in the photo.
- After this, remove the pulley from the axle and clamp the product in a vice.
- Using an adjustable or other wrench, unscrew the nut on the pulley so that the shaft does not rotate; insert the hexagon into a special groove at the end.
- Now we remove the washer and disassemble the unit body by unscrewing the corresponding bolts; before doing this, be sure to mark the positions of the body halves with a marker. The entire disassembly process is shown in the photographs.
- We remove the plastic casing and the front ball bearing, gaining access to the armature.
- Now we press the rear bearing of the generator from the armature in two ways:
- Using a two-jaw puller;
- Without a removable device, using two 19mm open-end wrenches (watch the video on how to remove a generator bearing without a puller).
How to remove a bearing from a generator armature without a puller
- Next, we press the rolling element out of the cover of the generating unit.
- We knock it out with a hammer with a mandrel to fit the outer size of the ball bearing (see dimensions below), a 27 socket head is also suitable.
- Before installing a new bearing in the VAZ 2110 generator, you should wipe the seating surfaces (rotor, housing cover hole) with a rag.
- Next, carefully remove the seal and add thick lubricant to the ball bearing, for example Litol.
- Let's start pressing the rear bearing onto the shaft. To do this, secure the assembly in a vice, place the new part on the shaft, and use a pipe and a hammer to press the part onto the rotor. The force is applied strictly to the inner race.
- We press the front bearing into the front cover of the generator using the old rolling element or a 27-inch head. We insert the new product into the hole evenly, without distortions, place the old element on top, then hammer the part into the hole. We apply force only to the outer ring.
- After replacing the bearings, reassemble the mechanism in the reverse order and install it back on the car. Watch the video for assembly procedure.
- This completes the replacement. Don't forget to read the tips and tricks at the end of the article.
Replacing a VAZ generator bearing
To the question: “What bearings are on the VAZ 2110 generator?” you can answer knowing the following characteristics of the car:
- What year is the car?
- 16 valves?
- Injector?
- Front or rear bearing?
In the “Ten” generator of a late production year, components of a different standard size and marking are installed, since the diameter of the rotor axis is different.
Bearing by number in GOST (front and rear):
- 6-180302 and 6-202 (according to ISO: 6302-2RS, 6202-2RS) - late models;
- 6-180303 and 6-203 (according to ISO: 6303-2RS, 6203-2RS) are new models.
To accurately determine the markings of parts, before buying bearings you should take measurements of the overall dimensions of the products, measure the rotor, and compare the data obtained in the table.
A generator for a car, of course, is not the “heart”, it is considered the engine, but without a generator you can’t go far - you can only get there. Driving without music is nothing, but without lighting, side lights and battery recharging, it’s bad. Once you start the engine, the generator is responsible for powering all electrical appliances.
The weakest point of a generator is often the bearings. They have quite a heavy load on them. If you hear an unusual noise when the engine is running, which increases as you increase speed, you can safely assume that the generator bearing has failed. Make sure that the source of the problem is the bearing, perhaps even in an open field.
If you hear creaking and howling while the generator is running, then you have discovered the main sign of bearing failure. The only correct solution is replacement.
Creaking and howling occur due to the fact that the bearing separators lose lubrication, they wear out, and are destroyed as a result of prolonged use under heavy loads.
Sometimes a thin creaking sound can be heard from the generator, which is often confused with bearing failure. In fact, it could be the timing belt pulley or the water pump. Because to make sure, just remove the belt. If the sound remains, then the culprit is the bearing.
What to use
Symptoms of generator bearing failure
Problems with the generator cannot be ignored. After all, they significantly affect the ability to use the car. The following symptoms usually indicate that the bearings have failed:
- Crunching noise when the engine is running. It often indicates wear on the generator ball bearings, but can also be caused by other reasons. When such a sound appears, you need to make sure that it comes from this node;
- Whistle, noise when the engine is running. These sounds also often indicate failure of these parts, but they can also occur due to other malfunctions. It is important to check that the generator is whistling;
- Unstable battery charging. The battery can either work normally, or quickly discharge, literally overnight. Often there is a drop in voltage in the on-board network and the inability to start the car due to a dead battery. These signs often indicate a broken ball bearing, but can also be caused by a malfunction of other parts of the generating device. There may also be a problem with the battery, terminals or wiring;
- The generator housing is hot. This can be noticed by touching it when the power unit is running or has just been turned off.
You can check the serviceability of the bearings by removing the generator belt from the pulley. If, after starting the engine, the crunching, whistling or other noise disappears, the unit requires repair. It is possible to understand which of the two elements has failed only after disassembling the generator. These parts can travel on average up to 100,000 km. But usually they break down at about 60,000-80,000 km. This can happen sooner if the belt is too tight or slipping. Dampness and dirt in the engine compartment can cause their bearings to fail ahead of schedule.
Replacing the rear and front bearings of the VAZ 2110 generator (2114, 2112, 2111, 2115)
Bearings in generators of VAZ 2110 cars are closed type, ball, single row, have a double-sided seal.
- The front marking is 6202 2RS (in domestic catalogs under number 180202).
- Rear bearing - 6103 2RS (aka - 24940220).
You can also find hubs on the market from 23 GPP (this is Vologda) and 3 GPP (this is Saratov). It is strictly not recommended to buy bearings on which the hubs are not marked. You also cannot buy Chinese generator bearings, which are now found everywhere, since the quality of these bearings does not stand up to criticism.
Initially, in the design of the 2110 generator, as mentioned above, two bearing devices are usually installed. In older versions of the car, parts marked 6302 or 6303 (these are front units), or 6202 (rear units) are used; in more modern versions, 6203 bearings are installed at the rear.
As for the sizes, they are as follows:
- for 6303 (or the domestic analogue under number 180302) the dimensions are 17*47*14;
- for marking 6302 (or domestic analogue 180303) - 15*42*13;
- for marking 6202 (Russian parts are marked as 180202) the dimensions are 15*35*11;
- for 6203 (domestic equivalent - 180203) dimensions - 17*40*12.
Necessary tools and sequence of actions for replacement
To independently dismantle old bearings and replace them with new similar parts, you will need to stock up on the following tools:
- open-end wrenches (set);
- flat blade screwdriver (size – medium);
- device for safely removing the generator pulley;
- vice;
- hammer.
Having taken everything you need and driven the car into the garage, you can begin. The sequence of actions when replacing bearings will be as follows:
- The positive terminal of the battery is removed.
- The timing belt is removed by alternately unscrewing the fastening nut and fixing bolt using open-end wrenches.
- All wires connected to it are unscrewed from the generator, the generator itself is removed from the fasteners and taken out.
- Using a vice, a wrench and a puller, the pulley is unscrewed and removed.
- Remove the generator cover where the front bearing is located. It is removed using a mandrel, the diameter of which will be approximately equal to the outer ring of the bearing itself and the hammer. A new one is immediately installed in place of the old bearing.
- Next, the rear bearing is removed by first dismantling the stator. Removal from the pulley is carried out in the same way, using a special device. Installation of a new rear bearing is carried out either under a hydraulic press or any alternative method that will avoid damaging the thread surface from possible damage.
- Generator bearing set (front and rear).
- Set of open-end wrenches.
- Flat blade screwdriver (medium size).
- Hammer.
- Vise.
- Puller for generator pulley.
Replacement
The procedure cannot be called complicated, but it is very important to strictly follow the instructions. Based on our recommendations, as well as video tutorials, you can carry out the replacement yourself without any problems.
We recommend: What to do if the cooling fan on the Lada Kalina does not turn on?
You have already found out what bearings are on VAZ 2110 generators, purchased a set of new spare parts, so you can start repairing.
Dismantling works
Front bearing
- Slightly unscrew the mounting nut on the generator, and also loosen the adjusting bolt.
- Reset the alternator belt and start the engine. This will allow you to verify that the problem is with the generator.
- If the noise disappears, then we move on. There is still a lot of work ahead of you.
- Let's move on to the battery, from which the negative terminal should be removed. This is important from a safety point of view and protection against accidental short circuits during repairs.
- Once the terminal is removed, unscrew all the wires going to your generator.
- If you have a crankcase guard, unscrew the mounting bolts and remove it. This will allow you to reach the lower mount of the generator and remove the device. Remove the generator by pushing it through the engine compartment.
- Using a regular screwdriver or other handy tool, you need to block the generator rotor and then unscrew the pulley.
- The next step is to look for special latches. By pulling them to the side, you will be able to dismantle the device body.
- Next, the generator brushes are unscrewed, as well as the mounting bolts holding the halves of the generator assembly. There should be 4 of these bolts in total.
- We recommend marking both halves of the generator housing to avoid problems during reassembly.
- Use a flathead screwdriver to pry up the cover and remove it.
- Practice shows that it is more convenient to remove the rotor from the front cover bearing in the following way. Take a nut and screw it onto the rotor threads. Then hit it with a hammer, first placing a wooden block under it.
- Find a part whose diameter will coincide with the diameter of the bearing being removed. For example, a 27 millimeter head may be perfect.
- Gently start tapping the element so that the bearing comes out of its seat.
- Take the new bearing and prepare to reinstall it.
- The first step is to treat the new bearing with lubricant so that it lasts as long and reliably as possible.
- To install a new component, you will need the old bearing. Place it on top of the new device and lightly tap with a hammer to install.
That's it, the front bearing has been removed and replaced. Let's move on to the back.
Press-fitting
Rear bearing
- To remove the rear element, you will need a special puller;
- If you don't have a puller, you will have to knock out the component with a chisel. An alternative option is a metal rod and a powerful, strong screwdriver;
- The selected tool is used to strike the bearing with a hammer. Here you definitely need to move along the surface, moving in the opposite direction;
- Some people can easily cope with dismantling; they use a regular strong open-end wrench;
- Now take the socket that you used to remove the front bearing and the old generator element that was removed. With their help, a new bearing is driven into its seat;
- If you don't like this method, use a tubular wrench or a metal pipe whose diameter matches the diameter of the rear bearing.
Having finished the work, all you have to do is assemble the assembly, following the steps in reverse order. You should start with the front cover of the generator, followed by all other components of the assembly.
If you carefully study the instructions, watch training videos, understand the structure and operating principle of the generator, replacing its bearings will become a fairly simple repair job for you, which will take no more than an hour of your time.
After completing the replacement, be sure to check the machine for noise. If everything was done correctly, the next operation to change the bearings will not be required soon.
Replacing the generator bearing on a VAZ-2112 is quite simple with your own hands. However, to complete the process you will need some knowledge of car design and auto electrics. Particular attention should be paid to the quality of the part, since low-quality components fail much faster than more expensive high-quality ones.
Video “More visual replacement instructions”
You can replace the generator bearing either at a car service station or in a garage. The only condition for replacing it yourself is that you must have a vice, as well as a special puller for dismantling. From the tool kit, you will need a standard mechanic's tool, including screwdrivers, wrenches and a hammer (the author of the video about replacement in garage conditions is the Expert R channel).
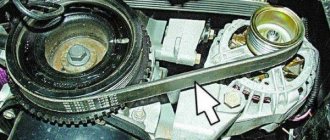
- First you need to disconnect the battery and remove the timing belt. To do this, use a 13 wrench to unscrew the fastening nut, and then, using a 10 wrench, loosen the tensioner; the fastening screw itself must be unscrewed.
- You need to disconnect all the wires from the generator device, after which you need to unscrew the lower clamp using a 13mm wrench, remove the screws, and dismantle the assembly itself.
- After removal, we proceed to disassemble the mechanism. First, unscrew the pulley, for this you use a 24mm wrench, at this stage you may need a vice. To remove the pulley from the axle, you must use a puller.
- After removing this element, the brush assembly, control device, capacitor, and diode rectifier are dismantled. All these components are located under a plastic cover. To disassemble, you will need to unscrew the four mounting bolts; they are used to secure the second part of the case. These bolts are typically welded and can be difficult to remove, so spray them with WD-40 and wait a few minutes before removing them.
- When the bolts are unscrewed, the front cover of the device can be removed - the front bearing is installed in this cover. To remove this device, you will have to use a special mandrel, and its diameter should be slightly smaller than the diameter of the outer ring. Alternatively, you can use a piece of pipe. The mandrel is mounted directly onto the ring, after which a hammer will be used to knock out the bearing part.
- When the device is removed, a new part is mounted in its place, then it is pressed into the cover, for this a mandrel with a hammer is also used.
- After completing these steps, the rear bearing is replaced; to do this, it is necessary to dismantle the stator. After removal, the plastic support of the part is pushed out and removed from the rotor. Only by doing this will you gain access to the bearing.
- The procedure for dismantling the device is carried out with a puller; when the part is dismantled, a new bearing is installed. Only in this case, the diameter of the mandrel must correspond to the size of the inner ring. When installing, try not to damage the ring itself; also during installation, keep in mind that under no circumstances should you clamp the rotor in a vice. This is because the rear part of the rotor is quite soft; therefore, when it is installed in a vice, scuffing may occur. And they, in turn, will not allow you to assemble the unit correctly.
- It is best to use a hydraulic pump to mount the part, but if it is not available, then the rotor should be placed on a wooden surface during installation. It is necessary to screw any nut directly onto the thread itself on which the pulley is installed; this will make it possible to further protect the thread from possible damage.
- When the bearing element is pressed into the structure, you can begin assembling the unit. The assembly procedure is carried out in reverse order.
Price issue
The cost of devices varies depending on the manufacturer. On average, prices for bearings vary around 70-150 rubles.
The video below provides more detailed and visual instructions for repairing a generator set and replacing bearings (the author of the video is Ivan Kirillov).
Having completely disassembled the generator, we first replace the bearing in the front cover.
The first time I disassembled this and similar generators, one thing surprised me. It turns out that the manufacturer seals the bearing pressed into the front cover of the generator, supposedly to prevent rotation of the outer race of the bearing in the housing.
As I understand it, this is being done to save money, since it is easier to rivet it than to install the bearing locking washer. But it turns out that these are not all surprises; the manufacturer recommends replacing the bearing along with the front cover of the generator. How do you like this news? To be honest, I was a little surprised.
We, of course, will not change the cover, but will only replace the bearing itself.
First, we need to remove the worn bearing from the front cover. When pressing out, you need to take into account several important points, namely: the cover is made of aluminum and can easily be damaged, also, the bearing can sit tightly in its seat or, on the contrary, dangle. To safely remove the bearing, you need to select a special support sleeve that rests against the housing. The photo below shows the red line where the bushing should rest. Bushing stop.
Naturally, the inner diameter of the bushing must be larger than the outer race of the bearing.
Well, then everything goes according to the established scenario, we install it on the bushing and knock out the bearing with some suitable tool. All this is of course good, if not for some nuances that are worth paying close attention to. The first thing we draw our attention to is that the bearing is cored and when it leaves its seat, it will have to remove a certain amount of metal. Neglecting this fact, in most cases, the lid may burst and then you will need to buy a new one.
Whatever happens, you need to remove the metal that secures the bearing. And how to remove it? After all, not everyone has a special tool that can do this. I saw on the Internet many different ways and as soon as these covers did not disfigure. For me, none of the methods that I saw on the Internet worked, because they are very barbaric. I use a very simple method, which I will tell you too.
Everything is very simple, we take a drill and a drill bit with a diameter of about 4 mm. We place the drill at an angle of 45 degrees into the cored hole and drill approximately 2 or 3 mm. And so on every hole. Everything is very simple. Now, when the bearing comes out, the remaining metal will have somewhere to go. And for greater security, the lid can be heated; when heated, aluminum becomes more elastic.
After removing the old bearings, you need to buy new ones. It is best to go to a store or market with old bearings (a sample, so to speak), because they can sell anything, just not what you need.
Before installation, I always check the presence of grease in the bearing. Often it is there, but it is not enough and I always add more. Since the bearings are closed, we need to remove the rubber-metal seal on one side. To remove it, you can use a sharp screwdriver or an awl. Carefully drive the screwdriver away from the inner race and remove the protective ring. Then add lubricant (lithol) and press it into place with your fingers. There is nothing complicated.
Before installing the bearing, you can heat the cover a little, then the bearing will spring into place on its own.
Before removal, we drilled out the core and now we need to re-secure it in the same way. Here you can use a metal rod, which is made of strong metal. If this is not the case, you can use a broken drill with an approximate diameter of 4-5 mm. We end one side of the drill with sandpaper and core the bearing.
Choosing a generator bearing for a VAZ-2110 car
Structurally, a conventional generator has two bearings - front and rear. The front one, as usual, is more powerful, since it remains under a relatively large load, which arises due to the influence of the tension of the generator belt. The integrity of the bearings should be checked by external inspection. Cracks in the clips, the presence of rust or metal chipping, etc. are unacceptable.
The next step is to check the ease of rotation, the presence of play or extraneous noise. It is recommended to replace the front bearing together with the cover, since it is rolled into the generator cover, but it is cheaper, if the cost of repairs matters, to press it out and replace it separately from the cover. If you decide to carry out the repairs yourself, without resorting to the services of a specialist, this will allow you to save some money. You will only need to spend money on purchasing bearings.
KATEK generators are routinely installed on dozens of them. With the digital designation 5102.3771 or 94.3701, the power of both is 80 amperes, voltage is 14 volts. Answer the question “What bearings are on the VAZ-2110 generator?” you can do this: if it is a standard KATEK generator, then this generator most often has two bearings. These are the front 6302 in older versions, or 6303, and the rear 6202, or, accordingly, in a more modern version 6203.
The dimensions of the front bearing (6303) are 17×47×14, the dimensions of the bearing (6302) are 15×42×13. Their domestic “twins” are designated as 180302 and, accordingly, 180303 and are called 303 closed, or 302 closed.
The dimensions of the rear bearing (6202) are 15×35×11, those of the bearing (6203) are 17×40×12. Domestic analogues are designated as 180202 and 180203.
Possible faults
By what symptoms can you understand that it is time to change the bearings on the generator:
- The device buzzed. If the generator unit makes noise after starting the engine, then most likely the reason is inoperative bearing devices. It happens that devices hum, and then stop. There is no need to think that the problem has resolved itself; the parts will still need to be replaced.
- The battery is charging unstably, this is due to problems in the operation of the shaft, in particular, its rotation. This problem can be indicated by a control indicator on the car’s dashboard.
- The assembly pulley rotates.
- Bearings should also be replaced if the devices become overheated. Overheating is caused by high friction of worn-out components (the author of the video is the altevaa TV channel).
Briefly about the reasons why these parts may fail:
- Components have worn out, in particular the rolling element, cage, sealing component or raceway. Many car owners think that if they lubricate the bearing in such a situation, this will solve the problem, but this is not true. Wear cannot be eliminated, so parts will have to be replaced.
- All bearing elements are initially lubricated during installation. Every car owner who has installed and lubricated parts knows how important lubrication of generator bearings is for the performance of the unit. If for some reason the lubricant is out or its level is insufficient, this can lead to accelerated wear of the part.
- The reason may also be the rotation of the outer race in the device body on the rotor shaft. This reason is also due to wear and tear of the elements or their defects.
- Abrasive particles could get inside the structure of the part, this will lead to not only noise, but also squeaking.
- Belt failure, use of an incorrect or defective belt on the shaft.
- Pulley imbalance. In case of such a malfunction, you must first find out for what reasons the imbalance occurred, and then solve this problem.
- Rotating the pulley (video author - Geha Lavbinovich).
Imported or domestic
Belarusian 90-amp BATE and Japanese Denso generators have bearings of the same size.
Most 80-amp generators have bearings of similar sizes, at least this applies to domestic ones. If the generator has already been replaced before you, then you may be faced with the fact that a generator from a different manufacturer is installed and the bearings are of different sizes. Depending on the generator manufacturer, bearings of other sizes are sometimes found, for example, in the fairly common Bosch 14V 53-98A 0124 415 038 generator, bearings 6003-2RS (rear) are installed, the dimensions of which are 17 × 35 × 10 and 6303-2RS (front) , respectively, 15×35×14.
In order to accurately determine the dimensions of the bearing, it will have to be removed. If the markings on the bearing are not visible, then it is best to turn to professionals (you should not trust a caliper).
If you have decided on the size of the bearing, then to the repeated question “What bearings are on the VAZ-2110?” The answer suggests itself - original!
The quality of bearings varies from manufacturer to manufacturer; some prefer to install bearings from domestic manufacturers on their generators, while others prefer imported ones. When repairing a generator, everyone decides this issue for themselves, but after listening to numerous tips, some car enthusiasts are inclined to choose imported ones.
If you focus on price-quality ratio, many experts recommend DAS LAGER Germany. But there are other suppliers of quality bearings: the French company SNR; FAG is one of the leading companies in Germany; NSK is another major bearing manufacturer from Japan; NTN – Japan; Kouo - part of the Toyota concern of Japan; Kraft or BOSCH.
We also supply bearings from Chinese manufacturers, but the attitude of motorists towards generators and bearings from the Middle Kingdom is far from flattering. A bearing is considered original if it is approved by the vehicle manufacturer for sale on the market. It usually corresponds to what is (or was previously) supplied to the assembly line. The car manufacturer guarantees that these bearings will not let you down.
If you are considering various options, then all the bearings with the corresponding markings at first glance look the same, but after opening the package, you need to pay attention to the marking, which, in addition to the designation of the bearing itself, consisting of digital and letter designations, must contain an indication of the manufacturer and necessarily the country of origin.