Basic faults
The main problem due to which a CV joint can become unusable is the ingress of a large amount of dirt into it. This happens when the anthers are damaged, so their integrity should be checked regularly. To do this, you just need to look under the car, first turning the wheels completely in any direction, and if you find lubricating fluid, ruptures or cracks in the cover, replace the damaged part. By shaking the drive shaft a little by hand, you can check the condition of its play.
Also, the reasons for the failure of the CV joint may be its expired service life, since it is limited, and poor quality of the part (defective).
Less common is damage to the retaining ring, in which the axle shaft comes out slightly from the part during sharp turns. This contributes to the appearance of damage on the “grenade”, and after some time to its complete failure.
Cracking and knocking noises when turning the wheels are harbingers of external joint malfunctions. Signs of damage to the internal grenade are crackling clicks and strong vibration that transfers to the body during acceleration.
Symptoms of internal CV joint failure
- Crunch . By turning the steering wheel and sharply pressing the gas pedal, you can hear the characteristic noise of a grenade, familiar to many drivers. This is due to the strong production of the balls, which allows them to roll freely along the grooves.
- Shaft play . To diagnose, just grab the axle shaft with your hand and move it in different directions.
- Vibration . A clear difference between the failure of the inner CV joint is vibration, which can be felt even on a straight, level road.
The need to change the grenade arises due to dust, sand, dirt, and water getting into the mechanism. This happens due to the boot being replaced at the wrong time.
Why change
If damaged anthers are found, they must be replaced. Otherwise, dirt will penetrate into the “grenade” through cracks and tears and over time the part will fail, and there will be a need to purchase a new element and then replace it.
What do you mean it will fail? When the car moves at any turn, the CV joint will fall apart into two parts. It will be impossible to continue operating such a machine. In addition, all the oil may leak out of the box.
To avoid unpleasant consequences, it is necessary to promptly replace the damaged part.
An outer CV joint will cost 1000 - 1500 rubles, depending on the manufacturer. The price of the internal “grenade” is slightly higher than 1400 – 2200 rubles.
Why do you need to change CV joints?
If you find defects in the boot, or it is dirty, you must replace it. Otherwise, as we have discussed more than once on the website provaz2114.ru, this element will break, and you will need to buy a new part. For the future: it is unlikely that it will be profitable for anyone to buy other spare parts when you can simply care for and control the old ones. However, if a breakdown does occur, you need to know that CV joints cost approximately from 1000 to 2500, and you will still have to change them. If the car becomes unusable, then when you turn the steering wheel, the hinges may fall apart into two parts. In this case, oil may leak out, and then you will no longer be able to continue your journey.
ball CV joint
Causes of failure
- Low amount of lubrication (wear of joints);
- Damage or contamination of the boot (rupture of the boot);
- Heavy loads.
- Bad roads with holes, bumps, uneven surfaces;
- Too aggressive behavior of the driver on the road, sudden movements;
Try to lubricate the hinges as often and as abundantly as possible, because for the most part it all starts with them.
Determining the malfunction of a specific CV joint
An unpleasant sound, in the form of a crunching sound at the outer joint, is heard when the steering wheel is turned sharply and pressure is applied to the gas.
If you are driving on a rough road full of potholes and hear a crunching sound, then you have problems with the inner joint.
CV joint replacement
You can make the replacement yourself; to do this, you need to stock up on the necessary tools:
- key at 17, 19;
- heads at 13 – 17, 30;
- balloon;
- mounting blade;
- knob;
- jack;
- pliers and lubricant.
Having prepared the tools, we move on to the car.
For convenience, we drive the car onto an overpass or inspection hole. We put the handbrake on and engage the gear. For greater safety, you can put clamps under the wheels; only the rear two are enough.
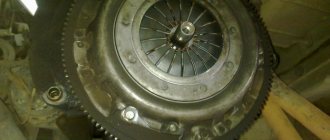
The inner and outer CV joints are located on the shaft drive, therefore, the technology for replacing them is almost identical.
CV joint replacement
- We remove the crankcase protection; to do this, unscrew two bolts at the front to 17 and 2 nuts at the back to 19.
- Drain the lubricating fluid from the box (about 1/3 of the total volume).
- We use a wheel wrench to remove the wheel bolts of the side of interest.
- Take the 30mm head and unscrew the outer CV joint nut.
- Raise the car using a jack.
- We take a 13mm wrench and unscrew the two bolts (you can knock out one of the pins) from the hub that hold the ball joint.
- Using a mounting blade (mount), we move the hub away from the reaction rods.
- Pull the strut towards you and pull the CV joint pin out of the hub.
- Move the shaft drive to the side.
- Open the hood and use a pry bar to remove the inner CV joint from the box. To do this, you need to insert a mounting blade between the parts and pull it sharply towards the box.
- After the CV joint has moved a little, we move to the wheel arch and pull out the shaft drive with two “grenades”.
- We take pliers and remove the large and small clamps of the protective cover from the grenades.
- If the boot is damaged, we tear it off, and if not, then we move it to the center.
- We hit the inner race of the inner CV joint as hard as possible with a hammer until it falls off. We do the same thing, on the other side.
- Remove the rings from the shaft drive.
- We put rings from the new CV joint kit on the shaft and a new boot.
- We hammer in a new “grenade” with a hammer.
- Lubricate the CV joint with grease, and squeeze the remainder into the boot.
- Using clamps, we fix the boot on the “grenade” and the shaft.
- We do the same with the other CV joint.
- We take the shaft drive, screw the nut onto the outer CV joint and use a hammer to hammer it into the box.
- We assemble the parts in reverse order.
Tags: problems with gearbox
Comments 72
guys, help me, I bought a new wheel drive shaft, installed everything on the VAZ2109 as the book says. But when I left and drove a couple of kilometers, at a small jump, the inner CV joint fell out. And I can’t turn it on. not a single transmission. What could be the reason... Thanks in advance
Thank you guys everyone, I'm very tired, I'm going to bed. I'll try again tomorrow
the main thing is not to lose heart =) everything will be fixed!
where can it get away from us! It’s just that today was my last day off (I was on sick leave) and the car is in a friend’s garage! and he needs it too!
Tomorrow I’ll take a look at my place and write back to you =) don’t stress yourself out too much - everything is fine there. Tomorrow let me know what you can do with the measurements and samples that I wrote to you =)
Thanks again everyone! Today I bought a new retaining ring, washed the flange on the grenade, sharpened it with a file and imagine it sat down! hooray! WE ALL WON! What would I do without you all!
The main task during assembly is to ensure that the holes inside these same gears are opposite the holes in the gearbox housing. this will be immediately clear - the slots will be visible upon inspection, or by touch with your hand.
in general: picture - www.mkad86.ru/acat/data/vaz/2109/v410.gif on it there is an axis drawn in the center, there are two gears on it (one is drawn at the bottom). they will not go anywhere, they will remain there. You insert the axle shafts into the gears (part number -2108-2303050) - so they can turn over, but they won’t fall apart.
I split my body like that...
I don’t even understand... in general, you can’t take out two drives, this is how you do it: take one out, put a chopper in its place... and then remove the other drive. Reassemble in the reverse order... If you don’t do this, then screw it... the differential simply falls apart
tough! well you're scary
there is a closed system of gears that are not supported by anything except the grenade shafts, you take out both grenades and it all falls apart...
Replacement results
Failure to replace the boot in a timely manner will result in the “grenade” breaking, which in turn will make it impossible to use the car. Regular inspection of boots and CV joints will prevent dirt from getting into the part.
If you find breaks in the boot, you should purchase new ones and install them. When replacing boots, you should inspect the CV joint to make sure it is in good condition. This will not take much time, but will preserve the integrity of the CV joint and save money.
If you nevertheless looked at the cracks and tears in the protective case and did not have time to replace it at the initial stage, but realized the problem from the characteristic sounds, then it is necessary to replace the damaged “grenade” as soon as possible. After the repair has been carried out, it is recommended to check the car; to do this, you need to drive it in a circle and accelerate a little on a straight road. The absence of creaking and tapping sounds is a sign of correct installation.
Which company is the most profitable to buy grenades from?
Since the VAZ-2114, our “four”, is considered more for young people, the companies that stand out most among them are:
- Lorbo
- Hola
- Kraft
Consequences of replacement
Careless handling of machine parts often results in consequences. Contamination of the boot, rapid wear of spare parts and two grenades. If you do not start replacing the boot and CV joints in time, the car can no longer be used for its true purpose. If the owner of the car constantly checks the condition of the anthers and hinges, then the likelihood of dirt getting in will be small.
If you notice rips and holes on the boot, you won’t be able to sew them up; you’ll have to buy new ones. When changing covers, you should also inspect the hinges to make sure they are working. This procedure will not take much of your time, but will preserve the integrity of the grenades and save your money.
After installation is completed, it is recommended to drive the car to check the serviceability of all parts. After making a couple of turns, if you don't hear any squeaking sounds, congratulations, you did it right!
Do not forget to monitor the parts from time to time and sometimes lubricate them, and then they will serve you for a very long time and with high quality.
how to insert the drive into the box
how to insert the drive into the box
Post by diablo36 » Oct 12, 2014, 3:06 pm » Message #400539
Re: how to insert the drive into the box
Post by diablo36 » 12 Oct 2014, 15:08 » Message # 400540
Posted by aerelf » Oct 12, 2014, 03:52 pm » Message #400544
Re: how to insert the drive into the box
Post by diablo36 » Oct 12, 2014, 04:15 pm » Message #400548
Posted by aerelf » Oct 12, 2014, 06:08 pm » Message #400562
Re: how to insert the drive into the box
Message by Jonny1602 » 12 Oct 2014, 18:11 » Message # 400564
If it stands up (the locking mechanism has unclenched) you will hear it, but it’s better not to pull - there is a tripoid and by pulling the drive you will tear the boot (it’s the only thing that holds it) faster than you can pull out the drive. To pull them out, they are usually pryed against the box with a chisel (chisel). I inserted it with my hands - I didn’t have to hammer anything.
Re: how to insert the drive into the box
Message by Jonny1602 » 12 Oct 2014, 18:14 » Message # 400565
Posted by aerelf » Oct 12, 2014, 6:19 pm » Post # 400566
Re: how to insert the drive into the box
Message by Jonny1602 » 12 Oct 2014, 18:25 » Message # 400568
Posted by aerelf » Oct 13, 2014, 08:08 am » Post # 400620
Re: how to insert the drive into the box
Message by Jonny1602 » 13 Oct 2014, 09:28 » Message # 400626
Posted by aerelf » Oct 13, 2014, 04:36 pm » Post # 400687
Message taurine » 13 Oct 2014, 16:40 » Message # 400688