From this small guide you will learn how to replace the clutch on a VAZ-2112. This car has earned popularity among young people and older generations. Yes, the car is still far from being comparable to prestigious foreign cars, but it has everything you need: a very playful and powerful engine, a comfortable interior, and a rather attractive appearance. And this is all that is necessary for an unpretentious person. And the most important thing is the low cost of maintenance. Spare parts for a 12 Series car cost much less than for foreign cars. In addition, many components from older “nines” and “tens” are suitable for it.
What is clutch?
Before you go to a car service center in Moscow or another city, try to figure out how to properly replace the clutch on a two-wheeler. As you can see, there is nothing complicated in the work procedure. You can complete all repairs yourself in a few hours.
The clutch is a mechanism that allows you to disconnect the engine crankshaft and the primary gearbox. As a result, the engine can work, the gearbox lever can be in a gear position, and the car will stand still.
A clutch is needed in order to change gears while the car is moving. If it were not there, then changing gears would be problematic - the lever is very difficult to move from one position to another. And all because the engine crankshaft and the wheels of the car are rigidly connected. And it is the clutch that allows for a kind of disconnection of the power units.
When repairing a car in a car service center in Moscow or any other city, you need to carefully ensure that the technicians complete all the work to the highest possible quality.
Is noise a sign that replacement is needed?
In some cases, the noise occurs when the engine is started, and it persists until the car warms up, after which it disappears. In other cases, the noise returns every time you try to disengage the clutch.
The worst option is a grinding sound. This sound indicates that the element is rubbing against the leaf spring, and wear will form on the petals. If you are “lucky enough” to encounter such a situation, there is no time. Replacement needs to be done quickly.
By the way, there is no point in repairing it. Release bearings cannot be repaired, so the only solution is replacement.
Basic clutch elements
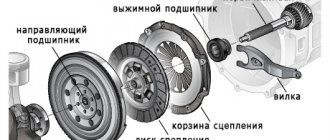
Now let's look at what main elements are included in the design:
- VAZ-2112 clutch drive disc (usually called the “basket”). It is installed on the flywheel and secured with bolts.
- Driven disk. It stands inside the “basket” and is connected to the gearbox input shaft using a splined connection.
- The release bearing is an element that allows you to act on the petals of the basket. With its help, the slave disk is disconnected from the master disk.
- Clutch cable - allows you to transmit force from the pedal to the release bearing.
- The clutch pedal, which the driver operates with the force of his foot.
These are all the basic elements that are present in the design of a car clutch. It is worth noting that the “two-piece” uses a cable drive system, which is much cheaper than a hydraulic one. But it is much worse in terms of convenience - the pedal is tight, this is especially noticeable on older cars. And if you want the clutch on your car to be as soft as possible, change the cable in a timely manner, do not wait until it breaks.
Popular problems and their solutions
There are several characteristic faults that occur on the VAZ 2110. Let's try to understand the reasons for their occurrence, and also consider ways to solve the problem.
- The clutch drives. The reasons may be: The pedal has insufficient travel, the tension is too tight. To eliminate this, you need to adjust the drive;
- The driven disk is deformed. Only replacement will help here;
- The driven disc hub sometimes gets stuck. If so, try washing it and lubricating the input shaft splines. If the element or the shaft itself is worn out, then replace them;
- The friction linings are broken and the rivets are loose. The best solution is a complete replacement of the casing, which includes a spring and a disk;
- The pressure plate is warped or warped. Replace the linings, but first make sure that there are no deviations in the end runout of the disk;
- There were problems with the cable. Pull it up. If there is no result, replace with a new one.
- The friction linings on the driven disk often burn or wear out. There is only one solution - replacement;
- Oil has reached the surface. We have already described how to solve the problem above;
Symptoms of a node malfunction
Before replacing the clutch on a VAZ-2112, you need to figure out whether it needs to be done at all.
Among the signs of malfunctions are the following:
- When you press the gas pedal, you can hear the engine picking up speed, but the car does not go faster. This indicates that the clutch is slipping, there is practically no connection between the driven and driving discs.
- Extraneous sounds are heard when the car moves - this may indicate the destruction of some system components. As a rule, at the same time as these sounds, the system also fails.
- A hum is heard when you lightly press the pedal - a clear sign of a faulty release bearing.
- The pedal falls through - most likely the VAZ-2112 clutch cable has broken. This is the most harmless thing that can happen.
- If the cable is intact, but the pedal falls and the clutch does not release, then the release bearing has collapsed. Unfortunately, this also happens sometimes.
Knowing all the signs of breakdowns, you can begin repairs. Replacing the clutch on a VAZ-2112 with your own hands is not difficult. You just need to know the order of the work.
The difference between the VAZ 2110 clutch and 2112
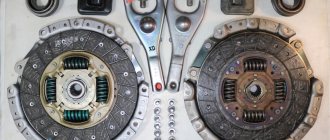
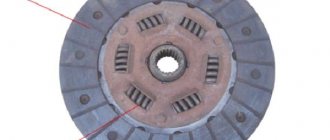
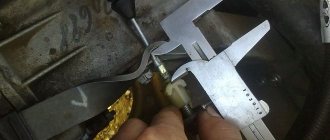
The clutch on the VAZ 2112 engine is produced with different characteristics of the pressure spring and damper spring; this can be distinguished by the following features: by the slot of the pressure spring petals (see Fig. 1) and the driven disc damper springs (see Fig. 2)
- Petals of the clutch pressure spring of the VAZ 2112 engine.
The pressure spring disk on the VAZ 2112 engine is exactly the same in size (200 x 140) as on the VAZ 2110 model, but the torque is 12% greater due to the reinforced pressure spring. On a VAZ 2110 you can install a pressure spring disk from a VAZ 2112. When installing a pressure disk from twelve on a VAZ 2110 model, the force when pressing the clutch pedal increases. Pressure spring discs from 2110 to 2112 cannot be installed.
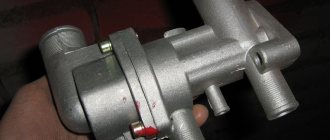
The clutch drive on the car is cable driven and has no gaps (there is no free play of the pedal when the clutch is constantly engaged). In a special bracket (25) the clutch pedal (27) is installed on the axle, its upper end is connected to the end of the cable (24), the cable sheath is fixed to the clutch pedal bracket, and in the engine compartment to the bracket (3) of the power unit. The steel cable (8) is connected to the clutch release fork (number 9 in the diagram). A rubberized cover (4) covers the end of the steel cable; the nuts (6 and 7) located nearby are designed to adjust the drive. After adjustment, the nuts are tightened together and tightened.
After replacing the clutch, it is necessary to adjust the clutch pedal travel (see “Replacing the clutch cable”). Over time, the lining of the driven disc wears off and because of this, the pedal travel increases. The maximum permissible clutch pedal travel is no more than 160 mm.
Dismantling the gearbox
The most important thing is to remove the gearbox. Therefore, it is best to carry out all work on an inspection hole or overpass - it’s really more convenient. Procedure:
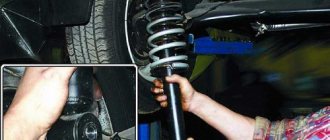
- Remove the left wheel, unscrew the nuts from the ball joint and the tie rod end. You will need to move the box to the side; the drive on the left should come out without any problems.
- Loosen the nut securing the rocker and remove it from the gearbox shaft.
- Remove the starter, having first disconnected the battery and all wires from it.
- Unscrew the fastenings of the pillows holding the box. It is recommended to place a jack or reliable support under the gearbox housing before doing this.
- Disconnect the speedometer cable, disconnect the wires from the reverse sensor, as well as the ground bus.
- Unscrew the three bolts and nut that secure the gearbox housing to the engine block.
- Carefully move the box to the side; the right drive must be removed.
A little about how to properly remove the box:
- Firstly, you cannot remove both drives at once - replace one with a tube that will hold the differential.
- Secondly, it is imperative to drain the oil from the gearbox crankcase. By the way, why not replace it?
Stories from our readers
“Fucking basin. "
Hi all! My name is Mikhail, now I’ll tell you a story about how I managed to exchange my two-wheeler for a 2010 Camry. It all started with the fact that I began to be wildly irritated by the breakdowns of the two-wheeler, it seemed like nothing serious was broken, but damn it, there were so many little things that really started to irritate me. This is where the idea arose that it was time to change the car to a foreign car. The choice fell on the melting Camry of the tenth years.
Yes, I had matured morally, but financially I just couldn’t handle it. I’ll say right away that I am against loans and taking a car, especially not a new one, on credit is unreasonable. My salary is 24k a month, so collecting 600-700 thousand is almost impossible for me. I started looking for different ways to make money on the Internet. You can’t imagine how many scams there are, what I haven’t tried: sports betting, network marketing, and even the volcano casino, where I successfully lost about 10 thousand ((The only direction in which it seemed to me that I could make money was currency trading on the stock exchange, they call it Forex. But when I started delving into it, I realized that it was very difficult for me. I continued to dig further and came across binary options. The essence is the same as in Forex, but it’s much easier to understand. I started reading forums, studying trading strategies. I tried it on a demo account, then opened a real account. To be honest, I didn’t manage to start earning money right away, until I understood all the mechanics of options, I lost about 3,000 rubles, but as it turned out, it was a precious experience. Now I earn 5-7 thousand rubles a day. I managed to get the car buy after half a year, but in my opinion this is a good result, and it’s not about the car, my life has changed, I naturally quit my job, I have more free time for myself and my family. You’ll laugh, but I work directly on the phone)) If If you want to change your life like me, then here’s what I advise you to do right now: 1. Register on the site 2. Practice on a Demo account (it’s free). 3. As soon as you get something on the Demo account, top up your REAL ACCOUNT and go to REAL MONEY! I also advise you to download the application to your phone, it’s much more convenient to work from your phone. Download here.
In the store I ask jokingly that I need a clutch cable for a ten, which will never break! They answer me: change the car. I bought a clutch cable for a VAZ 2110 in Balakovo. Of all, he was the most expensive.
You can replace dozens of clutch cables in various ways:
- Remove the frill and the windshield wiper (to make it easier to get to the attachment of the cable end to the clutch pedal)
- Without removing the frill (method for those who are able to take the lotus position)
The standard instructions for replacing the VAZ 2110 clutch cable involve removing the frill and windshield wiper, but I decided to take the shortcut and not disassemble anything.
Also, after replacing the cable, the clutch needs to be adjusted.
Replacing the VAZ 2110 clutch cable without removing the frill
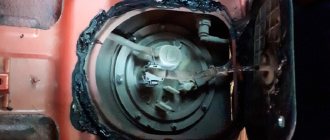
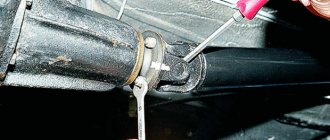
We unscrew the clutch cable fastening using a 19 key. Next, you need to remove the cable tip from the clutch release fork, but since the cable was torn, there was no need to remove anything
In fact, replacing the VAZ 2110 clutch cable with your own hands is quite simple. I did this procedure for the first time. The replacement was carried out in the winter outside in the evening with a flashlight in hand. I spent 2 hours replacing the clutch cable. I spent most of my time in the pedal area when removing and installing the cable.
Adjusting the clutch pedal VAZ 2110
The clutch pedal travel (all the way to the mat) should be 125mm (+-5mm). The maximum permissible pedal stroke is 160 mm. To adjust the clutch, you need to unscrew or tighten nut No. 2, after completing the adjustment, tighten lock nut No. 1. Tighten the rubber washer as much as possible to the fork.
You can adjust the clutch so that the pedal is lower than the brake pedal, then it will grab almost immediately after the pedal leaves the floor. If you make the clutch pedal high (higher than the brake pedal), then when you lower the clutch it will grab almost at the very end. A pedal that is too high can accelerate wear on the basket.
Replace the clutch cable on the “ten” yourself..
Clutch installation and assembly
Replacing the clutch on a VAZ-2112 is carried out according to the following algorithm:
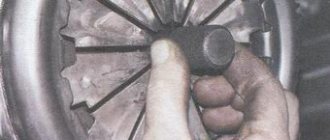
- Unscrew all the bolts that secure the basket to the flywheel. If you plan to install it again, then you need to unscrew the bolts evenly, crosswise. The main thing is not to damage the basket.
- Remove the basket and disk, install new elements in their place.
- Tighten all the bolts (be sure to use new ones, since the old ones are threaded) and install the guide sleeve.
- Tighten the bolts evenly, crosswise.
- Remove the old release bearing and install a new one.
- Reassemble everything in reverse order.
This is a short tutorial, but the hardest part is lifting and lowering the box, as it is quite heavy.
Replacing the clutch cable
The price of replacing a clutch on a VAZ-2112 is quite high - you will have to pay about 3,000 rubles for more or less high-quality spare parts, and at least the same for labor. But if you do everything yourself, you can save a lot of money.
Replacing the cable is much easier. The old one needs to be dismantled, and the new one needs to be fixed on the pedal and fork. The most difficult thing is to stretch it from the engine compartment into the cabin: the hole is quite small, and there are no amenities. But everything is doable, and all the work will take you, including preparation, no more than half an hour.
Important points when replacing the cable
Unscrewing the fastener
- As practice shows, the procedure for replacing a cable on a “ten” begins in the engine compartment. You are required to hold the fork and at the same time pull the cable that is removed from the fork.
- Then the cable fastener is removed from the bracket, which is located on the gearbox. Having completed this procedure, we go into the interior and dismantle the damaged element, that is, the cable.
- The result of the repair is influenced not only by the quality of the new cable, but also by the correctness of the entire replacement procedure.
- If you are dealing with a “ten” from an experimental industrial batch, then the bracket will be presented as a bolt with a Phillips-head screwdriver. To dismantle such a fastening element, you cannot use a regular screwdriver. A special shortened tool will be required.
- If the cable breaks while driving, you can unscrew the bracket with a handy tool, but through the safety block.
- It is strongly recommended to replace the non-standard bolt with a regular one, which can be unscrewed with a simple wrench.
- Be sure to keep a set of tools in your car, since it is extremely rare for a cable to break at the right moment. There is hardly a right moment for any kind of machine breakdown.