Replacing the light bulbs in the dashboard of a VAZ 2110 yourself
Installation of the dashboard on a VAZ 2110
The dashboard of the VAZ 2110 car is designed to reflect information about the current condition of the car. Made from ordinary plastic.
The presence of a huge number of light bulbs leads to the need to replace them from time to time. Many drivers want to replace the unsightly factory panel of the VAZ 2110 with a more modern one.
The article suggests finding out how to replace the dashboard bulbs of a VAZ 2110 and how to make it more aesthetically pleasing.
Features of the dashboard of the VAZ 2110 car
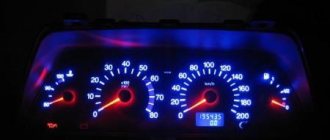
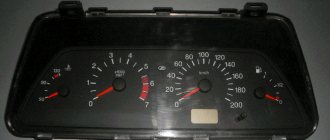
Dashboard VAZ 2110
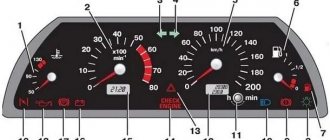
The composition on the dashboard of a VAZ 2110 car dashboard includes:
- 1 – indicates the temperature of the cooling water. If the arrow of this indicator moves into the reddish zone of the scale, this indicates overheating of the motor.
You need to pay attention to the operation of the electric fan and thermostat of the cooling system.
Tip: Do not operate the motor in overheating mode. Water temperature is more than 110 °C.
- 2 – tachometer. Shows the approximate frequency at which the engine crankshaft rotates.
To get the real value of the unit’s rotation speed, you need to multiply the device’s arrow reading by 100. The arrow reading in the reddish zone means that the engine is operating at an increased frequency, which is unsafe for the vehicle to continue moving.
- 3 – speedometer. The position of the arrow indicates the approximate speed of the car in km/h.
- 4 – indicates the fuel level.
- 5 – reset button on the daily mileage counter.
- 6 – screen for the trip odometer and odometer.
- 7 – screen for indicating the time.
- Positions 1 – used to illuminate device hands and scales.
- Positions 2 – the smallest in size are used in yellowish indicators and burgundy signal indicators. Such light bulbs are installed without rubber caps. Light filters of suitable colors are already integrated into the device.
- Position 3 – has a medium size, used to indicate a low gasoline level, just when the needle is at zero. It burns out very rarely.
The photo shows the installation of light bulbs on the panel:
Installing light bulbs on the panel
The entire arrangement of devices is fixed with 2 screws in the corresponding slot on the dashboard. Its connections are made using printed circuit board mounting using foil getinax. The board is perfectly attached to the back of the case.
The speedometer is equipped with 2 counters showing the distance traveled: one is total, the other is “daily”. Using the corresponding button, the readings of the latter are simply reset.
Tip: Readings can only be reset when the car is stationary.
The latest VAZ 2110 models are equipped with an electric dashboard. It contains all components and control indicators, icons and lamps.
Replacing the instrument cluster of a high panel on a VAZ 2108, VAZ 2109, VAZ 21099
Welcome! The instrument cluster is not a cheap thing, since all the indicators and lamps are located on it, replacing it is essentially nothing complicated, the most important thing is to know how to do it, only two combinations were used on cars of the Samara family, although if you take into account the fourteenth panel
then three combinations, the first combination is from the low panel (For information on how to replace this combination, read the article: “
Replacing
the instrument cluster of a low VAZ panel”), the second is from the high panel, today we are disassembling it, and the third and last combination is from a car of the Samara 2 family, that is from the fourteenth.
Note! To replace this part you will need to use: A screwdriver and a rag, because when you reach for the speedometer cable from the box or disconnect it from the gearbox, you will get dirty and you can wipe your hands with a rag, or initially you can just put gloves on your hands and then no rag no need!
When should you change the instrument cluster? When it becomes completely unusable and stops working, the speedometer on it may first fail, without which it will not be very convenient to drive, and the tachometer may also stop showing, but basically all these things are connected not with the combination but with something others, for example, if your speedometer has stopped showing, then check its cable, maybe it’s disconnected and the problem here is far from being a combination, the same thing with the tachometer, maybe the wires that come from it are broken or something else happened to them, the tachometer is the same will stop working, there were even cases when people went and bought a new instrument cluster and brought it with them and said replace mine suddenly stopped working, but it turned out to be a fuse that had blown and after replacement the old combination began to work exactly the same as it had worked before.
Replacing the backlight on the dashboard
Dashboard sign for VAZ 2110
To do this, you need to use the following algorithm:
- The panel should be removed.
- The illumination designation is determined by special LED bulbs. To replace the backlight, these bulbs must be removed.
Note: this must be done very carefully, because they are quite small. In addition, there is a possibility of damaging the panel itself.
- But before that you need to disassemble it. This is not a difficult task, as to disassemble it you just need to press the latches, thanks to which you can remove the bulbs.
- Everyone has seen that on top of the dashboard there is a “sticker” and symbols (speed, amount of gasoline). It is held on by glue, so to remove it you will have to dig around a little.
Remaining glue must be removed.
- You can start replacing the backlight.
Note: it is advisable to choose colors that are not very bright and strain the eyes. White or blue colors are ideal.
- To remove the light filter located on the back of the “sticker”, you need to take a utility knife. The light filter is located under the protective layer. First you need to remove it. Do not press too hard with the knife, as necessary parts may be damaged.
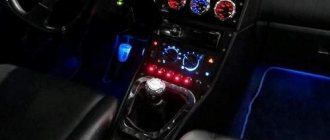
Description of dashboard tuning
Note: it is easier to remove it if you rub it with a knife in one direction, then in the other.
- To insert LED bulbs, you must remove the board located in the plastic case. There will be special holes for them.
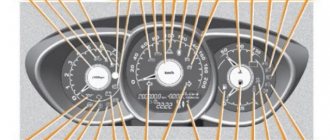
Panel instrument pinout
Note: but that's not all, you will need to solder the wiring of the light bulbs to the board for them to work.
- Now we need to put everything back together and install it correctly.
Instrument control panel illumination
To illuminate the stove, you first need to carefully remove the plastic handles of the levers that control the dampers and remove the glass. Below it is the stove itself. To do this, take any sharp object (knife or scissors) and carefully pry the glass. Prepare foil according to its size. It will be an additional source of illumination.
Fixed on the inside of the glass, it will give a very attractive appearance to the stove, and the console illumination will not be concentrated only in the place where the LED is installed next to the handle.
The next step is to remove the lamp socket from the backlight of the stove control unit. The lamp must be replaced with a purchased LED. In order for the light to spread around the entire perimeter of the stove, an LED strip is used, which is glued to the bottom. Two wires are usually soldered to the contacts, which are connected to the cartridge.
All connections are carefully insulated. Assembly is carried out in reverse order. If one of the parts does not work, check all contacts and connections again. The lighting of the stove control panel will become much better and more modern; the light from it will spread throughout the entire perimeter both day and night.
READ How to remove Toyota Corolla 150 steering wheel
Illumination of the heater (stove) control console.
Remove the plastic handles for the heater damper control levers. Remove the glass of the stove control unit by picking it up with a knife. We make a reflector out of foil and fix it under the glass of the VAZ 2109 heater control unit. If it is not made, the console backlight will be concentrated only in the place where the backlight LED is installed next to the heater fan speed control knob, and will decrease towards the opposite area, which does not look very good attractive.
Then we unscrew the lower part of the center console (the beard), remove the socket with the backlight lamp for the heater control unit and change the lamp to an LED. We put everything back together in reverse order.
It should be noted that simply replacing the backlight lamp with an LED one, despite all the tricks, will not achieve completely uniform illumination of the heater control panel. Although this is still better than the standard backlight.
To finalize the illumination of this unit, it is best to stick a 10 cm long LED strip to the bottom, solder 2 wires (plus and minus) to its contacts, and connect the wires to the backlight lamp socket of this unit. Just act carefully, do not leave uninsulated sections of wires to avoid a short circuit!
LED strip for illuminating the heater control panel
Now the backlight of the heater control panel glows brightly and evenly over the entire area. Moreover, this illumination is noticeable both day and night.
Illumination using LED strip
This is what the backlight looks like during the day
However, if in the daytime everything is great with the backlight, then when it got dark, I realized that the brightness of such a backlight was excessive for me, and it would be nice to make it a little less bright. You can, of course, adjust the brightness of the entire instrument panel illumination using the corresponding regulator to the left of the steering wheel, but the brightness of the remaining instrument panel illumination lamps suited me, so I did it differently. We take a black marker and paint over the coating above the LEDs (my LED strip is insulated) to the desired level of light transmission - and the problem of excess brightness is solved. The photo above shows a version of the backlight already modified in this way. You can also cover the LED strip with a piece of tint film, the effect will be the same.
Separately illuminated arrows
LEDS IN THE INSTRUMENT PANEL FOR VAZ 2110 2111 2112
Video guide for replacement
DIY
instrument panel for
VAZ 2110 An example of replacing
...
How to remove the instrument panel on a VAZ 2110, 2111, 2112 and replacing light bulbs
Video review - Backlight styling
interior of a
VAZ 2110 car, replacing
all incandescent light bulbs with diodes on
the panel
...
LED instrument panel VAZ 2110
If you want the arrows to glow a different color, you can do the following:
Note: in this case, the arrows will light up in a different color only when ignited.
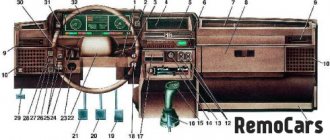
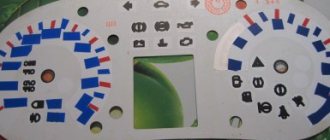
Description and location of indicators on the panel
After 2006, a new dashboard was installed on VAZ 2112 cars. For reasons that are not entirely clear, any description of it includes the prefix “euro”, probably due to its modernity and quality.
But in order to use it, you need to know the symbols, which are not always easy to understand even from the instructions. You can often only guess what this or that indicator and light bulb mean. To make this task easier for yourself, pay attention to the diagram of the instrument panel below and its explanations.
Description of the panel
- Arrow pointer. Intended to indicate the approximate coolant temperature. The data is obtained from a sensor that is installed between the cylinder head and the thermostat. This allows you to obtain accurate data. The sections have a range of 20 degrees, the lower level is 50, and the upper level is 130.
- Tachometer. Its purpose is known to any driver - to show engine revolutions per minute. Sections of 5 units, digitized every 10 units. To get the real value, add a couple of zeros to the number. Starting from 55, the engine enters the red zone in terms of revolutions.
- Left turn signal indicator.
- A similar indicator for the right turn signal.
- Speedometer. It is of the induction type and receives speed data from the sensor on the gearbox. Unfortunately, it’s definitely not very high; the error can be up to 5 km/h or even more.
- Fuel level indicator. The sensor is located directly in the tank.
- A warning light indicating a dangerously low fuel level.
- Low beam indicator.
- Lamp for monitoring the amount of brake fluid.
- High beam indicator.
- Lever for adjusting the clock.
- Total (odometer) and daily mileage.
- Alarm.
- Failure of electronic systems leading to critical engine failure.
- Clock and thermometer.
- Low battery charging voltage.
- Handbrake warning lamp.
- Critical oil pressure level.
- Fuel mixture enricher indicator.
Based on the above diagram, you can easily remember what this or that alarm light means. And although this is an instrument cluster for the VAZ 2112, it is approximately the same on other VAZ cars.
How to change the backlight using color film
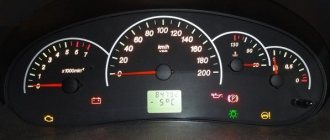
Old dashboard of VAZ 2110
In order to change the color of the dashboard lighting, it is not necessary to change the LED bulbs.
To do this you can simply:
- Take 12 LEDs and an LED strip.
- Remove the light bulbs from the base and insert one LED at a time in their place.
- You need to take the required amount of LED strip.
Instrument panel diagram
Note: its length is measured according to the size of the panel.
- The base and LEDs must be returned to their original location.
- The tape should be glued to the plastic of the panel (the appropriate temperature must be maintained).
- Tighten the block well.
How to assemble and disassemble the panel
To reset the speedometer or fix the problem that the turn signal light on the dashboard is not blinking, it must be removed.
To this end, you should perform the following actions:
- You can remove the cover, but the board will still be locked.
- You need to take a Phillips screwdriver and use it to remove a few more bolts.
- Now you need to unlatch the latches on the panel. You should start from the bottom. If they were disconnected from the bottom side, then you can push them up. This way the fee will be removed quickly.
- The arrows will have to be removed anyway.
Note: some arrows are easy to remove, but the arrows for the gasoline quantity indicator are much more difficult to remove. To remove the arrows, you need to gently pull them.
- The panel is disassembled, now we need to try to solve the problem.
Note: There are very small LEDs on the board that can also burn out. Because of them, the turn signal light may not blink, so they need to be replaced.
This requires working with a soldering iron.
But if the panel was disassembled in order to reset the speedometer readings, then:
Now it is advisable to somehow put the panel back together.
This is made even easier:
- Place the board in a plastic case.
Note: It is advisable to have a clean cloth underneath to prevent the surface from being scratched.
- Now you need to screw in the bolts on the panel itself. They do not need to be completely screwed in yet, as the arrows must be put in place first.
- Before putting the hands back in place, they need to be wiped thoroughly, as fingerprints, dirt, etc. will be visible when exposed to light.
Note: the arrows should be set approximately 3-4 mm below zero. It is also important that there is a small gap between the needles and the speedometer, otherwise they will stick.
It is much easier to install, as well as remove, long arrows. To install short arrows, you need to act very carefully, as they are more delicate compared to long ones.
- Before installing the glass, it also needs to be wiped. Now snap onto the latches.
- Secure the board with bolts.
- Lastly, screw in the screws on the cover, and then put all the light bulbs in place.
Working with a panel in a car is probably the simplest thing it can be. Therefore, there is no point in going to a car service center, where the price even for such trivial work will be high.
It’s better to look through a bunch of photos and videos before you decide to do repairs and tuning of the car’s interior with your own hands, so as not to harm the car. Any instructions will help you get the job done quickly and efficiently.
The instrument panel of the VAZ 2110 is boring and unsightly, but everything changes when they arrive - white LEDs.
About 8 years ago I myself assembled LED lighting for my six from what I had. Now the choice of LEDs is simply huge and without any problems I simply replaced the dashboard backlight bulbs with LED ones. The transformations pleased me.
Instructions for the instrument panel of the VAZ 2110 (old and new)
As in any other car, the instrument panel of the VAZ 2110 is designed to display the general condition of the car, show stable operation or problems in its main systems, as well as speed, fuel level, etc.
However, as practice shows, the control panel is not an open book for everyone. Let's look at its structure, instructions and description of the indicator lights on the new and old panel.
Indication symbols
As you know, all the lights on the control panel come on when the ignition is turned on, and then, when the engine is already running, most of them go out. But when one remains on or blinks, this cannot but be alarming, because not everyone can immediately figure out what malfunctions this indicates, which of the systems needs urgent repairs.
Let's look at the designations of the instrument panel of the VAZ 2110. You should know that regardless of whether the panel is new or old on your car, the designations are almost the same, but the indicators may be located slightly differently.
Instrument panel VAZ 2110
Top part
So let's start from left to right. First, the top part of the control panel:
- Side scale from 50 to 130 and arrow. Shows the temperature of antifreeze (antifreeze) in the engine cooling system;
- Almost round scale (0 – 80) and arrow. Tachometer showing engine speed;
- Two arrows at the top, almost in the middle of the control panel - turn signals (right, left);
- Speedometer. Well, this device, probably everyone knows, shows the speed at which the car is moving;
- A side scale with an arrow and, most often, two images of a filling column (white and red). Instead of a red column there may be a yellow light. This is an indicator of the fuel level in the tank. If the red column (yellow light) lights up, it means that there is very little fuel left in the tank - no more than 7 liters, urgent refueling is required.
Bottom part
Let's look at the indicators at the bottom of the control panel. If they don’t light up, it means the machine is working normally, and when any of them lights up, this indicates a malfunction in certain components. Most often, this is a signal that repairs are needed, and the sooner the better. From left to right:
- The indicator on the far left at the bottom is the air damper light (if you have a carburetor engine);
- Icon in the form of an oil can. If this light comes on, it means there is insufficient oil pressure in the engine. An alarming signal. You need to stop, find the reason;
- A round icon with the letter P inside on the control panel indicates that you have the parking brake on, which, as you know, should be turned off when moving away;
- Indicator of a fault related to the generator or battery (a symbolic image of the battery is shown on the indicator). Perhaps the battery is not charging from the generator, there is an open circuit, or the generator belt is loose or broken. In any case, your intervention and repairs are needed, otherwise troubles cannot be avoided;
- If the engine is running and the Check Engine indicator is on on the control panel, this is the most unpleasant thing for the driver, since it indicates serious malfunctions in the engine. In general, when this indicator lights up, it is recommended to stop driving and turn off the engine. Most likely it needs repairs;
- Typically there is a red triangle above the Check Engine. It lights up when the “hazard light” is on - an emergency signal sign;
- The headlight light indicates that the high beam is on. Designed to control headlights: when an oncoming car appears, do not forget to switch to low beam;
- A very important indication icon on the front panel (in a red circle) is a signal that there is not enough brake fluid. Perhaps it is leaking somewhere, which it is advisable to find out as soon as possible and, if necessary, carry out urgent repairs and replenish the level;
- The icon of a burning light is a control for turning on the dimensions;
- In addition to the indicated lights, the front control panel has time indicators (and a button for setting hours and minutes) as well as a display that shows the total and daily mileage. On the new panel, this display may be narrow.