Chevrolet Niva › Logbook › Replacing the Clutch Slave Cylinder.
Well, my patience has run out.
For 2 months it was leaking from under the car, namely from the working cylinder. Sometimes it got to the point where you would come in the morning and the pedal would already be empty. I forgot to top up the brake fluid in the evening, but it all ran away. Of course, I have a bonus that there is almost unlimited quantity of brake fluid. Top it up and let’s pump the pedal, 15-20 minutes are wasted. I endured and endured, and I went to the nearest one, Bal*K**, luckily it was nearby. It turned out that this spare part is present, 950 rubles. The manufacturer is really strange, “KAC”, let’s see how it behaves.
Having reached the garage, it turned out that we needed to sort out a little of the accumulated “junk”. Having dived into the hole, I found out that there was no dripping here, but simply flowing like from a tap,
Plus the barrel itself is cracked and needs to be replaced. It came, as they say, in one wave. To begin with, so as not to suffer later, unscrew the brake fluid supply hose to the working cylinder (17th key) and then you can safely unscrew the two bolts securing the bracket (13th key). Do not lose the plate that is under the cylinder; it presses the cylinder to the bracket and is located between the bracket and the gearbox housing, with the convex part outward. After you’ve collected everything that spilled out on you, you can safely unscrew the cylinder itself from the hose (be careful there’s a copper washer there, I don’t remember the size, but it’s better to replace it). Hurray, a stream of brake fluid started flowing at me, let it flow out, it’s not scary, but it’s realistic to get into trouble trying to fit a new cylinder. And so, nothing drips on me, I can collect it. Screwing on a new cylinder is not difficult; the difficulty arises when installing the rod. The thing is, my car doesn’t have a stabilizer (for religious reasons), which means I have nothing to rest the mounting on to pull the fork back. Fortunately, there was a bolt of the front lower silent blocks lying nearby, so I fixed it.
In your case, everything will be easier; you will have a stabilizer that you can rest against (Don’t forget to coat the rod with grease). Hurray, the rod is in place, tighten the hose, unscrew the bleeder fitting and climb out of the hole.
The turn has reached the barrel, there are no difficulties at all, 2 nuts for 10 and a clamp for 7, ready. I fill up the brake fluid and wait, since the classic pumping method alone will not work for me, so I go with my own method. The fact is that the hydraulic line is not large and is located almost vertically. Thus, you can bleed the system alone, by gravity, to squeeze out the air. We wait about one barrel for leakage, close the fitting and you're done, let's go check. Hooray! works)
P.S. For repairs using tools you need: 8 key 13 key 17 key Installation.
Source
Chevrolet Niva GOLDEN_FLY › Logbook › Replacing the rcs
12/13/2020 200055 km - 16372 rubles
Got around to replacing the clutch slave cylinder
I wanted the best...it turned out better than I wanted
Knowing that the rcs was leaking and having experience in restoring the cc and cc by replacing the repair kit, I bought it
And crawled under the car on the courts
I cleaned the cylinder of dirt and started removing
I wanted to unscrew the cylinder from the hose and fix it somewhere more comfortable and warm, but nothing came of it at all.
Then I decided to do everything in a canopy
My first thought was to buy the same one (I think they are on sale) and continue what I started, but something prompted me to buy a new control center and replace it in the assembly
I don’t trust Phoenix more than Samara, so I took the lower option
Due to the missing pressure plate, I also had to take a bracket
It was already sunset and before it got dark I still couldn’t unscrew the rcs from the hose (or vice versa)
But the morning is wiser than the evening...the idea came to unscrew the hose higher up from the tube and remove it from the bracket. Not an option at all - you can’t get it in / you can’t unscrew it.
Then the idea came to unscrew the entire line from the main central station, but there was no less trouble there...
Having suffered quite a bit on the courts at minus fifteen with the hose, having pretty much licked the edges, it was decided to remove the piston from the RCS and replace it with a new one from the box, along with the rod and boot of course.
This is where things started...
While I was walking to the trunk, I returned under the car and saw a puddle of brake fluid and an almost empty barrel (cellophane was nothing).
I inserted a new piston into the RCS, installed a retaining ring, and filled the barrel with brake fluid in full (my dad had a jar in his garage)
I loaded the pusher corrugation and attached the rcs to the gearbox on a bracket.
I pumped it by gravity. The pedal is where it was. The speeds are inserted smoothly without any problems.
There is a repair kit and a new case left in the NZ, maybe I’ll buy a bracket and assemble the RCS in my spare time as a reserve.
I noticed that Gur's hoses don't have much time left.
Most likely I’ll contact the service center... I got the screws screwed up with the RCS))
Niva Chevrolet and clutch slave cylinder: diagnostics, repair and replacement
The presence of a clutch in cars is not accidental, and its absence makes it impossible to travel in a vehicle. For most novice drivers, the clutch is the leftmost pedal in the car. But few people know its design, and therefore in this article we will pay attention to one of the main elements of the clutch - the working cylinder on a Chevrolet Niva. What is this product, why is it needed, where is it installed and how is it repaired and replacement parts carried out? You can learn about everything from this material.
Adjustment procedure
- Adjustment of the Chevrolet Niva clutch is carried out with the engine turned off. It is also better to disconnect the battery so as not to accidentally start the engine when the shaft rotates.
- The gearbox is moved to neutral. The master cylinder is installed with a gap of half a millimeter from the pusher. This distance is sufficient to disengage the clutch disc. Subsequently, the pedal travel is adjusted.
- The pedal travel should not exceed 3 millimeters. Adjustment must be made by changing the position of the locknut and bolt. By tightening them you can adjust the stroke amount.
- The pusher should move freely no more than 4-5 millimeters. To adjust it, you need to adjust the stop nut.
- Also, to adjust the pusher, you can change the position of the lock nut.
The total free play of the pedal should be within 25-35 millimeters. To more accurately adjust the clutch pedal, it is necessary to work on an inspection hole or lift.
Purpose and design features of the working cylinder
There are two types of cylinders in the clutch mechanism: working and main. You can learn about the purpose of the main one from the corresponding article, and today we’ll look at the Chevrolet Niva clutch slave cylinder. The Chevrolet Niva clutch system is based on the operation of a hydraulic drive, which, in turn, is inoperative without a cylinder. The essence of its operation is to directly receive the force coming from the main cylinder and thereby move the clutch release fork.
The design of the working cylinder is absolutely identical for almost all car models, therefore the principle of operation of the device is the same. The product consists, first of all, of a base, that is, a body where the following parts are assembled in a certain order:
All parts are assembled in a certain sequence, which allows the device to function correctly.
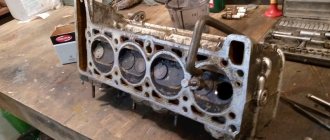
The photo below shows the working cylinder of a Niva Chevrolet.
How does the device function?
To understand the issue of purpose in more detail, let’s consider how the product’s workflow is carried out. So, when you press the main control lever (i.e. the clutch pedal), the pusher moves, which acts on the piston and it moves forward. When the piston moves under the influence of mechanical force, the pressure in the housing begins to increase. This is a process that occurs in the clutch master cylinder. After increasing the pressure, the liquid begins to be squeezed out through the discharge channel and enters the working cylinder. It contains a piston with a fork, which, under the influence of pressure, squeezes out the release bearing, thereby separating the engine and gearbox. At this moment, the corresponding gear is engaged, and then the driver releases the clutch pedal. After releasing the pedal, a return to its original position is observed: the engine engages with the transmission, which is due to the action of the pushing spring in the cylinder.
This is the essence of the functioning of the working cylinder of a Chevrolet Niva SUV. You cannot do without breakdowns and malfunctions, which are inherent in any mechanism. Thus, it is periodically necessary to repair the cylinder, since its functioning is based on friction, and, therefore, wear.
Where can I find the clutch slave cylinder in my car? On the Chevrolet Niva SUV, this product is located on the clutch housing, as on almost all cars. To do this, you need to open the hood and look at the area under the hood on the driver's side.
Fault Diagnosis
Initially, it is important to make sure that this particular element is faulty and requires replacement or repair. To do this, there are ways to identify malfunctions that will allow the car owner not to resort to the help of auto repairmen. So, if you notice the following shortcomings:
Clutch cylinder in need of repair
In this case, you should pay special attention to the working cylinder and promptly carry out repairs to avoid further troubles.
Cylinder replacement and repair
Replacement is carried out in the event of irreparable defects, which include damage to the cylinder body. In all other cases, repairs will be required. But first, let's look at how to remove the slave cylinder from a Niva Chevrolet SUV and install a new repair kit.
Clutch
In addition to the cylinder, the clutch itself, which transmits torque from the engine to the gearbox, can also fail. If it fails, this leads to difficulty in shifting gears, which negatively affects both the operation of the power unit and the gearbox itself.
The preconditions that it needs to be changed may be the following:
- The clutch does not engage fully. As a rule, the main cause is worn gaskets. In this case, you need to completely change the disk
- There are oil stains on the linings. This indicates that the seals have worn out and the part begins to heat up.
Replacement
You can replace the Niva Chevrolet clutch yourself, but you should know that this will take a lot of time. The first thing to do is to prepare a mandrel for centering the driven disk and a set of keys, after which we will do the following:
- Removing the gearbox
- Using marks, we mark where the flywheel is located relative to the engine casing
- We unscrew all the bolts that secure the disc to the flywheel with an eight key
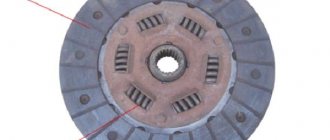
- Remove the release and driven discs. We visually inspect the driven disk; if damage or cracks are found on it, it is better to replace it with a new one. You will also have to completely change the disc if the distance between the rivet and the top of the lining is less than two millimeters.
- We check what density the damper springs have. If they weaken the disk you need to change it
- Let's look at the condition of the release petals. They should be located on the same level
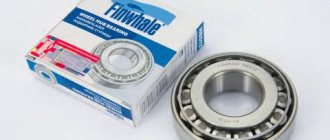
If all indicators are normal, the disc can be reinstalled, the only thing that should be replaced is the release disc. Another important part in clutch operation is the release bearing, which should also be changed periodically. If you press the pedal and you hear noise, this indicates that it should be changed, this can be done in the following way;
- The bearing is removed from engagement with the fork
- The release area is thoroughly cleaned and a new part is installed. It needs to be well lubricated before installation.
- Reassembly is done in reverse order
If you know all the signs that indicate that the clutch is faulty, and also know how this entire system works, you can carry out all the work yourself without resorting to the services of a specialist.
Chevrolet Niva the older the better › Logbook › Replacing RCS 2123 (clutch slave cylinder)
While driving, I pressed the clutch several times. Moreover, very sharply (the car jumped out into the meeting) - and the clutch “does not release.” The cylinder is jammed. I crawl under the car. Exactly - the working cylinder is squeezed out and does not crawl back.
I hammered it back in the direction of the red arrow. It’s good that our car is tall - you can crawl under it. The clutch worked. But a clear sign “it’s time to change” was already given.
2123-1602510 Working cylinder 900 rubles 2101-1601211 Clutch release fork cover 50 rubles 2123-1602492 Bracket VAZ-2123 clutch working cylinder 100 rubles
21230-1602494 Thrust plate aka 21230-1602157 RCS plate 30 rubles
21010-1602596 Copper washer d 12 mm 15 rubles Bolt M8x50 1.25 - 2 pcs Spring washer 8 - 2 pcs
This is how the hydraulic clutch works
Opening the tank lid
Unscrew the fluid hose from the cylinder and the cylinder itself.
(the plate was installed incorrectly - it is useless from the outside of the bracket - it should press the cylinder from the inside!)
At the same time, remove the torn cover and install a new one:
Compare old and new:
Installing a new cylinder
We put on a tube and “pump” it by gravity. (do not press the pedal!)
But the reason for the cylinder jamming is plaque and rust in the part where the cylinder rarely moves. Even with the ring removed, the piston did not come out.
Pull clutch working cylinder disassembled:
When does it make sense to repair and when to replace?
If the release bearing, as well as the main and working cylinders are faulty, the system is repaired. If noise occurs, the release bearing must be replaced. This part and the release fork are disengaged. The fork is moved to the side and the bearing is removed. Before installing a new bearing, it is recommended to clean the installation site. Before installation, the bearing and seat are lubricated with a special compound called Litol-24. Assembly is carried out in reverse order. Changing the bearing will ensure good clutch travel.
The purpose of the master cylinder is to transmit impulses from the pedal to the working parts of the clutch. If it does not turn on and off completely or fluid leaks out, then the cylinder must be repaired or replaced. Before repair, the part is removed and inspected. In the absence of major signs of wear and mechanical damage, the part is repaired. To do this, you need to flush the part with brake fluid. When cylinder components wear out, they are replaced with new parts.
The functionality of the clutch drive is ensured by the slave cylinder. To connect the master and working cylinders, a steel tube is used, on the lower edge of which a rubber hose is placed. Liquid periodically leaks through the rubber connection. After removing and repairing the part, bleeding is carried out. The clutch also needs to be adjusted.
To bleed the drive, put a hose on the working cylinder. One of the ends is placed on the valve of the part, and the second is lowered into the liquid. Depress and hold the clutch pedal. The procedure is carried out more than five times. After this, the valve is opened to release the air. The actuator adjustment will be successful if there is fluid leakage without air after opening the valve.
If the fork breaks, you do not need to remove the gearbox to replace it. Replacement is done using pliers, a carrier or flashlight, a hammer, a sharpener and a screwdriver. Pliers are used to remove the return spring.
The bolts on the clutch slave cylinder are unscrewed and the rod is uncoiled, which needs to be pulled out of the fork. After removing the protective glass, the plug is removed. Using a sharpener, the new fork is refined. The ends are chamfered and the rivets are ground down to a height of 0.5 millimeters. The release bearing is rotated in the hatch. In this case, make sure that the edges of the coupling are in a horizontal position.
The tips of the spring are directed towards the hole and the fork is inserted
She is carefully driven into the hatch using a hammer. It is recommended to check whether the spare part is adjacent to the ball joint
The antennae of the support are directed so that they cover the support. All other manipulations are performed in reverse order.