Removing and installing the Chevrolet Niva steering wheel
Tools:
- Flat head screwdriver
- Socket wrench
- Extension for socket wrench
- Head for socket wrench 24
Note: We carry out the work when removing the steering column switches, steering column or when replacing the steering wheel.
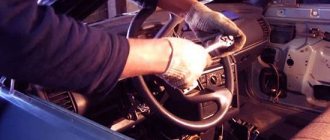
1. Having removed the key from the ignition switch, turn the steering wheel until the steering shaft locking device is activated.
2. We apply installation marks to the instrument panel and steering wheel. Disconnect the negative cable terminal from the battery terminal.
3. Use a slotted screwdriver to pry off the horn switch cover.
4. We move it away from the steering wheel.
5. Disconnect the wire block from the connector located in the steering wheel hub.
6. Using a 24" socket with an extension, loosen the nut securing the steering wheel to the upper steering shaft.
7. While rocking, pull the steering wheel toward you in order to remove it from the steering shaft splines.
Helpful advice: The steering wheel sits very tightly on the shaft splines, so do not completely unscrew the wheel fastening nut: if there is a sharp impact during removal, the steering wheel, jumping off the splines, can cause injury. For ease of reinstallation, mark the position of the steering wheel relative to the shaft.
8. If you cannot move the steering wheel with your hands, an assistant pulls the steering wheel up along the axis of the steering column, and strikes the end of the steering shaft with a hammer through a soft metal drift (in the event of a sudden break of the steering wheel, the nut will protect workers from injury).
Steering gearbox Niva
Adjusting the steering gear and the reasons that contribute to the need to adjust the steering column on cars of the Niva family (2121, 2131, 21213, 21214, Chevrolet and other variety of both series and sub-series) is the topic of this story.
These works are not difficult and, if you have direct hands and desire, they can be done with a bang in the garage with your own hands, or with the hands of a local professional
Steering gear design on Niva
But before we start shamanism with a tambourine, a few words about the design of that very steering gearbox. The Shaitan machine, although not cunning in its design delights, still requires ingenuity and understanding from anyone who decides to repair it.
To watch online, click on the video ⤵
Removing the steering wheel shniva airbag Read more
Replacing the steering wheel of a Chevrolet Niva. More details
Chevy Niva steering wheel. More details
How to remove the steering wheel of a Niva. More details
✅ STEERING STEERING UPGRADING ON CHEVROLET NIVA | UNIVERSAL BRAID FROM ALIEXPRESS FOR $2 More details
Restoration and reupholstery of Niva Chevrolet steering wheel Read more
NIVA. VAZ. How to remove and reposition the steering wheel straight. The best way to reinstall the steering wheel on a NIVA VAZ Read more
Steering wheel reupholstery, deflectors, and armrest for Chevrolet Niva Read more
SHOCK. WHAT I FOUND FOR THE CHEVROLET NIVA ON ALIEXPRESS COMPETITION Read more
We remove the airbag of the Niva Chevrolet. More details
Chevrolet Niva 4x4 Chevrolet Niva 2021 Replacement of the front bumper More details
Installing a comfortable steering wheel in a VAZ 2131 (NIVA LADA4x4). More details
The steering wheel of the VAZ 2123 is wobbly Read more
Niva 21213 Removing the steering wheel Read more
CHEVROLET NIVA replacement of internal combustion engine cooling radiator (with air conditioning) More details
Chevrolet - Niva steering wheel adjustment Read more
How to remove the steering wheel airbag from a Chevrolet trailblazer Read more
Review of Steering Wheel Braiding and Eyeglass Cover on Chevrolet Niva! More details
What does the Kalina steering system consist of?
The steering wheel is one of the main parts of the entire mechanism. It is located on the splines of the steering shaft and is secured there with a locking nut. This ensures maximum reliability of the wheel fit and reduces the likelihood of damage.
At the same time, the steering shaft itself is not an integral element, but consists of several parts - the upper and intermediate parts. Its rotation is carried out thanks to two bearings installed inside the steering column tube, on which the ignition switch with an anti-theft system is located. The steering column is assembled with an engine gearbox and an electric power steering control unit.
Protection from dust and dirt is provided by a decorative steering column cover mounted on the front of the panel. Its dismantling is carried out using a Phillips screwdriver. The normal functioning of the amplifier depends on the speed of the vehicle.
One of the parts of the column is the steering shaft driveshaft. Finding it is quite easy; to do this you will need to remove the casing. The steering shaft cardan softens vibration and makes steering safe.
Brackets are attached to the steering column tube using hinges, and their lower part is attached to the body with studs and special nuts. The top bracket has a mechanism that allows you to fix the column in different positions. When the lever is moved to the lower position, the angle of inclination of the column changes, and when it is moved up, it is fixed.
The rack and pinion steering mechanism consists of a housing, a rack and a drive gear. It is secured to the engine compartment crossbar using two steel brackets on rubber supports. The steering rod is attached to the racks, part of which are the steering ends, as well as adjusting bushings.
Car steering mechanism
Chevrolet Niva | Steering wheel
Some cars are equipped with an airbag, which is located in a container in the center of the steering wheel. To prevent accidental activation of the system, move the ignition switch to the Lock position, disconnect the battery from ground and wait at least 2 minutes.
After removing the steering wheel, it is prohibited to turn the shaft (or wheels), as the alignment of the spiral wire will be disrupted and the wire will break, which is why the airbag will not work in an accident. In case of accidental violation, restore the alignment before installing the steering wheel.
Niva car steering gear
In 1970, the designers of the Volzhsky Automobile Plant, who at that time had already mastered the production of the first VAZ model, were tasked with creating a comfortable off-road vehicle. At the development stage, many components and assemblies of the Zhiguli were transferred to the prototype of the new model. The car turned out to be quite lightweight in appearance, and off-road thanks to its off-road characteristics. At the same time, the interior turned out to be almost identical to that of a passenger car.
In 1974, the first 15 samples were produced, which went through a full cycle of pre-production tests. And in mid-1977, the first production car VAZ-2121 rolled off the assembly line. Some time after the launch of the conveyor, the car gained high popularity due to its reliable design and excellent off-road characteristics. In the best years, up to 80% of cars produced were exported.
An important role in such popularity of the car was played by the reliable and well-balanced design of the Niva, which made it possible to operate the car in different climatic and road conditions. The combination of a power unit, suspension, rigid two-volume body, transmissions and reliable steering ensured the Niva a long life on the assembly line.
Steering is considered to be one of the important critical systems of a car, the heart of which is the steering gear.
Steering
The Niva uses a worm-type steering gearbox. It provides reliable vehicle control at any speed and in different road conditions. The worm mechanism is equipped with a globoid type worm (variable shaft diameter) connected to an intermediate shaft and roller. A bipod is installed on the outer part of the roller shaft, which, through rods, activates the rotating mechanism. The rotation of the steering wheel ensures the movement of the bipod through a worm gear; it turns the wheels with rods.
The worm steering mechanism has a low level of sensitivity to shocks and impacts transmitted from the wheels on uneven roads. It has the ability to direct a VAZ vehicle to large turning angles and, accordingly, provides excellent maneuverability of the vehicle. The disadvantage of a worm gear is that it is difficult to manufacture. Worm steering has many connections and therefore requires periodic adjustments and adjustments.
The worm steering mechanism is used on off-road passenger cars with dependent wheel suspension, light trucks and buses. The simplicity of the design has an increased service life and a high degree of maintainability. A slight drawback may seem to be a slightly increased effort on the steering wheel, which occurs for a number of reasons. Having analyzed the design of the steering gear and the loads acting on it, we determine problem areas and ways to solve problems.
Chevrolet Niva | Removing and installing a steering wheel with an airbag
Cars are equipped with safety systems (SRS), including airbags and seat belt tensioners. Before working around the shock sensors, instrument panel and steering column, first disconnect the negative and then the positive terminals from the battery and wait 2 minutes. This will prevent unauthorized deployment of airbags and seat belt pretensioners, which could cause personal injury.
Remove the steering wheel as follows:
Turn off the ignition, disconnect the ground wire from the battery and wait 2 minutes before carrying out further work.
Set the wheels to drive straight.
On 1996 and 1997 models, release the clips on the sides and remove the center pad from the steering wheel.
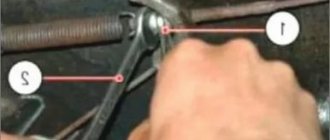
Rice. 13.1. Loosening the screw securing the airbag to the steering wheel
On models since 1998, loosen the screws securing the airbag to the steering wheel and located on the sides at the rear of the steering wheel (Fig. 13.1).
Loosen each screw until the tab on the screw comes out of the housing.
Difficulties in replacement
Many users often have questions when replacing an old steering wheel with a new one. Here are the answers to the most common ones.
Question 1: Are mounts suitable for different models?
Answer: The mounts are identical, so the Priora 2 SE steering wheel is recommended for use on older models as well.
Question 2: I removed the steering wheel, but now I can’t put the new one back, it doesn’t work manually, what should I do?
Answer: If the part has been dismantled, then it can also be installed back. The steering wheel is installed by pressing your hands towards the shaft, without using tools like a hammer, but everything may not work out on the first try. There is no need to make sharp pushes of the steering wheel; a simple smooth press will be enough.
Question 3: Are additional components needed for the mechanism besides the steering wheel?
Answer: Yes, you still need to purchase a steering cable of the same model. Its installation is carried out similarly to the old version.
Question 4: The steering wheel is stuck after installation, what should I do?
Answer: Most likely, the steering cable is installed incorrectly. Disassemble the structure and reassemble it, adjusting the position of the cable in advance.
Yes, it is possible, but you need to have some experience; if you have the slightest doubt about your abilities, it would be better to resort to the services of a technical assistance station.
Before you start dismantling any machine, you first need to prepare it a little:
- Align the steering wheel so that the car moves straight;
- Remove the key from the ignition switch and lock the steering wheel;
- Deactivate the negative terminal on the battery.
That's it, all that remains is to wait two or three minutes. The pause is needed so that the capacitor in the control system is completely discharged. The electrical circuit must be de-energized, avoiding short circuits.
What you need
Some tools will be needed, in particular, keys and screwdrivers. Their specific models depend on what exactly you plan to work with. Different brands of cars require different types of keys.
Step-by-step instruction
Before removing the airbag, it is worth understanding what version of it we are talking about and what model of car you plan to perform the task with.
Remove the airbag from the steering wheel
Let's consider the situation using the example of the Lada Priora car; in other models there may be minor differences (some examples are given below in the corresponding section), but the general essence is the same. Having carried out the preliminary preparation described above, we proceed as follows:
Turn the ignition key to the right. It is necessary that the lock opens so that the steering wheel can turn freely left and right. You cannot remove the key from the ignition, otherwise the steering wheel will lock; On the Priora-4, the steering wheel is spoked, and to remove the cushion, you need to tighten two countersunk bolts on the sides. A T27 sprocket key is suitable for this. With the steering wheel straight, first tighten the bolt on the left side
We turn the rotor 180 degrees and unscrew the other bolt. When both bolts are unscrewed, you need to pull the pillow towards you. It is important to be careful if the bolts are too tight - damage to the plugs is possible.
- Moving the pillow aside, holding the airbag with one hand, separate the plug from the middle of the device. You must first unclick the latch upwards, then remove the connector from bottom to top from the base;
- Now the signal wire is removed;
- You can remove the steering wheel itself, but do not forget to put the wheels straight before doing so so that the steering wheel is installed on the spokes in the same position;
- The steering column turn switch is being replaced, we are putting the parts back together.
Remove passenger
First you need to remove the glove compartment, then unscrew the existing protection in the same way with a Phillips screwdriver; when you see two bolts, unscrew them successfully, pry the plug off from above, and remove the wiring.
Remove other pillows
To remove the side airbag, you first need to disconnect the front seat assembly, the seat back. The safety fasteners are unscrewed. In principle, that’s all, you can remove it. And then screw it in and install everything back (if necessary, placing a new one in place of the old pillow).
Signs of a faulty steering rack
- A noticeable knock from the rack transmitted to the steering wheel;
- Rack play during rotation;
- Noticeable oil leaks;
- Increasing the applied force to turn.
The manifestation of at least one of the symptoms indicates that it is time to disassemble the steering racks to replace the repair kit and repair worn parts.
The main parts of the mechanism are: support sleeve, gear shaft, spool mechanism.
Schematic illustration of a car's steering rack.
Before troubleshooting, you have to dismantle the rack, which is not equally easy on all cars, and to disassemble it, you cannot do without a special tool. And as the steering rack is disassembled, the repair itself is carried out. Having a little skill in machine repair and a set of tools, it is quite possible to repair a rack with your own hands. And to make this even easier, let’s look at the main steps of how to disassemble the steering rack, and then it’s just a matter of remembering how everything stood and assembling it correctly, since you can disassemble whatever you want, but then putting it back together correctly can be quite problematic. Therefore, if you have not previously had to disassemble the steering rack, I would recommend photographing each step until the steering rack is disassembled.
Purpose and design of the steering wheel
The steering wheel performs a very important function in all vehicles, so it is almost impossible to do without it. This function is manual control of the car, or, more precisely, adjustment of the position of the wheels. On the Chevrolet Niva, as on many other cars, the front wheels are directly adjusted. The rear ones do not have the ability to change the angle of rotation. Thus, thanks to the presence of a steering wheel, the driver controls the car and moves in any desired direction.
On a Chevrolet Niva SUV, the steering wheel consists of a steel circular structure, the size of which is about 40 cm in diameter. The photo below shows a standard Chevrolet Niva steering wheel with a digital designation. Each number characterizes one or another parameter of the steering wheel and determines its size.
- External or overall diameter, the size of which is indicated above (40 cm);
- The diameter of the bagel itself, the size of which is 8-10 cm;
- The thickness of the spokes at the base and signal. This size for the Chevrolet Niv is different, since earlier models have the steering wheel shown in photo 1. More recent and restyled models are equipped with a three-spoke steering wheel, as shown above.
The steel structure is covered with decorative leather braiding, which makes the steering wheel look aesthetically pleasing and decorative. The design of the steering wheel is also complemented by a function such as a sound signal. A fairly necessary and useful function that should always be at hand.
Detailed instructions for installing electric power steering on a Niva
The procedure for installing the EUR with your own hands is as follows:
- First you need to disconnect the battery.
- Then the plug is removed from the steering wheel, the fixing nut is unscrewed, and the steering wheel itself is dismantled. You also need to unscrew the four screws and remove the plastic cover.
- The mounting bolts are unscrewed and the instrument panel is dismantled. Disconnect the steering column switch plug, unscrew the bolt that secures it, and then remove the device.
- Then the ignition switch wiring is disconnected, the device itself is removed, to do this, unscrew the two mounting screws and turn the key to position I.
- The next step is to dismantle the steering column; to do this, you need to unscrew the steering shaft screw, as well as several mounting screws and nuts. Please note that Nivas use screws with shear heads, so the best option would be to apply notches using a chisel and unscrew them with pliers. Next, the column itself must be lowered down and then dismantled.
- After this, unscrew the nuts on the mounting blocks with fuses and remove them. Also remove the relay cover located under the instrument panel.
- The interior and engine compartment are separated from each other by a partition; it has an elastic plug, which must be removed. The EUR wire is pulled through the hole. Make sure that the installed wire does not come into contact with moving components of the wiper motor.
- Under the dashboard itself, to the left of the steering wheel, there is an 8-pin connector, two gray wires are connected to it. The yellow-blue one from the EUR should be connected to this connector. Then, to the red block, which comes from the tidy, you need to connect the orange and blue-pink wires from the electric amplifier. Here, behind the instrument panel, you can find a ground bolt; you should connect the minus to it.
- An amplifier bracket is installed under the tidy; the wiring from the ignition switch should be threaded into it.
- Next, an intermediate shaft should be installed on the splines of the amplifier itself; remember that a ground should be connected to it in advance. The shaft itself should be securely fixed to the steering gear shaft and the EUR should be attached to the bracket. The shaft must not be pinched or too tight.
- The assembly itself is fixed to the plate using two bolts and two studs; it is advisable to install nuts under them.
- Next, the power and information connectors are connected to the amplifier.
- In fact, the installation procedure can be considered complete. Now you need to reinstall the ignition switch and steering column switch. To install the steering column trim, it will need to be cut, for example, with a hacksaw. The steering wheel and dashboard are put in place. Then the wiring is pulled from the EUR to the battery. Please note that in the existing plug in the partition between the engine compartment and the passenger compartment, it will be necessary to increase the size of the hole. Perform a functional check of the equipment and check all connections again.
Also interesting: Non-adjustable hubs on the Chevrolet Niva: review, diagram, device and reviews
In the video below you can watch how a self-installed power steering works (the author of the video is Vladislav Mantula).