What is a cylinder head and its functions in a car engine
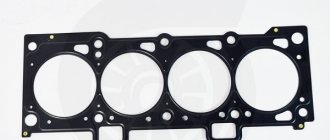
To ensure that the connection between the head and the cylinder block itself is sufficiently tight and airtight, a gasket is used. It performs three functions:
- seals the cooling system channel;
- prevents oil leakage;
- distribution - the cylinder functions normally, as a result of which the mixture of gasoline and air does not leak out.
The seal is used only once and is changed during any engine repair. You can use the following types - asbestos, non-asbestos, steel. Each gasket is good in its own way: metal gaskets distribute mechanical stress well, asbestos gaskets are more elastic and can withstand high temperatures.
You will need the following equipment: a 10 mm wrench, pliers and a flathead screwdriver. Different cars have their own design features, engine models and bolt patterns. It is impossible to create the same algorithm for all machines. Let's look at exactly how to do this with your own hands.
The cylinder head device in a Chevrolet Niva car
The Chevrolet Niva engine traces its origins to the 1.7 liter VAZ 21213 engine . It has the same cylinder diameter of 82 mm and a piston stroke of 80 mm. The differences lie in the design of the cylinder head (cylinder head). Hydraulic compensators and a single-row chain with a hydraulic tensioner appeared. The cylinder head itself is cast from aluminum alloy and is designed to attach the gas distribution mechanism, valves, spark plugs and form an optimal combustion chamber in the cylinders. This head received the index 21214, it has been produced since 2003.
Important! The cylinder head, camshaft, tensioner mechanism in VAZ 21214 engines differ from modifications 21213 and 2121 and are not interchangeable.
The gasket between the head and the engine block performs the following functions:
- sealing of engine cooling channels;
- sealing the oil supply channel to the block head;
- creating optimal gas pressure in the combustion chambers and preventing them from escaping into the block.
To ensure reliable connection, the cylinder head gasket is made of a composite with a metal base or all-metal. The mating surfaces must be smooth, without scratches or cavities; surface curvature of no more than 0.1 mm is allowed.
Signs of a broken cylinder head gasket
A blown head gasket can present with a variety of signs and symptoms. Below we will look at the most common ones:
White smoke from the exhaust pipe is one of the signs of a broken cylinder head gasket.
Exhaust gases come out from under the cylinder head. The most common symptom of a broken gasket, which becomes noticeable externally and by loud popping noises from under the hood.
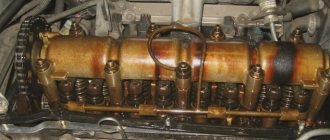
There is a noticeable gap between the cylinders. In this case, exhaust gases and the fuel mixture from different cylinders are mixed. and the same problems are observed in the operation of the machine as when the engine triples. By the way, it starts with difficulty, but works stably after warming up. The breakdown is determined by measuring the compression of the cylinders (under normal conditions it should not differ much). Antifreeze penetrates into one of the cylinders. This reason manifests itself in the release of white exhaust smoke (filled with steam) from the pipe even at positive air temperatures and in a drop in the antifreeze level. Oil leaks out from under the cylinder head. Its streaks are noticeable in the area of the junction of the BC and the head. The engine quickly heats up and overheats due to the fact that hot exhaust vapors penetrate the cooling system and prevent it from operating effectively. Antifreeze and oil mix in the engine compartment. This problem worsens engine performance and increases wear. An indicator of this malfunction is oily spots in the expansion tank. When antifreeze is mixed with oil, a reddish emulsion is formed on the inside of the lid, similar to sour cream or mayonnaise. The stove does not work well due to exhaust getting into the cooling system. As a result, the coolant temperature changes frequently and the heater heat exchanger does not operate efficiently. Pressure increases in the radiator pipes due to exhaust gases entering from under the cylinder head gasket. To detect this sign, you need to feel the pipes - they become too hard. Heavy carbon deposits appear on the candles. Due to the penetration of water or antifreeze into the cylinders, the spark plugs even become wet.
One of the most obvious signs of engine overheating is condensation forming on the surface. However, burnout or breakdown of the cylinder head gasket is only one of many causes of this malfunction.
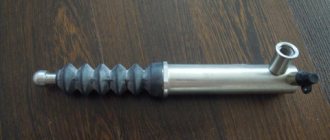
Replacing the front brake hose of a Chevrolet Niva - how to repair a VAZ
Tools:
- Brake bleeding wrench 8x10 mm
- Open-end wrench 15 mm
- Open-end wrench 17 mm
- Medium flat screwdriver
- Rolling jack
- Support stand
- Brake fluid container
- Rubber bulb
Parts and consumables:
- Aerosol lubricant type WD-40
- Sealing copper washer
- Brake fluid
- Brake hose
Note:
Replace hoses and pipelines if they are damaged. In addition, we recommend replacing hoses on a preventive basis after every 60 thousand km or after 3 years of vehicle operation, even if they do not appear to be damaged. The rubber of the hoses gets old and they can burst unexpectedly when braking.
1. Use a rubber bulb to pump out the brake fluid from the reservoir.
2. We hang and remove the front wheel.
3. Holding the tip of the brake hose with a “15” wrench, using a “10” wrench covering five edges, unscrew the tube fitting.
Note:
To reduce brake fluid losses, you can put a protective cap on the end of the tube for the wheel cylinder bleeder fitting.
4. Remove the hose tip from the bracket on the body.
5. Remove the hose fixing bracket.
6. Use a screwdriver to press the hose coupling lock.
7. Push the coupling with the hose out of the bracket hole.
8. Using a 15 wrench, unscrew the lower tip of the hose, holding the cylinder connector with a 17 wrench.
9. Remove the brake hose.
10. The joint between the hose tip and the cylinder connector is sealed with a copper washer.
11. Install the hose in reverse order.
12. After installing the hose, bleed the brake system as described.
Causes of cylinder head gasket failure
A crack or burnout of a gasket is a fairly common occurrence on a Chevrolet Niva. The vehicle is operated in extreme conditions; the engine runs at high speeds or with poor cooling off-road. The temperature in the combustion chambers reaches 1000°C, so the appearance of the slightest crack leads to rapid burnout of the gasket in this place.
A damaged node can be easily identified by the following symptoms:
- white steam from the exhaust pipe of the car (antifreeze enters the cylinders);
- drop in coolant level in the expansion tank;
- bubbling of antifreeze in the expansion tank;
- the appearance of an emulsion on the oil dipstick and timing components under the valve cover;
- increase in oil level due to antifreeze entering the crankcase;
- oil leaks from under the gasket outside the engine;
- the engine begins to stall and run intermittently;
- low compression in the cylinders.
Attention! The main reason for cylinder head gasket burnout is severe overheating of the engine, which leads to bending of the light-alloy cylinder head and the formation of cracks between the cylinder block. The manufacturer does not regulate gasket replacement on a Chevrolet Niva
It is designed for the entire service life of the engine - 125 thousand km. This part is disposable and is replaced with a new one every time the cylinder head is removed. Dismantling the engine head may be necessary to repair valves and their seats, replace pistons, piston rings
The manufacturer does not regulate gasket replacement on a Chevrolet Niva. It is designed for the entire service life of the engine - 125 thousand km. This part is disposable and is replaced with a new one every time the cylinder head is removed. Dismantling the engine head may be necessary to repair valves and their seats, replace pistons and piston rings.
Replacing the cylinder head gasket on cars
General rules suitable for any car, including the Chevrolet Niva:
- When disassembling, mark all attached parts with a marker - this way you will not get confused during the reverse process;
- when purchasing a gasket, buy exactly the type recommended by the engine manufacturer;
- be sure to remove any oil deposits on the fastening bolts;
- perform half or one turn when loosening the bolts to reduce the pressure;
- The cylinder head is assembled using special bushings;
- The bolts are finally tightened with a special wrench very carefully so as not to twist.
Draining antifreeze in Chevrolet
This is the first stage that is performed when replacing a damaged Niva gasket. Initially, you need to remove the mudguard and the lubrication sump housing - they are located in the engine compartment.
Further:
- reduce the pressure in the coolant supply system by opening the cap of the distribution tank (be sure to close it afterwards - this will reduce the antifreeze pressure);
- place a container of at least 9 liters under the drain (it is under the radiator on the left);
- unscrew the cap and wait until the liquid pours out;
- inspect the gasket of the drain plug - if it is worn out, replace it too;
- Remove the cap from the expansion tank again.
Now you need to get rid of the antifreeze remaining in the cooling system of the engine itself. To the left of the cylinder head, near the ignition unit, there is a separate drain hole. Place a container under it and unscrew the plug with a 13 key.
Reasons why the cylinder head gasket blew
The first thing you need to pay attention to is engine overheating. How can this happen? Everything is very simple
If the gasket is made of iron-as-bestos, it may simply not withstand high temperatures when the engine overheats. The gasket will gradually burn through, its strength will decrease, and it may swell. In addition, as a result of overheating, the plane of the cylinder head (cylinder head) can be bent. And if this happens, then you need to prepare for expensive repairs. Therefore, do not let the engine overheat! During strong engine heating, the material from which the cylinder head is made and the block itself are usually different, and their degree of expansion is also different, which leads to displacement and curvature of the surface of the cylinder head and gasket.
Next, what you need to pay attention to are the bolts that secure the cylinder head. Or rather, not even the bolts themselves, but how they are tightened
When tightening the cylinder head bolts, it is very important not to overtighten them or tighten them too loosely. If you overtighten the bolts, then there is a risk that you can break the bolt, and then a crease in the bolt will remain in the cylinder head, which will have to be removed
You cannot leave it there, as the head will no longer press properly. And if you tighten the bolts loosely, then there is a high probability that a hole in the gasket may also occur through a loosely fitted head. Therefore, when installing the cylinder head, you need to use a torque wrench and tighten the gasket, having previously found out the tightening torque of the bolts specifically for your engine.
Well, one last thing
It is very important that the gasket is made from high-quality material in compliance with all production standards. If the gasket is of poor quality, then you cannot expect good performance from it.
After all, if it was made in an unknown place and by an unknown person, then it may soon either be shot or burn out. It is important to remember that it is better not to save on such spare parts, but rather to overpay, but buy a high-quality cylinder head gasket.
Replacing the cylinder head gasket on a Niva Chevrolet car
- We remove the battery wiring and drain the antifreeze.
- We free the carburetor from cables and hoses.
- We dismantle the controller with voltage wires.
- Carefully remove the starter screen and heater tube from the manifold.
- Remove the antifreeze temperature sensor.
- Remove the brake booster hose.
- Remove the hoses from the cooling system and heater.
- Disconnect the camshaft and valve levers.
- We dismantle the chain and secure it.
- We unscrew the fasteners and remove the cylinder head with the pipe, carburetor and manifold.
According to reviews from Chevrolet Niva owners, you need to pay attention to the following subtleties:
- you should buy a metal seal as it is more durable and of higher quality;
- If the head fastener does not unscrew, you need to tap it with a hammer - this way you will minimally damage the surfaces and the key will not turn.
As you can see, replacing a gasket is not an easy task; you can do it yourself only if you have good general technical knowledge, skills and abilities. Remember, this is still the engine, the main part of the car. Before you do this, study the engine diagram well, the features of your car, do everything slowly, preferably in the morning with a fresh mind, because replacing a gasket is a feasible thing, but it requires attentiveness, scrupulousness and accuracy.
Why does coolant mix with oil?
This is because the cooling and lubrication channels are usually quite close to each other. When the gasket or the head itself is damaged, the fluids in both circuits begin to mix with each other.
If oil gets into the cooling system, there is a risk of overheating. It's even worse if coolant gets into the oil. Then the risk of engine seizure increases significantly.
A healthy engine does not consume coolant at all. If the antifreeze level drops, there are no visible leaks and all pipes are sealed, then two options are possible. First, the gasket or head of the block is damaged. Second, the exhaust gas recirculation cooler has lost its tightness, which has been happening quite often lately. The symptoms will be the same in both cases.
Gasket and head problems do not always mean that the coolant will mix with the oil. Sometimes coolant does not enter the lubrication system, but into the cylinders. In this case, thick white smoke appears from the exhaust system. You cannot drive for such a long time, since a large amount of antifreeze in the cylinders threatens complete destruction of the engine as a result of water hammer. The fluid cannot be compressed, which places greater stress on the pistons, connecting rods and bearings.
It happens that the cylinder head gasket burns out in such a place that the coolant or oil simply begins to flow out of the engine, but mixing or entering the cylinders does not occur. The situation is not always easy to diagnose, since the coolant, in contact with hot engine parts, quickly evaporates. And a white coating, indicating a malfunction, may be hidden in nooks and crannies that are inaccessible to the eye.
Removing the cylinder head - work order
Before servicing, make sure that the hood lid stops are secure, put the car on the handbrake and block the wheels with shoes.
- Disconnect the battery and relieve pressure in the fuel rail.
- Unscrew the radiator expansion tank cap and drain the antifreeze.
- Carefully unscrew the throttle block mounting bolts, having first disconnected the throttle cable. We dismantle the unit as an assembly if it does not require maintenance. If the gasket is intact, it is not necessary to change it.
- We dismantle the pipes connecting the cooling jacket of the cylinder head and the radiator. First loosen the clamps.
- We open the connectors of the control cables of the injectors. Temperature may cause the fasteners to break off, so don’t apply too much force.
- Disconnect the connectors from the temperature sensors on the cylinder head.
- We pull off the caps of the high-voltage wiring from the spark plugs and simultaneously check the condition of the insulation.
- Disconnect the fuel supply and return lines. Before starting work, be prepared to catch any remaining fuel.
- Separate the intake pipe of the exhaust manifold. If necessary, replace the gasket with a new one.
- We dismantle the thermal protective screens.
- Loosen the timing chain tensioners and fix the chain itself to the gear using a wire.
- We unscrew the mounting bolts and remove the camshaft.
- Remove the levers pushing the valves.
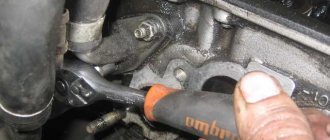
- Unscrew the cylinder head mounting bolts. Their location on engines 21213 and 21214 is similar.
- Carefully remove the cylinder block, starting from the front. The gasket remains on the lower block.
16. Place the block on a flat surface and remove the cooling system flanges. If the gasket is damaged, replace it.
Preventive maintenance and improvement of engine performance in the Niva car
Maintenance includes replacing the cylinder head gasket, cleaning oil passages, and lapping valves. At the same time, the camshaft is inspected for scoring and other wear. The choice of a spare parts manufacturer is a personal matter for the owner. However, such an important part as the gasket has different quality depending on the manufacturer.
When comparing the three options, the branded spare part turned out to be the poorest quality, there are no complaints about the Spanish model (it is the most expensive), and the golden mean is the Yegoryevsk consumables.
ATTENTION! Boring the block does not affect the gasket; there is no need to modify it. The order of tightening the cylinder head bolts is important.
It is failure to comply with this rule that most often leads to damage to the gasket during the assembly process. There are cases of rupture of jumpers, not to mention the violation of tightness due to pinching of the gasket. The sequence is shown in Fig.
The tightening torque of the cylinder head is also important.
The unit is installed in several stages, following the sequence:
- All bolts except 11, observing the order, are tightened with a torque of 20 N/m.
- Then, repeating the sequence, we tighten the same bolts with a torque of 69-85 N/m.
- We tighten bolt 11 in one pass, with a torque of 32-39 N/m
- We replace the torque wrench with a regular handle, and turn all the bolts 90°.
Cylinder head boring refers to mechanical tuning.
If you have the tools, you can do the work yourself. • We bore inlet and outlet flanges to a diameter of 34 mm. Figure 8
• Then, using sealant or plasticine, we align the flanges with the inlet holes, and mark the bore on the cylinder head. • Using the same cutter we machine the holes for the inlet and outlet channels.
• Then all that remains is to select and modify it to fit the new valve diameter.
By carrying out such work, you increase the power of the Niva SUV and torque at low speeds. This will help you drive confidently.
Bottom line: You should not be afraid of work that at first glance may seem difficult. With an average garage equipment, servicing and tuning the engine yourself will save the owner a lot of money.
How to disassemble a Chevrolet cylinder head
To find out why the cylinder head with which the Niva is equipped does not function properly, the said unit must be disassembled.
For this you will need:
- sets of spanner and socket wrenches, as well as a torque wrench;
- screwdriver set;
- sealant;
- coolant canister;
- fine-grained sandpaper.
Work on a Chevrolet is carried out in the following order:
- the car is placed on a ramp or pit (if you have just used the vehicle, then let the engine cool);
- do not forget to put the Niva on the handbrake and support it on both sides;
- disconnect the negative cable from the battery;
- drain the coolant from the radiator and the rest of the system;
- disconnect the drive levers from the valves and remove the hydraulic supports;
- remove the cable that drives the throttle valve from the holders;
- remove the camshaft along with the bearings;
- disconnect the hoses supplying lubricant to the Chevrolet hydraulic mounts;
- disconnect the connecting wires leading to the injectors, temperature sensors, throttle valve, idle speed and detonation;
- cut the plastic ties securing the mentioned Niva cables and move the latter;
- de-energize the spark plugs and, additionally, the temperature sensor;
- disconnect all pipes from the Chevrolet cylinder head - inlet and outlet, throttle, cooling system, adsorber, etc.;
- Only then turn off the fuel supply.
Torsion bolts (plastically deformable)
Part number: 21213-1003271-01-0. Name: Torx cylinder head bolt. This name (torsion bar bolts) is fundamentally incorrect, but what can you do if they are called that on all forums and in all stores. According to science, when they say torsion bar, they mean deformation from twisting. And in this case, tensile deformation. In stores, these bolts are also called cylinder head bolts for Niva Chevrolet or cylinder head bolts of a new type. I also came across the name torx or chamomile. These bolts, unlike hardened ones, provide a constant load. That is, in a very primitive way we can talk about the grommet effect, that is, about the constant force to compress the cylinder head gasket in the axial direction of the bolt. These bolts are widely used on imported engines because they avoid human factor errors. In fact, you don't need to tighten with the precision of a torque wrench. The final values are taken as angular values. I don’t really like this approach, but such things are now commonly called “assembly guarantee”.
Cylinder head tightening torque on ZMZ engines.
ZMZ engines are represented by modifications ZMZ-402.5, ZMZ-402.6, ZMZ-4061, ZMZ-4063, ZMZ-40522, ZMZ-40524. The cylinder head tightening torques for these engine models have different values.
Tightening torque of the cylinder head (cylinder head) on 402 engines (GAZELLE), modifications of ZMZ-4025,4026 engines.
| Detail | Thread | Tightening torque, Nm (kgf*m) |
| Cylinder head nut | — | 85-90 (8,5-9) |
| Rear cylinder head cover bolt | — | 11-16 (1,1-1,6) |
| Cylinder head cover bolt | — | 4,5-8 (0,45-0,8) |
Table No. 10. Tightening torque of the cylinder head (cylinder head) of ZMZ 4025 and ZMZ-4026. Tightening torque of the cylinder head (cylinder head) on 406 engines, modifications ZMZ-4061, ZMZ-4063, ZMZ-40522.
| Detail | Thread | Tightening torque, Nm (kgf*m) |
| Cylinder head bolt | — | 1) Pre-tightening: 69-82(6.9-8.2); 2) Hold for at least 1 minute 15 seconds - and final tightening - Turn to an angle of 70-75 degrees. |
Table No. 11. Tightening torque of the cylinder head (cylinder head) ZMZ-4061, ZMZ-4063, ZMZ-40522. Tightening torque of the cylinder head (cylinder head) on 405 and 405 Euro3 engines, modification ZMZ-40524.
| Detail | Thread | Tightening torque, Nm (kgf*m) |
| Cylinder head bolt | — | 1) Pre-tightening: 40-50(4.0-5.0); 2) Hold for at least 1 minute 15 seconds - and final tightening - Turn to an angle of 90 degrees. |
Table No. 12. Tightening torque of the cylinder head (cylinder head) ZMZ-40524. Tightening torque of the cylinder head (cylinder head) on ZMZ-409 engines.
| Detail | Thread | Tightening torque, Nm (kgf*m) |
| Cylinder head bolt | — | 1) Pre-tightening: 40-60(4.0-6.0); 2) final tightening: 130-145 (13.0-14.5) |
Table No. 13. Tightening torque of the cylinder head (cylinder head) ZMZ-409.
The sequence of tightening the cylinder head bolts is shown in the figure.
Tightening torque for GAZ-53 cylinder head.
| Detail | Thread | Tightening torque, Nm (kgf*m) |
| Cylinder head nuts | — | 77-82 |
Table No. 14.
Tightening torque of the cylinder head (cylinder head) of GAZ-53. Tightening torque of the KAMAZ-740 cylinder head The tightening torque on the KAMAZ-740.10, KAMAZ-7403.10 or KAMAZ-740.11-240 engines is the same and is shown in table No. 15.
| Detail | Thread | Tightening torque, Nm (kgf*m) |
| Cylinder head bolts | M16 | 157 — 176 (16 — 18) |
Table No. 15.
Tightening torque of the cylinder head (cylinder head) of KAMAZ-740. There are no similar entries.
Diagnostic methods
When direct or indirect signs are detected, a new task arises for the car owner. He needs to figure out how to check the cylinder head gasket for a breakdown.
There are several methods in total. Moreover, the diagnostics are quite simple and can be used in garage conditions. Experience does not play a key role here, since even novice motorists can cope with the task.
If you are interested and need to know how to check whether the cylinder head gasket on a car engine has been broken, perform the following manipulations. Any of the presented methods is suitable for obtaining an accurate answer regarding the integrity and current condition of the seal between the block and the head.
- Visual inspection. The simplest option is how you can determine for yourself that the cylinder head gasket on the engine is broken or worn out. There is no specific and strict algorithm of actions here. The malfunction is determined simply by visual observation. First you need to start the engine, open the hood and take a closer look at the area where the block and head connect. If even a small amount of smoke comes out through the cracks, there is a problem. You can also listen to the behavior of the motor, which may begin to produce uncharacteristic ringing sounds.
- Checking the radiator and coolant expansion tank. It is also necessary to check the neck, with the help of which new engine oil is filled as part of scheduled maintenance. The method is also visual. Just unscrew all the caps and look at them carefully. Don't forget to look inside the tank. If coolant has penetrated into the engine, you will see a characteristic red emulsion on the oil filler cap. If the oil is in the antifreeze, then oily spots will appear on the radiator cap or expansion tank.
- Exhaust pipe monitoring. Start the engine. You can ask an assistant to rev the throttle a little to increase the volume of smoke coming out of the exhaust pipe. If you see white smoke coming out, which is actually steam, there is probably a problem with a broken gasket. When using antifreeze, white smoke with a characteristic sweet tint usually comes out of the pipe. Additionally, look into the coolant expansion tank. If the level gradually drops, then you have probably diagnosed a gasket failure. Although the sign is considered indirect.
- Checking the presence of exhaust in the cooling system. To do this, you can use one of 2 methods. The first method involves unscrewing the cap on the radiator or expansion tank. If there is active seething inside, this is a bad sign. The second method is to use a balloon or a regular condom. The product is pulled onto the neck of the tank, having first removed the lid. Then the engine starts at a speed of about 3-5 thousand per minute. If the balloon or condom inflates (quickly or slowly), a leak has occurred. This means that the gasket will need to be replaced in the near future.
All methods have been used for decades, but continue to be effective, simple and quite accurate. Yes, you can spend extra money and go to a car service for diagnostics. But in order to save money, it is better to determine the fault yourself, and then entrust the replacement to specialists or do everything yourself.
Replacing the gasket yourself is potentially complex and difficult to do without the appropriate experience and special tools. Also, you should not trust garage service stations that do not have a license. Here it is better to spend more money, but put the car in the safe hands of specialists who will provide guarantees for the work performed.
Signs that the cylinder head gasket has blown
The purpose of the cylinder head gasket is to ensure tightness and prevent gases from penetrating from the cylinders back up into the engine compartment, as well as mixing coolant, engine oil and fuel with each other. In a situation where the cylinder head gasket is punctured, the seal of the block is compromised. The following signs will tell the car owner about this:
Why does the cylinder head gasket break?
In most cases, the reason why problems arise with the cylinder head gasket is simple overheating. Because of it, the block cover may “lead”, and the plane along which the gasket adheres to two contacting surfaces will be disrupted. As a result, depressurization of the internal cavity occurs with all the ensuing consequences. It is mainly aluminum heads that change their geometry. Cast iron is not subject to such malfunctions; they are more likely to crack than to bend, and only in the most extreme cases.
Scheme for pulling cylinder head bolts on VAZ “classics”
Also, due to overheating, the gasket can heat up to temperatures at which it changes its geometry. Naturally, in this case depressurization will also occur. This is especially true for iron-asbestos gaskets.
Another reason is a violation of the tightening torque of the bolts. Both very large and small torque values have a detrimental effect. In the first case, the gasket may collapse, especially if it is made of low-quality materials. And in the second, exhaust gases pass out without obstructing them. In this case, gases together with atmospheric air will have a detrimental effect on the gasket material, gradually destroying it. Ideally, the bolts should be tightened using a dynamometer that shows the torque value; in addition, the sequence of their tightening should be observed. Help information about this can be found in the manual.
As a rule, the tightening sequence is to tighten the central bolts first, and then the rest diagonally. In this case, twisting occurs in stages. In particular, in VAZ cars of “classic” models, the torque step is 3 kgf. That is, all bolts in the specified sequence are tightened to 3 kgf, after that they are tightened to 6 kgf, and to 9.10 kgf.
And the most obvious reason is the poor quality of the material from which the gasket is made. Everything is simple here. Try to buy products from trusted stores. When choosing, you must be guided by the “golden mean” rule. The gasket, of course, is inexpensive, so you shouldn’t overpay, nor should you buy downright cheap garbage. The main thing is that you are confident in the store where you are making a purchase.
It is also possible that the head gasket burned out simply from wear and tear of the material, because everything has its own service life.
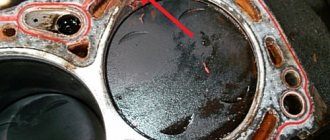
Examples of cylinder head gasket breakdown locations
Also, sometimes the reasons for the operation of the gasket are problems with disruption of the fuel combustion process (detonation, glow ignition). The cylinder head suffers greatly due to overheating. Cracks may appear in it, which will also lead to depressurization of the described systems. The head is usually made of aluminum. And when heated, it expands faster than steel bolts. Therefore, the head begins to put significant pressure on the gasket, and it experiences overload. This leads to hardening of the gasket materials, which in turn causes depressurization.
Often when a gasket fails, it burns along the surround or between the cylinders. In this case, erosion of the surface of the cylinder block and the surround itself often occurs near the damage. A change in the color of the gasket material near the surround may also indicate high temperature in the combustion chamber. To eliminate the problem, it is often enough to set the correct ignition angle.
It is important for the driver to understand the difference between the concepts of “breakdown” and “burnout” of the gasket. Breakdown in this case implies significant damage to the surface of the gasket or its individual elements
In this case (and most often this is what happens), the driver is faced with a burnout. That is, minor damage occurs, which is sometimes even difficult to find on the gasket. However, they are the ones who cause the unpleasant situations listed above.
When should you change the cylinder head gasket?
Such work will have to be done when the gasket is damaged. These could be cracks or holes in the gasket. If damaged, the car owner will observe the appearance of air in the cooling system . This will also be indicated by the bubbling of antifreeze.
Crack in the cylinder head gasket.
You will also need to change the gasket when there is not enough compression in the combustion chamber. In this case, the gasket may simply wear out and will no longer be able to perform its functions. Also, when cracks appear, antifreeze will enter the combustion chamber, which will lead to unstable engine operation.
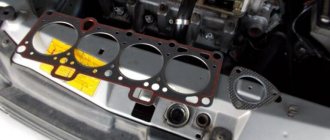
The cylinder head gasket on the Shniva burned out.
In all of the above cases, replacing the gasket will be simply necessary . If you do not replace it in time, the consequences can be dire.
Video about the signs of a broken cylinder head gasket in a Niva Chevrolet
Quick replacement of the timing chain on a Chevrolet Niva
Recently, an old friend of mine came to see me in his old Chevrolet Niva with the characteristic sound of an extended chain.
In addition to the timing kit, I had the foresight to purchase even a front cover gasket, a crankshaft oil seal and a kilo of marinated meat. I could not refuse such an offer. So, Niva Chevrolet replaced the timing chain and front crankshaft oil seal.
First, let the engine cool to an acceptable temperature. Remove the pipe by unscrewing the bolt by 10 and loosening the clamps.
Next, we unscrew the eight nuts by 10 and move aside the throttle cable and all the pipes that will interfere with us, remove the valve cover.
Remove the air conditioner belt by unscrewing the bolt 13 of the tension roller.
Then loosen three 13mm nuts and one bolt of the generator belt tension roller and remove it.
Now comes the fun part. To unscrew the pulley nut, we need a 38mm socket. Since the elongated head does not fit under a regular wrench (the radiator is in the way, but we don’t want to remove it), we use a pry bar, carefully sawed off from the hub key of some large car.
Everything fits perfectly. Unscrew the nut and remove the crankshaft pulley.
Unscrew the deflection roller.
We dismantle the reinforcing plate.
We unscrew the six nuts securing the front timing chain cover to the block and the three bolts securing it to the pan and remove it.
Set the top dead center. The key on the crankshaft should align against the mark on the block.
The mark for the camshaft sprockets is against the ebb of the camshaft housing.
Next, unscrew the oil supply pipe and two nuts 10 of the chain tensioner.
Next, unscrew the tensioner shoe, damper and remove the timing chain.
Compare the new and old timing chain. It could be worse.
New timing kit.
Reinstall the chain, guide and tensioner shoe. We tighten the chain by hand and check that the marks match.
To make it convenient for us to check the marks after installing the front timing cover, we find the factory mark on the crankshaft pulley and mark it with a white marker. This mark at TDC should be opposite the center of the crankshaft sensor.
We install the front cover, crankshaft pulley and tensioner. Let's check the marks again. We install all the removed parts in the reverse order of removal. Fill with fluids, start the engine and enjoy.
Block plane and gasket penetration
Loosen the fastening clamp and disconnect the hose of the lower thermostat pipe. Loosen the fastening clamp and disconnect the hose of the thermostat side pipe. Loosen the fastening clamp and disconnect the fluid supply hose to the heater radiator from the cylinder head pipe.
Unscrew the nuts of the fuel pipes and disconnect the fuel supply and drain lines. Remove the upper bolt securing the rear intake pipe strut, loosen the lower bolt of the strut and move it to the side.
Torsion bolts (plastically deformable)
Remove the two nuts securing the starter heat shield. Move the shield to the side. Remove the chain from the camshaft sprocket. Carefully place it on the tensioner shoe.
Tips for choosing gasket material
The question often arises which cylinder head gasket is better to use - metal or paronite. In fact, there are three options on sale, and each has its own characteristics:
- The difference between iron cylinder head gaskets is their high strength and wear resistance. They are durable, distribute the load evenly, but they are expensive and this option is not sold for many models.
- Paronite cylinder head gaskets are distinguished by fire resistance and elasticity. In the most important places they are reinforced with metal elements. At the same time, their properties deteriorate over time. The products are afraid of temperature changes and emit harmful asbestos.
- Non-asbestos or composite options are a modern solution characterized by strength, good fit and long service life. They are also reinforced with metal where necessary, making this type the most preferred type today.
There is no point in choosing between paronite or metal; it is much easier and cheaper to take the composite option, which has almost no disadvantages. If installed correctly it will last for many years.
Finding out that the cylinder head gasket is broken is much easier than it seems at first glance. If you know the main signs and check according to the recommendations of specialists, then in 99% of cases the car owner will be able to determine the problem on his own. The main thing is to replace the gasket in time.