Do-it-yourself removal and replacement of front-wheel drive VAZ 2110, 2111, 2112
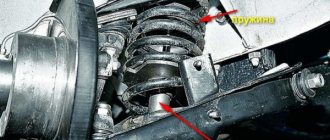
Since our roads are not yet impeccable and in some places are simply unrecognizable, we recommend checking the suspension more often for faults and damage.
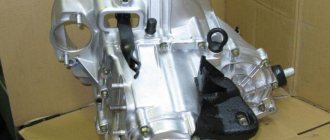
If you suddenly begin to notice a crunching sound when hitting bumps in the road, then it will be useful for you to learn how to remove and replace the front drives of a VAZ 2110, 2111, 2112 with your own hands. You will need: new front drives (drive shaft assembly), a set of keys, a pry bar, a hammer, a wooden block, lubricant, a lift, gearbox oil.
It is important to know! Before starting work, it is necessary to drain the oil from the gearbox.
After the gearbox oil has been completely drained, loosen the hub nut.
Then we remove the wheel, then remove and hang the brake caliper.
Completely unscrew the hub nut and steering knuckle. Next, we take out the outer CV joint.
Let's pry at the inner CV joint with a pry bar and pull it out.
We recommend replacing a couple of drives at once, so we will replace the old CV joint to secure the shafts.
We take a new drive and install the retaining ring.
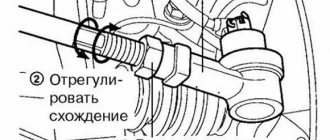
We drive the new drive into the gearbox. For convenience, we use a hammer and a wooden block. Repeat with the opposite wheel. We assemble the suspension, fill the gearbox with oil and do not forget to do the wheel alignment upon completion of the work.
Source
Removing the axle shafts
It should be noted that if for one reason or another it is necessary to remove both front axle shafts of a VAZ 2110 at the same time, then it is necessary to prepare the old internal joint in advance. It must be inserted into the technological hole in the gearbox instead of one of the drives immediately after dismantling, because after simultaneously removing both axle shafts from the box, the differential gears shift. As a result, it becomes simply impossible to install the drives in their proper places without disassembling the gearbox.
Before removing the axle shafts, you must drive into a pit or lift. If the work will be carried out in a pit, then you should secure the VAZ 2110 with the hand brake, place stops under the rear wheels and engage neutral gear. After this, you need to disconnect the terminals from the battery, remove the crankcase protection and drain the transmission oil from the gearbox. Then you can begin the main work. Algorithm of actions.
- First, while the car is on the ground, you need to loosen the hub nut, and then loosen it and the bolts securing the wheels.
- Next, you need to lift the desired side of the car with a jack, unscrew the wheel bolts, remove the wheel and only then unscrew the wheel nut.
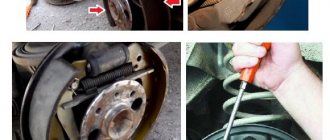
- Then you need to disconnect the wire going to the pad wear sensor, remove the brake hose seal from the bracket, loosen the hose tip on the working cylinder, bend back the lock washers, unscrew the caliper mounting bolts and remove it together with the pads.
- Next, unscrew and remove 2 bolts securing the shock absorber strut to the steering knuckle, or 2 bolts securing the ball joint.
- After this, you need to release the fist and pull the shank of the outer hinge out of the hub.
- All that remains is to remove the opposite end of the axle shaft from the gearbox; this is easiest to do using a pry bar.
It is worth noting that you need to pull out the drive smoothly, without strong jerks, holding it with one hand. Installation of the axle shaft is performed in reverse order. After completion of the work, the wheel alignment should be re-set.
Removal and installation of front wheel drives VAZ 2110, VAZ 2111, VAZ 2112, Lada Ten
We carry out the work on an inspection ditch or a lift.
EXECUTION ORDER
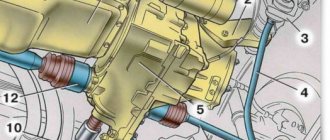
Drain the oil from the gearbox (see Changing the gearbox oil). We remove the mudguard of the VAZ 2112 engine (see Removing the engine mudguard). Unscrew the front wheel bearing nut (see Replacing the front wheel bearing). We unscrew the two bolts securing the ball joint (see Removing the ball joint).
We move the steering knuckle with the stand to the side and remove the drive from the VAZ 2111 hub.
Having placed the drive on the stretch...
...and leaning the mounting blade on the boss of the VAZ 2110 clutch housing, we push the inner joint housing out of the gearbox.
Be careful not to damage the protective ring on the inner joint housing.
Remove the right drive.
We use a screwdriver to pry up the retaining ring, with the help of which the drive is fixed in the VAZ 2111 gearbox...
...and remove it from the splined end of the inner joint housing.
If you need to dismantle the second drive or remove the gearbox, you must install a plug in the hole that approximately follows the shape of the shank of the internal joint housing. To do this, you can use a wooden plug.
We dismantle the left drive in the same way as the right one. In this case, it is convenient to rest the mounting blade on the wheel mounting bolt inserted into the recess of the gearbox housing.
We press out the inner joint housing and remove the left drive of the VAZ 2112.
When installing the drive, it is advisable to replace the retaining ring on the shank of the internal hinge housing with a new one.
We insert the shank of the inner joint housing into the hole in the VAZ 2110 gearbox and drive it to the place by pushing the entire drive or tapping the end of the outer joint with a copper hammer.
How to remove the drive of a VAZ 2110 – 2110, 2111, 2112 | ,
Wear of the hinges is caused by sand and dirt getting into the internal parts of the CV joint, when the rubber boots rupture.
We carry out the work on an inspection ditch or a lift.
To do this, remove the engine splash guard:
Using a 10mm socket, unscrew the five nuts for the front fastening of the mudguard to the body.
Use a 10mm wrench to unscrew the screws on the front plastic shield.
Using a 10mm wrench, unscrew the screws for the rear fastening of the plastic shield
Using a 10mm wrench, unscrew the two bolts securing the mudguard to the side members
To do this, drain the oil from the gearbox, use a 17 key to unscrew the plug and drain the oil into a container (volume - 4 l).
After draining the oil, screw the plug back in
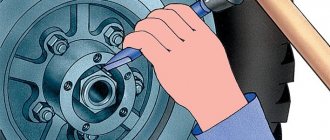
We unscrew the front hub bearing nut, to do this we remove the hub cap
Use a narrow chisel to straighten the dented collar of the nut.
We lock the rear wheels with the handbrake, engage first gear and place shoes under the wheels.
Use a 30mm socket to loosen the hub bearing nut.
Loosen the wheel mounting bolts.
We hang up the front of the car and remove the wheel.
Unscrew the two ball joint mounting bolts
We move the steering knuckle with the stand to the side and remove the drive from the hub.
Having placed the drive on the stretch...
Resting the mounting blade on the clutch housing boss, we push the inner joint housing out of the gearbox.
Be careful not to damage the protective ring on the inner joint housing.
Remove the right drive.
Use a screwdriver to pry up the retaining ring, which secures the drive in the gearbox.
...and remove it from the splined end of the inner joint housing.
If you need to dismantle the second drive or remove the gearbox, you must install a plug in the hole that approximately follows the shape of the shank of the internal joint housing.
To do this, you can use a wooden plug.
We dismantle the left drive in the same way as the right one.
In this case, it is convenient to rest the mounting blade on the wheel mounting bolt inserted into the recess of the gearbox housing.
Press out the inner joint housing and remove the left drive.
When installing the drive, it is advisable to replace the retaining ring on the shank of the internal hinge housing with a new one.
We insert the shank of the inner joint housing into the hole in the gearbox and drive it to its place by pushing the entire drive or tapping the end of the outer joint with a copper hammer.
Tightening torques for main threaded connections when replacing drives:
— hub bearing nut 225.6–247.2 Nm (23–25.2 kgf∙m);
— bolt securing the ball joint to the steering knuckle 49–61.74 Nm (5.0–6.3 kgf∙m);
— wheel mounting bolt 65.2–92.6 Nm (6.65–9.45 kgf∙m).
Removal and replacement of VAZ 2110, 2111, 2112 drives
Good afternoon. Today a VAZ 2110 pulled into our pits with a terrible crunch. According to the owner, this started after he ran into a hole. After we raised the car on a lift, we noticed that the drive was bent. And from the bent drive, both CV joints, internal and external, were broken. It was decided to buy the drive assembly and replace it. In this article we will tell you how to replace the front wheel drives of VAZ 2110, 2111, 2112. These instructions are suitable for cars of all years of manufacture.
Functionality check
The condition of the inner and outer CV joints should be examined separately, since the procedures and signs are somewhat different.
External grenade
Grenade If you want to verify that the outer CV joint is faulty, do the following:
- When starting from a standstill, deliberately create jerks, but not strong ones;
- Try to accelerate sharply and slow down;
- Move the shaft transversely between the CV joints. If you feel any play, then the grenade is definitely worn out.
Internal grenade
But to understand whether an element really needs to be replaced, do this:
- Raise the drive wheels, which will allow you to bring the inner CV joint to its maximum angle;
- Start the engine;
- Turn on first speed;
- If the hinge is at the limit of wear, you will hear a characteristic crunch. This is a signal that you need to change the grenade.
Inner CV joint VAZ 2110 - step-by-step do-it-yourself replacement instructions
Before you begin work on replacing the internal CV joint of the VAZ 2110 yourself, you need to prepare everything.
To do this, you need to secure the car, turn on 4th gear, and tighten the handbrake. Secure the rear wheels with wheel chocks. If they are not available, use bars of a similar shape. Remove the protective cap, unscrew the hub nut using an “arm” (extension) - a pipe or a pry bar. After the hub nut is removed, unscrew the wheel mounting bolts.
Let's move on to step-by-step instructions:
- Using a jack, hang up the wheel on which the CV joint is supposed to be replaced.
- Unscrew the bolts to remove the thrust washer of the hub nut.
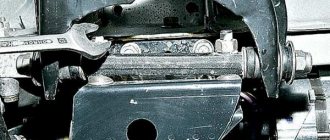
Using a pry bar, remove the inner joint from the gearbox.
Removing and replacing front wheel drives on a VAZ 2110
Front wheel drives are the parts that literally allow the car to move. The drives are removed when replacing CV joints (“grenades”) and when dismantling the gearbox. The wheel drive can be damaged, bent, as a result of driving into a deep hole at high speed or any similar physical impact. Next, we will look at how to remove and replace front wheel drives on a VAZ 2110 and its modifications.
1. First, drain the gearbox oil. To do this, use a 17 key to unscrew the plug shown in the photo.
The box contains approximately 4 liters of oil. Prepare a clean container of this volume in advance. Then tighten the cap.
2. The second step is to unscrew the front wheel bearing nut (Replacing the front wheel bearing)
3. Then remove a couple of ball joint bolts. (Replacement of ball joint VAZ 2110)
4. Move the steering knuckle to the side and remove the drive from the hub and place it on the stretcher.
5. Using a spatula as a lever, push the inner joint housing out of the gearbox. Do not damage the inner joint protective ring.
6. Now you can completely remove the right drive. 7. Pry up the retaining ring that secures the drive in the gearbox and remove it. 9. If you need to remove the left drive or gearbox, you need to put a plug in the hole in shape and size, similar to the shank of the internal joint housing. 10. The left drive is removed in the same way as the right one.
Useful : For convenience, the mounting blade can be rested on the wheel mounting bolt, which is inserted into the recess of the gearbox housing.
11. Press out the inner joint housing and remove the left drive.
IMPORTANT : When installing the front wheel drive, the retaining ring on the shank of the inner joint housing must be replaced with a new one.
12. Insert the shank of the inner joint housing into the hole in the gearbox and push it into place by pushing the entire drive, or by hitting the end of the outer joint with a copper hammer.
Source
Removing and replacing front wheel drives VAZ-2110
We move the steering knuckle with the stand to the side and remove the drive from the hub.
Having placed the drive on the stretch...
...and leaning with the mounting blade on the lug of the clutch housing, we push the inner joint housing out of the gearbox.
Be careful not to damage the protective ring on the inner joint housing.
Remove the right drive.
Use a screwdriver to pry up the retaining ring, which secures the drive in the gearbox...
...and remove it from the splined end of the inner joint housing.
If you need to dismantle the second drive or remove the gearbox, you must install a plug in the hole that approximately follows the shape of the shank of the internal joint housing. To do this, you can use a wooden plug.
We dismantle the left drive in the same way as the right one. In this case, it is convenient to rest the mounting blade on the wheel mounting bolt inserted into the recess of the gearbox housing.
When installing the drive, it is advisable to replace the retaining ring on the shank of the internal hinge housing with a new one.
We insert the shank of the inner joint housing into the hole in the gearbox and drive it to its place by pushing the entire drive or tapping the end of the outer joint with a copper hammer.
Tuning and repair of VAZ 2110
In this article we will look at how to remove and reinstall the front wheel drives of a VAZ 2110.
It is more convenient to carry out this type of repair on an inspection hole or overpass.
- Transmission oil needs to be drained
- Now you should remove the mudguard from the engine.
- Unscrew the bearing nut from the front hub.
- Unscrew the bolts on the ball joint (2 pcs.)
5. Move the steering knuckle and the strut slightly to the side and remove the drive from the hub.
6. Place the drive on the stretcher.
7. Use a mounting spatula to rest against the clutch housing and pull the inner joint housing out of the gearbox. Be careful not to damage the protective ring on the inner hinge.
8. We remove the right drive.
9. Use a knife or screwdriver to pry up the retaining ring on the splined end of the inner hinge housing and remove it.
Removing the front wheel drives of a VAZ-2110 car
We remove the drives to replace them or when dismantling the gearbox. Repair or replacement of the drive is required if there are knocking noises when cornering or increased vibration that occurs when the joints wear out. Wear of the hinges is caused by sand and dirt getting into the internal parts of the CV joint, when the rubber boots rupture.
We carry out the work on an inspection ditch or a lift.
To do this, remove the engine splash guard:
Using a 10mm socket, unscrew the five nuts for the front fastening of the mudguard to the body.
Use a 10mm wrench to unscrew the screws on the front plastic shield.
Using a 10mm wrench, unscrew the screws for the rear fastening of the plastic shield
Using a 10mm wrench, unscrew the two bolts securing the mudguard to the side members
To do this, drain the oil from the gearbox, use a 17 key to unscrew the plug and drain the oil into a container (volume - 4 l).
After draining the oil, screw the plug back in
We unscrew the front hub bearing nut, to do this we remove the hub cap
Use a narrow chisel to straighten the dented collar of the nut.
We lock the rear wheels with the handbrake, engage first gear and place shoes under the wheels.
Use a 30mm socket to loosen the hub bearing nut.
Loosen the wheel mounting bolts.
We hang up the front of the car and remove the wheel.
Unscrew the two ball joint mounting bolts
How to remove the front wheel drive of a VAZ-2110 car
We remove the drives to replace them or when dismantling the gearbox. Repair or replacement of the drive is required if there are knocking noises when cornering, increased vibration that occurs when the joints wear out
Wear of the hinges is caused by sand and dirt getting into the internal parts of the CV joint, when the rubber boots rupture.
We carry out the work on an inspection ditch or a lift.
To do this, remove the engine splash guard:
Using a 10mm socket, unscrew the five nuts for the front fastening of the mudguard to the body.
Use a 10mm wrench to unscrew the screws on the front plastic shield.
Using a 10mm wrench, unscrew the screws for the rear fastening of the plastic shield
Using a 10mm wrench, unscrew the two bolts securing the mudguard to the side members
remove the mudguard
To do this, drain the oil from the gearbox, use a 17 key to unscrew the plug and drain the oil into a container (volume - 4 l).
After draining the oil, screw the plug back in
We unscrew the front hub bearing nut, to do this we remove the hub cap
Use a narrow chisel to straighten the dented collar of the nut.
We lock the rear wheels with the handbrake, engage first gear and place shoes under the wheels.
Use a 30mm socket to loosen the hub bearing nut.
Loosen the wheel mounting bolts.
We hang up the front of the car and remove the wheel.
Unscrew the two ball joint mounting bolts
We move the steering knuckle with the stand to the side and remove the drive from the hub.
Having placed the drive on the stretch...
Resting the mounting blade on the clutch housing boss, we push the inner joint housing out of the gearbox.
Be careful not to damage the protective ring on the inner joint housing.
Remove the right drive.
Use a screwdriver to pry up the retaining ring, which secures the drive in the gearbox, and remove it from the splined end of the internal joint housing.
If you need to dismantle the second drive or remove the gearbox, you must install a plug in the hole that approximately follows the shape of the shank of the internal joint housing.
To do this, you can use a wooden plug.
We dismantle the left drive in the same way as the right one.
In this case, it is convenient to rest the mounting blade on the wheel mounting bolt inserted into the recess of the gearbox housing.
Press out the inner joint housing and remove the left drive.
When installing the drive, it is advisable to replace the retaining ring on the shank of the internal hinge housing with a new one.
We insert the shank of the inner joint housing into the hole in the gearbox and drive it to its place by pushing the entire drive or tapping the end of the outer joint with a copper hammer.
Tightening torques for main threaded connections when replacing drives:
— hub bearing nut 225.6–247.2 Nm (23–25.2 kgf∙m);
— bolt securing the ball joint to the steering knuckle 49–61.74 Nm (5.0–6.3 kgf∙m);
— wheel mounting bolt 65.2–92.6 Nm (6.65–9.45 kgf∙m).
Replacing the VAZ 2110 drive with your own hands
For the second time in two years, the short drive on a VAZ 2110 breaks off, and what’s most interesting is at the same intersection. The first time the drive jumped out, and the edge of the drive where the corkscrew ring was placed was torn off, and the last time, the drive was cut off at the support ring. In both cases, the drive broke off in the internal grenade.
When I first replaced the drive, many problems arose, the most difficult was getting the grenade out of the box. At that time, I did not know that it was easy to disassemble the grenade without removing it from the box and remove a piece of the drive. Therefore, I had to suffer, but the grenade did not lend itself to assembly or a chisel, somehow I took out a fragment from the grenade, assembled the drive and inserted it into the grenade. Checking the reliability of the installation of the drive inserted into the grenade, I sharply pulled the end of the drive and, lo and behold, the grenade came out of the box with ease.