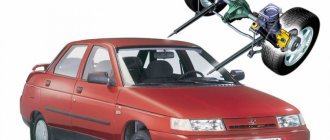
Do-it-yourself wheel alignment on a VAZ 2112. Taxi Bolt
You can adjust the wheel alignment angles of your car with your own hands, using available tools and ordinary tools. In this material we will tell you how to do wheel alignment without the help of others at home, and what difficulties are encountered in most cases when adjusting wheel alignment angles.
Incorrect wheel alignment adjustment may be a prerequisite, for example, for rapid wear of tires, or for the fact that when driving in a straight line the car will steer to the left or to the right. At the end of this article you will find a video that carefully explains and shows everything you need to know about wheel alignment.
First, let's look at the theory: wheel alignment. What is this? What are the wheel alignment angles and how does the car’s behavior on the road depend on them? Wheel alignment. What is this anyway?
Destruction. This is the angle between the vertical and the plane of the wheel. It ensures reliable contact of the tire with the road (see picture above). Convergence. This is the angle between the direction of movement and the plane of rotation of the wheel. The stability of the car in corners and tire wear depend on it.
In rear-wheel drive vehicles, the wheels should be slightly pointed towards each other. this is called positive toe. When moving, they move apart and become parallel. For front-wheel drive. on the contrary, the toe should be negative (see diagram below).
Custer. this is the longitudinal inclination angle of the kingpin. This parameter very rarely needs to be adjusted, only on a newly assembled front suspension made from new parts, so we will NOT consider its adjustment.
Repairing the suspension or steering control (replacing the same shock absorbers or control joint) leads to a significant change in the mounting angles of the wheels. Everyday operation of the car also makes adjustments to these characteristics over time, so from time to time there is a need to adjust the wheel alignment.
It is ideal to adjust the wheel alignment twice a year, during seasonal tire changes. During this period of time, you will fall into a hole more than once or run over a curb, causing the chassis to become loose and the angles to change. Timely alignment adjustment will cost much less than a set of new tires.
In 1955, South American engineer Lee Hunter developed the first wheel alignment control panel. Sensors mounted on the wheels sent focused beams of light and accurately measured angles. That's why the shield was called optical. But already in 1969 it was connected to a computer, and in 1995, 3D technology was used for the first time to measure and adjust angles.
True, Russian car owners drove without any shields or computers. Using wrenches, calipers, a whine and a plumb line, they adjusted the camber and toe angles with their own hands. Note on how to adjust the wheel alignment yourself
Before you begin adjusting the camber and toe angles, you absolutely need to check the car's chassis. If repairs are needed, then doing a wheel alignment is stupid. Steering and suspension must be in perfect order.
Pay attention to three points on which the wheel alignment angles on a car very much depend: the serviceability of the chassis (more about diagnosing the car suspension) Tire pressure. Loading the car.
Before adjusting the wheel alignment, be sure to check the pressure in the tires and make sure that you have NOT accidentally left a couple of bags of potatoes or cement in the trunk :) As an example, we will describe how to do a wheel alignment with your own hands on a VAZ 2109 car.
Adjusting the camber angle of the wheels.
The camber angles are adjusted in the following order (We remind you that in our case the actions are described for a VAZ 2109 car):
Before adjusting the camber, the car must be parked on a level surface. We put two vertical marks along the diameter of the wheel rim with chalk. one on top, the other on bottom. We apply a cord with a plumb line to the wing, and along the marks with a ruler or caliper we measure the distance from the rim to the cord at the top mark, and then at the bottom.
The difference should be ± 3 mm. The rim may NOT be flawless, so it is better to roll the car, turn the wheel 90 °, and make 2 more vertical marks. Again we produce frozen.
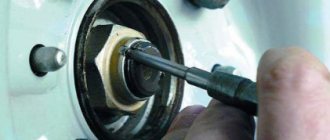
Do the same on the second wheel and write down the result. Then turn the car 180° and again take measurements, write them down and compare them. Then remove the wheel and, using 2 19mm wrenches, loosen the two bolts securing the shock absorber strut bracket to the steering knuckle.
Move the steering knuckle with a wrench to 19 due to the eccentricity of the bolt head inward or outward to the required distance, thus achieving the desired camber angle. Tighten the bolts, put the wheel in place, lower the car and rock it a couple of times, pressing on the fender. Take measurements.
On rear-wheel drive cars, the camber angle should be within 1/3 mm, and on front-wheel drive cars, the usual range is 1 to 1 mm. Adjusting the wheel toe angle
To adjust the angle of convergence, it is most convenient to take measurements using a special telescopic ruler with a scale (look at the photo above). It is more convenient to work in a pit. The steering wheel should be in a straight-ahead position.
Before adjusting the toe, make one mark on the inside of the wheels with chalk on the left and right tires as close as possible to the rims. Having created a preparatory tension in the ruler, install it, resting its ends against the intended points so that its body does not touch the body parts and suspension. Shake the ruler a little, and on the moving scale combine “zero” with the fixed pointer.
Lock the scale. Carefully Roll the car forward so that the ruler together with the wheels moves backwards, but does not touch the suspension and body parts. Check the readings.
If on a VAZ 2109 the distance between the wheels at the rear is less than at the front, then the control rods need to be shortened, and if it is longer, then. lengthen
Using a 27 wrench, loosen the locknut on the control rods. Nuts with marks on the edges have a left-hand thread. Using a 24mm wrench, rotate the coupling to configure the length of the pull.
Don’t forget: Watch the horizontal position of the steering wheel spokes. Place the moving scale on the ruler to adjust the toe to “zero” and roll the car back. With readings from 1 to 1 mm, you can complete the adjustment of the toe angle.
Look in turn from the side of each front wheel to the alignment of each rear wheel. With the steering wheel spoke horizontal, you will simply see that there is either no displacement of both wheels to the left or to the right. If the displacement is noticeably obvious, then by unscrewing one rod and tightening the other by the same number of turns, correct the displacement.
READ What Benefits Removing the Catalyst from a Car
After adjusting the wheel alignment yourself, it’s worth thinking about which wheels to choose: stamped or cast? It is believed that cast wheels significantly reduce the load on the suspension, while stamped ones. more comfortable.
You can adjust the wheel alignment angles of your car with your own hands, using available tools and ordinary tools. In this material we will tell you how to do wheel alignment without the help of others at home, and what difficulties are encountered in most cases when adjusting wheel alignment angles.
Incorrect wheel alignment adjustment may be a prerequisite, for example, for rapid wear of tires, or for the fact that when driving in a straight line the car will steer to the left or to the right.
What should the installation angles be: negative and positive values?
Average value for a passenger car. either zero or slightly negative (i.e., the wheels should be slightly pointed outward with the bottom).
Possible setting to a positive value. from 0 to 4.5 degrees. In sports cars, a negative value of .5 to .5.5 degrees is used. This ensures the highest level of grip and increases cornering stability.
There are disadvantages to negative angles. So, when driving in a straight line, the inner edge of the tire will wear out faster, and instability is likely when accelerating and braking on a straight path. A good option is to set the indicator at 0.5 degrees.
Positive and negative destruction.
https://sjracing.ru/svoimi-rukami/sxod-razval-na-vaz-2110-svoimi-rukami-kak-sdelat-razval-sxozhdenie-svoimi-rukami-na-vaz-2110-video-chto-takoe- kaster-kogda-nuzhno-delat-i-kak-pravilno-vystavit-regulirovku-uglov-v.html
Making a wheel alignment for a VAZ 2110 with your own hands
If you carry out car repairs yourself, then in this case you can save not only money, but also carry out high-quality repair work. And you can even do a wheel alignment of a VAZ 2110 with your own hands, the main thing is to have ideas and a certain set of tools.
Since the concepts of alignment and camber have already been discussed, it is now worth considering what castor is. When a car moves, it is strongly affected by the castor - this is the angle between the represented plane and the rotation of the wheels when the steering wheel is turned. The castor can be either positive or negative; it will determine how the drive axle will immediately return to its place. That is, with such values, the car should move in a normal position. Thus, the camber and toe angles should be checked periodically, but the caster is set by the manufacturers at the factory, and is not changed in the future. Now it’s worth figuring out how to do a wheel alignment on a VAZ 2110 yourself.
Tools for work
In order to make a wheel alignment yourself in your garage, you will need a small set of tools that I have listed below.
Adjusting the camber angle of the VAZ 2110
So we have come close to the question of how to set the wheel alignment yourself on a VAZ 2110.
Most often, data on angle degrees is indicated in the operating instructions for the VAZ 2110 car, and they are presented in 0 degrees.
Before you do the wheel alignment yourself on a VAZ 2110, you need to wet all the fasteners in advance, this is necessary so that all the nuts can be easily unscrewed. To measure the angle of inclination, use a building level.
- On the wheel rim, using chalk, place two marks on the top and bottom.
- The plumb line is fixed on the car fender, and then the distance between the marks is measured; the readings should not differ by more than 1 mm.
- Ideally, the wheel geometry is not accurate; in this case, the car is rolled back so that the risks move 90 degrees, and readings are taken again.
- After this, the wheels are turned again, but by 180° and measured again.
- Now remove one of the wheels using a wheel wrench, then unscrew the bracket on the shock absorber a little.
- then the steering knuckle is moved to the required distance, all this will help make more accurate camber measurements.
- Now you can put the wheel in place and rock the car a little with a little pressure on the wheel and take measurements again.
- All these procedures are carried out until the desired measurement figure is reached.
If we talk about the VAZ 2110, then the readings should have a difference of 1 mm.
Toe adjustment
Most often, ordinary threads are used to carry out such measurements, but in some cases a special ruler is used. To carry out such work, it is necessary to drive the car into a pit and set the steering wheel straight.
And now carry out the work in a certain sequence:
- Draw two marks on the tires next to the rims.
- Next, the ruler is installed so that its ends coincide with the marked marks.
- You can also use special equipment with a scale here; it should be set to 0. If such equipment is used, then several measurements should be taken with a ruler.
- The car is moved forward a little so that the marks move and the ruler moves along with the wheel.
- and at this time monitor the readings of the ruler.
- The readings on the rear and front wheels may be different, although this should not be the case. In this case, it will be necessary to adjust the steering rods.
- The locking nuts are unscrewed using a 27 wrench.
- then use a 24 key to change the length of the steering rod; work is carried out only with the coupling.
- Next, the scale of the ruler must be set so that you can adjust the toe to 0 and you will have to move the car a little back.
- if the readings agree with the desired value, then the alignment is complete, but it is better to double-check and again move the car forward a little.
- It is also worth paying attention to the steering wheel; if it is misaligned, it will immediately be clear that the traction is not set correctly. In this case, you need to check which traction is broken, and it will have to be increased.
Wheel alignment. what it is?
First, let's look at the theory: wheel alignment. What is this? What are the wheel alignment angles, and how does the car’s behavior on the road depend on them?
Destruction. This is the angle between the vertical and the plane of the wheel. It ensures reliable contact of the tire with the road (see picture above).
Convergence. This is the angle between the direction of movement and the plane of rotation of the wheel. The stability of the car in corners and tire wear depend on it.
- In rear-wheel drive vehicles, the wheels should be slightly pointed towards each other. this is called positive toe. When moving, they move apart and become parallel.
- In front-wheel drive. on the contrary, the toe should be negative (see diagram below).
Custer. this is the longitudinal inclination angle of the kingpin. This parameter very rarely needs to be adjusted, only on a newly assembled front suspension made from new parts, so we will NOT consider its adjustment.
Repairing the suspension or steering control (replacing the same shock absorbers or control joint) leads to a significant change in the mounting angles of the wheels. Everyday operation of the car also makes adjustments to these characteristics over time, so from time to time there is a need to adjust the wheel alignment.
It is ideal to adjust the wheel alignment twice a year, during seasonal tire changes. During this period of time, you will fall into a hole more than once or run over a curb, causing the chassis to become loose and the angles to change. Timely alignment adjustment will cost much less than a set of new tires.
In 1955, South American engineer Lee Hunter developed the first wheel alignment control panel. Sensors mounted on the wheels sent focused beams of light and accurately measured angles. That's why the shield was called optical. But already in 1969 it was connected to a computer, and in 1995, 3D technology was used for the first time to measure and adjust angles.
True, Russian car owners drove without any shields or computers. Using wrenches, calipers, a whine and a plumb line, they adjusted the camber and toe angles with their own hands.
Wheel alignment - what is it?
Wheel camber is the angle between the center plane and the plane of the road, all of which will affect traction, as well as the ability to control the car. Of course, if everything is configured correctly, then the car will perform maneuvers correctly.
Wheel alignment - what is it?
Alignment is the difference between the points of the rear and front wheels, most often measured in degrees or millimeters. The wear of the tires will depend on this parameter, and if it is not there, the tires will wear out quickly.
That is why they carry out the do-it-yourself wheel alignment procedure on a VAZ 2110, that is, adjusting all the presented parameters so that the car has good handling. Most often today, wheel alignment is carried out on special stands.
Instructions for adjusting wheel alignment yourself
Before you begin adjusting the camber and toe angles, you absolutely need to check the car's chassis. If repairs are needed, then doing a wheel alignment is stupid. Steering and suspension must be in perfect order.
Pay attention to three points on which the wheel alignment angles on a car very much depend:
- Serviceability of the chassis (more information about car suspension diagnostics)
- Tire pressure;
- Loading the machine.
Before adjusting the wheel alignment, be sure to check the pressure in the tires and make sure that you have NOT accidentally left a couple of bags of potatoes or cement in the trunk