"Ten" is a fairly quiet and comfortable car. The reason lies in the fact that the VAZ-2110 is equipped with a body with good aerodynamics, and modern materials and designs are used in the interior. The standard sound-absorbing panel is also hidden under the hood - it isolates the shield from the engine compartment. And this is not all the standard sound insulation of the VAZ-2110.
But if the car has already managed to “run” several thousand kilometers, then the situation will be completely different. The dashboard squeaks begin to be heard, and it is worth noting that these sounds directly depend on the temperature. If at 20 degrees above zero squeaks are almost inaudible, then at -20 they can be heard from everywhere. In addition to the “moans” of plastic linings, covers, doors and roofs, high-frequency noises from the operation of the gearbox and engine are added.
In such a situation, the best solution is to soundproof the car. It is not difficult to complete - you only need special materials, tools and skillful hands.
Selection of materials
In order for the sound insulation of a VAZ to be effective, it is necessary to select suitable high-quality materials. They are different: some are characterized by rigidity, others by increased ductility. The material should be selected depending on the location of application.
Vibroplast is a single-layer bitumen material trimmed with foil. This material will require approximately five sheets. The hood, roof, trunk and interior floors, doors, wheel arches, front panel are finished with vibroplast.
Bitoplast is similar to impregnated foam rubber. To completely soundproof a car, a couple of 10mm sheets will be enough. Bitoplast is also used as a cushioning material during interior assembly.
Splen has not only noise- but also heat-insulating properties. To soundproof a car you will need about six sheets of this material. Its cost is low, and any place can be treated with splen without thinking about saving.
Modelen is a fabric with a 2 mm layer of mounting adhesive. About 0.5 m2 of such material needs to be prepared. Modelen is suitable as a gasket if it is impossible to use bitoplast.
Main stage: finishing the interior with insulation
Let's consider a process such as soundproofing a VAZ 2110 car with your own hands. Videos and photos, which are quite sufficient on the Internet, can help you a lot. But if you do not have the time and opportunity to study the topic, then use the following tips:
- The front and lower parts of the interior are glued with vibroplast. The material must be in contact with the surface at every point. For convenience, the vibroplast can be heated with a hairdryer - it will become more pliable. Also, no one forbids sticking more than one layer.
- Do-it-yourself soundproofing of VAZ 2110 doors involves sizing with bitoplast. Doors are the main source of noise, so the more accurately you cut the material, the better the result will be.
- Glue any material onto the internal parts of the plastic parts. It is important to take into account the final thickness so that there are no problems during assembly.
- You can apply other materials on top of the vibroplast - with combined use, the result will be noticeably better.
- After gluing, carefully cover all remaining open areas with foam.
Disassembling the interior
First of all, you need to remove the front and rear seats. After this, you can begin dismantling the console. You'll have to tinker here, although there shouldn't be any particular difficulties. There are few fasteners on the panel, so it can be easily removed.
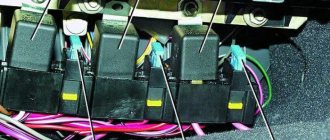
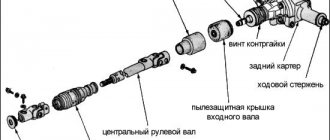
However, it is recommended to remember the order in which the wires are connected - this will save time during assembly. It is best to mark the pads by drawing up a wiring diagram. To remove the dashboard, you will have to remove the steering wheel along with the steering column cover. The rugs also need to be removed.
The standard sound insulation of the VAZ-2110 under the seats is fiber-bitumen, of different structure, thickness and appearance. At the back, the insulation is thinner, more elastic and covered with a film. Under the driver's seat the insulation is thicker, stiffer and without film.
This circuit effectively absorbs the noise of a running engine. But when replacing, the standard insulation must be dismantled, and the work here is complicated due to the many plastic fasteners. Most likely, the thick layer of new insulation will prevent the fasteners from being reinstalled, so they will no longer be needed.
After the dismantling of the old insulation has been completed, the interior has been stripped down to bare metal, and wires are hanging everywhere, you can immediately begin soundproofing the VAZ-2110.
Main difficulties
If you have already disassembled the interior of the car, you may have noticed that in the VAZ 2110 this is done quite simply. Even if you are new to this business, relying on the instruction manual, the work will be completed quickly enough. Additionally, we advise you to rely on video lessons. They can highlight a lot of useful and important things.
The main difficulty when disassembling the interior, without which it will not be possible to carry out full sound insulation, is dismantling the dashboard.
When disassembling the dashboard, be sure to mark all the parts, otherwise reassembling will turn into a real challenge.
The same instruction manual contains recommendations regarding dismantling the dashboard, so rely on it. Under no circumstances should you pull out all the cords, otherwise you will have problems later.
Finishing with insulating material
The front panel and the floor are covered with vibrating material - vibroplast. It is cut and packed tightly. To make installation convenient, heavy and inflexible material can be heated - ideally it should exactly follow the shape of the floor. Laying is carried out gradually with careful gluing into uneven areas. The entire surface is covered with vibroplast. The front panel can be insulated in several layers.
The splen is fixed on top of the vibroplast. Here you need to work carefully: the thickness of the splen sheet is 8 millimeters, and given that it does not want to deform, some elements will not be easy to install. A small amount of material is placed in the places where the sled is attached, and there is no need to attach splen under the central plastic tunnel at all. The front panel is pasted over quite simply; there is enough free space.
The rest of the car's sound insulation is carried out during assembly. The instrument panel is glued from the inside with 10- or 5-mm bitoplast. The joint of the air duct that leads to the legs is processed with modelling. Biplast is glued on top.
Other air ducts do not need insulation, but it is recommended to finish the joints with vibroplast. The joints of the central tunnel are covered with the same model, and biplast is also installed at the joints of the air ducts with the panel, but only after removing the factory seal.
After this, factory insulated carpets and floor upholstery are installed. The panel is installed in its place. When fixing the panel at the joints, it makes sense to fix the bitoplast to seal and provide insulation from extraneous sounds. Then you can install the remaining interior elements in place and connect the wires. When installing the panels, you can cover them from the inside with modelin or biplast.
Soundproofing a VAZ also involves gluing the trunk floor and rear wheel arches. Particular attention should be paid to arches; they use more insulation. Niches in the body - the bottom of the doors, pockets for storing tools, luggage spare tires - do not need to be taped: moisture often accumulates in such places, and the insulation can harm the body.
Do-it-yourself sound insulation of VAZ 2110 (materials for sound insulation)
| Soundproofing materials for cars. Soundproofing a car inexpensively means purchasing soundproofing materials and installing it yourself. |
Who said that the “ten” is a quiet car? Yes, of course, to someone who moved from a Samara, the VAZ 2110 will seem a much quieter and more comfortable car. Moreover, the new VAZ 2110 can really please its owner with relative silence. There are several reasons for this. This includes a body with improved aerodynamics, new designs and materials used in the interior. Under the hood you can find the standard soundproofing of the bulkhead on the engine compartment side and molded soundproofing of the hood. There are other engineering solutions. However, after the car has traveled a couple of thousand kilometers, it begins to seem that not everything is as rosy as it was before. The first thing that starts to creak is the front dashboard. And not all at once and not always, as on Samaras with a high panel, but in certain places and in certain temperature conditions. That is, for example, at +20 there may be nothing creaking at all, but at +40 the instrument panel trim on the sides creaks. At -20, everything that can creak creaks. Then the cricket starts somewhere in the area of the rear parcel shelf. Slowly, sounds of unknown origin begin to emerge, but coming from somewhere on the roof and from the doors. Plastic covers on the steering column, glove box cover and fuse box cover. Add to this the increasingly annoying mid-high-frequency noise when the engine and gearbox are running. In general, patience ran out after a trip of 500 km, when everything seemed to be loose and creaking. Then it's time to soundproof!
Anyone who has encountered a Russian service, after which 50 or even 90 percent had to be redone, has the option of doing everything yourself. Do-it-yourself car soundproofing
- a very subtle and individual thing. A single rattling sound can ruin the entire impression of a generally quiet car.
Before starting work, you can study a lot of literature, listen to a lot of different opinions of people who have had sound insulation done and who have done it themselves. Meet and talk with installers and even material manufacturers.
As a result, they usually stop at automotive (not construction) materials for sound insulation
.
So, here are the materials you can use:
1.
SGM vibro M2F
2.
SGM vibro M3F
3.
SGM vibro BMF
4.
Anti-creak 5
5.
Anti-creak 1
6.
SGM isol FI4
7.
SGM isol FI8
8.
SGM isol I3P
9.
SGM Vibro B2F
| SGM vibration M2F and M3F | |
| Material "SGM Technology"Official characteristics Flexible, elastic vibration-absorbing materials, which are a polymer self-adhesive composition (mastic), backed with aluminum foil, embossed with the company logo. Exclusive advanced production technology, which allows us to provide materials with a high level of quality and stable performance indicators; The use of a purposefully modified elastomer in the mastic composition gives it a high CMP, excellent adhesion to metal, resistance to environmental influences and a wide operating temperature range - -45+100C. Recommended application: Floor, tunnel, rear. sidewalls, luggage compartment, engine shield. Dignity : Ease of installation, good. | |
| SGM vibro BMF | |
| Material "SGM Technology"Official characteristics SGM-Vibro BMF – vibration-absorbing bitumen-mastic material. It is a multilayer structure consisting of duplicated layers of vibration-absorbing materials: aluminum foil, elastomer-bitumen composition and mastic, which is also a sticky mounting layer. The mounting layer is protected with anti-adhesive paper. The materials combine all the best qualities of bituminous and mastic materials: structural rigidity and at the same time ease of installation, high mechanical properties, adhesiveness and reliability of fastening. Recommended area of application: non-relief areas of the floor, luggage compartment, arches. Advantages : Excellent efficiency. | |
| Anti-skrip 1 and Anti-skrip 5 | |
| Material "SGM Technology"Official characteristicsAnti-creak 1 — cushioning material based on wear-resistant fabric 1 mm thick with an adhesive layer protected by anti-adhesive paper. It is glued between decorative elements and the car body, sealing air ducts. Anti-creak 5 — cushioning material based on polyurethane foam, with polyesters, 5 mm thick; Material Anti-creak 1 serves for sealing connections between decorative elements of the interior and the body, winding wire harnesses and covering air ducts. The adhesive layer on the material is consistently good. | |
| SGM - isol FI4 and FI8 | |
| Material "SGM Technology"Official characteristics They are polyethylene foam with a mastic mounting layer. Designed to isolate the interior from extraneous noise. In addition, all soundproofing materials have heat-insulating properties. The materials are elastic, moisture resistant and have increased stickiness and adhesion. As for perforated isolon on mastic, this is real sound insulation. As a result of perforation, the sound absorption coefficient is significantly improved, starting from mid-frequencies. | |
| Izolon PPE | |
| Material from Official characteristics Izolon PPE - polyethylene foam. The material has excellent thermal insulation properties, is elastic, waterproof, and environmentally friendly, which allows it to be used as a gasket, sealant, heat and sound insulator in many industries: construction, mechanical engineering, and the automotive industry. Unofficial characteristics Polyethylene foam is positioned primarily as a heat-insulating and water-resistant material. It’s a stretch to talk about soundproofing properties. Having a closed-cell structure, PPE cannot effectively dampen sound vibrations, but in a complex multilayer sandwich, in addition to waterproofing, PPE performs minimal functions as a sound insulator. Mainly due to its density. Theoretically, the more media with different densities and properties in the sound path, the more effective the sound insulation. Izolon PPE does not have an adhesive layer and is laid in sheets. For the floor this is understandable, but in the trunk it would be nice to glue it to the standard upholstery. | |
| SGM vibro B2F | |
| Material "SGM Technology"Official characteristics SGM-Vibro BF – vibration-absorbing bitumen material. It is a structure consisting of elastomer-modified bitumen with a front layer of aluminum foil and an adhesive mounting layer protected by anti-adhesive paper. The aluminum foil coating and the unique technology of combining bitumen with an elastomer with a high level of mechanical losses provides the material with excellent vibration-damping properties along with the rigidity and bending resistance required for this class of materials. | |
Interior treatment.
Disassembling the interior, I must say, is not a tricky task. The front seats can be removed quite easily, if you do not take into account the torsion bars tightly packed into the brackets. By the way, the fasteners of the brackets themselves and other bolts are often not tightened. That's why the driver's seat was almost torn off the ground. The rear seats are generally easy to remove. The situation with the console is a little more complicated, but dismantling is also not difficult. Unlike the “high panel” in the Samara, the “tenth” instrument panel has fewer fasteners and can be easily removed. The main thing is to clearly remember how and where the electrical wires went. If you forget something, it will take several times longer during the assembly process. It is recommended to mark all pads and draw up a wiring diagram.
There is one difficulty. In order to remove the instrument panel, you need to remove the steering column cover and the steering wheel itself. It's all about the temperature of the metal parts.
The instrument panel has been removed and the carpet has been removed. It is striking that the standard fiber-bitumen sound insulation has a different structure, thickness and appearance under the feet of the driver and rear passengers. Under the feet of the rear passengers, the thickness of the fibrous layer is much thinner, it is much more elastic and covered with a film, while the sound insulation under the feet of the driver and front passenger is thicker, stiffer and does not have any film. Perhaps this was done because there is more noise and vibration from the engine in the front part, and accordingly they need to be dampened more efficiently. Or maybe it’s because the “rear” sound insulation partially covers the floor tunnel and elasticity is required from the material. Dismantling the front standard sound insulation is greatly complicated by the mass of plastic fasteners. Unfortunately, I was not able to put these fasteners back, as a large number of layers got in the way. Contrary to public opinion, I did not notice any areas of rotting of the standard sound insulation, dampness, or water (the car is almost a year old), but it does have a very specific smell.
The sight of an injection machine stripped down to bare metal is depressing. There are a huge number of wires hanging everywhere. Probably in carburetor cars the number of wires is an order of magnitude or two less. The situation was aggravated by wires from additional equipment.
| Yes, after lifting the carpet and standard sound insulation, you can find a lot of interesting things on the floor of the car - a large number of washers, screws, some kind of plastic brackets. |
So, the interior has been disassembled. Let's get started.
Front panel processing technology is as follows: 1 layer
— SGM Vibro BMF (two layers on the front arches)
2nd layer
— SGM Vibro M2F (all over the front end)
3rd layer —
Anti-creak 5
ATTENTION! I would like to clarify right away that we do not encourage you to get carried away and use just such a multi-layer sandwich. Looking ahead, we note that the efficiency of using such a multilayer structure is not much greater than that in which there are half as many layers. Firstly, it made sense to experiment and get a result that would show the feasibility of this “exclusive”. Secondly, if you have the material... and don’t salt it... In a word, everyone who considers this configuration unnecessary is absolutely right, but, excuse me, that’s why the installation is unique.
It is worth noting that the standard vibration isolation of the front panel differs from that mounted on the floor and in the doors. It is thicker and has a metallized film. But it was poorly glued to my car and fell off in pieces.
| This photo shows the entire front panel and front arches in their finished form. |
Floor and tunnel processing technology
1 layer
— SGM vibro BMF 2 layer — SGM vibro M2F 3 layer — SGM isol FI8
Installation of SGM vibro M2F on the front floor
| Installation of SGM Vibro BMF on the rear floor |
| Installation of SGM Vibro M2F on the rear floor |
| Installation of SGM Vibro BMF on a floor tunnel |
| Installation of SGM M2F on a floor tunnel |
| This is what the floor looks like after installing SGM Isol FI8. |
| Floor tunnel after treatment with Antiskrip-5 (from the standard kit) To be fair, note that this part is cut out quite well. I just want to warn you that removing the anti-adhesive film should be done extremely carefully, preferably as it is being glued. |
| I treated the metal surface under the rear seat with fewer layers, because this surface is not an obvious source of noise. I treated approximately 60% of the surface with SGM Vibro BMF material, and then laid SGM Vibro M2F, having previously cut out the material for the gas tank hatch. | |
| Theoretically, PPE has nothing to do with sound insulation, because it has a closed-cell structure. Sound seems to pass through PPE only slightly attenuated, so it makes more sense to treat PPE as a hydrothermal insulator and cushioning material. | |
| Immediately after laying the PPE, we lay standard fiber-bitumen sound insulation |
| Due to a significant change in the configuration of the front panel, arches, and floor, standard sound insulation is reluctantly installed. I had to cut off about 30% to fit at least the main part. Many companies specializing in HI throw out the standard sound insulation altogether, but we chose not to do this. |
Processing the rear arches.
| The rear arches are not treated with anything at the factory and after removing the upholstery they look like this |
| The technology for processing the rear arches is the same as the front ones, with the exception that the SGM Vibro BMF was mounted in one layer. Since the BMF material is quite heavy, I did not mount it on strictly vertical surfaces, but only where it was possible to approach a horizontal plane. |
| Following the BMF was the M2F. |
| The same is true for the rear wing. Covers at most 60% of the surface. In general, this is correct, because theoretically sufficient efficiency is achieved by covering only 70% of the surface. |
| In this regard, additional pieces of M2F were used to cover at least 70-75% of the surface. |
| After installing M2F, it was the turn of SGM isola FI4 |
| The process is completed by Antiskrip 5, which binds all the previous layers together in one piece. |
Trunk processing
| The trunk, side cavities and spare wheel area are finished using fewer materials. The role of the trunk in the overall noise field of the car, it seems, is insignificant. And there are few membrane surfaces there. There are almost none of them in the top ten (exceptions are wings, roof and doors). Other surfaces are made with different ribs. The M2F was mainly mounted in the trunk. In some places BMF and SGM-isol FI8. Particular importance is attached to the place in the trunk under which the exhaust pipe is located. |
Door and ceiling treatment
| Different cars use different circuits. The first scheme involves the use of SGM M2F together with SGM Izol or Antiskrip 5. The second scheme is SGM B2F and Antiskrip 5. According to subjective feelings, M2F + Antiskrip 5 is as effective as B2F + Antiskrip 5. Moreover, B2F can also be mounted on the roof, despite its impressive weight. With doors the situation is quite simple. The casing is removed and the metal surfaces are treated with a vibration damper, then a layer of SGM isol FI4 or Anti-creak 5 (or 15) is glued on top of the M2F. SGM Izol FI4 or Antiskrip can be replaced with perforated Izol I3P. There is an opinion that polyurethane foam is not needed in doors, but if acoustics are installed in the doors, then the treatment helps improve sound quality. It is also better to treat the door trim with vibration-damping material, and here something like M2F would be even better. Those particularly concerned about sound quality can seal all the holes in the door to create a “closed” acoustic design. In any case, all the pads and rods can be wrapped with Anti-creak 1 so that they do not rattle on bumps. Anti-creak 1 strips are glued along the perimeter of the door trim so that the upholstery rests on it and not on the metal. The upholstery has now stopped making sounds. Roof treatment makes a significant contribution to the sound insulation of the car. In addition, oddly enough, it greatly affects the sound quality of the acoustics. Therefore, it is imperative to treat the roof and doors, even if you do not plan deeper sound insulation. This is not difficult to do, and the effect is noticeable. By the way, the doors will be more pleasant to close. An important point is that in order to treat the roof it is not necessary to completely remove the roof lining. Then it will be very difficult to put her in her place alone. To do this, everything is unscrewed except the rear view mirror and visors, and the upholstery seems to fall into the interior. In this form, the roof is easily accessible for processing, and reinstallation is very simple. The roof is now “wooden”. |
Instrument panel processing
| The procedure for disassembling, gluing and assembling the instrument panel is best done at home, over a glass of beer or something stronger. The panel itself consists of only three large plastic parts, but there are a lot of fasteners, so (as with the wires) it’s better to record everything or take photographs (as it was). | |
| Antiskrip 5 is mounted on horizontal membrane-type planes, and M2F on vertical ones. | |
| It is much more important to glue the joints (of which, in general, there are few) and wrap the wires and pads with Anti-creak 1. | |
| Anti-creak 1 material is glued at the junction of the main part of the panel with the front top cover. The material must be handled carefully. Once installed with an error, it is almost impossible to remove. And it’s easy to make mistakes at joints and curves. | |
| With Antiskrip-1 material everything is much more fun. It tolerates any mistakes, it can be torn off and re-glued. It is not so elastic and is much easier to install. We try to glue all the remaining parts of the panel with Antiskrip 5 material | |
Interior assembly
| First of all, I would like to make the following recommendation. If you can disassemble and process a car alone, then it is better to assemble it together. | |
| The “ten” uses ordinary polystyrene foam. There are three foam parts in total. Two parts are placed on the front wheel arches, providing a sort of step, and the third part, which can be seen in the photo, is placed under the console on the floor tunnel. The fact is that the floor tunnel has a peculiar relief, and in order for the console to stand level, this relief is compensated for by foam plastic. Polystyrene foam tends to make a grinding noise when friction occurs, therefore, to eliminate this ability, we cover the foam plastic part with PPE material (SPLEN 3002) and pieces of anti-creaking agent 1. | |
| Laying the carpet was not particularly difficult, unless you take into account the fact that the holes in the carpet did not coincide with the holes in the body, and in some places the carpet warped due to changes in the shape of the floor and the front panel. | |
| Installing the instrument panel is perhaps one of the most difficult operations. The weight of the instrument panel has increased by one and a half times, the thickness of the sound insulation of the front panel has more than doubled. All this interfered with the installation. The adjustable steering column lever created a huge problem. Rubber seals on doorways also interfere. In short, we do not recommend performing this operation alone. With great difficulty, the panel was installed and even tightened at the fastening points. However, if the bolts on the sides of the panel are tightened well enough, then the screws that attach the panel from below could not withstand the elasticity of the sound insulation and came off the brackets. I had to use stronger staples and screws. | |
| It took a lot of effort to sort out the intricacies of the wires. | |
| Separately, I would like to touch on the topic of the old heating system in the “ten”. | |
| The heating system in the VAZ 2110 could be better. There is only one problem - the quality of manufacturing and assembly. If you move the lever that moves the dampers vertically, then the air should, in theory, be redistributed in three directions. On the windshield, in the face, in the legs. Naturally, there are borderline and intermediate values. In practice, the damper movement lever does not close and open the dampers completely. In this regard, if I want to ensure that the system blows air only into the legs, nothing will work, since the air will blow not only into the legs, but also into the face and onto the windshield. But as soon as you close and open the dampers completely with your hands, with the central deflector removed, the air begins to blow much stronger. Unfortunately, it is difficult to ensure that the deflector lever moves the flaps completely, since this apparently requires a special and deeper modification of the system of plastic levers. When the panel has been removed, attention should be paid to this. Moreover, after installing the instrument panel, the flaps may be blocked. The plastic flap clings to the Anti-rip 5 layer and does not move. I had to scratch my hand quite a bit to remove the extra layer of Bitoplast around the air supply hole and strengthen the plastic lever for moving the dampers. If you do remove and disassemble the panel, pay attention to all this. | |
| We cover the plastic structure on which the buttons and devices are attached with Anti-ripple 1. Now they sit dead in their places and do not make a single squeak. | |
| A separate story was with the installation of the glove compartment (“glove compartment”). It didn't close. The standard sound insulation was in the way, which, due to the additional layers, stuck out strongly towards the box, so I had to make a slot in the standard sound insulation so that the rear edge of the glove box could move more or less freely. | |
| The left hole for the drawer locking structure had to be widened. The panel apparently was slightly askew, so the drawer on the left side did not lock. In addition, they covered the joints between the drawer and the panel with Anti-srip. As a result, we got an unpredictable result. The box closes tighter, but there is no hint of rattling when driving. | |
| With great difficulty, the center console fell into place. | |
| The main problem was related to the difference in heights. The console rose up and was difficult to dock with the panel, as can be clearly seen in the photographs. | |
| The instrument panel is assembled. | |
| Turn on the ignition. | |
| The engine starts and runs reliably. The devices seem to respond and show the correct parameters. By the way, we do not advise you to overuse starting the engine in a closed garage - the exhaust is not good for your health. | |
| Installing seats is another sad song. The seats are mounted on brackets at the front and bolted to the body at the rear. The bolts are short and do not even reach the middle of the sound insulation, so we had to make titanic, heroic efforts to install the chairs in place. Together, everything would be much easier. | |
| I had to tinker with the thresholds even more than with the seats. The self-tapping screws did not want to fall into place. I even had to buy longer self-tapping screws. | |
After installing the seats, we test drive the car. As a result, we got a lot of problems.  | |
| The floor got taller. The rubber mat makes pedaling much more difficult. This is especially true for the clutch. The pedal goes there easily, but does not return back. | |
| Somewhere I still made a mistake in the electrical wiring. Either I lost a terminal or shorted the wire to ground when installing the seats. As a result, when you turn on the ignition, two warning lights are constantly on - the handbrake (as if the handbrake is up) and the seat belt. | |
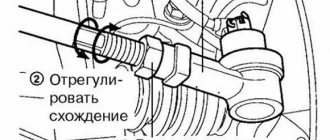
| The steering wheel was installed somehow without a second thought, and then they discovered that they had not installed it straight, to put it mildly. We were forced to drive around the garage for about 20 minutes in order to achieve a straight position of the steering wheel. In my opinion, this should be done while adjusting the wheel alignment. | |
results
Among people who have done soundproofing, it is fashionable to say this: “Of course, BMW did not turn out to be a domestic car, but there is an effect.” With this phrase they want to say two things. Firstly, the effect of soundproofing certain models (for example, VAZ 2110) is very low compared to the costs, but at the same time it is still sufficient to make you feel more comfortable. Secondly, sound insulation in high-end imported cars is achieved mainly structurally, due to body shapes, engine design, suspension, intake and exhaust systems. Unfortunately, at the time of writing this manuscript, I did not have the opportunity to drive new BMW models, but the noise level that I achieved while soundproofing the domestic VAZ 21102 is quite comparable with foreign cars of a similar class.
Regarding the effect, we can say the following. We get into the car - the doors close dully, pleasantly. It would be a good idea to first adjust the door locks (install anti-noise ones), screw in the anti-noise bolts, and lubricate them. After closing the door you can immediately feel the difference. Sound from outside enters the car with significant attenuation. I think mainly through windows. At idle, when the car is stationary, the difference with the untreated car is minimal. In the “standing ten” mode the engine runs quietly. RPM on a warm engine is 850-900. But as soon as you pedal properly, the difference is felt, as they say, with the naked eye. If earlier my gaze automatically fell on the tachometer at rpm of 3500-3800, now I find the needle in the region of 4000-4500. At the same time, I do not experience absolutely any discomfort, which was previously expressed as “it’s a pity for the engine.” Moreover, it’s nice to catch up with the engine to 5000-5500 and only from the strong vibration of the gas pedal you can guess that this is already a bit too much. I haven't dampened the gas pedal yet. ;))
Probably, in modes when the engine speed exceeds 2000, I managed to reduce the noise level by 3-4 dB. Aerodynamic noise is present at high speed, but to a much lesser extent. It's nice to feel how the car goes over potholes and bumps. Instead of clanging and rattling, there is a gentle tapping of the suspension mechanisms. Another interesting observation is that the car seems to have become more responsive and dynamic. The only explanation for this is that it is now easy to press the gas pedal without internal regret about the rumble and roar of the engine. Music naturally began to play cleaner at high speeds. There is no need to turn the volume knob to maximum at 100-120 km/h. In general, I am pleased with the result, but there are some disadvantages. The height of the seat and plastic consoles have changed. Of course: with so many layers! You have to get used to it, but it's not fatal. The worst part is that the layers interfere with the free movement of the pedals. The rubber mat under the pedals had to be completely cut off, the standard mat had to be cut, otherwise it would be impossible to use the clutch pedal. After a series of manipulations, it became possible to use the pedals, but due to the increased height of the floor, the foot now rests not only on the pedal itself, but often also on the lever on which the pedal is attached. This is especially noticeable on the brake pedal. Sometimes I put more pressure on the lever than on the pedal. It’s generally difficult to imagine what will happen in winter. There is no rubber mat under the pedals, which means water will flow under the standard mat. And in wide shoes, which were already a bit tight, now, apparently, it will become completely tight. However, after 2 weeks the floor around the pedals sank and this effect is no longer so noticeable. There are also aesthetic disadvantages. Not everyone will like the Anti-srip sticking out of all the cracks and the curved position of some plastic linings... However, if you consider that gaps and curvatures are the norm for a new car, this also does not pose a big problem.
Whether to soundproof your car or not is up to you. I can only say that if you do not have a strong desire, it is better not to do it even in a company, since the effect is unlikely to satisfy you. In addition, you instantly get used to the noise level. And it seems like he didn’t do anything. Of course, everything immediately falls into place when you get into an untreated car. I can also add that the less the developers thought about the noise level, the greater the effect. For example, in the “ten” the effect will be much more modest than in the “nine”. You can also add that the greatest effect of sound insulation is achieved in hot weather (unfortunately, this is the physics of the process). The lower the ambient temperature, the worse the sound insulation works. In cold weather, I think it won’t work at all. Therefore, if you plan to operate the car mainly in cold regions, then it hardly makes sense to do this. Finally, I will say that you don’t get so tired, actually, from the noise, as from the creaks and “crickets”. Therefore, I consider solving this problem to be the primary task of the Shi. It is likely that there is no need to do global sound insulation of the car. With just a little blood, Bitoplast and a patient attitude, it is enough to identify and glue all creaking joints. There is only one drawback of this approach - this process is endless. That is, today you can glue a couple of joints, and tomorrow others will creak... Or you can just turn up the music louder...
Up
Materials catalog
- Vibration insulation (mastic butyl rubber).
SGM-Vibro (M-series)
- Vibration insulation (modified bitumen).
- SGM-Vibro (B-series)
- SGM-Vibro (BM-series)
Vibration insulation (mastic-bitumen).
Heat/sound insulation
- SGM Izol (F series)
Soundproofing.
- IzolonTape 3004, 3008, 3010, 3015 VB, VBF
Let's sum it up
If the sound insulation of the VAZ is carried out correctly, the noise level should decrease by 40-55%. The sound of the running engine will not be heard as much, and you can completely forget about the noise of the wheels - especially when driving at speed. In addition, drivers who are not too lazy to do additional sound insulation claim that the car’s dynamics then improve.
Soundproofing of the VAZ-2107 can be done in a similar way. It is worth noting that the work is really worth spending time and energy on. This is especially useful if the machine is used constantly. Many car enthusiasts also soundproof the Priora. But we will talk about this in a separate article.
By the way, if you need windshield wipers for your car, go to the online store pro-wipers.ru
Stories from our readers
“Fucking basin. "
Hi all! My name is Mikhail, now I’ll tell you a story about how I managed to exchange my two-wheeler for a 2010 Camry. It all started with the fact that I began to be wildly irritated by the breakdowns of the two-wheeler, it seemed like nothing serious was broken, but damn it, there were so many little things that really started to irritate me. This is where the idea arose that it was time to change the car to a foreign car. The choice fell on the melting Camry of the tenth years.
Yes, I had matured morally, but financially I just couldn’t handle it. I’ll say right away that I am against loans and taking a car, especially not a new one, on credit is unreasonable. My salary is 24k a month, so collecting 600-700 thousand is almost impossible for me. I started looking for different ways to make money on the Internet. You can’t imagine how many scams there are, what I haven’t tried: sports betting, network marketing, and even the volcano casino, where I successfully lost about 10 thousand ((The only direction in which it seemed to me that I could make money was currency trading on the stock exchange, they call it Forex. But when I started delving into it, I realized that it was very difficult for me. I continued to dig further and came across binary options. The essence is the same as in Forex, but it’s much easier to understand. I started reading forums, studying trading strategies. I tried it on a demo account, then opened a real account. To be honest, I didn’t manage to start earning money right away, until I understood all the mechanics of options, I lost about 3,000 rubles, but as it turned out, it was a precious experience. Now I earn 5-7 thousand rubles a day. I managed to get the car buy after half a year, but in my opinion this is a good result, and it’s not about the car, my life has changed, I naturally quit my job, I have more free time for myself and my family. You’ll laugh, but I work directly on the phone)) If If you want to change your life like me, then here’s what I advise you to do right now: 1. Register on the site 2. Practice on a Demo account (it’s free). 3. As soon as you get something on the Demo account, top up your REAL ACCOUNT and go to REAL MONEY! I also advise you to download the application to your phone, it’s much more convenient to work from your phone. Download here.
Where to begin?
From the choice of soundproofing material, of course! On the modern market, the choice is huge; some even advise processing the foam rubber yourself, impregnating it with rubber-bitumen mastic; it is much easier to purchase ready-made material.
And this is what you will need:
— Vibroplast (or its analogue)
Vibroplast is a single-layer plastic material covered with foil that absorbs vibrations.
Vibroplast effectively eliminates vibrations, so it sticks to all surfaces where metal is present.
Splen (isolon, isotone or analogues)
Splen is a universal heat-insulating material that absorbs noise and vibration.
It is laid on top of the vibroplast and wherever possible.
— Bitoplast (analogs are also possible)
Sound-absorbing material like foam rubber.
Bitoplast is used on the inner parts of doors and front panels.
The tape is pasted in places of friction.
Aluminum tape (aluminum tape)
Serves for gluing splenite joints.
Application of materials by zones
Vibroplast - glue the outer and inner surfaces of the door, the first layer is placed on the roof, trunk lid and hood, dashboard, engine compartment panel, floor in the cabin and trunk.
Splen (on sealant) - glued on top of vibroplast on the floor in the cabin and trunk and on the engine compartment panel.
Splen (on glue) - goes to the walls and roof.
Bitoplast - glued to the inside of the dashboard and door trim.
Anti-squeak tape - cut into strips and glued to the instrument panel, door trim, and flammable plastic around the perimeter in places of possible surface friction.
Aluminum tape – fastens the joints of the splenium.
Shutdown
The last things you need to cover are the trunk lid, hood, and dashboard elements. Try to apply insulating material to all elements of the dashboard that may be sources of squeaks and extraneous noise. After gluing is completed, you need to assemble the entire interior, install the instrument panel, door trim, lay the carpet and install the seats.
The better the sound insulation of the car floor, the less vibration will be transmitted to the interior. After all the work carried out, comfort will be much higher, squeaks will disappear, and even the engine will start to run quieter (it feels like).
Source
Interior and trunk wrapping
Now you need to soundproof the car floor. For this purpose, vibroplast and splen are used. Vibroplast is laid as the first layer; it must be applied to the maximum area. Cover the material as best as possible so that it adheres to the metal surface. Splen is applied as the second layer. It also needs to be glued to the maximum area of the bottom of the cabin.
Recently, this type of sound insulation has become popular, such as applying a rubber-bitumen mixture to the outside of the car’s bottom. This allows you to reduce the level of vibration coming from the wheels and road surface. But it will be much more effective if you simultaneously treat the inner surface of the bottom. Everything inside the trunk needs to be carefully sealed with vibroplast. It will be a little more difficult here, since there is a niche for the spare wheel, protrusions for the shock absorber struts, and sometimes the edges of the screws come out.
Door noise
First, the door trim is removed (this operation is the same for all doors):
- Then soundproofing materials are installed, first the surfaces are treated with a degreaser (alcohol or acetone)
- An exception will be the lower part of the door, where an anti-corrosion coating is applied.
- Sound insulation will also be made of several layers
First layer
The vibration isolator is glued to the inner surface of the outer side (panel) of the car door:
- For convenience, it is better to cut it into pieces in advance.
- The material is inserted through technological holes in the inner lining, having previously been heated with a hairdryer for better fastening.
- Lay it overlapping
- The more area you cover, the better.
- To eliminate air bubbles, roll out the material with a hard roller or the handle of a screwdriver.
Reviews
Delivery of goods is carried out throughout Russia and the CIS:
1. Russian Post (from 350 rubles and above)
Delivery to all regions of the Russian Federation and CIS countries
2. Transport Companies (from 350 rubles and above)
Delivery throughout Russia and the Republic of Kazakhstan
- TK Energy (nrg-tk.ru)
- TC Business Lines (dellin.ru)
- TC SDEK (www.cdek.ru)
- TK PEK (pecom.ru)
- TK KIT (tk-kit.ru)
3. Pickup
The order can be picked up at the office at Tolyatti, 40 Let Pobedy 38, TD “Malachite”, 1st floor.
The waiting time for sending an order in our online store is approximately 2-7 working days, large orders 7-14 working days. days; color of bumpers, mirrors, body parts, spoilers, etc. 7-14 work. days; sewing covers, upholstery, steering wheels, gear knobs, EVA mats, etc. 7-14 work. days.
During this period, we will send you a tracking number by email. email to track the parcel en route.
Payment can be made in the following ways:
1. Payment to a Sberbank card
You can pay using the SBERBANK-Online application and other Bank applications.
After placing an order, making payment, do not indicate comments , we ourselves will understand by the amount of the order and the name of the sender. After receiving the funds, the status of your order will be changed to paid until 17.00 of the current day, or from 9.00 of the next Moscow time.
2. By bank card
Automatic acceptance of payments using MIR Bank cards, VISA International, Mastercard.
You can also pay with credit cards with a grace period.
To select payment for goods using a bank card, on the corresponding page you must click the “Pay for order by bank card” button.
Hood insulation
Insulating the hood itself does not significantly reduce noise, and some car owners do not work on the hood at all. But together with the insulation of the motor shield, a significant reduction in noise is achieved. While insulating the hood as the easiest element to work with, it is easy to gain experience in handling sound-absorbing products.
The primary coating is a vibration damper of the Vizomat MP, Bimast Super brands, which have a foil-coated coating to reflect thermal radiation; a fairly high temperature regime is created under the hood of a running engine, so the vibration damper must be resistant to high temperatures. It is placed between the stiffening ribs on flat surfaces.
For the secondary layer , products coated with foil that reflects sound waves should be used. It is fixed over the entire surface of the hood, including the stiffening ribs.
For the third coating, a factory soundproofing layer is suitable.
Where to begin?
From the choice of soundproofing material, of course! On the modern market, the choice is huge; some even advise processing the foam rubber yourself, impregnating it with rubber-bitumen mastic; it is much easier to purchase ready-made material.
And this is what you will need:
— Vibroplast (or its analogue)
Vibroplast is a single-layer plastic material covered with foil that absorbs vibrations.
Vibroplast effectively eliminates vibrations, so it sticks to all surfaces where metal is present.
Splen (isolon, isotone or analogues)
Splen is a universal heat-insulating material that absorbs noise and vibration.
It is laid on top of the vibroplast and wherever possible.
— Bitoplast (analogs are also possible)
Sound-absorbing material like foam rubber.
Bitoplast is used on the inner parts of doors and front panels.
The tape is pasted in places of friction.
Aluminum tape (aluminum tape)
Serves for gluing splenite joints.
Application of materials by zones
Vibroplast - glue the outer and inner surfaces of the door, the first layer is placed on the roof, trunk lid and hood, dashboard, engine compartment panel, floor in the cabin and trunk.
Splen (on sealant) - glued on top of vibroplast on the floor in the cabin and trunk and on the engine compartment panel.
Bitoplast - glued to the inside of the dashboard and door trim.
Anti-squeak tape - cut into strips and glued to the instrument panel, door trim, and flammable plastic around the perimeter in places of possible surface friction.
Aluminum tape – fastens the joints of the splenium.