To check the ignition switch, sequentially set the key to the positions at which the circuits indicated in the table should be closed.
When the key is turned to position “III”, the anti-theft device should be activated. When turning the key from position “III” to position “0”, the anti-theft device should turn off. This can be checked by turning the steering wheel.
When restarting from position “I” to position “II”, the locking is activated. The key can only be turned to position “II” from position “0”.
If there are defects, replace the contact group or ignition switch
Live contacts
Outdoor Lighting. Instrument lighting. High beam headlight alarm
Generator excitation winding. Ignition system. Windshield cleaner. Carburetor idle speed solenoid valve control unit. Direction indicators. Reversing light. Control devices
Low and high beam headlights. Fog light. Headlight cleaners. Rear window cleaner. Heated rear window. Washer. Heater fan. Engine cooling fan
1.
Unscrew the six screws securing the lower steering column casing of the VAZ 21099.
2.
Remove the lower steering column cover.
3.
. and ignition switch trim
4.
Remove the upper steering column cover.
5.
Disconnect the ignition switch wiring harness from the wiring harness.
6.
Disconnect the block with the ignition switch wires from the ignition relay for the Lada Satellite.
7.
Insert the key into the ignition switch of the VAZ 2109 and turn it to position “0” to turn off the anti-theft device. Unscrew the four mounting bolts (two bolts are located on top of the column). Remove the bracket and ignition switch for the Lada Samara (see notes 1 and 2).
If the bolt heads are sheared off, the bolts must be drilled out or removed using a screwdriver and hammer.
An ignition switch is installed on the part, secured with two bolts. There is a slot at the top of the bracket that accepts the hook on the ignition switch housing.
8.
Unscrew the screw securing the switch cover.
9.
Remove the switch trim by pressing out the two plastic latches with a screwdriver.
10.
Remove the contact group.
11.
Assembling and installing the VAZ 2108 ignition switch is carried out in the reverse order.
Repair of VAZ 2108: self- replacement of the ignition switch
In fact, the ignition switch is a regular breaker that closes or opens certain groups of contacts. VAZ 2109 - removing and replacing the clutch cable |. A malfunction switch will increase the already huge possibility of your vehicle being stolen, in addition to creating huge problems for you yourself and, usually, at the most inopportune moment for this.
Typically, replacing the ignition switch of a VAZ 2108 is carried out in the following cases:
- When they tried to steal the car, the ignition switch was damaged;
- If the car owner loses the key;
- When the contact group fails.
The car may not start due to bad contact. This is not difficult to check; all you need is an ohmmeter and a couple of minutes of time.
Replacing the lock cylinder or contact group
The need to completely replace ignition switch may only arise in the case of the above problems, but if the cause of the malfunction is one of its parts, then it makes sense to carry out a partial repair switch . VAZ 2109 engine injector: 21083, 21093, 21099. Citroen engine failure Belt replacement. For example, there are often cases when the ignition key begins to turn poorly in the keyhole; the fault can be eliminated by replacing the lock . Replacing the VAZ 2109 timing belt (injector, carburetor): video. In order to carry out such repairs, it is enough to have a minimal set of tools and knowledge. How to replace the ignition switch on a VAZ 2101-VAZ 2107? Replacing the lock from the lock cylinder only in. In fact, replacing the clutch cable on a VAZ on a VAZ 2109 Replacing the cable. The only tools you will need are a screwdriver and a hammer.
How to change the camshaft is written here
Scheme of VAZ and car ignition switch
The ignition switch cylinder of the VAZ 2109, despite its small size and completely inconspicuous location, together with the lock, plays the main role in the operation of the vehicle systems. Therefore, the failure of such a small unit can completely paralyze the operation of the entire car.
The ignition switch is used to turn on the power to the entire ignition and engine starting system, windshield wipers, reversing lights, turn indicators, and in some modifications even the radio and headlights. In addition, on some cars the ignition switch is additionally equipped with an anti-theft device that blocks the steering wheel from turning.
On a VAZ 2109, replacing the lock cylinder is very simple. It is only important to study the execution sequence and choose a tool.
The main purpose of the lock was initially to protect the car from theft, however:
- Today, as can be seen from practice, in order to start and steal a car, car thieves do not necessarily need to have a key or a duplicate of it
- To put it more clearly, the protection from the castle used to justify itself, but today it is “so-so”
- Advanced car thieves, equipped with modern technologies and devices, are able to hack the electronic protection of the most modern anti-theft systems in just a few seconds.
- And on the VAZ 2109, the lock cylinder or the VAZ 2109 lock itself, or its domestic analogue can generally be called entertainment for beginners
- In fact, the ignition switch is an ordinary switch that, when you turn the key, opens or closes a certain group of contacts
- The appearance of a malfunction in the ignition switch increases the likelihood of vehicle theft several times, in addition, it creates great trouble for you and, according to the law of meanness, at a completely inappropriate moment for this
- The design of any ignition switch is similar; it consists of a lock and its contact group
- And the contact group consists of two separate plates, fixed and movable
- The movable plate moves when the key is turned in the lock and the contacts are closed in the required sequence
- Already now, switches that have the same design and order of contact closure are successfully used on all domestic cars
Reasons for replacement
As a rule, replacement of VAZ 2109 lock cylinders is carried out in the following cases:
- When they tried to steal a car and the lock cylinder was damaged in the process
- If the owner of the car has lost his keys
- Breakage of the larva during operation
The car engine may not start due to poor contact. It is not at all difficult to check this; to do this, it is enough to have an ohmmeter on hand, or a multitester with an ohmmeter function and five minutes of time:
- Disconnect the “-” terminal from the battery
- Remove the lower casing from the steering column
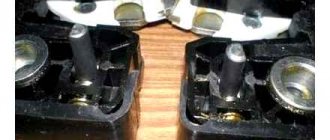
Removed the casing and opened the contacts
- Disconnect the contacts and check the resistance with an ohmmeter
- Serviceable contacts should have minimal (zero) resistance
- Otherwise, you need to replace either the contact group or the entire lock
We measure the contact resistance using an ohmmeter
Replacing the VAZ 2109 lock cylinders requires the following tools:
- New cylinder complete with keys
- Thin clock screwdriver
- Phillips screwdriver
- Fine drill
- Chisels
- Hammer
- Pliers
In the event of any breakdown, it is not necessary to replace the entire lock; if the cause of the malfunction lies in replaceable parts, then a partial repair of the lock is performed and replacing the lock cylinders on the VAZ 2109 makes sense when the key stops rotating freely in the keyhole. Another option for partial repair is to replace the contact group; for this, a minimum of tools and a little understanding of the device are enough. Our instructions will help you understand the device:
- Nothing and no one forbids you to change the entire lock every time, and even go to a service station if you are satisfied with the price
- After removing the casing, access to the switch lock opens
- The lock cylinder can, in principle, be removed at this stage
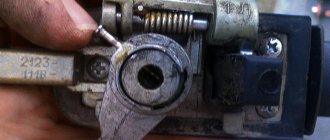
- Therefore, we pull out the side pin that holds it in the lock
- This can be easily done with a thin screwdriver (clockwise) while tapping it with a small hammer
- If the pin cannot be pulled out in this way, then try to drill out the cylinder carefully using a thin drill
- If it is more convenient for you to remove it first, remove the ignition switch before proceeding to replace the cylinder, to do this you need to unscrew the bolts securing the ignition switch to the steering column
- This must be done using a hammer and chisel, as these bolts have sheared heads.
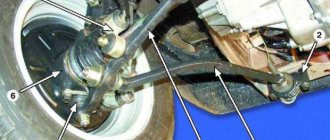
- Use a chisel to loosen them slightly, and then unscrew them with pliers, as in the photo below
Loosen the bolts securing the lock to the steering column
- Now we remove the bracket and the lock itself from the column, be sure to disconnect its electrical connector
- We unscrew the screw securing the ignition relay and remove it from under the panel
- Disconnect the connector
- Disconnect the “mass” wire
- Using a Phillips screwdriver, unscrew the screw
- Then release the latch and remove the cover, then the contact group
- So we pulled the switch
- We remove the cylinder with our own hands and the ignition switch, as already described above
- We are replacing it
- We check the operation of the lock with a new cylinder installed, to do this we turn the ignition key
- After installation, do not forget to check the correct operation of the locking mechanism, our steering shaft
- When the mechanism does not work when turning the steering wheel fully, you need to adjust the location of the lock on the steering column
- Only after completing the adjustment of the location and checking the functionality of our locking mechanism, you can tighten the bolts until the heads come off completely, use a “10” spanner for this purpose
- Exploded view of the lock
- From a cost point of view, replacing one contact group is the least expensive:
- All our actions are repeated in principle, as in the case described above with removing the lock, you will have to remove the casing, and so on
- To avoid the common nuisance associated with mixing up contacts, it is recommended to number them (or otherwise mark them) before disconnecting them.
- This measure will save your nerves and time
- Some models of locks have a locking ring in their contact group, and here we need an awl to remove it
- It’s important not to forget to put it back in place later.
- Then everything is assembled back and screwed to the steering column
That's all, all that remains is to finish watching the video and calmly change any part of the lock.
Ignition switch VAZ 2108-09 (reason for malfunction)
We tell you how to quickly change the ignition switch
. If possible, without even removing it
Before starting work, you need to de-energize the ignition switch of the VAZ 2108 ; to do this, as always, remove the negative terminal from the battery. Replacing the timing belt VAZ 2109 1.5 liter 8 valves with photos and videos. Next you need to remove the steering column cover. Afterwards, in order to facilitate the procedure for replacing the cylinder, remove the ignition switch. Replace the faulty lock a working one and reassemble everything in the reverse order. Replacing the front wheel bearing VAZ 2109 (21099.... Reinstall the ignition switch.
Pinout of lock VAZ-2110, VAZ-2111, VAZ-2112
Pinout of the ignition switch VAZ-2110:
- comes +12V for the microphone of the sensor of the inserted key;
- the mass comes when the driver's door is open;
- +12V goes to the starter (pin 50);
- +12V goes out after turning on the ignition (pin 15);
- +12V goes out when the key is inserted to pin 5 of the BSK;
- comes +12V to illuminate the lock cylinder;
- +12V comes from the battery (pin 30);
- not used.
Replacing the contact group of the ignition switch VAZ 2108
From a financial point of view, replacing a contact group is the least expensive. Everything in principle, as in the previous case with the lock , you will have to remove the lock and casing. Replacing the ignition switch on a VAZ 2101-VAZ 2107. To avoid troubles associated with mixing up the contacts, I recommend numbering or somehow designating the wires where each one was connected, this will save time and nerves. Some models of locks have a retaining ring in the contact group; you will need an awl to remove it. When finished, be sure to reinstall the retaining ring.
Malfunctions of the ignition switch of the VAZ 2109 and their correction
Malfunctions of the ignition switch of the VAZ 2109 are quite common. This element consists of two parts: mechanical and electrical. Because of this, malfunctions of the ignition switch on the VAZ 2109 can pose a big problem for many, which they cannot cope with on their own. This publication aims to familiarize the reader with all known malfunctions of the ignition switch and explain how to fix them.
What is
First, let's look at the structure of the castle. Let's find out what it looks like, what it consists of, what its operating principle is, and so on:
- As mentioned, the ignition switch is a very important element of the VAZ 2109 car, because almost all available equipment is connected to it.
Note. Although there are components that do not depend on the lock in any way. Here they are: license plate lights, brake lights, parking lights, hazard lights, interior lights and lights on the dashboard.
- There are different types of ignition switches: new or old type. The first version without a relay has three positions and a short key, the second with a relay has four positions and a long key.
Scheme
Below is a typical diagram of the ignition switch on the “nine”.
The lock belongs to the car's ignition system. Let us note right away that if problems are observed, you can fix them yourself, because, as a rule, the “nine” is equipped with an outdated ignition system that does not require diagnostics and repair at a service station.
How to make sure there is a problem
Below is a tip on how to make sure that the ignition switch is really not working:
- We insert the ignition key and turn it to a certain position. A short circuit in the circuit must necessarily occur. We look at the diagram: if the key is in position “1”, is the external lighting or control devices working;
- It is recommended to check at all positions of the lock. If deviations from the norm are observed, there is a problem with the lock;
- You can also check the functionality of the ignition switch in the following way: turn the steering wheel, which should not be blocked. The lock on a working steering wheel should only work when the key is turned a second time from position “1” to position “2”;
- You can reliably check whether the lock works like this: take an ordinary portable lamp and connect one end to ground, the other to the lock. We turn on the ignition - if the light is on normally, then the lock is in order. If the light glows dimly or does not light at all, the lock is faulty.
Common faults
Among them, the following are in first place:
- The lock is jammed. This is even observed in the “nines” when a new lock is installed. The reason is a manufacturing defect or what is given below.
Note. The lock may also jam due to problems interacting with the starter. In this case, you need to inject a little silicone grease inside the lock and do this every time the lock jams.
- The lock may wear out over time and this will cause it to perform poorly;
- The ignition switch easily becomes unusable in the event of an unsuccessful attempt to steal a car, as well as any careless handling.
Repair and replacement
Typically, the lock can be repaired. If this fails, you will have to completely replace it (see Replacing the VAZ ignition switch on your own). Repairing a lock in most cases comes down to replacing the cylinder or contact group. If after this the problem has not been resolved or it is possible to change the entire lock, then it is better to do the latter.
Larva and its replacement
So, we do the following:
- Remove the steering column cover and unscrew the fastening bolts that tighten the ignition switch clamp.
Note. The bolts have sheared heads and then you will have to use a hammer and chisel. The bolts are first loosened by blows with a chisel, and then unscrewed with pliers.
- We separate the two parts of the clamp so that they disengage;
- The larva can be changed already at this stage of the operation;
- We take out the side pin that holds the cylinder in the lock.
Advice. The cylinder can be easily removed with a thin screwdriver, for example, from a watch. At the same time, you need to tap the lock with a hammer.
- If you cannot pull out the cylinder after the side pin has been removed, you can try to drill out the cylinder using a thin drill;
- If again it was not possible to remove the cylinder, then it is recommended to finally remove the lock;
- Remove the wire plugs.
Note. One of the plugs (the one with the larger connector) is located under the dashboard. To remove it, you need to put your hand under the panel.
- If the ignition switch has a relay, then take it out from under the panel;
- Disconnect the connector;
- We also remove the ground wire;
- Remove the cover by pressing the latch, and then the contact group;
- Now it will be much easier to remove the larva;
- We replace it with a new one;
- We check the work on site before putting everything back into place. We turn the key inside the lock - all the processes described above should work.
Note. Don't forget to also check that the steering wheel lock works. If the steering shaft does not lock when the steering wheel is turned completely, we adjust the correct location of the lock on the column.
- After a thorough check, making sure that everything works correctly, tighten the bolts until the heads come off. It is advisable to use the key at “10”.
contact Group
Replacing the contact group of the lock, if this is the fault of the lock, is the most profitable from the point of view of monetary costs. The actions boil down to removing the lock (how to do this is written above). Here are some guidelines to follow:
- Before disconnecting contacts, you need to number them to avoid confusion;
- Some models of locks in the contact group design have a retaining ring, which must first be removed. This is most easily done using an awl.
In this way, malfunctions of the ignition switch on the VAZ 2109 can be eliminated with your own hands. During the work process, it will be very useful to study various photos, materials and diagrams, and watch a thematic video review. The cost of repairing or replacing the lock will be minimal, since all the work presented in our instructions is carried out independently.
MasteraVaza.ru
Self-replacement of the ignition switch of a VAZ 2108
- For this work, you need to use special bolts with break-away heads; I do not recommend using twenty-millimeter M6 bolts instead, since in this case it will be easier not only for you, but also for car thieves to remove your ignition switch.
- Using a chisel, you need to unscrew or knock down the bolts.
- Before replacing the lock , turn the key to the “I” position so that the latch that locks the steering shaft mechanism can enter the lock .
- Now that nothing is in the way, you can begin installing the new switch .
- Install it on the steering column, secure it with a bracket, then tighten the structure with new mounting bolts.
- After installation, do not forget to make sure that the steering shaft locking mechanism is working correctly; if the mechanism does not work, after a full turn of the steering wheel, you need to adjust the position of the ignition switch on the steering column.
- Upon completion of adjusting the position and checking the functionality of the locking mechanism, tighten the bolts until the heads are completely torn off, to do this, use a 10mm spanner.
What to do if the ignition switch fails?
It contains several contact groups. And when at least one of them loses its functionality, the entire system of the machine is de-energized. The main problem lies in the ignition switch relay. Sometimes you can purchase a similar one and replace it yourself, or change the lock entirely. To test a group of contacts, disconnect the negative terminal on the battery.
Next, the group with the wires located in the case at the bottom of the steering wheel is turned off in the car. Now we take an ohmmeter, which will help take resistance readings. The contacts are alternately connected to the chip terminals, the ignition is turned to different positions. Contact points are checked in pairs. If a weak contact or its complete absence is detected, the reason lies, most likely, in the lock core, which can be replaced. If the breakdown is significant, the entire relay or lock is rearranged. In such cases, the lock is removed. To do this, the trim from the steering column is dismantled and the chips are disconnected. This can be done with a screwdriver by pressing it on the locking elements. You should act carefully, without much effort, so as not to damage the wiring.
It's time to unscrew the bolts that hold the lock. The key is inserted into the ignition and turned to zero. Now use a screwdriver to press the button that secures the locking device in the column. When disconnecting wires, we recommend marking their sequence so as not to confuse them later.
Installing a new lock is carried out in the reverse order and does not create any difficulties. You can proceed according to the diagram that is included with the device kit.
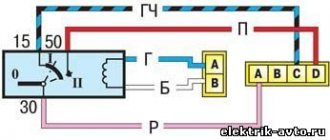
Wiring diagram for the ignition switch on the VAZ-2108, 2109 and 21099
Wiring diagram for the ignition switch on the old-style VAZ-2108, 2109 and 21099 with an unloading relay.
Pinout of the VAZ-2109 ignition switch with unloading relay:
- comes +12V in position I, II, III (parking)
- comes +12V in position I, II, III (parking)
- comes +12V in position III (parking)
- position I, +12V goes out after turning on the ignition (contact 15/2), disappears at start (II);
- position I, +12V goes to the starter (pin 50);
- position I, +12V goes away after turning on the ignition (pin 15), does not disappear when starting II;
- +12V comes from the battery (pin 30);
- comes +12V constantly.
Wiring diagram for the ignition switch on the VAZ-2108, 2109 and 21099 of the new model, without a relay.
Pinout of the new VAZ-2109 ignition switch:
- comes +12V constantly
- comes +12V constantly
- +12V arrives after turning on the ignition (pin 15), does not disappear when starting II;
- +12V arrives after turning on the ignition (contact 15/2), disappears at start (II);
- position I, +12V goes to the starter (pin 50);
- +12V arrives after turning on the ignition (pin 15), does not disappear when starting II;
- +12V comes from the battery (pin 30);
- comes +12V constantly.
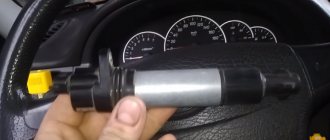
Photo 1, pinout of the new VAZ 2109 ignition switch
Photo 2, pinout of the new VAZ 2109 ignition switch
Schematic diagram
The basis is a mechanism in the form of a switch, which, when turned with a key, begins to connect various contacts. In most cases, the lock remains operational in several positions, each individually responsible for certain actions when the engine starts.
The initial position is responsible for powering the panel instruments and transmitting energy consumption throughout the machine. The following position is responsible for starting the motor. There is one more mode left - steering column locking. Each of them corresponds to a separate contact group of the VAZ 2109 ignition switch, which is responsible for:
- operation of side lights;
- alarms;
- light inside the cabin;
- illumination of the number located at the back;
- stop lights.
Ignition failure is a rare occurrence; few have experienced this. But when a tire gets punctured or the generator malfunctions, there is always a chance to get to the service station, but with a failed ignition, you shouldn’t have any illusions about moving.
Ignition switch VAZ 2109 faults
The ignition switch of the VAZ 2109 is a very important and at the same time very capricious mechanism of the car. And in today’s article we will try to analyze its importance and capriciousness, i.e. its malfunctions. The ignition switch serves to supply voltage to electrical circuits depending on the location of the key. The castle consists of 2 parts. These are the mechanical and electrical parts.
As has already been written, in our nine the ignition switch is a very important mechanism. Almost all of the car's electrics pass through it. Without an ignition switch, only a few devices can operate and these are:
1. Side lights.
2. Emergency alarm.
3. Interior lighting.
5. Rear number plate illumination.
This is necessary so that when stopping on the highway or in the city in an unlit place, we do not need to turn on the ignition in order to be noticed.
Pinout of the ignition switch VAZ-2101 - VAZ-2107
The ignition switch on these cars is located to the left of the steering column. It is fixed directly to it using two fixing bolts. The entire mechanism of the device, except for the upper part in which the keyhole is located, is hidden by a plastic casing.
On the visible part of the ignition switch housing, special marks are applied in a certain order, allowing inexperienced drivers to navigate the lock activation mode when the key is in the hole:
- “ ” – a mark indicating that all systems, devices and instruments that are turned on using the lock are turned off (this does not include the cigarette lighter, interior lighting, brake light, and in some cases the radio);
- “ I ” is a mark informing that the vehicle’s on-board network is powered from the battery. In this position, the key is fixed independently, and electricity is supplied to the ignition system, to the electric motors of the heater and windshield washer, instrumentation, headlights and light signaling;
- “ II ” – engine start mark. It indicates that voltage is applied to the starter. The key does not lock in this position. If you release it, it will return to the "I" position. This is done so as not to subject the starter to unnecessary loads;
- “ III ” – parking mark. If you remove the key from the ignition in this position, the steering column will be locked with a latch. It can only be unlocked by inserting the key back and turning it to position “0” or “I”.
The ignition switch has five contacts and, accordingly, five terminals, which are responsible for supplying voltage to the desired unit. All of them are numbered for convenience. Each pin corresponds to a wire of a certain color:
- “50” – output responsible for supplying current to the starter (red or purple wire);
- “15” – terminal through which voltage is supplied to the ignition system, to the electric motors of the heater, washer, and instrument panel (double blue wire with a black stripe);
- “30” and “30/1” – constant “plus” (pink and brown wires, respectively);
- “INT” – external lighting and light signaling (double black wire).
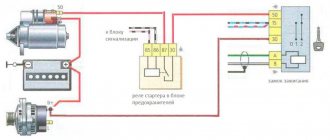
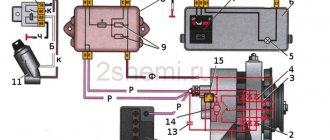
VAZ 2109 ignition switch diagram.
The ignition locks for the VAZ 2109 can be of different designs. There are 2 samples, this. new and old. The new one differs from the old one only in the absence of a relay, a shortened key and three key positions instead of four.
1. Ignition relay
2. Ignition switch connector
3. Ignition switch.
The ignition switch of the VAZ 2109 is faulty.
The most common problem with the ignition lock is its working out and jamming. If these symptoms occur, you should immediately replace the entire ignition switch, because in case of jamming, you can simply burn the starter and then the repair will cost you the cost of the starter. Another common problem is the failure of the contact group. In this case, several devices fail at once. For example, my low beam headlights, heater, cigarette lighter, and rear window heater immediately stopped working. Replacing the contact group with a new one, everything worked immediately.
© 2021 Repair and tuning of domestic cars Joomla! is Free Software released under the GNU General Public License.
How to replace the ignition switch, check the contact group and replace it on a VAZ 2108-VAZ 21099?
Replacing the ignition switch:
Removal: 1) Starting with “The battery is a rechargeable battery,” unscrew the nut that holds the “-” terminal on the battery and then remove the terminal. (How to remove the negative terminal from the battery, see the article about “Replacing the battery on a VAZ”, in the “first” paragraph)
2) Then remove the steering column cover and both steering column switches. (How to remove the casing and both switches, see the article: “Replacing under-steering switches”)
- Further, for clarity, the operation will be shown with the steering wheel removed, but you can still remove the ignition switch without removing the steering wheel.
3) Next, insert if the lock allows it, then insert the ignition key into it and put it in position “0”.
Note! The key must be installed in this position only to disable the anti-theft device!
4) Now remove the four bolts that secure the ignition switch. If you have these bolts with a cut off head, then knock them down with a hammer and chisel. (Be sure to read the “Important!” paragraph)
Note! If that doesn’t work, then try drilling out all four bolts, but just do it carefully without damaging anything!
5) Once the bolts are loosened, use pliers to remove them from the hole.
6) Next, remove the bracket on the left side, and the ignition switch on the right.
7) Now disconnect the wire block from the electrical connector.
 And finally, crawl under the dashboard, and there, disconnect the connector going from the ignition switch to the relay.
Installation: Installation of a new lock is carried out in the reverse order of removal.
Checking the contacts of the wire block:
1) First, remove the lock from the car using the text above.
2) Next, using an “Ohmmeter” or a “Multi-meter” with the “Ohmmeter” function enabled on it, connect its leads to the electrical connector and then look at the readings of the device.
Note! The device should clearly display “0”; otherwise, replace the contact group!
Replacing the contact group:
1) First, on the removed ignition switch, use a screwdriver to unscrew the screw that secures the ignition switch cover.
2) Then use a screwdriver to press out the two plastic latches securing the lock cover.
3) Then remove the cover.
4) And finally, remove the contact group from the ignition switch.
Note! Installation of the contact group is carried out in the reverse order!
Important! Not on all cars of the Samara family the ignition switch is attached to the steering column with four bolts; on some cars it is attached only with two bolts and on top it is secured with a hook indicated by a red arrow!
Additional video material: Below we have prepared a video related to replacing the ignition switch on cars of the Samara family.
Design and troubleshooting of the ignition switch of the VAZ 2109
One of the key components on a VAZ 2109 vehicle is the ignition switch. The electrical circuit of the machine uses it as a switching unit, providing voltage to the necessary power circuits. If this does not happen due to a malfunction of the switch, then it is possible to turn off individual groups of consumers or the car as a whole - it simply will not start.
Design and principle of operation of the lock assembly
On a VAZ 2109 car, 2 standard modifications of the lock can be installed. The old one has catalog number 21080-3704005-60. It features four key positions (long), and also contains an ignition relay. The new unit with catalog number 21080-3704005-30 has only three key positions and does not have a relay.
To connect all the wires to the VAZ 2109 car lock, a contact group is used. Each of the key positions has its own blocking, and therefore consumer groups.
Contacts “30” and “30/1” are closed. All dependent power circuits are disabled.
In this position, voltage is supplied to the elements of the ignition control system. To do this, the white and brown wires are connected, and the pink wire is connected to black and blue. In this case, several groups of contacts are formed. For example, “30 INT” turns on the power supply circuit for external lighting, including high beam lighting, and the dashboard lighting. Contacts “30/1” and “15/1” provide voltage to the direction indicator lamps, reverse lights, elements of the ignition system, etc. The pair “30/1”, “15/2” powers the low/high beam headlights, fog lights , washer, fans.
The ignition relay, which was switched on in the previous step, continues to operate. The main one is a pair of contacts “30”, “50”, which provides voltage for the starter to operate. In parallel to it, circuits should be formed from contact connections “30/1”, “15/1”, as well as “30/1”, “15/2”. The consumers that are connected in this case are similar to those described for position “I”. The pink wire in the contact pair, together with the black one, is shorted to red (instead of blue).
Used to supply voltage to the components of the parking (“30/1 P”) and side lighting/dashboard lighting (“30 INT”) components. The black wire forms a closed circuit with the brown and pink wires.
The lock and its circuit perform two functions: electrical and mechanical. The essence of the first is to close certain groups of contacts based on the position of the key. From a mechanical point of view, when the ignition is turned off, the steering wheel is blocked, making it impossible to rotate. That is, the second function is protective.
Possible malfunctions and ways to eliminate them
The nature of the lock assembly malfunctions on a VAZ 2109 car can also be electrical or mechanical.
The first group includes violations of the integrity of electrical circuits in the switch at a certain position of the key. If there is no contact, then the connected consumers may not work, or the car will not start at all. If there is contact, but the wrong parts of the circuit are closed, this is fraught with a short circuit and thermal damage to the lock. It will begin to melt and a characteristic smell will appear. Depending on the scale of the disaster, the contact group will most likely need to be replaced.
From a mechanical point of view, the core/larva may become stuck in some position. In this case, it will be physically impossible to turn the key in the lock. The only correct repair option is to replace the entire assembly.
To diagnose faults in electrical circuits, you need to stock up on the following tools.
- Multimeter or tester. If it is not available, as an option, you can use a control light operating at 12V voltage.
- A set of screwdrivers and keys for dismantling the lock. Since the only option for repairing mechanical faults is to replace parts that have failed, they will come in handy in this case as well.
Before starting diagnostics, you will have to disconnect the terminal block and ring all contacts in the sequence that corresponds to each of the key positions. For clarity, you should have an electrical diagram of the unit at hand. If the circuit is closed, there will be a resistance indication on the device.
Replacing the lock should begin with de-energizing it. To do this, you will have to loosen the fastening nut and remove the negative terminal of the battery. After this, the protective and decorative casing and the turn/window washer switches are removed. The lock is attached to the steering column using four screws or two screws and a hook latch. It may be difficult to remove due to the screws. In this case, they will have to be cut or drilled, doing everything extremely carefully. The terminal block is disconnected, and the dismantling process can be considered complete.
Assembling a new lock assembly occurs similarly, but in reverse order.
Steering lock testing
Steering wheel testing
If you don't check the steering lock, you may encounter certain problems in the future. Therefore, do not waste your time on this event. It consists of removing the key from the ignition and turning the steering wheel at a slight angle.
- If there is no lock, you will need to slightly adjust the position of the lock. Make sure it fits into the groove located on the steering shaft.
- If the locking is effective, you will only need to tighten the four installed breakaway bolts until they stop. Twist until the heads break.
When the lock installation is completed and the test has passed, do not forget to connect the device to power and start the engine. If it starts, all systems dependent on the ignition switch are working, you can fully begin reassembly. Follow the reverse instructions for removing the casing and steering column switches. It would not be amiss to check the condition of certain nodes along the way. It is quite possible that some of them also need replacement or a little preventive maintenance.
Welcome! The ignition switch breaks quite rarely, but it still happens. After a lock breaks, it of course needs to be replaced with a new one, but how to do this, you ask? Some people still know the answer to this question, but some do not. For those who don’t know, we have prepared this article, which will describe in detail the process of replacing the ignition switch. And at the end of this article you will find a video clip that will describe in detail the process of replacing this lock.
Note! To replace the ignition switch, you will need the following tools: First, you will need screwdrivers, and you will also need a drill, a small hammer, pliers, and you will definitely need to stock up on a chisel!
When do you need to change the ignition switch and contact group? It must be replaced if it breaks, as well as if the key is lost, and even if the cylinder in the lock stops turning and is stuck in one place. The contact group must be replaced if it is deformed, and even if, after turning the key in the lock, the car’s engine stops starting.
Note! Before you immediately say that the contact group of the lock is to blame for everything, first check the contacts of its wire blocks for functionality. (How to check the contacts of the contact group, see below in the section: “Checking the contacts of the wire block”)