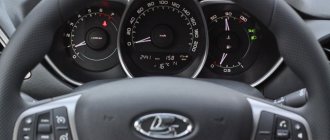
Devil-26rus › Blog › Tuning the dashboard of Kalina/Prior
It all started when my father installed an RGB
dashboard diode strip on his dashboard; many people had done this before, but my father’s eyes strained from the excessive brightness. Here comes some food for thought. Since for this undertaking I used a ready-made RGB controller from the Middle Kingdom, how to make the backlight dimmer without resorting to interfering with the circuit of the controller and tape. I’ve been wanting a Gamma diode panel for a long time, and then the idea came naturally.
We mark the plans for implementation and let's go. It is necessary to make the arrows change the light, so that the scales, separately from the arrows, change the light, and this happens by scrolling the oddometer button.
To begin with, I used an American tint film for the experiment. Unfortunately, my experiment was a fiasco. In the cold, the film began to move away from the lining with the scales, and every day more and more bubbles began to appear.
I thought, I need to do something about this; attempts using a primer did not end in success, and the glossiness of the film, as it were, was also not the limit of desires. Looking at the overlay, I thought, what should I tint you with? Oh yes, I tinted the taillights on the 15k with a special varnish, and it burned on my head. No, unfortunately not a halo. And something else.
I bought a bottle of varnish and started creating. This was the first time, and it didn't work out either. Since the varnish began to react and the varnish curled up. Damn, how can you do the same! It’s good that the scales from the PP remained from my former Kalinka, where I changed them to tuned ones.
Experiment part two. I thought it was wrong and tried it by changing the dosage of the varnish. I applied a very thin layer and waited an hour. Then four more layers with an interval of about 30 minutes. Another couple of hours of drying and everything worked out.
see also
Comments 18
It turned out great!) I also did the overexposure, but I didn’t bother and made the tidy red. I plan to buy a device from Priora 2, but this is for the distant future.
Thank you. She won't suit you
Well, what if you install a different connector? (just run all the necessary wires)?
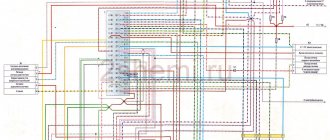
Unfortunately, it’s neither the connector nor the fastening. The mount is absolutely the same, the problem is that this dashboard has a CAN bus. Most of the evidence on it flies along it. There is no converter from analog to CAn; there is a converter from can to analog. I came across an adapter for a Priora so that I could install a dashboard from a Priora 1 on a Priora 2. What is this for? There are tuned Gamma dashboards; to unify them, we made an adapter that converts CAN commands into analog and displays them on the dashboard. If you had E-gas, you could get by with a little money, change the brains of the M74 to the M74can, make small changes to the pinout of the ECU connector and add two pins CAN H and CAN L and bring these pins to the dashboard. Or install second M74CAN brains as a CAN adapter, which will receive signals from the sensors and send them to the control panel. In short, there is no point, it’s better to consider something like PP Flash x4 or Gamma. It will be less expensive.
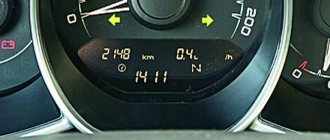
It's sad, I liked the appearance of the Priora 2 panel. I have a cable gas pedal. I was thinking about the instruments of Kalina 2 or Grants, but I don’t like the lack of fuel level and temperature indicators with arrows, they are all on the screen. (And I’m used to monitoring the temperature and fuel level) Then I’ll look at the Flash x4 or Gamma software, maybe I’ll find something I like.
Granta and Kalina 2 are similar to Priora 2 via CAN, I have Kalina 2, the fuel level is displayed on the displays, but the problem is with the temperature, you have to choose either the instantaneous flow rate so that it shows either the temperature, I got tired of this problem and installed a BC. And so I scrolled through Avito, maybe for normal money I can get a Flash x4, there was one on the former Kalinka, the tidy is awesome, RGB lighting, the boletus is clear. And it looks awesome to my taste.
Mmm looks cool, I'll write it down in my notes. Thank you very much!
It’s a pity, of course, that it won’t fit from the Priora, then I’ll think about other options.
Everyone likes the Priorovsky, I would like the Kalina 2 to be something like this, but alas, my tidy is related to the Grantovsky and not the Priorovsky.
It's a shame, of course, the tidy is chic.
In its external likeness there is an Intelm dashboard with navigation, but the price is space, I wanted it, but I wasted money and bought Flash x4
Of course, it really costs space, this is because of the color navigation display, if it weren’t there(
In its external likeness there is an Intelm dashboard with navigation, but the price is space, I wanted it, but I wasted money and bought Flash x4
Source: www.drive2.ru
Which LEDs to choose for instrument panel illumination
To highlight the readings in the Granta or Kalina instrument cluster, green SMD-3528 LEDs are used. Instead, you can use SMD LEDs of different brightnesses. Here are the most commonly used:
- very bright SMD 5050 (luminous flux - 15 Lumens);
- bright SMD 3825 (brightness 7-9 Lumens)
- medium brightness SMD 3528 (about 5 Lumens);
- medium brightness SMD 3028 (about 5 Lumens);
- not bright SMD 3020 (about 4 Lumens);
- not bright SMD 3014 (about 3 Lumens).
How to change the color of the instrument cluster illumination
1. Use SMD of the desired color. For example, use white LEDs to illuminate one part of the panel, and blue LEDs for the other.
2. Use a light filter (electrical tape or film of different colors) together with white LEDs. We stick it on the desired area, as a result of which we get the illumination of the desired color. To change the color, you do not need to use a soldering iron, just disassemble the instrument panel and stick a film of a different color.
It is worth noting that the hands have an orange coating. To change the illumination of the hands, wipe off the varnish with nail polish remover and, if necessary, apply a new varnish of a suitable color. Another option is to use LEDs for the arrows of the desired color.
You can change the backlight of the screen (display) not only by replacing its LEDs, but also by turning the film over. First, we tear off the film from the display, clean the remaining adhesive with a solvent and glue the film on the back side. This results in an inversion of the panel display:
3. Use RGB-SMD LEDs. If you want to change the backlight color at once. In this case, you will have to additionally output switching control.
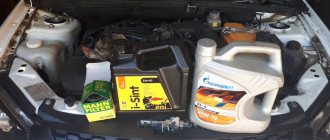
Materials for tuning
Tuning the instrument panel will require the purchase of materials such as spray paint, varnish, primer and solvent. All these materials can be found in any auto parts store for VAZ. It is worth considering that the first 3 substances must be intended for working with plastic, and the solvent can be ordinary.
Before applying paint, it is necessary to degrease the coating, having previously cleaned it of contaminants. After this, a two-layer primer is applied. If you have set yourself the task of updating the entire interior, you will need to paint the plastic trim in the desired places in the same way.
After allowing the primer to dry thoroughly, you need to apply paint in 2 layers. This will help improve the overall appearance of the interior by hiding unsightly and worn-out plastics under layers. To protect the instrument panel from cracks and damage, the painted surface should be treated with clear varnish.
After waiting for the varnish to dry completely, you can begin assembling and installing the instrument panel. All work is done carefully and carefully, since there is a possibility of damaging the painted surface. Upon completion, you can evaluate your efforts; now you won’t need to update the panel for several years. Tuning is complete!
Do-it-yourself dashboard overexposure
You will need: remove and disassemble the instrument cluster, SMD LEDs (unsoldered from LED strip or LED lamp), soldering iron.
The process of replacing LEDs on the instrument panel board consists of unsoldering the standard SMD LED and soldering a new one in its place. During such tuning, there are several important points to consider:
- take your time so as not to damage the conductive traces of the board;
- observe the polarity (SMD LEDs have a bevel on one side, install a new LED in the same position);
- do not overheat the LEDs; high temperatures may cause them to fail;
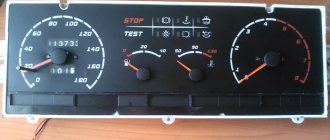
After soldering the required LEDs, it is recommended to check the backlight. To connect the instrument cluster at home, you need to apply +12V to pins 19 and 21, and ground to 17. You can also verify that the installed LEDs are working properly using a multimeter in “tester” mode, connecting the probes to the LED according to the polarity (red probe is plus) :
If all LEDs are installed successfully, reassemble in the reverse order. Relighting the instrument cluster of Grants or Kalinas is a great way to make your car more individual and stylish. It is noteworthy that there are a lot of options for implementing such panel tuning, but which style suits you best? Participate in the survey, share video materials and photos of your improvements.
Let us remind you that the website presents other modifications to the instrument panel, for example, you can reflash it and install an outside air temperature sensor.
Source: xn--80aal0a.xn--80asehdb
Installation of additional sound insulation
When tuning the interior of the Lada Kalina, additional sound insulation should be installed. As you know, the comfort of a car is commensurate with the noise level of the car. For sound insulation, materials such as bombs, vibroplast and modelin are used. After applying soundproofing materials, you need to leave them for a while so that they are well strengthened.
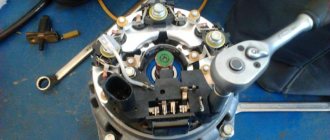
Hi all. Let's begin the epic. Our experimental device was a Lada Kalina instrument panel from a friend’s car. The green color of the instruments is somehow already starting to bother me, so it is to be demolished, long live the approach to foreign basins) Let's go... What we need: the instrument panel itself, a white and blue LED strip, wires, alcohol or vodka and of course cotton swabs) 1.
We take the shield itself, on the back side we see 10 bolts for a slotted screwdriver, unscrew them.
2.
Removing the back cover we see the board. it also has bolts: the red ones hold the light diffuser on the front side, on which the scales are glued; green ones hold the LCD screen housing. And the screen pressure plate latches are marked in blue.
3.
Before unscrewing the bolts in the previous photo, remove the arrows, turn the tacho and speedometer counterclockwise and pull them towards you, temperature and gas clockwise in the same way.
4.
We unscrew the bolts that were on the board and disconnect everything into components.
Electronic instrument cluster flash x4 for Lada Priora, Kalina, VAZ 2110-2112
Electronic instrument cluster with GPS navigation Itelma on Lada Kalina
Instrument cluster connector for Lada Priora, Kalina, Kalina 2
Complete set of instrument cluster with GPS navigation Itelma for Lada Kalina
Electronic instrument cluster gamma gf 822 for Lada Priora, Kalina, VAZ 2110-2112
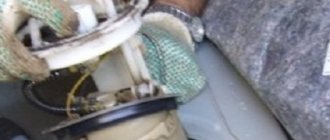
We dismantle the device ourselves
To remove the dashboard in Kalina-2, first dismantle the plastic cladding. The part is held in place by three self-tapping screws, two of which are immediately visible. Look at the tidy below and you will find them. The third screw, in turn, is located in the fuse compartment.
The fuse compartment will be covered with a cover.
In the figure, the required element is indicated by the number “3”.
In the absence of cladding, it is easy to find 4 screws holding the tidy in place. By unscrewing them, the block can be completely dismantled. But don’t rush: when dismantling, you will need to disconnect the connector. This means that even before performing all operations, the battery terminals are disconnected.
Usually only the negative terminal is disconnected. The part is held in place by one nut, and to unscrew it you need a 10mm wrench.
Changing the color of the shield
Original design of the Kalina panel
Not all Kalina owners like the Lada dashboard. Some car enthusiasts are unhappy that it is gradually losing its prestigious appearance. Others believe that the cheapness of the plastic spoils the interior. Still others are simply tired of plain cladding and want to complement it with bright inserts of a different color. All of the above problems can be solved by simply repainting the dashboard. The shield needs to be repainted in darker colors, otherwise its alteration will be very noticeable.
First, you need to completely disassemble the panel so as not to spoil its appearance, and then paint over it with high quality. After dismantling, remove the dial, buttons and arrows, as there is a possibility of staining small parts.
Replacing LEDs
Having disassembled the instrument panel unit, you will notice that the illumination of two scales and the display is provided by flat LEDs. They, in turn, can be replaced with parts of the same standard size. But remember one rule: the switching polarity cannot be violated. On a planar diode, polarity is indicated by the presence of a “bevel” on one side.
There is an example when standard elements were replaced with blue light diodes:
The next video will show how you can further improve the tidy by simply replacing the LEDs.
The operating voltage of one diode is 3-3.5 Volts. Do not install elements designed for other voltages. It is not recommended to use LEDs that are too powerful and consume significant current.
Adding a digital scale
For those who have experience working with plastic, the following tuning option is recommended.
In the instrument panel, under any of the two scales, you can cut out a window in which a standard indicator is fixed. We are talking about a digital indicator consisting of two or three separate segments.
The plane of the tidy is cut through, an indicator is attached to the window
When the modification is completed, the dashboard looks like this:
3-segment indicator installed and secured
If there are glares, use a simple solution: cover the inside of the glass with a matte tint film. Good luck.
Rework by replacement
This option seems obvious: the speedometer and tachometer can be left in place, and the computer display can be replaced. In reality, such a replacement is difficult to perform. The on-board computer in Kalina-2 is integrated into the tidy circuit, so you cannot get rid of it. The instrument cluster unit is usually replaced as an assembly, and third-party companies have been able to provide several suitable solutions.
You can install a more “complicated” dashboard than in Kalina, produced by ITELMA. This company is a supplier of electronics for all VAZ cars. We will leave the choice to the owner. Happy tuning!
Tuning the dashboard on Lada Kalina
Many owners of Lada Kalina are not satisfied with the appearance of the dashboard, and especially its lighting. This issue can be solved simply by installing additional lighting using an LED strip. At the same time, you can safely experiment with colors to choose the backlight color that is most pleasing to the eye.
The LED strip installation procedure is simple, but you need to take into account some nuances. In order to independently tune the dashboard on the Lada Kalina and install LED backlighting, you need to follow the instructions below.
First of all, you need to remove the instrument panel frame. Inside the frame, in its upper part, there are two self-tapping screws hidden under plugs. Use a thin flat screwdriver to remove the plugs and use a Phillips screwdriver to unscrew the screws. After this, pull the frame towards you so that the upper part comes forward.
The lower part of the frame is attached to two clamps located in the corners. You need to bend them and remove the frame. After this, unscrew the two screws securing the instrument panel and pull it out towards you. Disconnect the power wires and remove the instrument panel.
The glass of the shield is attached to clips, which must be carefully bent so as not to break them or scratch the glass. Then we remove the arrows (it is better to mark what position they were in), strictly pulling them towards ourselves in the direction of the pins on which they are attached. On the reverse side of the instrument panel of the Lada Kalina there are clamps that secure its outer part. We bend them and remove the front side of the instrument panel.
The interior of the Kalina dashboard has a peculiar shape - it is flat at the bottom and arched at the top. The LED strip can be installed in three ways, which determine the level of its illumination.
If you lay the tape around the entire perimeter, the light will be quite bright, but this option is acceptable if you want to use LEDs in neutral colors - blue, green. An average level of illumination can be achieved by laying the tape along the upper arc, and by installing LEDs below, you will get a slightly dim light. In any case, the choice is yours.
Along the perimeter in the inner part of the dashboard there are protrusions that fix the glass of the shield, which need to be carefully filed. Moreover, this must be done in such a way that the upper parts of the protrusions remain, and the lower parts are removed just enough so that the LED strip fits in them.
After this, install the tape and connect it to the nearest power point. If you don’t like the level of illumination, experiment with other options, and only when you settle on one of them can you paste the tape.
Connecting the LED strip to power is best done from the back of the dashboard, so you will need to drill a hole for the wiring. When connecting wires, do not twist them; it is best to solder and insulate them.
After the tape is connected and tested, we reassemble in the reverse order. At the same time, we must not forget that the arrows must be installed exactly in the position in which they were before removal.
Source: tuningvaz.in
Instrument panel tuning
When tuning the interior of a Lada Kalina, you should replace or simply change the appearance of the dashboard. To do this, the old panel is removed, and in its place either a new one is installed or upholstered with special material.
As mentioned earlier, you can use leather. Then the car will look very stylish. The material is carefully glued to the dashboard, holes for the instruments are cut out. When the material has fixed, you need to remove all unnecessary elements.
An interesting option for tuning the interior of the Lada Kalina would be an updated clock and its lighting. You can create your own clock markings and print them. Then take a transparent folder cover that allows light to pass through, and attach a printed dial to it, make holes on it, and thus get a dial of your own design.