Payment for goods and downloading of the book in electronic form (PDF format) is made on the website.
To do this, you need to find the book you are interested in and click on the “Buy” button. The price of the book is indicated on the button.
For convenience, the price on the website for residents of Russia, Belarus and Kazakhstan is presented in rubles.
For residents of Ukraine in hryvnias, and for all other countries - dollars.
After clicking on the “BUY” button, a payment window will open where you can select a payment system with which you can pay for the selected book using any bank card (Visa, MasterCard, MIR, etc.)
When you click on the “Pay by bank card” button, the Portmone payment system will open, which is the easiest way to make a payment.
In addition, the website offers four payment systems for payment:
- Yandex (payment from any bank cards, Yandex Money account, QIWI Wallet, terminals, etc.);
- Portmone (payment from any bank cards, Portmone account);
- PayPal (payment from any bank cards, PayPal account);
- WebMoney (payment from any bank cards, payment from WebMoney wallets).
Payment via Yandex Cashier
After selecting payment via Yandex, the Yandex Cashier payment system will launch, where you need to select a convenient payment method (bank card, QIWI, Yandex Money account, etc.)
After specifying payment details and confirming payment, payment for the goods will occur.
If you have a bank card in a currency other than the ruble, then the money will be debited from the card at the rate of the Central Bank of Russia at the time of the purchase.
This payment method is optimal for residents of Russia, Kazakhstan and Belarus.
Official website of the Yandex Kassa payment system https://kassa.yandex.ru
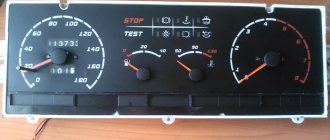
General tuning aspects
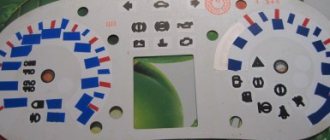
The simplest tuning of the VAZ 2106 dashboard is to purchase a ready-made set of accessories and replace standard devices. You can install it yourself using the instructions included with the kit. More labor-intensive is the tuning of individual devices, which involves replacing stickers and arrows.
When changing arrows and stickers, you need to be careful, as these parts are very fragile.
Tuning the VAZ instrument panel can be done by replacing the meter dials with white ones and installing overlays on the panel. You can cover the panel with artificial leather or leather if you have sufficient funds. Before stretching the material, the surface of the shield must be cleaned and then adhesive must be applied in an even layer. Next, press the leather or substitute over the entire surface and wait until the glue dries. At the last stage, you need to process the edges, giving it an aesthetic appearance.
Payment via Portmone
After selecting payment through Portmone, the payment system will launch, where you need to select the payment method: bank card or Portmone account.
The price in the Portmone payment system is converted into dollars at the exchange rate of the Central Bank of the country where you are located.
If you have a bank card in a currency other than the dollar, then the money will be debited from the card at the rate of the Central Bank of your country at the time of the purchase.
After specifying payment details and confirming payment, payment for the goods will occur.
Official website of the Portmone payment system https://www.portmone.com
Injection engine control unit diagram
Electrical connection diagram for the injection engine control system:
1. — Controller connector. 2. — Mass air flow sensor. 3. — Coolant temperature sensor. 4. — Crankshaft position sensor. 5. — Throttle position sensor. 6. — Oxygen concentration sensor. 7. — Speed sensor. 8. — Ignition module. 9. — Electromagnetic valve for purge of the adsorber. 10. — Electric fan relay. 11. — Electric fuel pump relay. 12. — Main relay. 13. — Fuse protecting the power circuit of the electric fuel pump relay. 14. — Fuse protecting the power circuits of the main relay. 15. — Fuse link. 16 - Fuse protecting the constant power supply circuit of the controller. 17. — Diode. 18. — Idle speed regulator. 19. — Injectors. X1. — Diagnostic block. X2. — Connection block to the vehicle electrical system.
Payment via PayPal
After selecting payment via PayPal, the PayPal payment system will launch, where you need to select the payment method: bank card or PayPal account.
If you already have a PayPal account, then you need to log into it and make a payment.
If you do not have a PayPal account and you want to pay using a bank card via PayPal, you need to click on the “Create an Account” button - shown with an arrow in the picture.
PayPal will then prompt you to select your country and provide your credit card information.
After specifying the information required to make the payment, you must click on the “Pay Now” button.
Official website of the PayPal payment system https://www.paypal.com
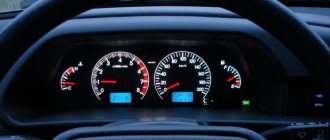
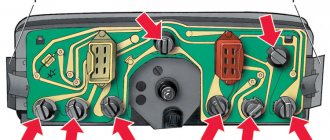
Dismantling instructions
Removing the VAZ 2106 instrument scale may be necessary when repairing and replacing its elements, tuning and modification. Dismantling is not difficult and will require a small set of tools: wrenches and screwdrivers.
Stages of dismantling the tidy
The removal procedure consists of the following steps:
- First of all, you need to remove the front box from below the tidy.
- Then you need to unscrew all the fasteners and pull out the lower latches.
- Remove the radio plate.
- Next, remove the casing from the steering column.
- The next step is to disconnect the wires. Each one needs to be marked to make assembly easier.
- Now you can dismantle the shield by disconnecting all connectors.
- After removing the sensors, they need to be sorted in order to assemble correctly.
After upgrading the instrument panel, assembly is carried out in the reverse order (the author of the video is Nikolay).
Payment via WebMoney
After selecting payment via WebMoney, the payment system will launch, where you need to select the payment method: bank card or WebMoney wallet.
If you already have a WebMoney wallet, then you need to log into it and make a payment.
If you do not have a WebMoney wallet and you want to pay in another way, you need to select any of the methods that WebMoney offers and make the payment
After specifying payment details and confirming payment, payment for the goods will occur.
Official website of the WebMoney payment system https://www.webmoney.ru/
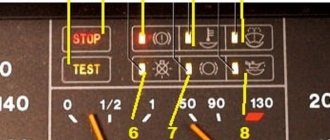
LED panel lighting
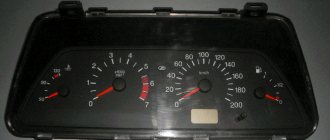
The most popular lighting for VAZ 2106 devices is LEDs. The panel looks especially beautiful at night. LED lamps of various colors are used for illumination. At least 2 bulbs are installed on the speedometer and tachometer dials. For small sensors, one LED is sufficient.
LED lighting around the entire perimeter will look more impressive. LEDs must meet the 12-volt voltage of the on-board network. When installing LEDs, be sure to observe polarity. Thanks to tuning, the VAZ 2106 tidy takes on an individual look and becomes more convenient and functional.
Downloading a book
After successfully completing the payment (by any method) and returning to the KrutilVertel store from the payment system website, you will be taken to the successful payment page:
On this page you need to indicate your e-mail, where access to download the book will be sent.
If you are already registered on our website, then simply follow the link to your personal account.
The book you purchased will be in your personal account, from where you can always download it.
Please note that after making the payment, you need to return back from the payment system website to the KrutilVertel website.
If for some reason you did not return back to the site and closed the payment system tab with a message about the successful completion of the payment, please let us know - we will send you a letter indicating access to download the book.
Electrical diagram of VAZ-2106 (new)
General diagram of the electrical equipment of VAZ 2106 / 21061 / 21063 / 21065, produced 1988 - 2001.
1 — front lights; 2 — side direction indicators; 3 - battery; 4 — battery charge indicator lamp relay; 5 – relay for turning on low beam headlights; 6 — relay for turning on the high beam headlights; 7 – starter; 8 – generator; 9 – external headlights; 10 – internal headlights; 11 – fan motor activation sensor; 12 — electric motor of the engine cooling system fan; 13 – sound signal; 14 – ignition coil; 15 – ignition distributor; 16 – spark plugs; 17 — carburetor solenoid valve; 18 – coolant temperature indicator sensor; 19 – engine compartment lamp; 20 – reverse light switch; 21 – oil pressure indicator sensor; 22 – low oil pressure indicator sensor; 23 – indicator sensor for insufficient brake fluid level; 24 — windshield wiper gearmotor; 25 – switch*; 26 — windshield washer electric motor; 27 – fan motor activation relay**; 28 – voltage regulator; 29 – windshield wiper relay; 30 – additional fuse block; 31 – main fuse block; 32 – relay-interrupter for alarm and direction indicators; 33 – relay for turning on the heated rear window***; 34 – brake light switch; 35 – plug socket for a portable lamp****; 36 – additional resistor of the heater electric motor; 37 – heater electric motor; 38 – heater motor switch; 39 – hours; 40 – glove box lighting lamp; 41 – cigarette lighter; 42 – alarm switch; 43 – instrument lighting regulator; 44 – brake fluid level indicator lamp; 45 – three-lever switch; 46 – ignition switch; 47 – rear window heating switch***; 48 – rear fog lamp switch; 49 – external lighting switch; 50 – lamp switches located in the front door pillars; 51 – gearmotors for electric windows of the front doors***; 52 – lamp switches located in the rear door pillars; 53 – parking brake warning lamp switch; 54 – interior lamps; 55 – fuel level indicator with reserve indicator; 56 – coolant temperature indicator; 57 – oil pressure indicator with low pressure indicator; 58 – tachometer; 59 – parking brake warning lamp; 60 – battery charge indicator lamp; 61 – carburetor air damper indicator lamp; 62 – side light indicator lamp; 63 – turn signal lamp; 64 – headlight high beam indicator lamp; 65 – speedometer VAZ-2106; 66 – carburetor air damper warning switch; 67 – power window switch for the left front door***; 68 – relay for turning on the electric windows of the front doors***; 69 – power window switch for the right front door***; 70 – rear lights; 71 – license plate lights; 72 – sensor for level indicator and fuel reserve; 73 – pads connected to the rear window heating element***; 74 – trunk lighting lamp; 75 – rear fog lamp.
The order of conditional numbering of plugs in blocks:
a – switch; b – ignition distributor sensor; c – windshield wiper and windshield wiper breaker relay; d – hazard warning and direction indicator breaker relay; d – three-lever switch.
* Installed if a vehicle uses a contactless ignition system. In this case, an ignition distributor sensor of type 38.3706 and an ignition coil of type 27.3705 or 027.3705 must be installed. ** Since 2000, it has not been installed and electric motor 12 is switched on directly by sensor-switch 11. In this case, instead of the previously used temperature sensor 11 of type TM-108, sensor-switch 661.3710 is used. *** Installed on car parts. **** Not installed since 2000.
Wiring diagram VAZ-2106 carburetor - full view:
Problems when paying with bank cards
Sometimes difficulties may arise when paying with Visa/MasterCard bank cards. The most common of them:
- There is a restriction on the card for paying for online purchases
- A plastic card is not intended for making payments online.
- The plastic card is not activated for making payments online.
- There are not enough funds on the plastic card.
In order to solve these problems, you need to call or write to the technical support of the bank where you are served. Bank specialists will help you resolve them and make payments.
That's basically it. The entire process of paying for a book in PDF format on car repair on our website takes 1-2 minutes.
If you still have any questions, you can ask them using the feedback form, or write us an email at [email protected]
Electrical diagram of VAZ-2106 (old)
General diagram of the electrical equipment of VAZ 2106 / 21061 / 21063 / 21065 produced in 1976 - 1987.
1 – front lights; 2 – side direction indicators; 3 – battery; 4 – battery charge indicator relay; 5 – relay for turning on low beam headlights; 6 – relay for turning on the high beam headlights; 7 – starter; 8 – generator; 9 – external headlights; 10 – internal headlights; 11 – sound signals; 12 – electric motor of the engine cooling system fan; 13 – fan motor activation sensor; 14 – ignition coil; 15 – ignition distributor; 16 – spark plugs; 17 – carburetor solenoid valve; 18 – coolant temperature indicator sensor; 19 – engine compartment lamp; 20 – reverse light switch; 21 – oil pressure indicator sensor; 22 – sensor for low oil pressure indicator; 23 – indicator sensor for insufficient brake fluid level; 24 – windshield wiper gearmotor; 25 – windshield washer electric motor; 26 – relay for turning on sound signals; 27 – relay for turning on the fan motor; 28 – voltage regulator; 29 – windshield wiper relay; 30 – additional fuse block; 31 – main fuse block; 32 – relay-breaker for alarm and direction indicators; 33 – brake signal switch; 34 – plug socket for a portable lamp; 35 – heater electric motor; 36 – additional resistor of the heater electric motor; 37 – hours; 38 – heater motor switch; 39 – glove box lighting lamp; 40 – cigarette lighter; 41 – alarm switch; 42 – instrument lighting switch; 43 – warning lamp for insufficient brake fluid level; 44 – three-lever switch; 45 – ignition switch; 46 – rear fog lamp switch*; 47 – external lighting switch; 48 – lamp switches located in the front door pillars; 49 – switches for warning lights of open front doors; 50 – alarm lights for open front doors; 51 – lamp switches located in the rear door pillars; 52 – parking brake warning switch; 53 – interior lamps; 54 – fuel level indicator with reserve indicator; 55 – coolant temperature indicator; 56 – oil pressure gauge with low pressure indicator; 57 – tachometer; 58 – parking brake warning lamp; 59 – battery charge indicator lamp; 60 – carburetor air damper indicator lamp; 61 – side light indicator lamp; 62 – turn signal lamp; 63 – headlight high beam indicator lamp; 64 – speedometer; 65 – carburetor air damper warning switch; 66 – parking brake warning relay; 67 – rear lights; 68 – license plate lights; 69 – sensor for level indicator and fuel reserve; 70 – trunk lighting lamp; 71 – rear fog lamp*.
The order of conditional numbering of plugs in blocks:
a – windshield wiper and windshield wiper breaker relay; b – hazard warning and direction indicator breaker relay; c – three-lever switch.
Wiring diagram VAZ-2106 carburetor - full view: