When is injector cleaning necessary?
In order to understand the condition of the injectors, you need to clearly listen to the “whispering” of your engine:
- increased fuel consumption (consumption rates),
- "triple" of the engine,
- unstable operation at idle,
- breakdowns during engine operation.
These symptoms should alert you and make you think about the stable operation of the system as a whole.
Frequency of cleaning injectors
There is no specific point in time that would indicate the frequency of their cleaning. Remember that if nothing bothers you about the operation of the engine, then there is definitely nothing that needs to be repaired. However, if symptoms appear, it is best to first carry out an analysis and determine the exact cause of the problem.
What will cleaning do?
When the injectors are cleaned, you will immediately feel changes in the operation of the engine. However, note that this depends on the amount of carbon deposits and instability before the cleaning process. Therefore, the more contaminants there are, the better the cleaning is done, the greater the chance of getting serviceable injectors.
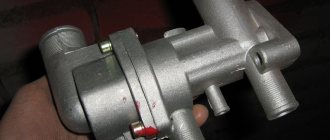
Timing device VAZ 2110 injector 8 valves
Many people are concerned about the question: Do the valves on the VAZ 2110 injection engine bend? No, it doesn’t bend, the 8-valve injector does not suffer from this defect. But this does not mean that you should not monitor the timing belt. Since loosening and subsequent jumping of the belt by a certain number of teeth will lead to inevitable problems
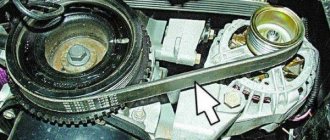
It is worth paying special attention if engine oil gets on the belt; an oiled belt will not last long. Below is a detailed image of the timing diagram of the 8-valve injection engine "tens"
See the photo below.
When replacing the timing belt on a VAZ-2110, it is necessary to clearly align the marks on the camshaft and crankshaft pulleys; without this, the engine will not operate normally. Another important point is that when the tension roller moves to its original state, the marks shift as the belt tension changes. Therefore, carefully check whether the timing marks are clearly aligned before putting on the cover covering the timing belt.
Cleaning engine injectors
This method is not the actual cleaning of the injectors, but it fully allows you to get rid of deposits on them without resorting to dismantling them.
First of all, this is much faster, but on the other hand, the result is not always effective. However, as VAZ-2112 car owners say, in some cases, this really helps.
Work process
- A compressor is connected to the system, similar to that described earlier, which is capable of increasing the pressure in the ramp to 3.2 atmospheres. In parallel, we connect a purifier in a container of at least 1 liter. (Most often, special injector cleaners are used in metal containers - approx.).
- Next, we start the engine and let it run for 10 minutes, after which we stop and let it rest for the same amount of time.
- Then we start it again and, by re-gassing, pass the entire liter of liquid through the injectors.
- When the engine stalls, change the spark plugs, which will become covered with soot.
The entire process of work in this way should not exceed one hour.
By the way, such work can render spark plugs unusable, so clean the injectors on the engine using old or spare spark plugs. Or guess the moment when you will change the spark plugs. We have already talked about the choice of spark plugs for 16-valve engines.
Cleaning injectors with ultrasound
And another method that can be easily used to clean them is ultrasound.
Pros and cons of using ultrasound
There is still debate about how useful this method is, and there is no consensus on this. Some say that this method harms the injectors due to the destruction of the mesh, and that such work should only be combined with washing and dismantling. Others say that such work has a very good effect on the condition of the injectors and does not harm them in any way; moreover, the condition of ultrasonic cleaned injectors is comparable to new parts.
In any case, it is up to you to decide whether to use this method. The cost of such work at a car service is 2,000 rubles and takes about 4 hours.
Dismantling
Before replacing or cleaning the injectors, they will need to be removed from the fuel rail. To achieve this, the following activities are carried out:
- Make sure the engine has cooled down properly. It is not safe to work on a hot engine;
- Disconnect the power wires from the fuel pump to de-energize the device;
- Try to reduce the pressure in the engine power system as much as possible. To do this, the engine starts, and then you need to wait until it stalls at idle speed;
- Repeat this procedure several times until the car simply stops responding to turns of the ignition key;
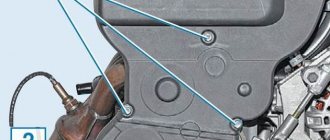
- That's it, now our goal is the fuel rail. To remove it, you must first remove the terminals from the battery, turn off the power to the ramp itself, disconnect the fuel supply hoses, and also disconnect all electrical appliances going to it. These are pressure, idle, throttle position sensors;
- If you have an 8-valve engine, then you do not need to remove the receiver. This step is relevant for engines with 16 valves;
- Experts do not recommend removing the intake manifold without dismantling the throttle valve and the hose going to it. It is better to unscrew and disconnect everything at once, which will allow you to continue working more conveniently;
- Cover the exhaust manifold openings with something to protect them from foreign objects;
- Using a hex wrench, you can unscrew a couple of bolts and remove the fuel rail along with the injectors;
- Make sure that there are no distortions when removing the ramp, otherwise problems may arise with the dismantling processes;
- We remove the injectors. To do this, remove the mounting brackets that hold the electrical connector. You also need to remove the bracket that holds the injector in its seat.
After dismantling the elements, be sure to close the seats to prevent debris and other objects from getting in, and place the nozzles themselves on a table or floor, after laying down a dry rag.
Here you can decide whether to change or clean the elements of the fuel system. If replacement is required, install new injectors in place of the old ones and follow the assembly procedure.
Cleaning
Here proceed as follows.
- Remove the rubber rings from the injectors, and when cleaning is finished, replace them with new seals.
- The cleaning process should begin with the nozzles, on which various deposits form as the car is used.
- Be sure to thoroughly clean the funnel-shaped surfaces where tar deposits accumulate.
- The next step is the fuel mixture supply channels.
- To open the solenoid valve to supply fuel, you will have to trick the device with a 5-7 V power supply.
- Some use stabilized voltage sources, phone chargers, or even a car battery. If using a battery, the voltage should be supplied through the light bulb. It will play the role of a current damper. Otherwise you risk burning the winding.
- Electricity is supplied through two wires, in the gap of one of which a button is installed. It will close and open the network. This creates an imitation of the operation of an injector in an engine due to the influence of a pulsed electric charge.
- You can supply the cleaning liquid to clean the injectors through a can of carburetor cleaner. Inexpensive and effective, even better than specialized chemicals.
- Be sure to tightly connect the cylinder and nozzle with a rubber tube, clamps and any other means.
- All is ready? You can then apply electricity to open the injector. At the same time, press the button on the cleaning agent canister.
- Soon the torch of the liquid jet, which will exit through the fuel atomizer of the injector, will change its “clumsy” direction and will begin to uniformly exit the nozzle. This indicates that you have removed all carbon deposits.
Homemade cleaning device
Before replacing the cleaned injector, check its actual condition.
Prices for cleaning injectors
- In order to clean the injectors that have been removed and fixed on the ramp, you will need a total cost of about 500 rubles .
- And to clean them in the service, you will pay about 2000 rubles , and this is the same as when cleaning with ultrasound.
Since such work does not pose any difficulty, it is much easier to do everything yourself.
Injector prices
If, after the cleaning and diagnostic procedure, you come to the conclusion that it is completely faulty and needs to be replaced, then it is worth noting that you should buy a strictly analog nozzle, with the part number indicated on its body. The average price for them is in the range of 1000-1500 rubles.
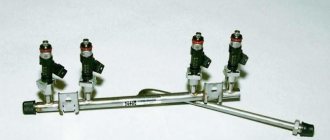
Fuel rail can be removed
- Removed the fuel rail:
- This is how it looked:
- I removed the injectors and wiped them of dirt:
- Soaked them in carburetor cleaner:
- While the injectors were soaking, I put together a diagram for cleaning them:
The light bulb in the circuit was 10 W, a simple halogen. I brought the button without locking and the wire from work. I didn’t use anything to supply the cleaner to the nozzle - I just put the nozzle on the can and it fits quite tightly.
ready-made cleaning scheme
- The injector is connected as follows: the left contact is positive, and the right contact is negative.
Then I cleaned each nozzle in two passes of 10-15 sprays. I didn’t take a video or photo of the spray torch - it was inconvenient to take pictures, because... he did everything alone. In principle, the nozzles were not dirty - the spray pattern did not change much, and from the very first presses it sprayed normally. Then I checked the winding resistance of all injectors. Values in the region of 11.9-12.2 Ohms are within the norm.
You can start assembling, but before that you replaced the O-rings on the injectors - replaced 4 out of 8, because half of the rings were in excellent condition (at the injector-ramp transition). I removed the ones to replace:
- Assembling the ramp with injectors:
ready to install
- And put the ramp in place:
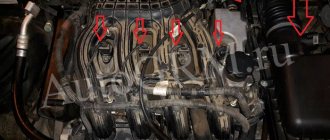
At the same time I cleaned the cylinder head cover
- Before installing the receiver with the throttle valve, I also cleaned the valve; since the last cleaning it has become quite dirty:
before cleaning
- Also, when removing the receiver, two pillows to which it is attached fell apart - I had to go get new ones:
- We collect everything, check it and start it.
Started with half a kick. Since in general the injectors were not dirty, I didn’t expect much of an effect, but here I was pleasantly surprised. According to the first sensations, the engine began to run more softly, and responded somehow better to the gas pedal. Let's check whether this procedure helped during a cold start in the cold winter. But the most unexpected effect was a decrease in average consumption by almost a liter.
If before this my average consumption recently was consistently 9.2-9.4 liters per 100 km, then after five days of commuting to work the average consumption is already 8.6 liters per 100 km. And at XX it used to be 0.8-0.9 l/hour, but now it’s 0.7-0.8 l/hour. So it was not in vain that I climbed into the injectors and spent several hours.
Source: https://www.drive2.com/l/4788489/