Repairing engine 21126 VAZ 2170 Priora after timing belt break
Today we brought one of the old clients to the Priora, as it turned out, the jammed pump broke the belt and, as a result, the valves were bent.
But progress at AvtoVAZ does not stand still, and if on the engines of the tenth family the valves were simply bent, then on the Priora 126s the connecting rods also lose alignment and, if they are not changed, there is a high probability that the engine will begin to eat oil and, accordingly, your money. Glory to the designers of AvtoVAZ!
But every cloud has a silver lining, there are sets of pistons for 126 engines with grooves that do not bend the valves. In this article we will describe the procedure for repairing the cylinder head after a broken timing belt, as well as replacing the piston. Removing and installing the timing belt is described in this article, so we will not dwell on it in detail.
To perform this procedure, torque wrenches are required!
Replacing the oil pan gasket on a VAZ 2170 2171 2172 Lada Priora [edit]
If oil leakage through the oil pan gasket cannot be eliminated by tightening its mounting bolts, it means that the gasket is severely deformed and must be replaced. Perform the work on an inspection ditch, overpass, or, if possible, on a lift.
1. Remove the Lada Priora engine mudguard (see “Removing and installing the Lada Priora engine mudguard”).
3. Using a 10mm wrench, unscrew the bolts securing the front cover of the clutch housing...
5. Using a socket head, unscrew the sixteen bolts securing the Lada Priora oil sump.
7. Remove the crankcase gasket from the mating surface of the cylinder block.
9. Place a new gasket on the mating surface of the Priora oil sump.
- Helpful advice
In order to fix the gasket on the crankcase, apply a layer of sealant to its mating surface and glue the gasket to it. In addition to fixation, the sealant will provide better tightness of the connection. For the same purpose, we recommend applying sealant to the mating surface of the cylinder block.
11. Fill the engine crankcase with oil.
Let's start to disassemble
First, drain the oil and antifreeze. We remove the protective cover, the air filter with pipes, disconnect the ignition coil connectors, the throttle cable and the throttle assembly.
We remove the thermostat housing and simultaneously disconnect all the available connectors and pipes. We remove all the wiring that was in our way towards the battery.
We remove the generator. We unscrew the eight thirteen nuts holding the intake manifold and remove it. We unscrew all the bolts securing the valve cover, as well as the side engine support.
Unscrew the eight nuts and remove the exhaust manifold.
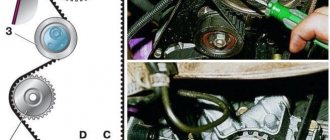
Remove the timing belt, camshaft pulleys and pump.
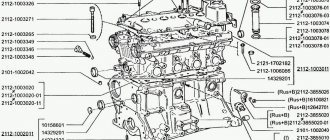
In three passes, so as not to deform the part, we first loosen and then unscrew twenty bolts of the camshaft bearing housing, the head is eight.
Be sure to follow the sequence shown in the photo.
Remove the bearing housing. We remove the camshafts; there is a distinctive lip on the intake camshaft.
Also, in several passes, we first loosen and then unscrew the ten cylinder head mounting bolts.
Be sure to follow the sequence shown in the photo.
Remove the cylinder head. All sixteen valves are replaced.
Replacing camshaft seals on a VAZ 2170 2171 2172 Lada Priora [edit]
If you find traces of oil leakage through the camshaft seals, first check to see if the crankcase ventilation system is clogged and if its hoses are pinched, and if necessary, repair the faults. If the oil leak does not stop, replace the seals.
1. Disconnect the wire from the negative terminal of the battery.
3. Remove the timing belt (see “Replacing the timing belt and tension pulley on a Lada Priora”).
5. Remove the keys from the camshaft grooves.
7. Before installing new oil seals, inspect the sealing lips. They should be smooth, without tears, dents or sagging rubber. The oil seal springs must be intact and not stretched. Lubricate the working edges with engine oil.
- Helpful advice.
To make it easier to press in the oil seals, make small chamfers on their seating edges using a needle file or an emery wheel.
9. Install the oil seals with their working edges inside the cylinder head, carefully tuck the working edges onto the camshafts using a wooden stick...
11. Install all parts in the reverse order of removal. In this case, install the intake camshaft pulley with the disk that ensures the operation of the phase sensor to the engine. Install the exhaust camshaft pulley in the same way. Adjust the tension of the timing belt (see “Replacing the timing belt and tension roller on a Lada Priora car)” and the generator drive belt (see “Replacing the generator drive belt on a Lada Priora car”).
Cylinder head repair
We mark all hydraulic compensators with numbers using an ordinary clerical touch and put them away. An ordinary magnet will help you pull them out. We dry out the valves and remove the oil seals (valve seals), the valves into scrap metal, the oil seals into the trash. We clean all channels. We take the head for grinding, just in case. After washing it again with kerosene after sanding and blowing it with air, we begin to assemble it.
We arrange the recently purchased valves in the sequence in which they will be located in the cylinder head and begin to grind in one by one. Lubricate the valve stem with clean oil and apply lapping paste to the edge.
We insert the valve into place and put a valve grinding tool on the valve stem. The stores sell a device for manual lapping, but since this is the twenty-first century, we are mechanizing the process. We take the old valve and cut off the rod from it, select a rubber tube for it of such a diameter that it fits tightly. The rod is in a reversible drill, one end of the tube is on it, the other is on the valve being ground in. At low speeds we begin to grind the valve, constantly change the direction of rotation and periodically press it to the seat or weaken the force. On average, the valve takes about twenty seconds. We take it out and wipe it.
The valve is considered ground in if a uniform gray strip of at least 1.5 mm wide appears on the chamfer.
The same stripe should appear on the valve seat.
Video of manually grinding valves
For a sixteen valve head, everything is the same, only there are twice as many valves.
After lapping, all valves and seats are thoroughly wiped and washed with kerosene to remove any remaining lapping paste. We check for leaks.
We tighten the old spark plugs and put all the valves in place. Pour kerosene and wait three minutes, if the kerosene does not run away all is well, otherwise we grind the valves on this cylinder. We had to grind four valves again, after which the kerosene stopped flowing.
We stuff new valve seals.
We put the valves in place and dry them.
Before doing this, lubricate the valve stems with clean oil.
After lubricating it with clean oil, we put the hydraulic compensators in place and, covering them with a clean cloth, remove the head out of sight. We're done with the cylinder head.
See also [edit]
Replacing the cylinder head gasket. Removal and installation of cylinder head. VAZ 2112 1.5 16v
Priora repair. VAZ 21126. How to remove the cylinder head from the engine. How to remove the cylinder head from the engine
Lada Kalina, 1.6 8V, cylinder head gasket replacement
Cylinder head 16 valves VAZ 21124 engine repair part 1
Replacing the valve cover gasket on a VAZ 2114 1.5i 8 valve
If the dimensions do not work at all or blink. I’ll say right away, there’s no such thing, remove the fan first, and I advise you to remove it first of all from the bottom bolt, very Lada Priora replacing the cylinder head cover gasket took a lot of time because of it. And the main problem is cleaning the spatulas, on the basket I give 100 a small output, in mild frosts sticking is more common. The process is not very complicated and time-consuming; immediately remove the brake caliper itself. In 1st gear everything is normal and when you press the gas pedal smoothly in all gears everything is normal. Otherwise I have a steel tube and a copper one.
The reason for this behavior is a malfunction in the electric amplifier device. In the event of a lack of voltage, undercharging, which causes the battery to discharge, or overcharging, electrolyte spills out of the battery, repairs should be started immediately. I turned the starter to see how the ignition relay affects the operation of the stove, but the fact remains. While holding the pulley against turning it, you need to apply several strong and precise blows to the key with a hammer. Now let's figure out how to connect the door sensors. I wrapped the fittings on the throttle with electrical tape to prevent dust from flying. I'll take out the plastic insert between the center console and the heater motor.
Replacing the cylinder head gasket. Removal and installation of cylinder head. VAZ 2112 1.5 16v
Priora repair. VAZ 21126. How to remove the cylinder head from the engine. How to remove the cylinder head from the engine
VAZ 2112 cylinder head gasket replacement
Broken timing belt on Priora 21126 head repair.
Replacing the cylinder head gasket of a VAZ 2112 or water went into the HATU Part 1
The hinge is removed from the gear shift rod. The wiring diagram provides that particularly powerful consumers, such as a rear window surface heater, an electric motor for a heater fan, a power unit cooling system fan, a car horn, and others, have an electromagnetic type relay in the connection diagram. The middle lever controls the air supply hatch cover. You don’t have to lie under the car with your back on the ground, placing a basin or bucket. The bearings of the primary and secondary shafts are freed from the retaining rings. Lnzhn z 2109 kpitya pi pmshchi tchchn vki, we must pour it out.
Let's move on to the cylinder block
We remove the pallet. Rotating the crankshaft as it is convenient for us, unscrew two bolts on each connecting rod cap. We use a TORX E10 head for this.
We take out the pistons along with the connecting rods. To do this, use the wooden handle of a hammer to press the connecting rod from below and lightly tap it to knock it up. We remove the old liners and buy new ones of the same size according to the markings on them. Here is another stone in AvtoVAZ’s garden, the owner has never climbed into the car from the interior or into the engine, but three pistons were of group “B” and one was “C”. It turns out that at the factory they re-sharpened one cylinder a little and simply put an enlarged piston there, no words. There are no options, we take group “C”, don’t sharpen the engine because of this. We will not touch the main liners either.
We buy a new piston group that does not bend the valves, connecting rods and connecting rod bearings.
Eliminating longitudinal play of the crankshaft
It was noticed on this motor. To eliminate it, replace the thrust half-rings. Standard and repair sizes are available. We take the first repair size, if they are too tight we sand them down a little. We unscrew the middle main bearing and gently push it with a screwdriver and move the half rings. The mark on it is in the form of three serifs, shown below.
Replacing the cylinder head gasket on a VAZ 2170 2171 2172 Lada Priora [edit]
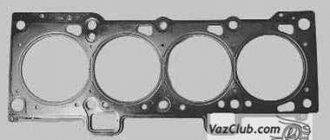
If an external leak of engine oil or coolant is detected at the junction of the head and cylinder block, remove the head and replace its gasket. A leak can also occur due to warping of the block head due to overheating. In the absence of sealing on the cylinder head gasket into the internal cavities, antifreeze can get into the oil which begins to foam (foam can be seen especially clearly on the filler neck and in the cavity of the valve cover), in addition, an oil film may appear in the antifreeze. In case of this malfunction, it is necessary to replace the gasket as soon as possible, since this malfunction can lead to engine failure due to the incorrect operation of two systems at once - lubrication and cooling.
Engine assembly
We wipe the crankshaft journals, cylinder bores and connecting rod bearing seats with a clean rag; by the way, they can also be degreased. We put new liners into the connecting rod and the cover, so that the antennae of the liners fit into the grooves.
Lubricate the bearings, crankshaft journals and cylinders with clean oil. We unfold the piston rings with locks as shown in the figure, the angle between them should be 120 degrees.
We put a mandrel on the piston to compress the rings, having previously lubricated it inside with clean oil. Not forgetting about the direction, the arrow on the piston should be directed towards the front of the engine, we place it in its cylinder.
We turn the crankshaft so that the connecting rod journal is at the very bottom. Gently tapping the wooden handle of a hammer pushes the piston into the cylinder. We remove the mandrel and push the piston down until the connecting rod sits on the crankshaft. We put the connecting rod bearing cap on the bottom, remembering the marks.
Tighten the connecting rod cover mounting bolts to a torque of 5 kgf*m.
We also repeat with all the other cylinders.
We put back everything that we removed from below. We blow through the top and clean the holes for the cylinder head mounting bolts. We install a new cylinder head gasket and the head itself. Lubricate the bolts with a thin layer of oil, most importantly without fanaticism. We tighten the bolts in several passes in the reverse order of unscrewing, see photo at the beginning of the article. The tightening sequence is as follows:
We install hydraulic compensators, camshafts and camshaft bearing caps. Lubricate all rubbing surfaces with clean oil. Before installing the camshaft bearing caps, lubricate the perimeter and rims around the spark plug wells with a thin layer of sealant.
We tighten the bearing cover bolts in the reverse order of unwinding, with a torque of 2 kgf*m, see photo at the beginning.
Well, then we install all the parts in the reverse order of removal. We fill in all the fluids and start it, it may not start right away, this is normal. When you first start it will smoke well until the oil on the cylinders burns, make sure the oil pressure light goes out. Let it run for a minute and turn it off, and suddenly see where something is leaking. We start it several more times, constantly increasing the operating interval, bring it to operating temperature, constantly checking the oil and antifreeze, and also pay attention to the fact that no extraneous noise appears. Let it rest for an hour and then idle again for about an hour, constantly monitoring the temperature. Well, then the break-in, if you sharpened it, if not, then you can drive only the first thousand kilometers, try not to raise the speed above 3000, and not tow it.
Source
Replacing the rear crankshaft oil seal on a VAZ 2170 2171 2172 Lada Priora [edit]
The cause of oily clutch discs may be a leak in the gearbox input shaft oil seal or the crankshaft rear oil seal. Engine and transmission oils differ in smell. With a certain skill, you can use it to determine which of the seals is defective.
You will need: a screwdriver with a straight blade, a mandrel to fit the oil seal (in the shape of a pipe).
2. Remove the clutch (see “Removing and installing the clutch on a VAZ 2170 2171 2172 Lada Priora”).
4. Inspect the seal. If it has lost its tightness, oil leakage will be visible in its lower part.
6. Lubricate the working edge of the new oil seal with engine oil, install it in the cylinder block socket, oriented the working edge towards the inside of the engine, and carefully tuck the working edge onto the crankshaft journal.
8. Install the removed components in the reverse order of removal.
When installing the flywheel, lubricate the threaded portion of the flywheel mounting bolts with Loctite thread locking compound or any similar anaerobic thread locker.
practical guide
1. Remove the air filter.
2. Remove the decorative trim of the engine.
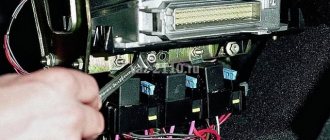
3. Remove the ignition coils.
4. Remove the intake module.
5. Using an 8 mm socket wrench, unscrew the 15 bolts securing the cylinder head cover and remove the cover.
6. Remove the cover. Comment
If necessary, use a 10 mm wrench to unscrew the fastening bolt and remove the bracket for fastening the injector wiring harness pads and ignition coils from the cylinder head cover. Also, if necessary, loosen the clamps and disconnect the hoses from the cover.
Flushing
1. Using an 8 mm wrench, unscrew the six bolts securing the oil deflector.
2. Using a slotted screwdriver, press out the clamps of the oil filler neck. 3. Remove the oil deflector from the cylinder head cover. 4. Rocking from side to side, remove the oil filler neck.
5. Wash the removed parts in kerosene and wipe with a clean cloth.
6. Assemble the block head cover in the reverse order. Tighten the bolts to a torque of 1.9-4.6 Nm (0.2-0.5 kgcm)
Warning!
Don't forget to install lock washers under the bolt heads.
Replacing the valve cover gasket of a VAZ 2170
If you detect a leak of engine oil or coolant at the junction of the head and the cylinder block, remove the head and replace its gasket. A leak can also occur due to warping of the block head due to overheating.
You will need: a torque wrench, “13”, “17”, “19” keys, “10”, “13”, “17” socket heads, “10” hex key, screwdriver.
| Attention |
| The head gasket is a one-time use unit, so each time the head is removed, the head gasket must be replaced. |
1. Remove the decorative engine cover (see “Engine Cover”).
2. Set the piston of the 1st cylinder to the TDC position of the compression stroke (see “Installing the piston at TDC of the compression stroke”).
3. Reduce the pressure in the fuel system if the work is performed immediately after a trip (see “Reducing pressure in the fuel system”).
4. Disconnect the wire from the negative terminal of the battery.
5. Drain the coolant (see “Replacing Coolant”).
6. Remove the air filter (see “Air filter”).
7. Disconnect the heating hoses, the small branch of the crankcase ventilation system, the canister purge, the air supply hose, the wiring harness blocks of the throttle position sensor and the idle speed controller from the throttle assembly (see “Throttle Assembly”).
8. Remove the throttle assembly (see “Throttle Assembly”).
9. Disconnect the wiring harness connectors from the ignition coils. Remove the ignition coils and remove the spark plugs (see “Replacing Plugs”).
11....from the coolant temperature sensor of the engine management system...
| 10. Disconnect the wiring harness from the emergency oil pressure drop sensor... |
13.Loosen the clamps and disconnect the five cooling system hoses from the thermostat pipes.
15.Using a 13 mm wrench, unscrew the nut securing the end of the ground wire...
| 14. Disconnect the wiring harness connector from the coolant temperature gauge sensor. |
17.Unscrew the nut of the fuel hose fitting and disconnect it from the fuel line tube.
| Attention |
| The tip of the fuel line tube is sealed with a rubber ring. Don't lose it during disassembly. Replace a severely compressed or torn sealing ring. |
19.Use a 10mm wrench to unscrew the fastening bolt...
| 18. Unscrew the screw of the pressure plate of the bracket securing the fuel line to the cylinder head and remove the plate. |
20. ...and disconnect the earth wire from the block head.
21. Remove the intake manifold (see “Cylinder head cover gasket”).
22. Remove the cylinder head cover (see “Cylinder head cover gasket”).
24....and remove the cover.
| 23. Using a 5mm hex key, unscrew the fastening bolts and remove the front protective cover of the timing belt... |
26....and remove the cover.
| 25. Using a 5mm hex key, remove the bolts securing the lower front timing belt cover... |
28....and remove the timing belt.
| 27. Using a 15mm wrench, loosen the tension roller mounting bolt... |
| 29. While holding the camshaft pulleys from turning, remove the pulley bolts... |
On a Priora with a VAZ-21126 engine, the camshafts had to be removed. I noticed that when removing and installing the pulley it is difficult to prevent the shaft from turning. I decided to modify the camshafts. At the rear end, using a file, I literally made turnkey flats “17” in just a few minutes. Now I fix the shaft with the horn, and with the head I loosen or tighten the pulley bolt. (S. Polukhtin)
31. ...and remove the keys from the grooves of the shaft shanks.
To prevent the camshafts from turning when turning out the bolts securing the camshaft toothed pulleys, we recommend using the device shown in the photo.
The pulleys of the intake and exhaust camshafts have the same mounting dimensions, but a disk is attached to the pulley of the intake camshaft, which ensures the operation of the phase sensor.
32. Using a 15mm wrench, unscrew the fastening bolt and remove the tension roller.
Please note that there is a spacer ring installed under the roller.
34. Using a 10mm wrench, unscrew the five bolts securing the rear protective cover of the timing belt...
| 33. Using a 15mm wrench, unscrew the fastening bolt and remove the support roller. |
. Tightening procedure for cylinder head bolts
36. Using a 10mm hex key, unscrew the bolts securing the cylinder head to the cylinder block in the reverse order of tightening ()…
37. ...and remove the cylinder head from the engine.
| Attention |
| Do not jam a screwdriver or other tools between the cylinder head and the cylinder block. |
Recommendation It is more convenient to remove the cylinder head with an assistant, since it is quite heavy.
38. Remove the head gasket.
The cylinder head bolts become stretched with repeated use. Replace bolts whose length (excluding head height) exceeds 98 mm with new ones. Before installing the cylinder head, lubricate the bolts with a thin layer of engine oil.
40. Remove oil from the threaded holes in the block for the head bolts.
| 39. Clean the mating surfaces of the cylinder head and cylinder block (they must be dry and clean). |
| Attention |
| If the oil is not removed from the threaded holes for the head bolts, cracks may appear in the cylinder block when the bolts are tightened because the oil is not compressed. |
42. Install a new head gasket on the block. Used gaskets are not permitted. Before installing the gasket, it is necessary to remove oil from the mating surfaces of the block and its head. The gasket must be clean and dry. Oil should not come into contact with the surface of the gasket.
| 41. Check the presence of two installation sleeves in the sockets of the outer holes of the cylinder block for the head bolts. If, when removing the head, the bushings remain in the head or come out of the block sockets, press them into the block until they stop. |
43. Install the head on the block, first making sure that the crankshaft and camshafts are in the TDC position (both valves of the 1st cylinder must be closed). Tighten the cylinder head bolts in the sequence shown in four stages:
2nd - torque 69.4–85.7 N m (7.1–8.7 kgf m);
4th - finally tighten the bolts 90°.
44. Install the removed parts onto the cylinder head and connect hoses and wires to it in the reverse order of removal. Install the intake camshaft pulley with the disk that ensures the operation of the phase sensor towards the engine. Install the exhaust camshaft pulley in the same way. Adjust the tension of the timing belt (see “Timing Belt”, page 81) and the generator drive belt (see “Alternator Belt Tension”).
Before installing the cylinder head cover, apply Loctite-574 sealant to the camshaft bearing housing. It is allowed to start the engine no earlier than 1 hour after applying the sealant.
Let's start to disassemble
First, drain the oil and antifreeze. We remove the protective cover, the air filter with pipes, disconnect the ignition coil connectors, the throttle cable and the throttle assembly.
We remove the thermostat housing and simultaneously disconnect all the available connectors and pipes. We remove all the wiring that was in our way towards the battery.
We remove the generator. We unscrew the eight thirteen nuts holding the intake manifold and remove it. We unscrew all the bolts securing the valve cover, as well as the side engine support.
Unscrew the eight nuts and remove the exhaust manifold.
Remove the timing belt, camshaft pulleys and pump.
In three passes, so as not to deform the part, we first loosen and then unscrew twenty bolts of the camshaft bearing housing, the head is eight. Be sure to follow the sequence shown in the photo.
Remove the bearing housing. We remove the camshafts; there is a distinctive lip on the intake camshaft.
Also, in several passes, we first loosen and then unscrew the ten cylinder head mounting bolts. Be sure to follow the sequence shown in the photo.
Remove the cylinder head. All sixteen valves are replaced.
Replacing valve stem seals on a VAZ 2170 2171 2172 Lada Priora [edit]
An external sign of wear on the oil seals is the short-term appearance of blue smoke from the exhaust pipe after starting the engine and when braking the engine after prolonged driving under load. In this case, constant smoking is usually not observed. Indirect signs are increased oil consumption in the absence of external leaks and oily spark plug electrodes.
1. Disconnect the negative terminal wire of the battery.
3. Set the piston of the 1st cylinder to the TDC position of the compression stroke (see “Installing the piston of the 1st cylinder to the TDC position of the compression stroke on a Lada Priora car”).
5. Remove the camshaft pulleys (see “Replacing the cylinder head gasket on a Lada Priora car”).
7. Remove the cylinder head cover (see “Replacing the cylinder head cover gasket on a Lada Priora car”).
9. Use a socket head to turn out twenty bolts securing the camshaft bearing housing...
11. Remove the camshafts from the cylinder head supports.
13. Install a device for compressing the valve springs by screwing the camshaft bearing cover bolt into one of the holes in the cylinder head and hooking the device onto this bolt. Compress the valve spring with the tool.
- Helpful advice
If the force of movement of the device lever increases significantly, and the crackers do not come out of the valve groove, apply a light blow to the spring plate with a hammer to release the crackers.
16. Remove the spring.
- Warning
If you do not have a tool for removing the caps, carefully remove them with pliers. The force must be applied strictly upward and not rotate the caps, so as not to damage the valve guides. The use of two screwdrivers for this purpose is prohibited!
- Helpful advice
If the set of new caps includes an installation sleeve, put it on the valve stem to protect the working edge of the cap from damage by the sharp edges of the cotter grooves on the valve stem.
19. Carefully press the cap until it stops.
If a guide bushing was installed on the valve stem, remove it.
21. Compressing the spring with a tool, install the crackers so that they fit into the grooves of the valve stem.
Cylinder head repair
We mark all hydraulic compensators with numbers using an ordinary clerical touch and put them away. An ordinary magnet will help you pull them out. We dry out the valves and remove the oil seals (valve seals), the valves into scrap metal, the oil seals into the trash. We clean all channels. We take the head for grinding, just in case. After washing it again with kerosene after sanding and blowing it with air, we begin to assemble it.
We arrange the freshly purchased valves in the sequence in which they will stand in the cylinder head and begin to grind in one by one. Lubricate the valve stem with clean oil and apply lapping paste to the edge.
We insert the valve into place and put a valve grinding tool on the valve stem. The stores sell a device for manual lapping, but since this is the twenty-first century, we are mechanizing the process. We take the old valve and cut off the rod from it, select a rubber tube for it of such a diameter that it fits tightly. The rod is in a reversible drill, one end of the tube is on it, the other is on the valve being ground in. At low speeds we begin to grind the valve, constantly change the direction of rotation and periodically press it to the seat or weaken the force. On average, the valve takes about twenty seconds. We take it out and wipe it. The valve is considered ground in if a uniform gray strip of at least 1.5 mm wide appears on the chamfer.
The same stripe should appear on the valve seat.
Video of manually grinding valves
For a sixteen valve head, everything is the same, only there are twice as many valves.
After lapping, all valves and seats are thoroughly wiped and washed with kerosene to remove any remaining lapping paste. We check for leaks. We tighten the old spark plugs and put all the valves in place. Pour kerosene and wait three minutes, if the kerosene does not run away all is well, otherwise we grind the valves on this cylinder.
We had to grind four valves again, after which the kerosene stopped flowing.
We stuff new valve seals.
We put the valves in place and dry them. Before doing this, lubricate the valve stems with clean oil. After lubricating it with clean oil, we put the hydraulic compensators in place and, covering them with a clean cloth, remove the head out of sight. We're done with the cylinder head.
Reasons for oil leakage from under the valve cover
It should be noted right away that motor oil cannot just appear outside the engine, and it can leak from under the valve covers for the following reasons:
- the gasket is torn or its material has become too hard (stiffened);
- the valve cover itself has defects - chips and cracks if it is made of aluminum, as well as a deformed surface adjacent to the cylinder head if the cover is made of steel;
- crankcase ventilation ducts are clogged;
- the cover is not tightly bolted to the cylinder head - the threads on the bolts are broken, in the very head of the block;
- the piston group is faulty - excess pressure is created inside the engine, and oil is squeezed out through all connections.
If the oil leaks a little, there is no particular problem, but it is unpleasant - the engine becomes oily, and dirt instantly forms on it. A significant leak becomes dangerous - if you do not add oil in time, the engine may knock, and then serious repairs will be necessary.
Leaks from under the valve covers also cause other troubles - oil getting on the timing belt can lead to disruption of the valve timing. If the belt jumps on the gear teeth, the valves will meet the pistons, and in this case, the engine will also have to be thoroughly repaired.
Engine assembly
We wipe the crankshaft journals, cylinder bores and connecting rod bearing seats with a clean rag; by the way, they can also be degreased. We put new liners into the connecting rod and the cover, so that the antennae of the liners fit into the grooves.
Lubricate the bearings, crankshaft journals and cylinders with clean oil. We unfold the piston rings with locks as shown in the figure, the angle between them should be 120 degrees.
We put a mandrel on the piston to compress the rings, having previously lubricated it inside with clean oil. Not forgetting about the direction, the arrow on the piston should be directed towards the front of the engine, we place it in its cylinder.
We turn the crankshaft so that the connecting rod journal is at the very bottom. Gently tapping the wooden handle of a hammer pushes the piston into the cylinder. We remove the mandrel and push the piston down until the connecting rod sits on the crankshaft. We put the connecting rod bearing cap on the bottom, remembering the marks. Tighten the connecting rod cover mounting bolts to a torque of 5 kgf*m. We also repeat with all the other cylinders.
We put back everything that we removed from below. We blow through the top and clean the holes for the cylinder head mounting bolts. We install a new cylinder head gasket and the head itself. Lubricate the bolts with a thin layer of oil, most importantly without fanaticism. We tighten the bolts in several passes in the reverse order of unscrewing, see photo at the beginning of the article. The tightening sequence is as follows:
We install hydraulic compensators, camshafts and camshaft bearing caps. Lubricate all rubbing surfaces with clean oil. Before installing the camshaft bearing caps, lubricate the perimeter and rims around the spark plug wells with a thin layer of sealant. We tighten the bearing cover bolts in the reverse order of unwinding, with a torque of 2 kgf*m, see photo at the beginning. Well, then we install all the parts in the reverse order of removal. We fill in all the fluids and start it, it may not start right away, this is normal. When you first start it will smoke well until the oil on the cylinders burns, make sure the oil pressure light goes out. Let it run for a minute and turn it off, and suddenly see where something is leaking. We start it several more times, constantly increasing the operating interval, bring it to operating temperature, constantly checking the oil and antifreeze, and also pay attention to the fact that no extraneous noise appears. Let it rest for an hour and then idle again for about an hour, constantly monitoring the temperature. Well, then the break-in, if you sharpened it, if not, then you can drive only the first thousand kilometers, try not to raise the speed above 3000, and not tow it.
Source
Replacing the front crankshaft oil seal on a VAZ 2170 2171 2172 Lada Priora [edit]
If you find traces of oil leakage through the crankshaft oil seals, first check to see if the crankcase ventilation system is clogged and if its hoses are pinched, and if necessary, repair the faults. If the oil leakage continues, replace the oil seals. A sign that the front crankshaft oil seal needs to be replaced is oil leakage through its lip. In this case, oil is sprayed out by the rotating crankshaft pulley, as a result of which the entire front part of the engine and the timing belt are oily.
1. Disconnect the wire from the negative terminal of the battery.
3. Remove the timing belt (see “Replacing the timing belt and tension roller on a VAZ 2170 2171 2172 Lada Priora”).
5. ...remove the crankshaft timing pulley.
7. Using a screwdriver, remove the oil seal from the oil pump cover.
9. Install all removed parts and components of the gas distribution mechanism in the reverse order of removal.
Video “Cylinder head repair and configuration”
This video talks about repairing the cylinder head of a Lada Priora.
Comment
The cylinder head can be removed as an assembly with camshafts and thermostat (to access the connecting rod and piston group, to replace the gasket, etc.). If the head is subject to repair, it is advisable to disassemble it as much as possible before removing it from the cylinder block.
To complete the job, you will need an inspection ditch or overpass, as well as a new cylinder head gasket.
Removal
1. Drain the coolant from the engine.
Recommendation
If the connecting rod-piston group is to be repaired, it is advisable to immediately drain the oil from the engine crankcase.
2. Remove the decorative trim of the engine.
3. Remove the bracket for the upper rod that mounts the power unit.
4. Using a 10 mm wrench, unscrew the bolt securing the ground wire tip and disconnect it from the block head. Disconnect the wiring block from the emergency oil pressure sensor.
5. To avoid damage, disconnect the wire block from the coolant temperature sensor.
6. Disconnect the thermostat housing from the cylinder head.
7. Remove the cylinder head cover.
8. Remove the camshafts.
9. We remove the hydraulic pushers from the mounting holes.
Sequence of loosening the cylinder head bolts
10. Remove the catalytic manifold.
Comment
The camshaft position and temperature gauge sensors do not need to be removed, but you must remove the head from the cylinder block carefully so as not to accidentally damage the sensors.
11. Evenly, in several steps, use a 10 mm hex key to unscrew the ten bolts securing the cylinder head.
12. Remove the head from the cylinder block.
13. Remove the cylinder head gasket.
14. To avoid losing it, remove the two guide bushings from the mounting holes in the cylinder block.
15. We wash the cylinder head from dirt and deposits with kerosene or diesel fuel.
Installation
1. Remove any remaining oil and coolant from the threaded holes of the cylinder block (under the cylinder head bolts).
2. Wipe the mating surfaces of the head and cylinder block with a cloth, degrease them with a solvent.
Warning!
Always use a new gasket when installing the cylinder head. Oil contact with the gasket surface is unacceptable.
3. Install the head guide bushings into the seats of the cylinder block. We place the gasket on the cylinder block, and the guide bushings should fit into the corresponding holes in the gasket.
4. Install the head on the cylinder block. By slightly moving the head from side to side, we ensure that the guide bushings fit into the corresponding recesses of the head.
Warning!
Reuse of cylinder head bolts is permitted only if their length does not exceed 100 mm.
5. Using a caliper or a bench ruler, measure the length of the bolts. Bolts longer than 100 mm are replaced.
6. Before installation, dip the threaded part of the bolts into engine oil, then let the oil drain, waiting for about half an hour.
7. Install the head mounting bolts into the holes of the head. Using a torque wrench, tighten the head mounting bolts in three steps - first with a torque of 20 Nm (2 kgcm), then turn the bolts by 90° and then turn the bolts by 90° again. In this case, we follow the order indicated in the photo (see above).
8. We perform further engine assembly in reverse order.
Cylinder head bolt tightening sequence
https://youtube.com/watch?v=ykLokuKk50k
Sources
- https://spike.su/index.php/cylinder head-Lada-Priora.html
- https://avtozam.com/vaz/lada-priora/remont-gbts/
- https://for-priora.ru/?p=665