Checking and adjusting thermal clearances in the valve drive (8V) Lada Largus
Tools:
- Open-end wrench 10 mm
- Set of flat probes
- adjustable wrench
Notes:
We carry out the work when characteristic clicking knocks appear in the area of the cylinder head with a frequency half the speed of the crankshaft. Basically, knocking occurs as a result of wear of valve mechanism parts and the associated increase in thermal clearances in the valve drive.
Knocks can be heard clearly when the engine is idling.
It is also recommended to check the gaps when the car has driven more than 100 thousand km.
We carry out the work on a cold engine.
Valve arrangement in the cylinder head
1 – row of intake valves; 2 – row of exhaust valves.
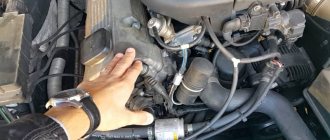
1. Remove the cylinder head cover.
2. We remove the upper timing cover and, following the mark on the camshaft gear pulley, set the piston of the first cylinder to TDC at the end of the compression stroke.
Note:
The cylinders are counted from the flywheel.
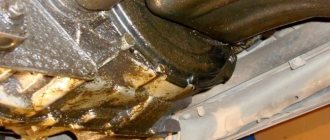
3. Then we check one by one and, if necessary, adjust the clearances in the drive of the intake and exhaust valves of the 1st cylinder. When checking (in this position of the crankshaft and camshaft), the heels of the rocker arms of the indicated valves should face the backs of the heads - the cylindrical parts of the camshaft cams. In this case, the rocker arms can swing on the axis within the clearance in the drive.
4. Using the flat feeler gauges from the kit, we check the thermal gap between the ends of the valve stem and the adjusting screw.
The gap should be within 0.2 (+0.05 -0.075) mm for intake valves and 0.4 (+0.05 -0.075) mm for exhaust valves. The feeler gauge should move in the gap with little effort.
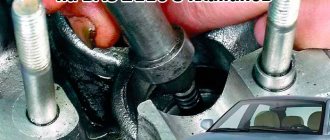
5. If the gap size (thickness of the feeler gauge) differs from the required value, use a 10 wrench to loosen the tightening of the lock nut of the adjusting screw, holding the screw by the flats (width - 3 mm) with an adjustable wrench.
6. Then, by rotating the adjusting screw, we set the desired gap.
7. Tighten the locknut while holding the adjusting screw with a wrench. We check the gap again and repeat the adjustment if necessary.
8. Consistently turning the crankshaft clockwise each time by the bolt securing the auxiliary drive pulley 180°, we check and, if necessary, adjust the thermal clearances in the valve drive of the 3rd, then the 4th and then the 2nd cylinders.
9. After adjusting the thermal clearances in the valve drive, install the removed parts in the reverse order.
The article is missing:
- High-quality photos of repairs
- Photo of the instrument
Adjustment procedure for an 8-valve engine
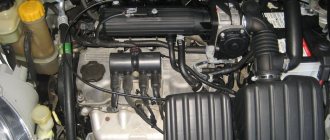
The Lada Largus valves are adjusted in accordance with the technical regulations of the manufacturer. First, you need to place the car on a level surface, jack up the front wheel, engage fourth gear, open the hood and remove the air filter housing, disconnecting all the pipes. Then you should remove the high-voltage wires from the spark plugs, the connector from the ignition module, release the wiring harnesses and take them towards the passenger compartment.
Before removing the valve cover, you need to wipe it so that when removing it, dust or dirt does not get on the valve mechanism or the block head. For convenience, you can remove the ignition module.
The next stage is setting the top dead center (TDC). To do this, you need to slowly rotate the jacked wheel and make sure that the letter “F” appears on the stiffening rib of the camshaft drive gear. In this case, the piston of the first cylinder will be at TDC on the compression stroke, and both valves will be closed. Cylinder numbering starts from the flywheel side. Armed with a set of feeler gauges, pliers and a 10 mm wrench, you can make the adjustment yourself.
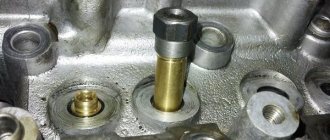
A feeler gauge with a thickness of 0.15 mm is used for the intake valve, and 0.25 mm for the exhaust valve. They need to be inserted sequentially into the gap between the rocker adjustment screw and the valves. The feeler gauge must fit in with a slight interference fit, otherwise the gap must be adjusted. While holding adjusting nut 1 with pliers (see Fig. 1), you need to loosen lock nut 2 with a 10 mm wrench. Then set the required gap with nut 1 and lock it with nut 2, holding it from turning with pliers.
Check again and repeat the settings if necessary. A similar procedure must be performed for the third cylinder, turning the crankshaft 180 degrees, then for the fourth and second. It is important to follow the order of working with the cylinders according to scheme “1342” so that the camshaft cam 7 is in contact with the rocker 8 at a minimum radius from the center of rotation.
Adjusting thermal clearances in valves
First, select a level area on which to place the car. Next, use a jack to release one of the front wheels and engage fourth speed. In the engine compartment, remove the air filter, first disconnecting the pipes from it. Next, remove the spark plug high-voltage wires, remove the connector connected to the ignition module and carefully move all the wire harnesses towards the passenger compartment. Be sure to wipe the valve cover: this must be done so that any dirt on it is not transferred inside the mechanism. If you think that the ignition module is bothering you, remove it too. Further steps:
- Transferring the pistons to top dead center (TDC). To achieve this, spin the freed front wheel so that the Latin letter “F2” appears on the edge of the camshaft drive gear. In this case, the piston of the 1st cylinder (you need to count from the flywheel) will be in the TDC position, then both the intake and exhaust valves will be closed.
- Arm yourself with 0.2 and 0.4 mm probes. Using the first of them, check the valve operating on the inlet, the second - on the outlet. The feeler gauge should fit into the gap between the valve and the adjusting screw with little force. If this is not the case, the mechanism should be adjusted.
- Take pliers and tighten the adjusting nut with them. Unscrew the locknut with an open-end wrench to “10”. Achieve the required gap and secure it with a nut.
- The order of adjustment for cylinders is: 1,3,4,2. That is, the rocker should touch the camshaft cam within the smallest radius when viewed from the center of rotation.
- After completing the procedure, carry out a control check of the gaps and, if necessary, adjust those that do not meet the standard.
Adjustment procedure for an 8-valve engine
The Lada Largus valves are adjusted in accordance with the technical regulations of the manufacturer. First, you need to place the car on a level surface, jack up the front wheel, engage fourth gear, open the hood and remove the air filter housing, disconnecting all the pipes. Then you should remove the high-voltage wires from the spark plugs, the connector from the ignition module, release the wiring harnesses and take them towards the passenger compartment.
Before removing the valve cover, you need to wipe it so that when removing it, dust or dirt does not get on the valve mechanism or the block head. For convenience, you can remove the ignition module.
The next stage is setting the top dead center (TDC). To do this, you need to slowly rotate the jacked wheel and make sure that the letter “F” appears on the stiffening rib of the camshaft drive gear. In this case, the piston of the first cylinder will be at TDC on the compression stroke, and both valves will be closed. Cylinder numbering starts from the flywheel side. Armed with a set of feeler gauges, pliers and a 10 mm wrench, you can make the adjustment yourself.
A feeler gauge with a thickness of 0.15 mm is used for the intake valve, and 0.25 mm for the exhaust valve. They need to be inserted sequentially into the gap between the rocker adjustment screw and the valves. The feeler gauge must fit in with a slight interference fit, otherwise the gap must be adjusted. While holding adjusting nut 1 with pliers (see Fig. 1), you need to loosen lock nut 2 with a 10 mm wrench. Then set the required gap with nut 1 and lock it with nut 2, holding it from turning with pliers.
Check again and repeat the settings if necessary. A similar procedure must be performed for the third cylinder, turning the crankshaft 180 degrees, then for the fourth and second. It is important to follow the order of working with the cylinders according to scheme “1342” so that the camshaft cam 7 is in contact with the rocker 8 at a minimum radius from the center of rotation.
Adjusting valves on Lada Largus
What is valve adjustment? This is an increase or decrease in thermal clearances between the camshaft cam and the part of the mechanism that opens the valve.
If the gap is larger or smaller than necessary, the engine will not be able to operate at full capacity. Because of this, parts will wear out faster, fuel consumption will increase and traction will deteriorate.
TIP: On the Lada Largus you need to adjust the valves every 100 thousand km. mileage If the car runs on gas, then the valves need to be checked more often - every 50-70 thousand km.
INTERESTING: The correct thermal gap is extremely important because metal expands when heated. The valves lengthen slightly as they warm up. If changes in size are not compensated, the combustion chamber loses its tightness.
What happens if you don't adjust the valves?
The main noticeable consequences of incorrect clearances are increased fuel consumption, poor traction and noisy engine operation.
Due to incorrect clearances, the load on the valves and catalyst increases. The valves cool less well and the engine does not operate at full capacity.
Increased and decreased thermal gap
The thermal gap may increase or decrease over time.
With an increased thermal gap, the camshaft hits the valve mechanism. The valves do not close completely and at the wrong time. Because of this, not all of the fuel-air mixture burns, and the engine produces noticeably less power.
With a reduced clearance, the valves do not close tightly, and the combustion chamber ceases to be sealed. Because of this, compression drops. The valves cool less well and may burn out over time. The load on the catalyst also increases.
In both cases the motor does not work properly. Fuel consumption increases, engine power decreases and the load on parts increases.
Consequences of incorrect adjustment
The optimal value of thermal clearances was determined by analyzing the operation of the valve mechanism, gas distribution system and carrying out accurate calculations. With an increased distance, noise appears when the engine is running, especially when it is not warmed up, due to shock loads that negatively affect the entire timing system. This can lead to desiccation of the valve, its jamming, and when it meets the piston at TDC, the gap bends the valve on Largus.
Large thermal gaps do not allow the combustion chamber to be effectively filled with the working mixture, which reduces engine power and impairs the efficiency of its operation.
Too small thermal clearances reduce compression, lead to strong heating of the valve and seat and lead to their burnout. In such a situation, not only does camshaft wear increase, but more serious damage to the timing system may also occur. In both the first and second cases, the result of incorrect adjustment will be the replacement of valves on the Lada Largus, and the entire set will have to be changed
The valve mechanism is an important part of the engine timing system. Modern 16-valve engines are equipped with hydraulic compensators that automatically maintain the required thermal clearance throughout the entire service life of the vehicle. But most cars use traditional valve mechanisms. Adjusting thermal gaps is not a very complicated procedure that almost every car enthusiast can do. But special attention should be paid to this operation, since if the adjustment is incorrectly performed, a major overhaul of the engine may be required.
How do you know when the valves need to be adjusted?
Adjusting the valves is a standard procedure. We recommend that Lada Largus owners contact the service every 100 thousand kilometers if the car runs on gasoline. If gas equipment is installed, then you need to check the gaps more often.
INTERESTING: The main sign of a changed thermal gap: the “clattering” of an unheated engine.
TIP: In critical cases, the “clicking” does not stop even after warming up. This means that the gaps have already changed too much and you need to urgently contact service.
If the engine begins to run louder than usual, then first of all you need to listen to the valves. Quite often, it is the changed thermal clearances that explain the increased noise.
How are valves adjusted?
The procedure takes approximately one and a half hours. During this time, the technician will measure the gaps and adjust them if necessary.
- Remove the valve cover.
- We measure the gaps with a feeler gauge in 0.05 mm increments.
- We adjust thermal gaps.
- Clean the cover and space for the gasket.
- We install a new gasket and put on the cover.
- We tighten the cover in 2 stages with a torque wrench.
- We check the operation of the engine.
In addition to adjusting the gaps, it is important to clean the surfaces and seal the valve cover tightly. Otherwise oil will leak.
After adjusting and installing the cover, it is tightened in 2 stages with a torque wrench. First with a load of 2 Newton meters, then with a load of 10. Thanks to this, the lid stands evenly, without distortions or deformation of the gasket.
Adjusting valves in Logan-Shop St. Petersburg takes only an hour and a half. We recommend periodically listening to a running, cold engine and contacting service as soon as you hear a “clunking” sound. This way you will significantly extend the life of the valves, catalyst and engine as a whole.