The OBD port has been actively used in cars all over the world since the beginning of the 21st century.
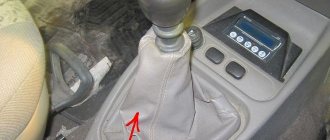
The AvtoVAZ concern began installing an OBDII port in its models, starting with the Lada Kalina. By the way, before this period the tenth family had a 12-pin plug. Note: the Granta diagnostic connector does not require access devices, since it is quite possible to detect and use it blindly. For example, on a Lada Kalina, to connect, you should remove the plug next to the gearshift lever.
The purpose of the car diagnostic connector is to quickly exchange data with diagnostic devices. This makes it possible to both read and delete error codes and adjust some presets in RAM. In addition, it is possible to read the current value of the sensor identifiers specified on the Lada Granta. However, in order to be able to use these functions, you must first know where the diagnostic connector itself is located.
Search for OBD-2 on Lada Granta
- Sitting on the front right seat, you need to find the glove compartment lid.
- Place your hand underneath the lid and move it to the left towards the center console.
- Your hand should now rest on the diagnostic connector.
As a visual reference, look at the vent cover located at the front passenger footwell. Above it is the plug we are interested in. By the way, it is not necessary to look at the port itself, since it will not be difficult to detect from the driver’s seat. The main thing is to know the place where you will be looking.
Where is the diagnostic connector located in the Lada Granta?
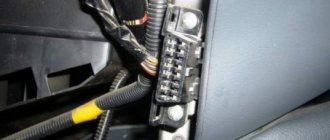
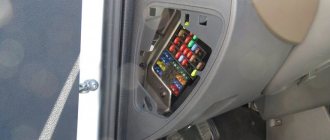
To find the diagnostic connector in Grant, you should look under the front passenger seat. In the place where the passenger's feet should be, there is a small space above which the glove compartment is located. On the left wall of this recess you will find a ventilation grille through which air is blown when the stove is on. Directly above this grille is the diagnostic connector.
To get to it and establish a connection, you will have to unscrew several bolts from the plug. The connector is quite large and has a distinctive appearance, so you are unlikely to miss it.
It is recommended to be careful when connecting the adapter to the diagnostic connector of the Lada Granta. The fact is that the location of the connector is not very convenient. Because of this, when the adapter is turned on, there is always a risk that a passenger will touch it with his foot. In principle, the adapter itself is held in the connector quite firmly. However, if a passenger hits it hard (and this most often happens completely by accident), he will easily break both the connector and the adapter. The simplest solution would be to either warn the passenger not to move their legs too actively (which does not always help), or not to ride with the adapter installed in the connector. Some car owners solve this problem radically - car service centers ask them to move the connector to another, safer and more convenient place. However, this will cost a decent amount.
Using the connector
The main options for using OBD-2 in the Lada Granta include:
- connecting a scanner to check the machine and deal with errors;
- installation/connection of an on-board computer, for example, Multitronics or State.
Connecting an on-board computer to a Lada Granta car will have a useful effect, because in this way it will be possible to:
- monitor the engine temperature;
- receive error codes as soon as they occur;
- forcefully start the cooling fan.
Why do you need a diagnostic connector?
Every time the vehicle undergoes a technical inspection, the data is updated. If any breakdown occurs, it is likely that it will be much easier to fix it by receiving data about the condition of the car during maintenance by connecting to the diagnostic connector.
Diagnostics of this type is not a panacea for a breakdown: with its help, the average car owner is unlikely to determine the exact cause of the malfunction. The fact is that information can be displayed with serious deviations. Therefore, only a professional is able to determine the cause of the malfunction, based only on the data received from the diagnostic connector. However, sometimes, if the problem is obvious, this information can help any car owner - too large a deviation of the parameters from the norm excludes the possibility that the problem is an error.
Thus, the data will help determine the cause of the breakdown.
Self-diagnosis Grants
To diagnose the Lada Grant, a standard K-Line adapter is not enough. It provides for the installation of an electrical control unit of a different configuration than on other VAZ vehicles, and it requires a special adapter. Today, the most popular is the use of the ELM-327 diagnostic adapter and various software for it, for example, ScanMaster, Torque.
It’s worth looking at what the ELM-327 adapter looks like in specialized literature or on the Internet.
Specialists on official servers use the dealer scanner DST-14T. It is unlikely that you will be able to perform diagnostics on Grant yourself, since this is not a simple procedure. It includes software and hardware components, and not just connection via K-Line. It is important to be able to compare the device readings with real circumstances.
Where is the diagnostic connector in Lada Granta?
The vehicle's diagnostic connector is designed for high-speed data exchange with diagnostic devices, which allows you to read and erase error codes, adjust some presets in RAM and read the current value of the parameters of sensors installed on the vehicle. Thus, in order to take advantage of these functions, you first need to know where the diagnostic connector is in the Grant.
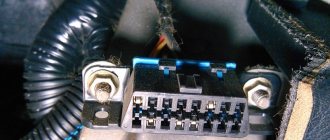
The Granta diagnostic connector is located to the left of the glove box, above the side ventilation grille in the area of the passenger’s left foot. To gain access to it you will have to unscrew a couple of screws securing the plastic panel.
The Grant diagnostic connector is ODB-II type (16-pin trapezoidal), the connector diagram is shown in the photo:
- 4 — Body grounding
- 5 - Signal ground
- 6 - CAN-High line, J-2284
- 7 - K-line diagnostics (ISO 9141-2 and ISO/DIS 14230-4)
- 9 - SCS (Service Check System) - Output for reading slow self-diagnosis codes
- 12 — Output for programming
- 13 — Input/Output for VTM-4 and immobilizer control
- 14 - CAN-Low line, J-2284
- 15 - L-line diagnostics (ISO 9141-2 and ISO/DIS 14230-4)
- 16 - Power supply +12V from battery
Now, knowing the location of the Lada Granta diagnostic connector, you can connect an on-board computer or scanner.
Electric power steering
When the EPS diagnostic light comes on or the electric power steering switches on/off after a certain period of time, you first need to check the EPS using the diagnostic connector. Open Diag (application) together with an OBD-2 adapter or scanners will help here:
- Scanmatic;
- Motor Master;
- ScanDoc.
The diagnostic process is designed to indicate where errors are located and decipher them for further repair based on the type of malfunction. In addition, it is quite possible to perform the check without a scanner:
- There is an 8-pin connector (black) under the ignition switch under the steering wheel. It is necessary to dismantle the casing at the steering column (unscrew the fastening screws from below).
- Insert the paper clip, closing the two contacts.
- Turn on the ignition and observe the warning lamp.
- The first signal will be the continuous burning of the lamp (“1”).
- It is necessary to count subsequent short signals, that is, if there are 3 short ones, then “3”.
- In our case, the code “13” should be formed.
Features of the Scanmatic-2 scanning kit
The designated set can be easily found in the retail chain. It fits such a thing as the diagnostic connector on a Lada Granta car, but will require the use of a laptop. The Scanmatik-2 package initially includes a scanning program. The cost of such a device (set), according to the official website, is 13,700 rubles. In terms of applicability to domestic cars, this is the best option for scanning, as evidenced by many reviews from diagnosticians.
To diagnose it yourself, first of all we boot up the laptop and activate the required program. Using a “USB” format cable, we connect the computer with the vehicle’s diagnostic socket. In the dispatch menu of Windows devices, we find the appearance of a “fresh” “COM” port, which we “register” in the settings. We insert a cord with an “OBD-2” connector into the diagnostic connector, which is connected with a “USB” cable using the adapter included in the delivery kit. We control the glow of the green lamp, which is equipped with the OBD diagnostic connector, which indicates the correct connection. After launching the special program, activate the “Engine” tab and click on the “Auto-detection” symbol. This allows the program to identify the on-board car computer on the Lada Granta.
If identification is not carried out automatically, then it is possible to manually select the name of the modification (in our version, “VAZ”) from the versions present in the software registry. A menu will appear on the display allowing you to select the ECU. There are cases when the program fails to determine the brand of the on-board controller, for example, when the software was previously “reflashed”.
After communication has been established between the ECU and the diagnostic tool, a list containing diagnostic modes is displayed on the screen. We enter the working window and get the opportunity to view the list of parameters, as well as adjust their settings. This point helps not only to find the fault, but also to improve the configuration of any system. To implement this action, you will need to enter the section called “Settings”. The “View” menu allows you to adjust the settings of the “Blutooth” function in case of using a wireless switching method.
The user of a Lada Granta car can create a set of parameters, which can subsequently be extracted from a list of values pre-present in the program. For example, using this method you can create a specific set that allows you to check the idle speed of the engine, and then save the data and use it an unlimited number of times in the future.
Upon completion of the diagnostic process, we return to the program menu for selecting the ECU and deactivate the ignition.
Engine control unit Lada Granta
As mentioned at the beginning of the article, Granta received new “brains” with CAN support (M74CAN). This innovation is capable of integrating “brains” with alarms and radios with a CAN bus.
They often install a “Standard” controller with Itelma number 11186-1411020-22: This ECU is not compatible with earlier VAZ models. In early VAZs, for example, Priora, the ECU came with a K-channel for data transmission.
Location of the ECU for Granta:
The “brains” are located at the bottom of the front panel, or rather under the glove compartment. It will be better visible if viewed from the passenger seat. The ECU is hidden by sound insulation and upholstery, so it will not be easy to get it out.
ECU firmware:
Serial firmware should indicate an optimized dynamic version for the 1.6-liter 8-valve Granta with an “M74” controller and an exhaust gas emission standard of “EURO-2”.
ECU chip tuning allows you to physically disable the second oxygen sensor (“lambda probe”) along with the catalyst. If this version of the firmware is implemented, this will lead to a significant increase in the dynamic capabilities of Granta.
To find out what firmware the control unit has, use the OpenDiag application, together with a diagnostic adapter connected to the OBD2 connector.
Methods for diagnosing ECUs and errors on Lada Granta via OBD2
Self-diagnosis
On Grant, the ECM with the M74 controller has built-in self-diagnosis that detects malfunctions. The ECM detects the problem, then the “Check Engine” light comes on and the error identification begins. Then the code is saved in memory and shown on the dashboard.
Did the Check Engine light come on on Grant?
Detailed article on the causes of Check Engine and how to clear the Check. If your Check Engine light comes on, read this article immediately. The material explains what a Check Engine is, what to do if it appears, and how to remove this error yourself.
Is the Check Engine light on?
TOP 15 reasons why the Check Engine light comes on and ways to solve the problem. Read the article to solve the Check Engine problem.
Reviews of diagnostic scanners for LADA GRANTA
Read detailed articles on the review of car scanners, including those compatible with LADA GRANTA.
Reviews of OBD2 diagnostic car scanners
This section provides descriptions of diagnostic scanners and adapters. Before purchasing a scanner for your car, it is recommended that you read reviews of the most popular equipment models.
Diagnostics 2110
The tenth generation VAZ received a 12-pin diagnostic block. These began to be installed on cars as Euro-3 and higher standards were introduced.
Why is OBD2 not suitable for 10?
Frets of the tenth family received their own connection option for diagnostics. You cannot connect a standard international plug to it - intervention will be required.
The reason is that tens have a 12-pin connector. OBD2 has 16 pins.
Adapter for ELM327 and OBD2
News - you can assemble an adapter for tens. Need to:
- Connection diagram;
- 4 wires;
- New OBD2 format plug (if you don’t want to connect the wires directly to the scanner every time).
You cannot connect an OBD2 scanner directly to connector 2110 - you need either an adapter or a direct connection of several contacts according to the diagram below.
The adapter circuit for tens requires working with four contacts. No need to go into all 12.
Advantages of an auto scanner
“Scanmatik-2” was appreciated even by professional diagnosticians. Having tried this kit once, car enthusiasts were pleasantly surprised that for a relatively low price it allows you to work with a full fleet of domestic cars and an impressive part of foreign ones. When working with the diagnostic kit of this model, you can also use a wireless interface to connect the system to a computer (Bluetooth).
The OBD-2 connector on Grant regularly supplies power to the diagnostic adapter. In extreme cases, the Scanmatik-2 adapter can be powered from the cigarette lighter. In general, the device is very convenient for performing diagnostic procedures yourself. It even has surge protection. If, for example, you apply current from the cigarette lighter when the system does not need it, nothing bad will happen.
Every device has pros and cons. Many car thieves know how to use the diagnostic connector for their own selfish purposes. As a rule, the diagnostic block is used by criminals to disable the standard immobilizer. A common solution to this problem is to replace the standard block with a “re-pinned” one, with a different arrangement of contacts.
The adapter consists of a “male” (fake connector) and a “female” (standard connector), which is previously removed. It will not be possible to connect standard diagnostic equipment to the new connector without such an adapter, but the chances of saving the car from theft are increased. That's all. Good luck!
This morning I looked at the engine temperature data through the OBD2 Torque program and did not find the diagnostic connector the first time. Before searching, I googled that the diagnostic connector is installed “on the front passenger side in the area of the center console.” I looked all over the center console and couldn't find any traces of the connector.
General questions about OBD2 on Grant
Let's look at questions about OBD2 on Grant - a diagram of what it is needed for.
How to use the connector
The main options for using OBD2 in Grant:
- Connecting a scanner to check the car and work with errors;
- Installation and connection of an on-board computer of the State or Multitronics type.
Working with the diagnostic scanner is described in detail and step by step at the link.
It will be useful to connect the on-board computer - this is how you can:
- monitor engine temperature >;
- receive error codes immediately when they occur;
- force the cooling fan to turn on.
Diagnostic block diagram
The contact diagram of the block is shown in the picture:
The pinout of the block can be useful in the manufacture of adapters for OBD2.
Choosing equipment for diagnosing Lada Grants
The location of the block for car diagnostics Grants is a question that is closely related directly to the diagnostics itself via the OBD2 connector, as well as to the choice of equipment, scanners and adapters.
As mentioned above, the ECU on Grants is equipped with a CAN bus (if you have an M74 CAN ECU). There are no problems with the selection of equipment for diagnostics via the CAN bus, since even a regular ELM327 2.1 is suitable for connection.
To study grant diagnostic issues, read the relevant articles, documentation and sections of the site:
How to use the diagnostic connector
- Directly to destination. To diagnose a car using an adapter that is connected to a computer or phone, or to a special diagnostic device.
- For the purpose of having fun. Connect the adapter and install the Torque program on your phone, connect to it using a Bluetooth connection, and you can view the data online. And if you have a phone with GPS, then you can measure acceleration to 100 km/h, time to cover a section, etc.
Diagnostic connector with connected adapter ELM327
For those owners who are faced with the problem of connecting a non-standard on-board computer or connecting another adapter for diagnosing the Lada Granta, information on the location of the diagnostic connector will be very useful.
If we recall previous AvtoVAZ models, then this block was located either under the steering wheel on the right side of the driver, or in the area of the floor tunnel. Granta in this case is a little different from his compatriots. The diagnostic block is located on the right side of the floor tunnel under the instrument panel. That is, if you are sitting in the front passenger seat, then you just need to lean over and look to the left under the floor tunnel plug.
But in fact, the location of the diagnostic connector on the Grant, depending on the “whim” of a particular assembler, or on the year of manufacture of the car, may differ slightly. Some owners claim that the block is located on the left side of the floor tunnel, while for others it is generally located in the center console area. But its visual representation is perfectly clear to everyone from the top photo, so that it is clear what to look for.