WHAT ELSE IS NEW IN PRIOR
A transport net on the station wagon, which can be hung vertically, separating the interior from the trunk. They plan to fill the engine and gearbox with synthetic oil instead of mineral oil. This will not only have a beneficial effect on the vehicle’s performance and the durability of the components, but will also allow us to eliminate the currently obligatory 3,000 km maintenance.
Upper shock absorber strut mounts (Anvis). Rear shock absorbers with a reduced body diameter and imported seals. Alarm indicating that the driver has not fastened his seat belt. A little later it will appear for the passenger sitting next to you. Sooner or later an automatic machine will appear. Read about one option in three pages.
This is a quick reference, now let's move on to the details:
Solving problems, malfunctions, glitches of MMS on Lada Granta, Priora, Kalina, Vesta
The radio (multimedia system - MMS) of Lada cars is AvtoVAZ’s first step in the direction of standard multimedia; the plant has not previously produced such devices. Along with the wide functionality of MMS, there are also disadvantages that we will solve together in this article.
Unlike foreign cars, the standard MMC Lada can be modified. To expand the capabilities of the radio, it is flashed. This procedure does not always end well; sometimes after flashing the firmware, the radio does not boot, but freezes on the “LADA” logo. Solution to the problem:
- Make sure nothing is inserted into the USB port.
- Try turning off the power to the MMC (remove the battery terminal) for 5 minutes.
- Create an empty explorer.txt file in the USB root. Insert the USB and press and hold the Settings button, the WinCE desktop should open.
- Try formatting the SD card to a different file system (FAT32/exFAT/FAT) and reflash the radio again.
- Use another SD card to flash the radio firmware.
Malfunctions were noticed in the operation of standard navigation - it does not search for satellites. Or an error appears: “Application MMC.exe encountered a serious error must shut down.” Or the radio screen has turned white while the radio is working. Or, on the contrary, the backlight or MMS sound disappeared. Or, when trying to connect MMS to an iPhone or iPad, both devices recognized each other, but the music did not play and the radio was frozen. In all cases we try:
- restart MMS.
- Disconnect the battery terminals for 5-10 minutes.
- try to flash the MMC with the stock (original) firmware.
- reset MMC to factory settings.
To do a hard reset of the MMC (reset to factory settings), when it is not possible to enter the settings, press the Power button and hold it for 15 seconds, after which all MMC settings should be reset.
The radio sees files on the USB-Flash, but does not play them. MMC may not support audio or video file format (see specifications),
If MMS does not turn on. You will need to remove the radio and check the fuse on the back of the device and the reliability of the connections of the connectors with the wires.
Some car enthusiasts are concerned that the MMC gets very hot. This is a normal situation.
These are not all the problems of MMC. Some malfunctions may be defective, in which case you will have to contact the dealer for warranty. If you repair the radio yourself, you should not rely on the warranty.
Some features that will help solve problems:
- go to the desktop - hold SETTINGS for more than 15 seconds; access to the desktop in MMS with built-in navigation (instructions for site users): To download files you need to log in to the site
- reboot the radio (reset) - for Lada Kalina 2/Priora - hold down the power button for 15 seconds, for Lada Granta hold down the volume button for 15 seconds).
In some cases, installing standard firmware (for Granta/Kalina/Priora or Vesta) helps solve problems.
Have you encountered glitches with standard MMS? Were you able to solve them yourself or did you have to apply under warranty to solve the problems? Let us remind you that you can connect an amplifier and a subwoofer to the MMC.
Priora, Granta, Kalina
Let's start, perhaps, with the Russian automobile industry, which has such car models as Priora, Granta and the updated Kalina. All these models are equipped with standard car radios and navigation systems.
Kalina - in this car, the standard car radio can be installed in two types. The first is a 2 DIN car radio without a CD drive and without TouchScreen. The second car radio - without a CD drive, with a 7-inch display with TouchScreen, with support for MMC cards. The screen on Kalina is resistive and is more durable, and this also allows it to work in both extreme heat and cold. Not all playback formats are available on the MMC device. Basically, the car radio reads such popular music formats as mp3, wma and wav. In addition to music, it can also play video files.
The car radio is equipped with an equalizer that can be adjusted to your taste and color. The factory setting is programmed for 6 equalizer playback options. For those who like to watch videos, it is better to download a converter to your computer, with which you can later change files for playback in your car. The Lada Kalina 2 radio has Windows CE 6 built in.
To exit to the desktop menu, you need to press the Settings button on the screen and wait a while. After which the screen will blink a couple of times and the desktop will appear. In order to return, you need to double-click on the Home icon. Kalina does not have a built-in GPS receiver, and therefore only a map is installed on it without navigation. To do this, you need to buy a GPS receiver, for example, model USB-GPS BU-353S4. After installing it, you will need a driver, to do this you need to go to the official Windows CE website and download it. After installing it, find this driver on the flash drive and click on it twice, the system will ask you whether to install it in the Windows folder, you confirm by clicking OK.
The next time you turn on the GPS navigator, everything from the Windows folder will be deleted. To do this, find our installed driver and copy it to a folder called StsticStore.
We turn it on again and check it on the GPS, see if everything works, launch it by double pressing the Home button. Next, we return to the Windows menu on the desktop. At this point, the system will ask you for the driver again, but since we have already copied it in advance, in the window that appears we simply indicate its path StaticStoreUSBSER.dll. All these given options will help you and this problem will no longer bother you. The information that the Navitel version for Windows CE is not distributed is no secret to anyone. It turns out that you can’t buy it, which means you’ll have to download it from torrent trackers. For convenience, you can take versions 7.5 or 8.0. Navitel must find our GPS receiver, and for this we need to reflash it for further work with Com5 at an approximate speed of 4800. This comes with add-on patches with which you can do this.
We write Navitel to the MMC card in the root folder called NavitelContent, where the card itself will be located. Then we insert the card into the radio and launch Navitel. A sound signal will inform you that a connection with satellites has been established.
The standard car radio on the Grant and Priora has a similar navigation system, so the settings of the standard radio on the Grant, as well as the settings on the standard radio on the Priora, are the same.
Search
Not long ago, AVTOVAZ began producing the Lada Kalina with a head unit. Previously, radio installation in Kalina was offered only by dealers in car showrooms as an additional service that was paid for by the client. Now the buyer has a choice between installing a music system with his own hands or buying a car with a head unit already installed.
Kalina sound installed
Technical characteristics of the head unit in the Kalina Lux selection:
- 2DIN touch screen;
- presence of stereo radio;
- ability to play multimedia files;
- ability to synchronize with a mobile phone;
- works with bluetooth.
Device development - WindowsCE 6.0. RAM - 128 MB. 5th generation CPU. These features cannot but please fans of AvtoVAZ products, because now driving a car has become much more enjoyable.
Kalina Radio Recorder: The Norma's technical specifications differ from the luxurious lack of a touch screen, Bluetooth connectivity and mobile phone synchronization. The size of the radio is 1DIN, removable panel. Some trim levels have 4 speakers and an antenna. The radio receives a wide range of radio waves, can play discs of different sizes, and work with USB drives and SD cards.
It's also funny that the car with the walkie-talkie went through all the special tests before going to the masses. They have been tested at extremely low and very high temperatures, and electrical compatibility has been verified by simulating the radio interference range.
When choosing a radio in your car, you must decide which media to use as the main one. This will save money. If, for example, a car enthusiast is sure that he does not need a CD or tape recorder, then why pay for a radio using these functions.
How to install a 2 din radio receiver Pioneer AppRadio SPH-DA110 in Lada Granta (OK)?
For those who choose CD players, there is one small drawback that manufacturers are trying to combat - loss of music fragments due to shaking while traveling. But progress is not in place, and the mechanics are improving. Having an ISO in the car and, accordingly, in the audio device will simplify the connection. The presence of a USB adapter allows you to play music from different media.
When choosing a radio, you should pay attention to the power characteristics. They have the most and a low threshold
Higher power is rarely used except in extreme situations. The choice should be made according to the rated power, in other words, the one that is used in most cases. Often, manufacturers indicate only the highest values on the packaging, so when choosing, you should carefully consider the annotation (passport), and not the box.
You may also like
It is also worth paying attention to the control panel. It should be as simple and convenient as possible, because in most cases it will be used while driving
Exquisite design can distract the road. Convenient and understandable buttons and backlight adjustment will only be useful. Be sure to check the spectrum of perceived frequencies. Since radio stations mostly broadcast in the frequency range from 80 to 110 MHz, it is better to have a tuner.
Correct connection of the radio
Connecting a radio with your own hands is not difficult, but you need to do it correctly. For example, so that the radio does not drain the battery when parked for a long time and it is possible to use the radio when the ignition is turned off. Let's look at several options for connecting a car radio. Let's start with the connectors that are used in radios.
Car radio connectors are:
- Custom connectors
- ISO connector (international standard)
Of course it is more convenient when the radio has an ISO connector. If you have to change the radio, just plug in the plug and you're done
In the case of individual radio connectors, you can buy either an adapter connector for ISO, or cut the wires and connect them to the individual connector block according to the diagram (which is not recommended; in extreme cases, you should use heat-shrinkable tubes and precautions). An important point when connecting radio is to correctly connect the positive wire. To connect the radio, it is better to take it directly from the battery through a fuse
The diameter of the wiring must be no less than that of the radio connector. As a last resort, connect the radio from the cigarette lighter.
Example: standard connection diagram for a radio to reduce leakage:
Black - ground Yellow - power supply +12 volts, from the battery Red - signal to turn on the radio (from the ignition switch), low-current +12 volts (logical “1”). Blue - turning on the Antenna or other devices (low-current +12 volts when the radio is on) Diodes - any, low-current type KD522B is sufficient. To connect the radio, you need to apply plus to two wires (red and yellow):
- Yellow - responsible for powering the radio memory (settings)
- Red - (power) turns off the radio.
| According to the instructions, the red wire is connected through the ignition switch, so the radio will turn off after the ignition is turned off. |
For owners of VAZ 2110 cars, in order not to pull the wire to the ignition switch, you can connect to pin 5 of the BSK block:
However, such a connection has its drawbacks, for example, you need to leave the ignition key with the passenger so that he listens to music, and even when the ignition is on, power consumption increases.
| Therefore, often these two wires (yellow and red) are twisted together and connected to the permanent positive together. Now the radio always works, regardless of the ignition. The negative aspect of connecting the radio this way is the constant current consumption (depending on the model of the radio, the current consumption is different), which leads to the battery being discharged when the car is parked for a long time. |
Connecting a radio via an additional button
To prevent current leakage, place a button in the cut of the red wire:
- Button in the section of the red wire of the radio;
- The button switches between constant “plus” and after ignition;
- Through the alarm.
With the first option, I think everything is clear: just a regular on/off button is hung in the cut of the red wire on the radio. Thus, your radio always works, but if you decide to leave the car in the parking lot for a long time, then simply turn it off. button to supply current to the radio. The second option is when an emergency button is used instead of a regular button. You will use the second emergency button to switch the power mode of the radio:
- The button is pressed - power is supplied to the radio through a constant plus
- The button is not pressed - power is supplied to the radio through the plus from the ignition
Example of connecting a car radio:
- The radio backlight wire to the cigarette lighter backlight wire.
- Plus after ignition from the clock block (orange wire)
- A permanent plus with a battery or cigarette lighter.
- Ground "-" from the cigarette lighter
Third option: you can install a simple circuit that will supply a plus and automatically disconnect it from the alarm. If the car has a two-wire solenoid with activation for closing and opening by changing the polarity for each of these operations, then it should work like this: When the doors are opened, a positive pulse from the solenoid is sent to relay P1, and the relay will operate and actually go into self-retaining mode, providing power from the battery through the terminals of its contacts and relay P2 and connecting the radio to the power supply. If there is a positive pulse during closing, relay P2 will operate, and the power supply circuit of relay P1 and the radio will break, the radio will turn off, and the relay will go into a de-energized state. But this scheme also has a minus - it is increased power consumption due to the additional relay P1, which will always be turned on along with a working radio.
Product delivery options
Note! Below are the shipping methods available specifically for this product. Payment options may vary depending on the shipping method. Detailed information can be found on the “Delivery and Payment” page.
Parcel by Russian Post
Available payment methods:
- Cash on delivery (payment upon receipt)
- Using cards Sberbank, VTB, Post Bank, Tinkoff
- Yandex money
- QIWI
- ROBOKASSA
Shipping throughout Russia. Delivery time is from 5 to 12 days.
Parcel by Russian Post 1st class
Available payment methods:
- Cash on delivery (payment upon receipt)
- Using cards Sberbank, VTB, Post Bank, Tinkoff
- Yandex money
- QIWI
- ROBOKASSA
Shipping throughout Russia. Delivery time is from 2 to 5 days. More expensive than regular delivery by Russian Post, approximately 50%. Parcel weight up to 2.5 kg
Express Parcel EMS
Available payment methods:
- Cash on delivery (payment upon receipt)
- Using cards Sberbank, VTB, Post Bank, Tinkoff
- Yandex money
- QIWI
- ROBOKASSA
Shipping throughout Russia. Delivery time is from 3 to 7 days. More expensive than regular delivery by Russian Post, approximately 100%.
Transport companies
Available payment methods:
- Using cards Sberbank, VTB, Post Bank, Tinkoff
- Yandex money
- QIWI
- ROBOKASSA
Delivery is possible to any locality where there is a representative office of the transport company. Delivery time is from 2 to 10 days. Sending large parcels is approximately 50% more profitable than by Russian Post.
Radio MMS VAZ 2192 Kalina 2, Priora 2, standard assembled Luxury
Dear customers, in order to avoid errors when sending the MMC radio VAZ 2192 Kalina 2, Priora 2, standard assembled, in the “Comment” line, indicate the model of your car, year of manufacture. Currently, depending on the vehicle configuration, several types of 2 din radio can be installed.
The first is called “2 DIN audio system, without CD drive, without TouchScreen”, the other “multimedia system without CD drive, with a 7-inch display with TouchScreen” (MMC).
The MMC VAZ 2192-7900200 radio kit includes:
1. Radio 2192-7900200-00
2. Multimedia display 2192-7900100-00
3. Connecting harness for display and radio 2192-7905030-00
It is possible to install this radio with an LCD display instead of the standard radio in the “norm” configuration.
Screen (multimedia display) 2192-7900100 is separated from the radio buttons 2192-7900200 - MMC Lada Kalina 2 (luxury) and Lada Priora 2 (luxury)
The central console of the Lada Priora (pre-restyling) was initially designed for a single-din player; the height of its location in the console did not matter. In the reystaling, this problem has been solved - the monitor is installed as high as possible, on the dashboard itself.
Installing the MMC 2192 multimedia system on the center console of the Lada Priora (pre-restyling) is the most suitable option in terms of functionality, price, reliability and ease of installation.
This multimedia system MMC 2192 with a 7-inch screen is installed on Kalina 2, Priora 2, and can also be installed on Lada Priora and has the following properties:
1. Playing music files + radio;
2. Availability of navigation;
3
Displaying important information on displays (engine temperature, fuel remaining, etc.)
4. Possibility of connecting a rear view camera;
5. Bluetooth and normal and Hands Free;
6. Ability to play video files;
7. Connecting multiple devices.
To navigate the MMC 2192 multimedia system, you will need the following equipment:
2. 8 GB flash drive with cards;
3. Firmware for radio MMC 2192
The set is formed individually
5. Wire for connecting a mini ISO rear view camera with a tulip;
6
CAN bus for displaying important information on the MMC 2192 display (engine temperature, fuel remaining, etc.); 7
Wire to amplifier;
7. Wire to the amplifier;
8. USB hub is a small device that has several USB ports. It connects to the USB port of the MMC 2192 and makes it possible to use several USB devices.
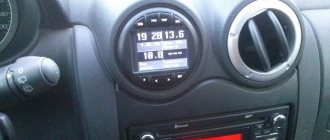
MMC 2192 runs on the Windows CE 6 operating system. This is specially optimized for devices with a minimum memory capacity of 128MB. Turning on the radio does not take much time (about 2-3 seconds).
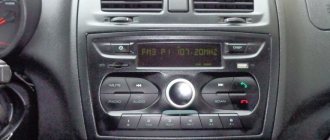
The MMC 2192 radio supports audio formats: MP3, WMA and WAV. While a tune is playing, the display shows information about the album, artist, and cover art. You can adjust the shades of sound using the equalizer (there are 6 pre-programmed settings for Jazz, Rock, Voice, etc.).
The display of the MMC 2192 Priora and Kalina radio is resistive. Unlike a capacitive screen, it is able to work without failures in more severe conditions, such as frost or heat. The display itself is quite bright and pressure sensitive. Due to the lack of a visor, there is glare in sunny weather, but not critical.
The MMC 2192 radio supports audio formats: MP3, WMA and WAV. While a tune is playing, the display shows information about the album, artist, and cover art (if any). You can adjust the shades of sound using the equalizer (there are 6 pre-programmed settings for Jazz, Rock, Voice, etc.). The sound quality is good, quite clear, without audible cuts in the highs or lows.
MMC 2192 supports only one video format: WMV with a resolution of 320*240px. To play video files you will have to use a converter, for example, Xilisoft Video Converter Ultimate. It will not be possible to play a video without conversion, for example, in 720p resolution, the picture will slow down, and the sound will lag behind the video, due to the insufficiently powerful processor.
The MMC 2192 radio is capable of opening photos, supported formats: JPEG, JPG, JPE, BMP, GIF, PNG.
The standard MMC 2192 allows you to connect your phone via bluetooth and download the phone book. In addition, it is possible to play music from your phone. Disadvantage: if you use several phones, it will be difficult to save settings
You can connect a USB-Flash to the MMC 2192 radio, which must have the FAT16 or FAT32 file system. The radio connector is located on the back of the radio, which you will have to move yourself to a specially designated place in the glove compartment.
Audio, video and photo
The radio supports audio formats: MP3, WMA and WAV. While a tune is playing, the display shows information about the album, artist, and cover art (if any). You can adjust the shades of sound using the equalizer (there are 6 pre-programmed settings for Jazz, Rock, Voice, etc.). The sound quality is not bad, quite clear, without audible cuts in the highs or lows.
MMS supports only one video format: WMV with a resolution of 320*240px. To play video files you will have to use a converter, for example, Xilisoft Video Converter Ultimate. It will not be possible to play a video without conversion, for example, in 720p resolution, the picture will slow down, and the sound will lag behind the video, due to the insufficiently powerful processor.
Review of MMC Lada Granta (luxury) and Lada Kalina 2 (standard)
Review of MMC Lada Kalina 2 (luxury) and Lada Priora (luxury)
The radio is capable of opening photos, supported formats: JPEG, .JPG, .JPE, .BMP, GIF, .PNG. For example, a photo with a resolution of 1400x800px and a size of 1MB will open in about 1 second, and a photo of 1978x3456px and a size of 7MB will take as much as 9 seconds.
It is worth noting that after purchasing a car, the antenna comes as a gift. You will have to install it yourself.
Kalina-2 Norma standard radio, buttons + text screen, and also a video with its review
Having mastered the production of the Lada Granta in the liftback body, VAZ began supplying a standard radio (not touchscreen) in the Norma+ car configurations.
Let us immediately note that the radio tape recorders intended for Kalina-2 and Granta look the same, but their mounting is different, so these devices are not interchangeable.
Looking ahead, let's say that a review made by the owner of a car with a similar radio is presented on video. Now let’s talk about what exactly VAZ is offering today to owners of Kalin and Grant in the Norma+ configuration.
A few words about the radio of the “normal Kalina-2”
When looking at the “device”, which AvtoVAZ designates with the numbers 2190-7900010-40, it immediately becomes clear that installing such a device in a standard 1DIN compartment will not work. VAZ cars in the “Norma” configuration come from the factory with an empty compartment (its height is 1DIN), and in the “Norma+” radio tape recorder occupies the entire central part of the console.
That is, the owner has the following choice: you can install a standard VAZ radio, but then the easy-to-use shelf will disappear, or you can look for and install a unit of standard height. The VAZ radio does not fit into the 1DIN high compartment.
There is no touch screen on it, but under the “twist” there is a whole array of plastic buttons.
VAZ push-button radio for Kalina-2
Such a radio, as we see in the photo, can be found in the only configuration of the Kalina Cross. The “device” in question differs from the Granta radio in the presence of a frame with holes.
There were rumors about the release of specific units intended only for crossovers, but in the end everything turned out to be simpler - VAZ always ordered radio tape recorders from Itelma, and this tradition was continued.
First of all, let's say that the main task of a built-in radio is to play music. To do this, it provides two hardware ports (USB, SD) located on the front panel.
Radio stations can be switched using the lower buttons, and the device can also perform the functions of a Bluetooth headset - it’s not for nothing that there are “Receive” and “End End” buttons.
The amplifier power is standard, the number of channels is four.
Advice for future and current owners of VAZ push-button radios
The release of standard VAZ “devices”, devoid of an expensive “sensor”, has been expected for a long time. Back in the first half of the year, we were told that such a unit should appear in the fall.
As you can see, VAZ was embarrassed to build a graphic display into the radio, and all information on the screen is displayed in standard symbols. The only available backlight color is emerald (there will be more of these colors in crossovers).
The device is a “turn on and listen” device, and in standby mode the display displays the time.
The fact that the manufacturer placed the USB port right on the face of the radio is not bad. Now owners have the opportunity to quickly connect a USB drive, or use the standard port as a power source.
Priora head unit technical specifications
I would like to start by telling you why everything happened and for what purpose.
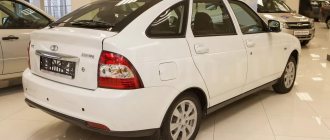
My father took the car, a Priora Universal, such a white one, absolutely beautiful) They called it the White Wagon. They have always been not indifferent to music, especially high-quality music, and they also like to watch TV, on the road, for example, or when going out into nature. Therefore, the question arose: Will a full-time GI be suitable for all these needs?
, from which several specific questions arise: -is there a linear output, outputs? -Are there linear inputs? (for example, put the sound from the TV there)
I want to dedicate this entry to these questions, as well as a more or less detailed disassembly of the State University. Let's begin...
What we have:
Standard GU, included in the luxury configuration.
A wide list of functions, design to match the interior of the cabin and much more... but these are the normal
(i.e. tulips) linear outputs front-rear, linear input (popularly AUX) are absent in this radio. Instead, the standardized miniISO connector:
After searching for a long time, I found this picture:
Much of it is true, but not all
! I thought, looked, walked around the State University. I was sure that there were 4 linear outputs, but AUX, its presence wasn’t very good. For some reason, they made a separate Navi item in the menu of this radio, as I understand it, it turns on the sound from the navigator, namely voice instructions. And as luck would have it, contact 11 did not respond in any way to the change in capacitance - no background or noise was heard.
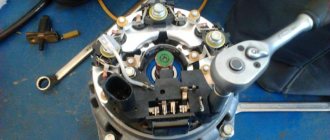
It was decided to disassemble the GU piece by piece, from the inside, so to speak) Let's go!
Remove the top cover - one screw, on the left
Remove the mask - panel. 4 screws - 2 on top, 2 on bottom. Carefully bend the latches on the sides, there are also 4 of them. Carefully pull out the mask - it is on pins PLS
Answers (2)
Of course you can, especially if the sizes are the same. Look at the photo for example.
You need to remove the climate control panel (held on by latches) and so on. It’s better to do this at a radio installation service.
MMS from Lada Grants
There is nothing complicated, even if you want to install a single-din radio instead of a double-din or vice versa, buy a special frame and, of course, the radio itself and that’s it)
Which one do you have now and which one do you want to install?
On VAZ cars of an earlier year of production, such as 2101, 2102, 2106, etc., such a concept as a “standard radio” was absolutely alien. But, as they say: time does not stand still, and along with it, the development of the domestic automobile industry does not stand still either. On new models of Lada cars, especially Kalina, Grant, Vesta, etc., the radio came already from the factory, and not just in the form of a music player, but in the form of a device with the ability to play video and photo formats, and of course sound.
The most popular standard radio, which was most often installed on Lada Kalina and Kalina 2 cars, is called “MMC”. You can understand what its advantages are and why it has earned such fame by reading this article.
Standard multimedia Priora 2
This product was chosen by 52 customers
This radio has a 2-Din format and has all the modern functions. It has a large LCD display with support for tags and file names written in Russian and English. The backlight color is similar to the backlighting of the dashboard elements. Installed in the center console of Lada Priora cars (VAZ 2170, 2171, 2172), installed at the factory on the “Lux” configuration. The equalizer has a significant effect on the range of output frequency characteristics. Supports formats: MP3, WMA, CD-DA, Ogg Vorbis.
Has a USB connector for playing music from removable media. The system has a digital radio tuner and supports the function of storing found radio stations.
This radio also has Bluetooth support , which makes it possible to use the “Hands Free” option. Phone numbers appear on the head-up display while calling or dialing. The system is equipped with a sensitive microphone with a filter against sound interference.
Important information for ordering! A USB cable for 1 slot in the glove compartment of the Lada Priora is not included in the delivery package and must be purchased separately!
Weight, kg: 1.85 Dimensions, cm: 28 x 22 x 15 Volume, m3: 0.00924
Connecting a 2 DIN radio to a standard place in the car
How to connect a 2 DIN radio with aliexpress in a car
DIN stands for "Deutsche Industriele Norme" - or "German Industrial Standards". The standard dimensions of a radio tape recorder installed in the car's standard socket. These standards are used by all manufacturers of cars and car radios (or almost all), at least all Chinese radios supplied to us from aliexpress, all of them are assembled according to 1 DIN standards, and more often - 2 DIN. By the way, 1 DIN is the size of the radio, the width x height of which is 180x50mm. 2 DIN - 180x100mm, with the installation depth of all DINs being 160mm. There is also a very rarely used standard for radio dimensions 1.5 DIN - 180x75mm. But finding such a radio is very rare, so today we will consider the usual size of a multimedia player - 2 DIN.
So, in order for us to connect such a radio, if we previously had a 1 DIN radio in the car, we will have to remove the old radio and install the ears on which the radio is attached under the dashboard from the new radio (these are most often included with the radio, but always please specify). In addition to the ears, we will also need a frame sized 2 DIN, which will no longer be included with the radio. It must be purchased separately for each vehicle. It is very advisable to treat the places of fastening and contact of the plastic of such a frame with an anti-creaking composition, otherwise not very pleasant squeaks will be produced in the cabin; they will not appear immediately, but over time.
So, with the installation of the radio, everything is more or less clear (for those who are not very clear, watch the video of installing the 2 din radio below). Now we need to look at the connection diagrams for the 2 din radio, and also figure out its pinout.
Connection diagrams for 2 DIN radio
Most Chinese 2 din radios from Aliexpress are connected to the car via an ISO - Euro connector. This is the most universal connector and the easiest to connect to almost any car. And the pinout is quite logical and simple.
Pinout of ISO - Euro connector of Chinese 2 din radio from aliexpress (example - Podofo - 7018B). Similar radios with an ISO connector will have the same pinout.
Designation of wires of a Chinese 2 din radio
But there are other connectors often used on Chinese radios. I suggest you familiarize yourself with their pinout and subsequent connection
Pinout of 2 din radio from China
The meaning of the 2 din connectors of the radio
Meaning of 2 din radio wires
Connecting tulips 2 din radio
Video - examples of connecting 2 DIN radios
Connection diagrams are, of course, good, but it’s much more clear to see how someone has already gone before you by connecting a 2-din radio to a standard place and made a fairly sensible video about it. So, I suggest you familiarize yourself with the most outstanding works of connecting radio tape recorders that are only available in the YouTube collection.
Connecting a 2 din radio using the example of a Lada Priora
Connecting a 2 din radio in a Kia Rio or Hyundai Solaris
Connecting a 2 din radio in Renault Logan or Sandero
Connecting a 2 din radio in a Toyota Corolla 120
From the videos it follows that there is nothing particularly complicated, except for partial disassembly of the car’s dashboard, connecting a 2 din radio to its standard location is no different. You just need to buy everything you need, understand the connection diagram and pinout of the radio, as well as the wires, and slowly connect everything. This process will not present any problems for any more or less handy person.
How to connect a camera, phone and steering wheel buttons to a 2 DIN radio
The issues of connecting steering wheel control buttons, a rear view camera and synchronizing a phone with it to a Chinese 2 din radio are so extensive that one article is not enough to discuss these topics. Therefore, we decided to break these topics down into the following articles:
Tips for installing a radio in Lada Priora
In order to avoid unforeseen difficulties during the installation of the radio in the Lada Priora, it is recommended to use the advice of experienced car enthusiasts:
- 1. Before installing the radio, you need to thoroughly study the connection diagram for media devices. If the player's connectors are connected incorrectly, there is a high probability of failure of some vehicle systems;
- 2. There are many models of radios from different manufacturers. Some of them have individual connectors with an additional adapter included for the ISO standard. This fact should be taken into account when choosing an audio device for the Lada Priora, since one of the connection options in this situation would be cutting the wires and directly soldering them to the car’s wiring;
- 3. When directly connecting the standard radio, you can use special terminals;
- 4. The connection diagram for the audio player via ISO will remain the same when replacing the radio with a new one.
Do not twist or wrap electrical tape to connect wires directly. How to check the thermostat without removing it from the car. 2 years ago. How to change a Renault Logan. This type of insulation is dangerous when operating a car in winter, since at low temperatures the adhesive-based tape is deformed and destroyed, which will lead to a short-circuit in the car's wires.
We will talk about how to install a Clarion radio of double height instead of two pockets in the center console of a car.
That is, there is already a 1 DIN hole (a pocket or glove box is inserted there, scientifically) in the car, and a radio of the same size can be installed there without any problems. This standard has been adopted for a long time and most automakers comply with it. But installing a double-din device is a task for the Master.
Main characteristics and functions of the radio on a Priora car
Device in the car
To prove the acceptable quality of the Priora radio, let's consider its main characteristics. The car radio operates on FM and AM frequencies, with the former being perceived in the range from 65 to 108 MHz, having stereo separation of more than 30 dB and sensitivity at a noise/30 dB ratio of 12 decibels. The AM band operates at frequencies of 522-1620 kHz, with an intermediate frequency of 450 kHz and a sensitivity of less than 43 dB.
The closest buttons to the driver of the Lada Priora on the radio are the buttons located on the left side:
- turning on/off the receiver;
- instant mute (Mute);
- selection of operating mode (Mode);
- selection of frequency range (Band);
- scanning frequency range / tracks / sequential tuning on a station (Scan). In scan mode, the receiver will pick up all stations in the selected range and play for a few seconds. By pressing again you can select the corresponding station;
- start/pause playback or select a radio station (1);
- scanning tracks or selecting a radio station stored in memory as number 2 (2\Int);
- to select a station recorded at number 3 or to play tracks repeatedly (3\RPT);
- to select a radio station recorded under number “4”, or to play music in random order (4/RDM);
- button “5” makes it possible to either go to the radio station stored in memory as number five, or go to the next folder when playing an MP3 disc (F+/5);
- button “6” makes it possible to either go to the radio station stored in memory at number six, or go to the next folder when playing an MP3 disc (F-/6).
Driver's seat
In the center of the radio panel in the Lada Priora there is an SD card loading window (at the top), a disk loading window, a liquid crystal display, cell phone control buttons, a slot for the built-in microphone, a hole from the “Reset” button (activated by a sharp thin object when an error is displayed , all buttons to initialize the system do not work). At the bottom there is an encoder knob, control buttons, and a menu selection confirmation button.
Closer to the passenger located in the front seat of the Lada Priora, on the radio panel there are such functions as:
- disc eject button (top);
- enabling the automatic search function for alternative frequencies (AF). This option allows you to find the best broadcast for a specific channel;
- automatic tuning to stations, scanning of stored stations, searching for a folder or a specific track (using the AS/PS search method);
- Search for thematic radio stations using the RDS (PTY) function. For example, you can select stations that broadcast only rock, pop, weather, finance, etc.;
- enable the feature for the messaging service (TA);
- button for displaying additional data (Info);
- selecting equalizer mode (EQ)
- selecting a radio station stored in memory under numbers 7, 8, 9, 0 (buttons 7-0).
- The standard radio on the Priora has the ability to use buttons “1” to “0” to dial a phone number.
The choice of tape recorder mode is carried out through the “Mod” button, in the menu of which you can select a radio receiver, memory card, disk, USB or information from the navigator using a brute force method. The recorder will play navigation signals (if a navigator is connected) while playing the currently selected main function (eg radio) in muted mode.