The SAUO replaced manual control of the heater, but otherwise the stove remained structurally the same. As in earlier models, the interior heating system is a housing with a radiator installed inside, connected to the cooling system of the power unit - a heat source, dampers that redirect the air flow to the desired zones, and a fan driven by an electric motor, which creates the air flow. SAUO is a controller that, depending on the set parameters, monitors the temperature in the cabin and regulates the position of the dampers, maintaining the specified mode.
Video: Heater VAZ 2110; eleven; 12. Design and principle of operation.
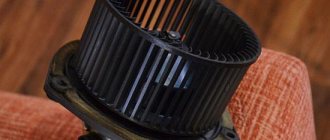
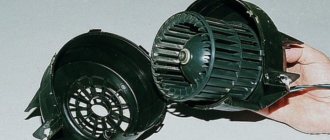
The efficiency of the VAZ-2110 interior heater would be low without the forced creation of air flow, and this task falls on the stove fan.
Preparation
Preparatory activities do not include many complex operations. You will need to do the following:
- Remove the negative terminal from the battery to de-energize the car and protect the car from possible short circuits;
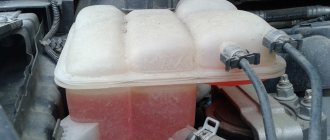
- Drain the coolant from the system. To do this, open the cap of the expansion tank to relieve excess pressure, and then unscrew the drain. The liquid must be drained into a special prepared container.
When draining the cooling liquid, one important rule must be observed - the procedure is carried out only when the engine has cooled down.
If in the future you are going to use the same antifreeze or antifreeze, then choose a clean container for draining.
Preparatory work
- First, the “mass” terminal is removed from the battery.
Replacing the motor on the VAZ 2110 stove
- Next, the coolant is drained from the cooling system into a prepared container.
- If you intend to use old antifreeze, it is necessary to let it settle before pouring it into the engine cooling system.
Model selection
Even if your VAZ 2110 has an old-style electric motor (manufactured before 2004), you can, of course, find a “original” fan. But it is quite possible to install a new type of motor instead - it is larger than the previous one, secured with three bolts. And its cost is not that high.
By the way, the new model heater fan from the VAZ 2110 is even suitable for some Nissan models with minor modifications. This is what the owners of this car often use when they install at least three times cheaper motors in their foreign car during repairs.
Causes of malfunction
There can be many nuances that the heater motor has begun to work poorly. Among them are two main ones that can be helped by a small repair rather than a complete replacement of the fan. The commutator brushes may well wear out. The brushes themselves, in turn, can “gnaw through” the copper lamellas of the collector, which is why it does not want to work, and the heater motor “goes silent.”
Although this happens quite rarely, brass sleeves of plain bearings can squeak or whistle. Repairs are made by regular lubrication, although this usually helps for a short time; sooner or later the electric motor will need to be replaced. So, if you still have to get to the furnace fan, perhaps replacing it completely will be the best solution. In addition, it saves your time.
Work to replace the fan in the cabin
Replacing the heater motor of a VAZ 2110
The subsequent change of the heater motor will be done directly from inside the car:
- Under the dashboard you need to find the block that goes to the electric motor. She disconnects.
- After this, you will need to unfasten the ground wiring of the electric motor. As a rule, it is pressed to the body by the front mounting nut of the heater.
- The trim and lining of the windshield frame are dismantled, and you cannot do without unscrewing the mounting screws.
- The right upholstery is removed from the interior heater, and the fastening nuts and screws should also be unscrewed.
- The heating hoses are disconnected. At this stage of work, extreme caution must be taken, since antifreeze residues may leak from these hoses and the heater radiator.
- To prevent the smell of coolant in the car interior, you need to lay a material that absorbs moisture well.
- The wiring is disconnected from the electric motor, from the micro-reducer, and also from the pneumatic valve.
- After these steps, remove the front housing with the stove casing. These elements are fixed with brackets and screws. It is worth noting that the engine and motor are located on the casing.
- The latches are removed, and the engine and motor are removed.
Recommendations for replacing the motor
Replacing the heater motor of a VAZ 2110
You can disassemble the electric motor yourself only to evaluate the collector and clean it. If the cause of the breakdown lies in another situation, then it is not advisable for a non-specialist in working with such parts to disassemble it. It's better to buy a new electric motor.
Note! It is also not recommended to dismantle the engine impeller on your own, since installing it in its place will disrupt the balancing, which plays an important role. Naturally, the electric motor will function, but not smoothly, which can lead to breakage of the bearings and noise when the stove is turned on.
Since the stove is in a disassembled state, it becomes possible to calmly view the other components of the cabin heater. So:
- In order for more heat to come from the radiator, you need to dismantle it and wash it. It is fixed on the rear heater casing, which is removed by unscrewing the mounting screws. After this, the radiator can be easily removed and washed under the pressure of water flowing from a hose that is connected to the radiator inlet or outlet tube. The same pressure washes away dirt from the surfaces of the removed radiator.
- To disassemble the air ducts and heater control mechanisms, you will need to remove the instrument panel on which the main air ducts are located.
Note! Usually the panel with the main air ducts is made as one piece, so it must be handled with the utmost care so that it does not have to be replaced later.
- After this, you need to remove the interior air ducts, which are secured with special screws, and the decorative lining of the floor tunnel.
Note! Under this trim there are air ducts for heating the feet, which are attached to the body with screws and latches.
- The air distributor is removed from the dashboard by unscrewing the mounting screws and disconnecting the damper control rod.
- Reassembly must be done in the reverse order of disassembly. If necessary, seal the dampers with glue. You can also seal the mounting points of the hoses with the radiator with sealant.
- When all the parts are assembled and installed in their places, the functioning of all components is checked and antifreeze or antifreeze is added. It all depends on personal preference.
- At the final stage, they check the tightness of the attachment of the hoses to the radiator and the actual operation of the assembled stove.
For those who perceive information visually, it is recommended to watch a video with a detailed description of the actions and several photos that will help you do everything correctly.
The stove releases cold air
The first thing to do is to determine the cause of the breakdown. This will help you find ways to solve it. But there are quite a lot of them, so let's look at the most popular ones.
One common reason is that only cold air comes out of the unit. This is the first sign that the stove is not working properly. The reason lies in the fact that the interior temperature sensor has broken down - it is responsible for what conditions are in the cabin and whether they correspond to those set by the driver. If it fails, then its readings are incorrect. Thus, the stove receives information that it is hot in the cabin. It will therefore produce cold air to make conditions more comfortable.
It's easy to fix this problem. There are several steps you need to take. First, remove the lampshade by unscrewing it. Then install a new sensor and check it for serviceability.
Also, the reason that cold air comes out of the stove can be a breakdown of the gear motor. To determine it, you must first check the temperature sensor for serviceability. If everything is in order with the latter, then clearly the problem lies in the gearmotor. It is worth noting that this part, like the previous one, cannot be repaired. The only way to solve the problem is to replace it with a new one.
This process is a little more complicated. It consists in carrying out the following actions. First, the wipers are removed. Then you need to unscrew the bolts that are responsible for fastening the frill and remove it so that it does not interfere. Thus, access to the element that has failed will be obtained.
Then you need to remove the gearmotor itself. To do this, its fastening is unscrewed. A Phillips screwdriver will help with this. Next, you should carefully disconnect all the wires. This should be done as carefully as possible so as not to damage anything. This is the only way you can completely dismantle the broken part. Using the same principle, but in reverse, install a new element. At the same time, make sure that the cut of the part clearly fits into the damper.
Signs of a malfunctioning heater motor
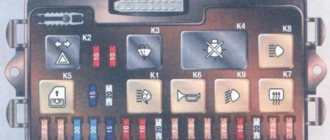
First of all, you need to check the fuse.
It often turns out that this is the problem. If the heater fuse is blown for any reason, it should be replaced. If after replacing the fuse the stove still does not work, then you should proceed to dismantling and replacing the motor itself. The first sign of a malfunction of the heater motor on a VAZ 2110 may be noise from the motor itself. The reason for this sound may be the lack of lubrication on the engine, or it may indicate the imminent death of the heater motor on the VAZ 2110
Preparing for replacement
If you have at least some skills in working with wrenches and screwdrivers, replacing the stove motor will be a feasible repair for you. To get to the electric motor of the VAZ 2110 heater, you first need to open the hood and remove the “-” battery terminal.
Now, in fact, we are removing the motor itself, which does not work as we need, or has completely failed:
- The windshield wipers need to be removed. To do this, pry off and remove the rubber caps, take a 10mm wrench, unscrew the nuts, disconnect the brushes;
- We pry up the decorative plugs (a slotted screwdriver is useful here), unscrew the screws that secure the frill, then a couple more nuts on the edges (with a 10mm socket wrench), remove the frill;
- Having removed the rubber seal, unscrew the screws with which the engine compartment shield is attached;
- Now, remove the hose that supplies washer fluid to the injectors;
- The hardest part is getting to the right side of the engine compartment to remove it. It has two nuts at the bottom (also for a 10mm socket wrench). It would seem easy to unscrew, but it’s just painfully inconvenient. Although there is a positive point here - these nuts do not have to be completely unscrewed - the shield can be pulled out after a few turns;
- Before disconnecting this shield, remove the clamps from the hose going to the vacuum brake booster;
- Unscrew the screws (4 pieces) from the cabin filter cover and remove it;
- The heater motor has already appeared. It is necessary to disconnect the heater motor block, as well as the resistor block;
- Now you can pull out the left side of the stove, and with it the fan motor;
- It became possible to replace the heater fan;
- Reassembly is carried out in the same order, only exactly the opposite.
Be prepared for the fact that for the first time replacing the heater motor on a VAZ 2110 (repair) will take you a couple of hours.
Many motorists have encountered the fact that the heater fan on a VAZ-2114 has failed. But not all of them know that it is quite easy to replace it with your own hands, and it is not necessary to pay a small amount to a car service center. On average, the entire process will take up to half an hour and will help save significant money.
How to replace the heater fan on a VAZ 2110-VAZ 2112?
Note! These instructions for replacing the heater motor are suitable for many cars of the tenth family, but not for all, because dozens were produced in very different configurations and designs throughout the entire time, some VAZ 2110 even had an engine from Opel installed from the factory, such a car is marked VAZ 21106, so we won’t be able to write about everything (since it will be a very long article), we’ll just take the most common tenth family and use its example to show how to replace a stove motor through descriptions and pictures!
1. First of all, you will need to get to the motor, it is hidden under a trim that is located under the windshield, and inside this trim, the motor is still placed in a casing, so you will have to remove a lot of decorative elements, in more detail how to do this is described in the article under title: “Replacing the cabin filter on a VAZ 2110” and by the way, the trim that is located under the windshield cannot be removed without removing the brush, and when you lift it, pay attention there will be a tee under it (see the place where it is located on the large photo), disconnect the hose from it that is connected at the bottom (see small photo) and the trim can then be removed from the car.
2. We go further, as soon as all the elements that prevent access to the casing in which the motor is located are removed, find the wires coming from the motor, or to be more precise, one “Plus” wire and one “Minus” wire, so here is the minus (Indicated in green arrow) is secured to the nut (indicated by a blue arrow), you unscrew it, but the plus (indicated by a yellow arrow) is connected to another wire through a wire block and a connector (see small photo), disconnect them from each other.
3. Then, using a flat screwdriver, pry out the four latches (They are indicated by arrows) that fasten two casings together, on one of which the stove motor is attached. Be sure to replace any latches that will be broken during their removal with new ones during reassembly. It is recommended to install all the fasteners in their places to prevent the housings from moving between each other.
4. And finally, unscrew all the screws that hold the casings together, there are only about 8 or 10 of these screws (We could be wrong), when they are all unscrewed, the casings can be separated (see small photo), but just remember where the screws go they are twisted because they have different lengths and you cannot wrap the long ones where the short ones should be located and vice versa.
Note! The stove motor can be removed assembled with the casing, or you can immediately take it out separately, it’s up to you how to do it, but having taken out everything assembled, it will be much easier to disconnect the motor (since it will be more convenient), and the motor is separated in the following way, you will only need just remove two wires (minus wire and plus wire) from the hole into which they are threaded in the casing and that’s it!
5. Installation is carried out in the reverse order of removal, after installing the stove, you will have to use the help of an assistant and find out whether you installed the stove correctly in its normal place or with a skew (If it is skewed, then this will need to be removed immediately), in general, closer to topic, ask an assistant or even get into the car yourself and turn on the stove, while assembling it, i.e. tighten the fastening screws (You don’t even have to tighten everything) and install the clamps and, of course, put the minus on the body, and connect the plus to the connector, then turn it on and if everything works fine in all modes, then turn it off and go tighten the last screws, install the covers under windshield and of course install the brushes, the replacement is complete, if after turning on you hear a crackling noise, then this only means one thing, namely that the heater blades are touching the body in which it is located, then turn off the heater and unscrew the screws , remove the clamps and remove the body together with the stove, place the motor there correctly, tighten everything again and try until the noise disappears, just like it disappeared, screw everything back and install all the parts in the reverse order.
The process of replacing a fan on a VAZ-2114
As already mentioned, the process of replacing the stove fan will take quite a bit of time and even a novice motorist can do it.
The unit itself is located in the engine compartment, behind the engine shield. It is protected from dust and dirt by a plastic casing, which performs its functions well, but not always.
Before you begin the replacement process itself, you need to collect the tools. So, let's look at what you need: a set of keys (where would we be without it), a Phillips-head screwdriver and a new fan as a part.
Exact withdrawal algorithm
Now that the motorist is fully armed, you can consider the step-by-step instructions for replacing the heater fan:
- We remove the negative terminal from the battery.
- We find the fan power connectors under the dashboard and turn it off.
- We unscrew the two mounting bolts of the protective casing from the engine compartment.
- We dismantle the nut of the “minus terminal” of the motor power supply.
- Unscrew the screws securing the motor.
- We dismantle the fastening of the stove air intake grille and remove it.
- Remove the motor assembly with the protective casing.
- We disassemble the casing and remove the motor itself.
- Assembly is carried out in reverse order.
Fan selection
Now that the process is clear and discussed, it is necessary to consider which stove fan is suitable for the VAZ-2114. To do this, first turn to the spare parts catalog. In addition to the original spare part, a number of analogues were found that are recommended for installation.
Original spare part (article)
2108-8101078 — original catalog number of the heater motor for the Lada family of cars 2108-21099, as well as 2113-2115. It is manufactured at the AvtoVAZ plant and the average cost is 2000 rubles.
Analogs
In addition to the original stove fan, you can find several analogues on the market that are recommended for installation.
So, let's look at all the possible options:
- Fenox HM81002 - the cost of this product is 1,500 rubles. Country of origin: Belarus.
- Master-sport 2108-8101078-PCS-MS - the average cost is also about 1,500 rubles. Country of origin: Germany.
Unfortunately, no other analogues were found, but some motorists are modernizing this unit by reworking it.
The whole assembly is assembled
Or they buy the entire spare part assembled, here are the part numbers:
- Pekar 2108-8101091 is a very popular option among VAZ-2114 owners. Good reviews, cost about 1500 rubles.
- Luzar 2108-8101091.
VAZ 2110 heater blows cold, why?
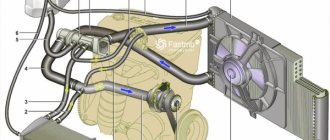
Many owners of “ten” complain that at some point the stove constantly blows cold air and no amount of turning the handles of the automatic heater control system can save the situation. There can be a lot of problems and malfunctions. For example, the ACS controller itself is faulty, the ceiling sensor or micro-geared motor is faulty and simply does not open or close the damper. Another reason is the air (air lock) in the heater radiator, which is simply not capable of heating the air passing through it. Below is a schematic representation of the VAZ 2110 heater device .
Heater dampers VAZ 2110
Often the cause of poor performance of the “tens” heater is the damper of the VAZ 2110 heater . The damper may not close tightly or open poorly. The heater flap itself is made of plastic, which can become warped and perform poorly over time. Many car owners buy a metal damper and change it themselves. How to check the functionality and evaluate the condition of the heater damper? Everything is quite simple, remove the central air duct deflector and there you have it - a damper! Let's look at the photo.
Design of the VAZ-2110 heater
The SAUO replaced manual control of the heater, but otherwise the stove remained structurally the same. As in earlier models, the interior heating system is a housing with a radiator installed inside, connected to the cooling system of the power unit - a heat source, dampers that redirect the air flow to the desired zones, and a fan driven by an electric motor, which creates the air flow. SAUO is a controller that, depending on the set parameters, monitors the temperature in the cabin and regulates the position of the dampers, maintaining the specified mode.
Video: Heater VAZ 2110; eleven; 12. Design and principle of operation.
The efficiency of the VAZ-2110 interior heater would be low without the forced creation of air flow, and this task falls on the stove fan.
How to Remove the Heater Motor on a VAZ 2110
Replacing a stove fan on a VAZ 2110, VAZ 2111, VAZ 2112
Welcome! Fan oven. If you go into the terminology, the word "fan" means an impeller with blades, but people are so used to saying the word "fan", so this article, which we have named, will actually discuss the issue of replacing the heater, to warn that if the motor that you started doing something wrong, for example, or all the contacts inside it burned out, do not try to restore it, but rather buy a new machine in the store, of course, it is not cheap, but you will install it and forget about the child for a very long time if he is completely gone , Roche and oven stopped working (motor burned out) and it's cold outside, you can take it cheap to analyze or browse various flea markets and much more. d.
The note! To replace the oven you will need: screwdrivers of different types (from short to long), wrenches, spanners, and we recommend stocking up on a new cabin filter (this is only if the filter has not been changed for a long time) To simply remove furnace motor, you need to remove the windshield, and by removing the trim, you will still have access to the cabin filter!
Result:
Where is the fan? When you remove the windshield you should have the following image (see photo below), note the red arrow, it was designed to separate the housing that houses the engine (on the right) and to separate the air intake on the left). There is also a cabin filter where the air intake is located in the oven.
When should I replace the fan? At the beginning of the article we roughly described all the symptoms that can occur if the motor fails, but we must repeat that not all people read everything that is written on the page, in general, this is closer to the essence of the fan. can completely break down (over time, and if there was a lot of voltage, it can simply burn out. Such cases occur due to the negligence of people themselves, some put coins instead of fuses, the wiring begins to melt, and since there is no fuse, the circuit is not opened and not published ( does not work), it may partially (does not work at speed, but this is not an oven, most likely it is the SAUO unit, check, just change it to a known product, if everything starts to work, the unit is still replaced) they start making unpleasant noises and (this is also an oven), for example, squeaking, etc., all these malfunctions appear temporarily and can immediately after purchase if the plate is damaged or should have been in this condition.
The note! By the way, in addition to the engine itself, much more comes out of the system, most often this is the SAUO unit, at least the stove itself, well, don’t forget about the fuse, otherwise you will disassemble the entire stove, replace the engine and other heating parts, but do not change anything, then look in fuse box and you will see a blown fuse on the plate, this will be very annoying if you are just throwing money away, so always with any breakdown, first open the assembly and see if there are fuses, see F18!
Replacing the heater motor (heater fan) VAZ 2110, 2111 and 2112
Detailed video instructions for replacing the heater fan ( oven
) on
VAZ 2110
, 2111 and 2112 cars.
VAZ 2112. how to change the combustion engine (new model).
Video review of a new type of replacement electric fan heater for VAZ 2110
Do it yourself.
How to replace the oven fan on a VAZ 2110-VAZ 2112?
The note! These instructions for replacing the furnace heater are suitable for many cars of the tenth family, but not for all, since dozens were manufactured with very different levels of trim and design, for some VAZ 2110 even the Opel engine was supplied from the factory, such a VAZ car marked 21106. so we can't write about everything (because it would be a very long article), just take the most common tenth family and use it to show furnace motor replacement with description tools and drawings. !
Fan repair (step by step)
The disassembly technology is very simple, but proceed carefully. Since electric motor failure lies in the wear of bearings and graphite brushes, let’s consider how to replace these elements:
- Let's disassemble the electric motor. To do this, first remove the impeller, and then the two spring clamps of the motor support.
- We remove the support.
- Unscrew the screws securing the brush assembly and remove it.
- Carefully knock out the rotor.
- We clean the elements from dust and dirt.
- From the inside of the stator, carefully bend the edges of the plate holding the bearing.
- We knock out the bearing and install a new one in its place (for replacement you need bearing No. 609).
- We bend the edges of the plate back.
- We inspect the condition of the collector plates on the rotor and, if necessary, sand them with sandpaper (fine-grained).
- We replace the worn brushes with new ones (we solder the wires of the worn ones, and in their place we solder the wires of the new elements).
- We bend the stops of the brush springs (this will allow you to easily install the brush assembly in place).
- We put the rotor in place.
- We install and fix the brush assembly, having previously seated the brushes in their seats.
- We install brush springs into the holes that covered the stops and bend the stops back.
- Install the fan support and impeller.
- We install the repaired fan on the car.
Replacing the pipe
I went to the store, bought a set of pipes (in reserve), clamps, and antifreeze to top up. I returned to the garage and began to disassemble. This was my first time replacing this pipe. I knew that it was going to the stove and I also knew that I would have to take a lot of disassembly, plus drain the antifreeze.
First things first. First, I unscrewed several screws and removed the left trim (aka sound insulation). Then I removed the air pipe, loosening two clamps, and also disconnecting the crankcase ventilation pipe.
Next, I proceeded to dismantle the front window trim and removed the wiper arms.
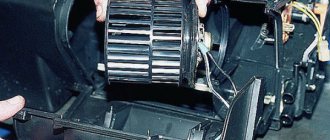
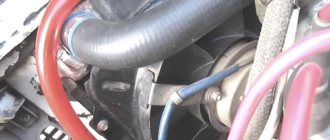
After all the operations performed, I finally saw where the damaged pipe ends. But it is blocked by the heater fan housing.
So we’ll remove it too. It is held on by three screws and two top latches. There were no problems with withdrawal. In one step I cleaned the fan of debris.
I didn’t take out the fan itself, I just moved it a little to the left. And now I had access to the clamp and pipe.
Stories from our readers
“Fucking basin. "
Hi all! My name is Mikhail, now I’ll tell you a story about how I managed to exchange my two-wheeler for a 2010 Camry. It all started with the fact that I began to be wildly irritated by the breakdowns of the two-wheeler, it seemed like nothing serious was broken, but damn it, there were so many little things that really started to irritate me. This is where the idea arose that it was time to change the car to a foreign car. The choice fell on the melting Camry of the tenth years.
Yes, I had matured morally, but financially I just couldn’t handle it. I’ll say right away that I am against loans and taking a car, especially not a new one, on credit is unreasonable. My salary is 24k a month, so collecting 600-700 thousand is almost impossible for me. I started looking for different ways to make money on the Internet. You can’t imagine how many scams there are, what I haven’t tried: sports betting, network marketing, and even the volcano casino, where I successfully lost about 10 thousand ((The only direction in which it seemed to me that I could make money was currency trading on the stock exchange, they call it Forex. But when I started delving into it, I realized that it was very difficult for me. I continued to dig further and came across binary options. The essence is the same as in Forex, but it’s much easier to understand. I started reading forums, studying trading strategies. I tried it on a demo account, then opened a real account. To be honest, I didn’t manage to start earning money right away, until I understood all the mechanics of options, I lost about 3,000 rubles, but as it turned out, it was a precious experience. Now I earn 5-7 thousand rubles a day. I managed to get the car buy after half a year, but in my opinion this is a good result, and it’s not about the car, my life has changed, I naturally quit my job, I have more free time for myself and my family. You’ll laugh, but I work directly on the phone)) If If you want to change your life like me, then here’s what I advise you to do right now: 1. Register on the site 2. Practice on a Demo account (it’s free). 3. As soon as you get something on the Demo account, top up your REAL ACCOUNT and go to REAL MONEY! I also advise you to download the application to your phone, it’s much more convenient to work from your phone. Download here.
Approximate price 1200 rub.
Which heater motor is suitable for my car? For old-style heaters, a fan with catalog number is suitable: 2108-8101078. For new model heaters: 2111-8118020, 2111-8118020-01 and 2111-8118020-02.
So, let’s vote and leave reviews about the heater fans:
- Which manufacturer is better to choose?
- How often did you have to change the stove motor?
ps All off-topic comments will be deleted.
The best stove fans for VAZ are produced by the company..
Fan in heating system
The fan plays the main role in the operation of the heating system of the machine.
Heater fan VAZ 2114
Any car is not immune from failure of not only the fan, but also the heating system as a whole.
To understand the issue of why the fan does not work, you need to: start the car, switch the heater at speeds 1, 2, 3 in order. If no additional sounds appear, the fan simply does not work.
If the fan does not turn on in the first two speed modes, but starts working in the third, the problem is in the functioning of the additional resistor, or in the switch itself.
How to replace the VAZ-2114 stove motor with your own hands
A warm interior is the key to good and comfortable travel by car. A non-working stove can not only cause discomfort, but also become an argument against further travel by car at all. It’s one thing when you came to the garage, noticed a non-working heater and refused to move further in the car during the breakdown, but if this breakdown caught you on the road, the nearest service center is far away, and it is not possible to drive a car with a non-working interior heater, because the windshield becomes covered with frost and further movement becomes dangerous. Then the only option left is to either transport the car using a tow truck, or try to fix it yourself.
External view of the VAZ 2114 heater fan motor
If we describe this process briefly, the procedure will be as follows:
- Remove the top clips - metal spring clips
- Unscrew all screws securing the motor housing, side, bottom and middle
- Unscrew the nut securing the negative wire and disconnect the positive plug
- Remove the heater housing assembly with the fan
READ Replacing Cabin Filter Kia Seed 2012
Installation proceeds in reverse order. In principle, in the video guide presented above, this process, both removal and installation, is shown as clearly and accessible as possible. If you have any questions, ask below in the comments.
It is worth mentioning the price of a new heater motor for a VAZ 2110-2112, it ranges from 1000 rubles for a high-quality domestic fan.