Lada K alina 2 . CHECKING AND REPLACING THE VOLTAGE REGULATOR ON THE CAR
You will need: a flat-blade screwdriver, 8", 12" wrenches, 7", "8", "24" socket wrenches, a hammer, a DC voltmeter, a megger.
The operation of the voltage regulator is to continuously automatically change the generator excitation current so that the generator voltage is maintained within specified limits when the rotation speed and load current change.
If necessary, you can check and replace the voltage regulator without removing the generator from the car.
Shown is working on a car without air conditioning. On a car with air conditioning, a generator of a different model is installed, and to remove the relay-regulator, the generator must be removed from the car. 1. Move the rubber boot aside and connect the “plus” wire and the “minus” wire to the generator housing.
2. Start the engine and turn on the headlights.
3. After 15 minutes of engine operation at medium speed, measure the voltage; it should be 14.4-15.1 V. If undercharging or overcharging is observed (the voltage does not fall within the specified limits), replace the voltage regulator.
4. The serviceability of the capacitor can be checked with a megger or tester (on a scale of 1-10 MOhm). Connect the tester probes to the capacitor contacts. Before connecting, the device shows infinity. At the moment of connection, the resistance decreases, and then again tends to infinity. In this case, the capacitor is OK.
The faulty capacitor is replaced together with the rectifier unit as follows.
1. Disconnect the wire from the negative terminal of the battery. 2. Disconnect the wiring harness block from the generator terminals.
12. Check the serviceability of the voltage regulator. Connect a 12V test lamp to the brushes. Apply a voltage of 12 V “plus” to the terminal, and “minus” to the “ground” of the brush holder. In this case, the control lamp should light up.
13. Set the voltage to 15-16 V - the lamp should go out. If the lamp is on or off in both cases, then the regulator with brush holder is faulty and needs to be replaced.
14. Install the voltage regulator in the reverse order of removal.
On Kalina cars, the generator is three-phase and produces alternating current. There is no need to go into too much theory; an ordinary motorist only needs to know how to independently diagnose and repair the installation. This means installing the generator and voltage regulator directly. The fact is that at the output of the power windings the voltage jumps in the range of 10-30 V, and to power the entire on-board network you need 12 V. The first step is to rectify the voltage and then stabilize it.
Generator operating principle
To visually visualize the operation of the installation, use the generator connection diagram. The second component of the installation is a voltage regulator, which is included in the power circuit of the rotor winding. The instrument panel contains a charge control lamp that:
- Lights up when the ignition is turned on and there is a breakdown in the generator set.
- Does not light up in normal mode and when there is a proper charge level.
A relay with normally closed contacts is used to power this lamp. Therefore, when the ignition is turned on, it lights up. Further, as soon as you start the engine, the generator begins to generate voltage. The relay winding is connected to the rotor power circuit; when voltage appears, the contacts switch - they open and the lamp goes out.
Let's sum it up
As it turned out, repairing or replacing the generator in a LADA Kalina car does not require much effort, so such manipulations are accessible even to inexperienced owners; a connection diagram is used to make the task easier. An important point in operation is periodic diagnosis of the condition of both the unit itself and its component elements, including the tension system. Timely prevention will significantly extend the life of the unit, and the owner of LADA Kalina will have considerable savings.
Main Generator Components
In general, a generator is a converter that creates electrical energy from mechanical energy. On all cars, the design and operating principle of these devices are similar. The design consists of the following components:
- The stator winding, a thick copper wire is used for it, since it is with its help that voltage is generated.
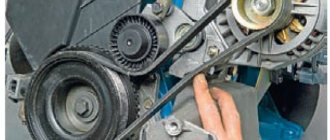
- The rotor winding is excitation. Without it, it is impossible for current to appear in the stator winding. In order for any potential difference to appear in the frame, the presence of two components is necessary - rotation and a magnetic field. Thanks to the generator belt on the Kalina, the rotor rotates. It is its winding that fulfills these two conditions - a magnetic field is created around it, and it rotates around its axis.
- The rotor is equipped with slip rings, to which voltage is supplied using a brush assembly.
- A pulley mounted on the rotor allows rotation to be transmitted from the crankshaft via the generator belt on the Kalina.
- A mechanical or electronic voltage regulator changes the voltage on the rotor winding. Due to this, the generator produces a stable voltage.
- The block of semiconductors (valves) mentioned earlier is necessary to convert three-phase alternating voltage into unipolar direct voltage.
- Covers with bearings are designed for rotor alignment and normal operation of the unit.
- The capacitor allows you to get rid of residual alternating current after rectification.
Testing a three-level relay
Regulated power supply
Novaya Lada: Check light on Kalina: what to do
Some car owners install on their cars, instead of standard “chocolate bars,” three-level relays, which are technologically more advanced. Their difference is the presence of three voltage levels at which the battery power is cut off (for example, 13.7 V, 14.2 V and 14.7 V). The appropriate level can be set manually using a special regulator.
Such relays are more reliable and allow flexible adjustment of the cutoff voltage level. As for checking such a regulator, it is completely similar to the procedures described above. Just do not forget about the value that is set on the relay, and accordingly, check it with a multimeter.
Signs of generator failure
To diagnose the generator set, it is not necessary to remove it. Here are some typical symptoms of breakdowns:
- The presence of a hum and whistle from the generator indicates that the bearings are damaged. If you start it, the rotor may jam and the belt may break.
- Whistling, short-term ignition of the charging control lamp - the alternator belt on the Lada Kalina is worn out, or it has low tension. If the lamp is constantly on, there may be a break.
- If the charging lamp is on, this means that there is no voltage at the generator output. The reason may lie in the windings, voltage regulator, slip rings, diodes, wiring.
Actions when charging disappears
The generator on a Kalina with air conditioning has more power than on cars without an air conditioning system. The design and faults are the same. What to do if charging is lost? Don't panic and check immediately:
- Voltage regulator. The easiest and most expensive way is to replace it with a known good one. But you can also apply voltage of 12 V and 15 V to check operation. Regardless of whether the regulator is mechanical or electrical, it will behave the same. In the first case, voltage will be supplied to the excitation winding, but in the second - not.
- Alternator slip rings and brushes. You can use a simple lamp probe to check the contacts. The length of the brushes must be more than 5 mm, otherwise they should be replaced.
- The integrity of the field winding can be checked with a tester. Moreover, there is no need to remove the generator, just crawl up to the slip rings and check the resistance between them. Please note that they should not short to ground.
- The condition of the stator winding and diode bridge can be assessed only after dismantling the generator.
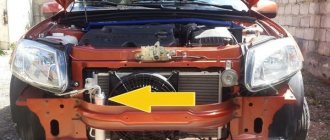
How to check the fuel pressure of Lada Kalina
The pressure in the engine power supply system can be checked with a conventional pressure gauge (for example, from a tire pump).
We carry out the work on a cold engine. Relieve pressure in the power system.
We put an oil-resistant reinforced hose (with an internal diameter of 12 mm) onto the threaded fitting of the pressure gauge and secure it with a clamp.
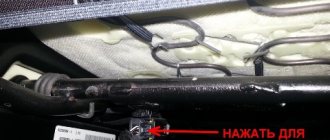
On the right side of the engine (in the direction of travel of the car), unscrew the plastic cap of the fitting on the fuel rail (for clarity, the plastic engine screen has been removed).
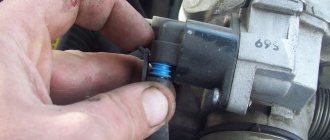
Using the wheel valve cap, unscrew the spool valve from the fuel rail fitting.
Remove the spool from the fuel rail
We put a hose pressure gauge on the ramp fitting and secure it with a clamp.
With the ignition off, for 3-5 minutes we use a wire to supply contact “11” of the diagnostic connector with 12 V power from the battery.
The electric fuel pump should turn on. Its operation can be monitored by ear.
Within 10 seconds we measure the fuel pressure, which should be equal to 3.6-4.0 bar. After turning off the pump, the pressure may decrease slightly and then stabilize for a while.
If the pressure in the system is more than 4.0 bar, the fuel pressure regulator is faulty.
Low pressure (below 3.6 bar) in the power system can be caused by a clogged fuel filter or fuel module strainer, as well as a malfunction of the electric fuel pump and fuel pressure regulator.
To check the fuel filter for contamination, you need to remove it, drain the remaining fuel from it and blow it through a piece of hose (you can use your mouth).
The resistance to air passage during purging should be insignificant. Otherwise, we replace the fuel filter with a new one, which we recommend always keeping in stock.
We check the condition of the fuel module strainer after dismantling the module. If the mesh filter is very dirty, clean and rinse it.
To check the serviceability of the fuel pressure regulator (at low pressure), connect a hose with a pressure gauge directly to the outlet fitting of the fuel module.
We supply power to the electric fuel pump as indicated above. If the fuel pressure is 3.6 bar or higher, the regulator is releasing fuel pressure too much. This regulator is faulty and must be replaced.
If the fuel pressure in the engine power supply system is low and continues to drop after the electric fuel pump is turned off, then this may be due to leaky connections of the fuel module, a malfunction of the pump, or leaking injectors.
To find the cause of the malfunction, turn on the electric fuel pump again for 10 seconds (supplying power to contact “11” of the diagnostic connector) and after turning it off, completely pinch the rubber hose supplying fuel to the fuel rail. If the pressure stabilizes, then either the fuel module or the electric fuel pump is faulty. If the pressure continues to drop, one or more injectors are leaking.
New Lada: How to check the generator on a LADA car » Lada.Online - all the most interesting and useful about LADA cars
A leaking injector can usually be identified by the dark color of its nozzle, which contains coked droplets of fuel. Checking the tightness of the injectors is described in the article - “How to remove the fuel rail and check the injectors of the Lada Kalina.”
How to dismantle the generator
Now we need to tell you how to remove the generator. To do this, proceed according to the following principle:
- Disconnect the battery.
- Disconnect all wires going to the generator.
- Pre-treat threaded connections with penetrating lubricant such as WD-40.
- Unscrew the nut from the top mounting of the generator. The bracket can also be removed.
- Unscrew the nut from the lower mounting bolt. Hold the bolt head from turning.
- Remove the Kalina generator belt from the roller. There is no need to perform any manipulations with the air conditioner and power steering.
- Remove the generator from its seat.
Disassembling the device
To disassemble the generator, you need to perform several simple manipulations:
- Remove the drive pulley. Try not to lose the key.
- Unscrew the nuts from the back cover that secure all parts of the structure.
- Remove the voltage regulator. At the same time, evaluate the condition of the brush assembly.
- Disconnect all parts of the generator.
After this, you can begin to carry out repairs.
Bearings often fail, especially the one located in the front cover. The reason for this is excessive belt tension. To make a replacement, you need to unscrew four screws and press the bearing out of its seat. Instead, install a new bearing. To increase reliability, change both rollers at once.
Installation and repair features
Installation occurs in reverse order. If necessary, the generator is replaced or repaired. In some cases, repair will be impractical, since there are many unusable components, including stator and rotor windings. Restoration will be expensive; it will be much easier to completely replace the generator on Kalina. The cost of a new generator in stores is 4-5 thousand rubles. At "showdown" you can buy it 2-3 times cheaper.
As already mentioned in previous articles, the main malfunctions of the generator are failure of the diode bridge, brushes with a voltage regulator, or even an open circuit in the winding of the device. Below I will give some of the types of diagnostics using a multimeter that anyone can perform independently if they have this device.
Causes and symptoms of malfunction
The regulator will need to be replaced if the part fails. This can happen for several reasons:
- Short circuit in the circuit , which led to its breakdown. This happens quite often, since the “relay” is a power source, and there is no fuse between it and the rotor.
- Brushing of brushes resulting from friction against the rotor .
You can find out about problems with the operation of the generator, in particular with the charging relay, by changing the voltage of the on-board network.
Checking the voltage with a tester. All consumers are turned off.
All consumers are switched on, drawdown is minimal. Ideal operation of the voltage regulator relay.
After checking, do not forget to put the cap back on.
In practice, during the operation of the car this is determined by the following symptoms:
- Headlight beams of different brightness . When you press the gas pedal they light up brighter, at idle they dim.
- An undercharged battery will affect the morning start-up. The starter turns much harder than usual.
Battery overcharging due to increased voltage . It can affect you in several ways:
- Electrolyte boiling in jars . It will manifest itself as a sharp, unpleasant odor emanating from the battery;
- Frequently blown fuses . If they are missing, the “weakest” part of the wiring will burn out (places with pockets of copper oxidation, poor contacts).
Traces of electrolyte are visible along the edges of the battery. This occurs due to overcharging.
Checking the rectifier unit (diode bridge)
To perform this diagnostic, it is necessary to remove the diode bridge from the Kalina generator; this was described in more detail in previous articles in this section.
Then we connect the tester with the black wire to the negative plate of the block, and the red one in turn to the three contact terminals of the diodes. This way we check all the rectifiers in the block. The values on the device should be in the range from 400 to 800 Ohms. Personally, on my Kalina, during this test, all diodes showed a resistance within 535 Ohms. But the repair instructions from the Third Rome publishing house talk about numbers of 580-620 Ohms. I will say right away that when I rang two serviceable generators, the values specified in the manual were not achieved, although there were no problems with charging, so I personally doubt the accuracy of the data in this instruction.
Then we carry out the same operation, only swapping the contact wires of the multimeter. In this case, the device, with working diodes, will show infinity, that is, its readings will not change:
Checking the serviceability of the voltage regulator with brushes
To do this, you need to connect a 12 Volt light bulb to the two ends of the brushes, and apply 12 Volt voltage to the regulator contacts. If this device is working properly, the light should light up. When the voltage supplied to the regulator increases to 15-16 V, the light should go out.
In case of detected malfunctions in various devices, we replace them. More details about this are written in previous articles from the “Generator” section.
Checking relay type 591.3702-01
Relay test diagram type 591.3702-01
You can also still find a voltage regulator of type 591.3702-01, which was installed on rear-wheel drive VAZs (from VAZ 2101 to VAZ 2107), GAZ and Moskvich. The device is mounted separately and installed on the body. In general, the test is similar to that described above, but the differences are in the contacts used.
In particular, it has two main contacts - “67” and “15”. The first of them is a minus, and the second is a plus. Accordingly, to check it is necessary to assemble the circuit shown in the figure. The verification principle remains the same. In normal condition, at a voltage of 12 V, the light bulb lights up, and when the corresponding value increases to 14.5 V, it goes out. When the value returns to its original value, the light comes on again.
A classic regulator of this type is a device of the PP-380 brand, installed on VAZ 2101 and VAZ 2102 cars. We provide reference data regarding this regulator.
| Adjustable voltage at regulator and ambient temperature (50±3)° C, V: | |
| at the first stage | no more than 0.7 |
| on the second stage | 14,2 ± 0,3 |
| Resistance between plug “15” and ground, Ohm | 17,7 ± 2 |
| Resistance between plug “15” and plug “67” with open contacts, Ohm | 5,65 ± 0,3 |
| Air gap between armature and core, mm | 1,4 ± 0,07 |
| Distance between second stage contacts, mm | 0,45 ± 0,1 |