Replacing the VAZ 2109 starter bushing is necessary when there is excessive axial runout of the rotor. Because of this, contact is lost and there is no mass on the rotor winding. Problems arise when starting the car engine, starter power and speed decrease.
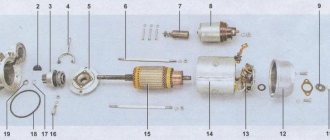
When replacing the bushing, it is necessary to completely disassemble the starter, since it is otherwise impossible to check the suitability of all its parts. All the work can be done in a garage with your own hands, without the help of a partner, without using special tools. You will need a new bushing, new brushes if maintenance has not been done in a while.
What removal tools might be useful?
This work is best done in a garage; there must be a pit. The ideal option would be to remove the box on an overpass. But if there is no hole in the garage, you can use a jack instead. Also, you need to stock up on stands to secure the machine, since this must happen at some height. This is why the process is very difficult to complete alone. It is worth asking a friend for help, or if there is no such person, you can hire him in a special company.
To change the bushings, you need the following tools:
- The most important tool that may come in handy is a basic set of keys. They can be of different sizes, this will greatly simplify the work.
- Equally important is the mounting. Without it, it is impossible to perform high-quality work that will last a very long time.
- Also, in order to change the bushings, you will need a rag.
- And the last, mandatory tool on this list is a large container, which will be designed to drain all the oil.
These tools, which are contained in this list, must be carefully prepared in advance. In your work, you can use not only wrenches, but also ring wrenches. Because there is a rotating head, the process of removing the transmission can be very quick and easy. The main thing to remember is to fix the machine; it is necessary in order to have access to the casing, which is located below.
Replacing starter bushings and brushes
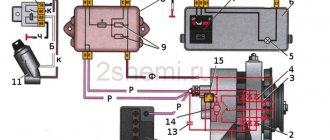
A starter is an electrical machine designed to start an internal combustion engine. The operation of the starter is based on several elements that have a clear sequence of actions: the retractor relay retracts the freewheel, the starter shaft begins to rotate, and after the engine starts, everything returns to its original position. It would seem that if one of these systems fails, everything becomes clear - the reason is a malfunction of the solenoid relay or power supply to the starter. However, what to do when the starter rotates quite slowly or even gets stuck. After all, such work will not ensure reliable and quick engine starting. Let's try to figure out why this is happening and how to fix this problem.
Faulty starter bushings
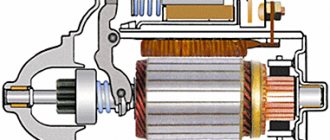
The reason the starter turns slowly or even sticks may be due to its armature. The fact is that when the armature turns, its poles touch the pole structure of the starter, which creates a certain friction between these two parts. The occurrence of friction helps to reduce the rotation speed or seizing of the unit. Touching of these elements can be caused either by incorrect design (this is only the fault of the manufacturer) or by misalignment of the starter shaft. Such misalignment can be caused by simple wear of special bearings, which are usually called bushings. These bushings are responsible for reliable axial fixation of the armature shaft and ensure its unhindered rotation. It is very important that the bushings ensure proper alignment of the shaft, otherwise the starter will not work correctly and may even jam.
Replacing starter bushings for VAZ 2109
If the above-mentioned malfunction is detected, both bushings must be replaced. To do this, the starter must be removed from the car, disassembled accordingly, worn parts replaced and the starting device assembled.
Procedure
1. First of all, the car is installed on an inspection hole, and the possibility of its movement is also excluded. Open the hood and disconnect the negative terminal of the battery. This procedure is necessary in order to reduce the risk of an accidental short circuit. Try to make this action a habit whenever you carry out repair work.
2. Remove the wire attached to the starter solenoid relay terminal. After this, unscrew the power contact fastening. After removing it, you will have access to the positive battery cable, which must also be removed.
3. Unscrew the engine protection mounting bolts. This is to get to some of the lower parts of the starter. It is worth recalling once again that carrying out repair work of this level is recommended specifically on an inspection pit or overpass.
4. Find three nuts on the starter to secure it. Two of them are located on the hood side and can be unscrewed directly from the engine compartment, but the last one is located under the assembly, so unscrewing it must be done exclusively under the car. After the nuts are removed, remove the starter from the car engine.
5. The front starter bushing is located in the clutch housing. No fasteners are used to secure it, so it is pressed inside. Take a tap that matches the inner diameter of the sleeve and carefully screw it inward. Once the tap starts to press against the clutch housing, do not stop. Under the action of the thread, the sleeve will gradually be squeezed out.
6. After this, clean the hole in the clutch housing and prepare a new bushing. Try not to use lubricants, as with prolonged use the bushing will begin to rotate and lose all functionality.
7. Press the new bushing into the hole. If it fits tightly, this is a good sign that will ensure its durability.
8. The rear hub is much easier to change. To do this, disassemble the starter and squeeze the bushing out of the cover. After this, a new element is pressed into the cover, and the assembly is assembled in the reverse order. However, this method, although economical, does not provide adequate reliability. To ensure the bushing lasts longer, it must be purchased along with a new starter cover.
After replacing the bushings, the starter is installed in reverse order.
Starter brush problem
Another reason why the starter does not rotate well or sticks is faulty brushes. The voltage is transmitted to the starter rotor winding through a brush device that has contact with the rotor shaft commutator. If the contact is poor, voltage transmission may not be provided (the starter does not turn at all), or it may be provided in insufficient quantities (the starter does not rotate fast enough). The fact is that the brush apparatus works on the basis of graphite brushes, which tend to wear out with prolonged use. If the bushings are in good condition, and the starter still turns very slowly, then it’s time to replace the starter brushes.
How to change bushings on a VAZ 2109 starter?
The car box itself can weigh more than 30 kilograms, it’s worth knowing this in advance in order to install a winch for a small fixation of all the parts present. Also, do not forget that there should be a lot of light in the room, because there are small details, and due to the presence of dirt, it may seem that they have disappeared.
Repair
Next, you have to check the condition one by one and take appropriate measures to eliminate problems with the following components of the starter:
Now let's talk about everything one by one.
Brushes
First, assess the current condition of the brushes. In most cases, they are the source of problems with the starter.
- Remove the pair of screws that hold the protective cover in place. The cover is now easy to remove.
- Use a screwdriver to remove the retaining ring from the shaft, and don’t forget about the adjusting washers.
- Unscrew 2 more tie rod nuts. Remove the manifold side cover.
- Use a screwdriver to press out the springs and remove the brushes from the holder.
- Measure the brushes with a caliper or ruler. If the height is less than 12 millimeters, the brushes must be replaced.
- It is also better to replace elements if there are chips, cracks and other defects on the surface.
Brushes
Anchor
If all is well with the brushes, the next suspect is the anchor.
- Remove the housing with the starter.
- At the anchor, look at the condition of the commutator, check whether the winding is intact.
- If there is carbon deposits on the collector or signs of breakdown, clean these areas with fine sandpaper.
- Check the armature and stator windings using a multimeter in ohmmeter mode.
Overrunning clutch
Parallel checking of the overrunning clutch with the armature will allow you to replace the latter at the same time.
To gain access to the clutch you will have to remove the armature from the front cover. At the same time, change it if necessary.
- Remove the retaining ring located near the overrunning clutch.
- Remove the restrictor ring.
- Remove the plastic lever stop, which will allow you to reach the anchor.
- Remove the intermediate support from the shaft.
- Check the condition of the gear teeth. If there are defects, the unit is replaced with a new one.
Bendix or overrunning clutch
Traction relay
Replacing the traction relay is necessary if, when voltage is applied to its terminals, the overrunning clutch does not extend. Sometimes the VAZ 2109 is equipped with collapsible relays. But it’s still better not to repair it, but to replace it with a new relay.
- To remove the relay, unscrew the two screws located on the front;
- Lift the relay, disconnect the armature from the lever;
- Remove the relay from the housing, grabbing the spring and armature. All elements are changed if necessary.
Bushings
Excessive wear on the bushings often impairs the performance of the starter. This is due to the material from which they are made - brass, bronze or copper. Contact with stronger metal causes wear.
Bushings
- In the case of the VAZ 2109 starter, we have one bushing located in the rear cover, as well as a second one, which you will find in the clutch housing.
- The presence of defects can be determined visually. If the elements have chips, cracks, burrs, or other defects, this indicates wear.
- Try moving the starter shaft transversely. If there is noticeable play, the starter bushings are worn out and need to be replaced.
- When planning to replace the rear bushing, it is recommended to simultaneously change the cover itself.
- The front bushing is removed from the crankcase using a tap of the required size. Tighten the tap like a thread, and resting it against the bottom of the hole, the sleeve will gradually begin to move out of its place.
- Before installing a new bushing, treat the inner surface of the seat with engine oil.
When putting the starter back together after repair, the most significant advice is to clean the surfaces from contamination. This will significantly extend the service life of the repaired unit and avoid breakdowns in the near future.
Be prepared for the fact that attempts to repair the starter will not give the expected effect. In this case, it is better to replace it completely or contact a trusted car service.
What is the algorithm of actions?
- It is necessary to very carefully and carefully disconnect the entire negative terminal, which should be located on the battery itself.
- Then, you will need to drain the pre-prepared oil into a completely different, deep container.
- Next, you need to remove the mudguard, as well as all kinds of crankcase protection.
- Then, you need to dismantle all the nuts, and then the wheels. After completing this process, you will need to slightly raise the engine itself, and then slightly fix it in this position. This can be done using stands, which can be made from various materials.
- After completing the previous processes, you can move on to the main ones - remove the entire cable.
- Next, you can remove the starter. It’s also better to dismantle it entirely, then secure it to the wires that are located next to it.
- After this, you need to remove all kinds of ground wires. Also, do not forget about the bolts that need to be unscrewed.
- And the last, final stage will be removing the food stretcher from the machine, which is located on the left side of it.
When is it necessary to replace?
Wear or complete destruction of the bushings is indicated by the appearance of excessive axial runout of the rotor, due to loss of contact and lack of mass on the rotor winding. This leads to the cessation of the starter’s operation, and if the power unit manages to start, then during operation a strong noise is heard from the engine compartment, which develops into a squeal and then abruptly fades.
In some cases, the breakdown of elements is caused by the rotation of the armature, which occurs jerkily or too slowly. If such manifestations are detected, you must immediately begin diagnostics and repairs, otherwise the problem will only get worse.
If, during inspection, signs of wear, defects, cracks, or metal shavings were revealed on the parts, they will need to be replaced. Usually the element located in the clutch housing fails.