05/14/2021 43 020 VAZ 2109
Author: Ivan Baranov
The problem of incorrect activation of speeds in VAZ cars can be called spontaneous, since it is familiar to many car owners of Russian-made cars. Now you can find out why the reverse gear on the VAZ 2109 does not engage and how to fix this problem.
[Hide]
Three-shaft gearbox: design and principle of operation
The difference between three-shaft mechanics and two-shaft mechanics is that three types of shafts are used here.
In addition to the driven and driving ones, an intermediate shaft is also used. The input shaft, connected to the clutch, transmits torque to the intermediate shaft. The transmission occurs through a corresponding gear - thus, the shafts are in constant mesh.
Three-shaft manual transmission device
The intermediate shaft is located parallel to the primary shaft, all gears on it are rigidly fixed.
The secondary shaft is located on the same axis as the primary one. The thrust bearing on the drive shaft, into which the secondary shaft fits, is responsible for this. In this case, the gears of the driven shaft can rotate freely and are not rigidly fixed to the shaft. The secondary shaft gears are in constant mesh with the intermediate shaft gears. Consequently, in the neutral position of the gearbox, torque from the input shaft is transmitted to the intermediate shaft and then to the gears of the secondary shaft. But since they rotate freely on the shaft, the car does not move.
Between the gears of the secondary shaft there are synchronizers, the work of which is to equalize the angular speeds of the gears of the secondary shaft with the angular speed of the shaft itself due to friction forces.
The synchronizers are rigidly fixed to the shaft and, due to the spline connection, can move along it in the axial direction.
Unlike a two-shaft gearbox, the shift mechanism in a three-shaft transmission is located on the box body and consists of a control lever and rods with forks. The mechanism is also equipped with a locking device to prevent two gears from being engaged at the same time.
It may also have a remote control. In this case, the remote switching mechanism is provided by the rocker or hinged cables.
The principle of gear selection in a three-shaft gearbox is similar to the principle of operation of a two-shaft transmission.
Fixing the problem
Let's look at several ways to help fix the problem with engaging reverse gear.
Backstage adjustment
Before you begin solving the problem, take with you everything you might need:
- new gearbox driveshaft;
- speed selector shaft oil seal;
- two ring wrenches 13;
- wrench 10;
- hammer;
- screwdriver.
To fully replace the cardan, you will need to drive into a pit or overpass. In addition, you will need an assistant who will shift the gearbox lever while you adjust it.
Let's start replacing the cardan and adjusting the rocker:
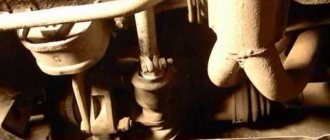
- You need to crawl under the bottom of the 2109 and find your gearbox. Take two 13mm wrenches and loosen the clamp located on the transmission drive rod. After this, you can remove the drive from the gearbox mechanism rod.
- Then take a screwdriver and, with a little force, pull the boot closer to the unit. If you accidentally damage the boot, you can simply dismantle it so that it does not bother you. Now take a 10mm wrench and unscrew the locking screw on the cardan.
- Next, take a hammer and very carefully knock the gearbox driveshaft off the shaft. Do this carefully so as not to damage the shaft. Remove the cardan boot if you did not remove it initially. If necessary, replace the speed selector shaft oil seal.
- At this point we can consider that half the work has already been done. Now you need to install the driveshaft of the box. We install the element in the reverse order. First, install the new boot in place, and then place the cardan on the shaft. Remember that the position of the retaining screw must coincide with the recess on the shaft.
- When the universal joint is in place, tighten the fixing screw and install the boot on the universal joint. You also need to put the gear shift drive rod on the cardan rod, but there is no need to tighten the clamp.
- Next, you will need the help of another person, since you need to adjust the gearshift lever. Ask your assistant to sit in the driver’s seat: he should set the gearshift lever to “neutral” and move it slightly to the right. In this position, an assistant should hold the lever while you tighten the cardan clamp.
When the cardan adjustment is completed, you need to check how the speeds on the lever are switched on. If the problem that caused the reverse gear to not engage in your VAZ 2109 was in the cardan, which is most likely, then after replacing the element the fault should disappear.
Changing gearbox oil
Also, one of the common reasons why reverse gear in a VAZ 2109 does not engage is poor gear oil. As stated above, the liquid has already lost its properties and its further use does not make sense. But how do you understand that the transmission fluid has already exhausted its service life? This issue should be taken seriously, because the fluid replacement procedure is not that cheap. Therefore, you need to know for sure that the gear oil has lost its properties.
- Pull the dipstick out of the gearbox hole to measure the level and drop a drop of liquid onto a white cloth. If at least one of the following conditions occurs, change the oil immediately.
- The lubricating fluid is discolored and may have a slightly black tint. Also, even in a small drop of oil you can see metal particles or other dust.
- The transmission fluid is opaque and appears very viscous. If you try it by touch, the substance will stick to your hands. In addition, if you drop this oil onto a piece of cloth or napkin, it will be absorbed very slowly compared to new oil.
- Very cloudy or foamy liquid. This may mean that transmission oil has entered the engine. If so, then the problem with engaging reverse gear is the first thing you will notice. If the car continues to operate on poor transmission fluid, then it may be necessary to completely repair the gearbox and the entire transmission system.
Automatic transmission won't shift gears
Although the automatic transmission is maintenance-free, that is, it is designed for the entire life of the vehicle, it is also susceptible to breakdowns. However, here the reasons why gears are not changed when the engine is running are partly different. Let's look at them:
- failure of the rocker is a breakdown typical of older models of automatic transmissions. The slide cannot be repaired; the part must be replaced. And in most cases, you will have to remove the box to do this;
- The second common reason, which also occurs on cars with a manual transmission, is insufficient transmission oil level. Depressurization of the automatic transmission will be indicated by oil leaks, and their localization allows you to determine which gasket or oil seal is leaking. You can change the gaskets yourself, there is nothing complicated here. After replacement, it is necessary to change the oil, draining the old one. Since automatic transmission repair is the most expensive type of repair after engine overhaul, it needs to be looked after - checked for oil leaks every 2000 kilometers;
- When the control unit fails, the car becomes completely immobilized. Repair consists of replacing the faulty device and thoroughly inspecting the electrical path of the box.
Those malfunctions that are caused by internal reasons cannot be eliminated independently. Moreover, not all car services will undertake such work. In any case, if you have problems with shifting on a car with an automatic transmission, you should first perform computer diagnostics of the box.
Source
Reverse gear of VAZ 2109 does not engage Video
The problem of incorrectly turning on the speed in a VAZ car is considered natural, since it is familiar to many motorists of Russian cars. At this point, you can read why the reverse gear of the VAZ 2109 is not turned off and how to fix it.
What are the prerequisites for preventing the rear gearbox from falling into a VAZ car? In fact, you will like them much more, because the problem with turning on the speeds, one way or another, lies in the boxing system and, more precisely, in the box itself.
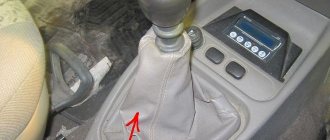
Transmission lever in a VAZ 2109 car
- Incomplete clutch release. Typically if the clutch is not disengaged properly our customer will experience poor clutch engagement, unfortunately this problem only affects reverse gear.
- The gearbox levers or traction drive are damaged. The installation may also be loose. To eliminate this problem, a thorough analysis of the department and its suite of accounting programs must be conducted. If necessary, it is recommended that our client remains replaced with corrupted accounting components (software).
- The gearbox oil is ready. In this case, the speed switching problem will affect everyone without exception. Therefore, the likelihood of such complexity, unless only the reverse speed is reduced, is very small. As you can see, if necessary, you should check the level of consumables in the system and add oil to the gearbox.
- Bad gear oil. The transmission fluid has already lost its characteristics and cannot even completely lubricate all the components of the box. Thus, the problem will also affect everyone without exception, although in fact there were times when it was difficult to engage a particular reverse gear. In this case, an oil change is required.
- Bad behind the scenes: You need to adjust the gimbal behind the scenes. Due to poor stage control, the reverse gear not only cuts but also flies from time to time. This problem is one of the most common among VAZ 2109 cars, so its elimination will be considered mainly.
Let's look at some of the methods that will help you troubleshoot reverse speed issues.
Before you hit an obstacle, think about what else our client needs to do:
- new ball box for balls;
- shaft speed seal;
- two 13 keys;
- wrench 10;
- hammer;
- screwdriver.
To actually change the driveshaft you will need to ring the hole or overpass. Today you need an assistant who will move the gear lever even if you adjust it.
Let's start replacing the cardan and adjusting the wings:
You need to go to the bottom of 2109 and find your gearbox. Take two 13mm wrenches and unscrew the clamp located on the gearbox rod. Then, of course, remove the actuator from the shift rod. Then take a screwdriver and slightly pull the cover closer to the car. If you accidentally damage the trunk, then, of course, just remove it so that it does not interfere with you
Now take a 10mm wrench and loosen the retaining screw on the driveshaft. Next, take a hammer and carefully remove the gearbox universal joint from the shaft. Do this carefully so as not to break the shaft
Remove the universal joint if you didn't remove it first. If necessary, replace the gearbox shaft seals. In fact, this is already half the battle. Now you need to install the cardboard box behind the scenes. Install the item in reverse order. First of all, install the new boot at the destination, then install the driveshaft onto the shaft. Remember that the position of the locking screw must correspond to the notch on the shaft. Once the driveshaft is in place to your liking, tighten the mounting screw and place the shoe on the back of the frame. It is also necessary to slide the driveshaft onto the universal joint, but the clamp should not be tightened. Further assistance is required from another person as the gear shift lever needs to be adjusted. Have your assistant sit in the driver's seat and place the shift lever in neutral and turn it slightly to the right. In this position, an assistant should hold the lever while you tighten the PTO clamp.
Troubleshooting
Many transmission malfunctions that cause the reverse gear to disappear or fall out can be eliminated without removing the unit from the car.
If the cause is a loosening of the bolt securing the clamp on the rod, then to correct the defect it is necessary:
- Place the car on a lift.
- Completely loosen the clamp nut.
- Place the gearshift lever in the fully engaged reverse gear position.
- Fully engage reverse gear at the gearbox using the shift rod on the crankcase.
- Tighten the clamp mounting bolt.
Backstage adjustment
If tightening the clamp does not help get rid of the problem, then you need to check the condition of the shift drive parts. One of the reasons why the reverse gear does not engage may be a poorly adjusted rocker.
To make adjustments to the mechanism, you may need the following tools:
- two wrenches with a size of 13 mm, preferably a socket design;
- any wrench or 10 mm socket;
- small hammer;
- slotted screwdriver.
Since the cause of malfunction of the link can be wear of parts, spare parts may be needed:
- universal joint of the rocker;
- Sometimes the shift rod seal may need to be replaced.
Two people are required to adjust the rocker or replace parts of its drive. One person must change gears from the passenger compartment, and the second must adjust the travel of the shift rods.
The order of work is as follows:
- Provide access to the bottom of the car by placing it on a pit or a lift.
- Using a 13 mm wrench, loosen the clamp installed on the gear shift rod.
- Remove the rod from the box rod.
- Using a screwdriver, carefully remove the boot.
- Using a 10 mm wrench, unscrew the fixing bolt on the cardan shaft.
- Knock off the cardan shaft with light blows of a hammer. It is important not to damage the shaft.
- Remove the universal joint seal boot.
- If there is an oil leak, the sealing gland on the box rod must be replaced.
- Install a new boot (or leave the old one if it is intact) and install the universal joint on the shaft.
- Align the hole on the cardan with the notch on the shaft.
- Tighten the 10 mm clamp and install the boot completely in place.
- Install the rod on the cardan rod and adjust the gearshift lever travel.
- The second person should sit in the driver's seat, set the gear shift lever to neutral, move it slightly to the right and hold it in that position.
- After this, you need to tighten the 13 mm clamp nut.
Typically, after such a repair, the reverse gear starts to engage without problems. In addition, the operation of the entire gear selection mechanism on the VAZ-2109 becomes clearer.
The video from the author MegaMeyhem shows the process of replacing the backstage.
Changing the gearbox oil
If the oil seal on the rod is damaged, oil leaks out of the gearbox housing, and dirt can get into the box itself. These factors may be the reason why reverse gear stops engaging. In addition, the oil in the box loses its properties during operation, so it must be replaced preventively at least once every 35–40 thousand kilometers. Before replacing, you need to check the condition of the oil in the box. To do this, you need to remove the oil dipstick installed in the gearbox housing and visually assess the quality of the oil. The presence of metal and dirt particles in the oil on the dipstick is unacceptable. The oil itself should be quite liquid and not stick to your hands in a thick layer.
Dipstick with oil level marks
To replace, you will need the following materials and tools:
- New oil. When purchasing oil, you need to consider the type of gearbox. For fairly rare four-speed gearboxes, three liters of oil are required, for newer five-speed ones - 3.3 liters. The oil itself must have a tolerance of 80W-85, the manufacturer does not matter.
- A container for draining old oil with a volume of at least 4 liters.
- A funnel with a hose for pouring new oil or a syringe.
- Wrenches 12 and 17 mm of any type.
- Rags and cleaning solvent.
The actual work order is as follows:
- Place the car with the heated gearbox on the pit.
- Remove the rubber plug from the gearbox ventilation valve installed on the top of the crankcase.
- Clean the valve and plug from dust and dirt. It is convenient to clean parts with thin wire and a rag.
- Reinstall clean parts.
- Wipe off dirt from the bottom of the box. Unscrew the plug on the bottom of the box housing.
- Place a container under the drain hole and drain the oil. It will completely merge in at least 20-25 minutes.
- After this, screw the drain plug back into place and carefully tighten it with a wrench. First, the plug and hole must be thoroughly wiped with a rag.
- Pour fresh oil through the oil level dipstick hole in the box.
- During filling, it is necessary to check the oil level, which normally should be between o and “MAX” on the dipstick rod.
- If there is an overflow, the oil can be pumped out with a large medical syringe with a tube on the spout.
- Within a few days after the change, it is advisable to check the level and appearance of the oil. You also need to make sure that there are no leaks through the plug and box seals.
We recommend: Removing the front bumper on a Renault Duster: nothing complicated, the video is proof of this
Rubber crankcase ventilation cap Drain hole on the crankcase Dipstick in the upper part of the crankcase An oil funnel installed in the dipstick hole
On early versions of front-wheel drive VAZ gearboxes there is no hole for the dipstick. To fill the oil in the crankcase of such boxes there is a control hole closed with a threaded plug. Filling is carried out using an oil syringe. The oil level is considered normal when it reaches the lower edge of the inspection hole.
The arrow indicates the inspection hole on the side of the gearbox housing. Filling oil with a transmission syringe.
Replacing the gear selection mechanism
One of the common reasons why the reverse gear of a VAZ 2109 does not engage is the breakdown of spring 2 installed in a separate mechanism.
Gear selection mechanism
To access it, it is necessary to remove and repair the mechanism itself, located inside the box.
A short list of necessary actions:
- Disconnect the car.
- Remove the air filter completely.
- Remove the left wheel and loosen the CV joint hub nut.
- Drain the oil from the gearbox crankcase.
- Remove the two bolts securing the left ball joint to the steering knuckle.
- Unlock and remove the steering tip.
- Remove the fist from the CV joint splines.
- Completely remove the left drive.
- Remove the starter and negative wire from the gearbox housing.
- Remove the gear shift rods from the gearbox and clutch.
- Unscrew the speedometer drive cable.
- Place a support under the box housing and remove the box support fastening
- Remove the gearbox from the vehicle and disassemble it.
When disassembling the gearbox, it is necessary to check the condition of the gear locks, since wear is the main reason why the reverse gear spontaneously jumps out of gear. You can get to the lock without removing and disassembling the box; it is located on the side of the crankcase and is closed with a screw plug. Disassembling the gearbox and inspecting the gear selection mechanism will also help solve the problem in which the reverse gear on the VAZ-2109 does not turn off.
Spring replacement
Often, owners change the entire mechanism assembly, which costs on average about 2 thousand rubles. But you can disassemble the mechanism and get by with replacing the spring, which costs up to 50 rubles.
You need to do the following:
- Remove the stopper from the blocker axle and remove the axle itself.
- Unscrew the lever axle nut.
- Remove the axle and replace the spring.
- Reassemble in reverse order.
Checkpoint diagram
The gearbox design is as follows:
- To ensure gear shifting, the gearbox contains a primary shaft consisting of a gear block. They are constantly engaged with the drive gears from the first to the fifth speed (that is, those that are oriented towards driving forward);
- The secondary shaft is equipped with a drive gear for the main transmission, and it also has gear synchronizers that ensure forward movement of the driven gears. There are also bearings plus an oil sump;
- VAZ two-satellite differential, with the driven gear of the main gear attached to the flange of its box;
- the gearbox drive consists of a gear shift knob, a ball joint, a selector rod, a rod, gear selection mechanisms, and gear shifting mechanisms;
- Jet thrust is designed to protect the gearbox from flying out of gear. Its ends are attached to the support and the power unit.
Gear shift drive diagram
Box nuances
The VAZ 2114 uses a five-speed manual gearbox. It is quite simple in design, which allows you to independently carry out preventive and repair work.
Device diagram
Experts recommend identifying a malfunction at the initial stage of its occurrence, since delaying means wasting even more time, effort and money.
Example in the video: the synchronizer does not help
Diagnostics and replacement of the speed sensor
Let's start answering the last question. Never, under any circumstances, attempt to remove the speed sensor.
It is mounted on the gearbox housing and is accessible. But this does not mean that the sensor is easy to replace.
Speed sensor on box 2181
Even when installing the “old” sensor, it will not be possible to achieve complete tightness. The oil will gradually leave the crankcase, and adding it to the 2181 gearbox will be difficult.
So, the reader understands: dismantling the sensor is prohibited, even if it is not removed for the purpose of replacement.
The clarity of gear engagement and the operation of the entire shift mechanism often worries owners of cars with a manual transmission. A common problem is that after starting the engine, one or more gears are engaged with great effort or not completely, it is not possible to change gears, at the moment of switching on, extraneous noise is heard, unnecessary vibrations appear, etc.
Such malfunctions appear unexpectedly, and difficulties when shifting gears can increase gradually. Speeds may be difficult to switch on “cold” and/or “hot”. It is noteworthy that gears in a manual transmission often shift normally when the engine is turned off.
Read in this article
Video
A video from the Garage channel demonstrates the removal of the switching mechanism on an already partially disassembled box.
Do you have any questions? Specialists and readers of the AUTODVIG website will help you ask a question
Was this article helpful?
Thank you for your opinion!
The article was useful. Please share the information with your friends.
Yes (76.92%)
No (23.08%)
X
Please write what is wrong and leave recommendations on the article
Cancel reply
Rate this article: ( 14 votes, average: 4.57 out of 5)
Discuss the article:
First speed is not fixed
When starting to move from a standstill at first speed, especially from difficult ground such as sand and snow, you have to hold the gear shift lever, since it does not hold on its own, the gear is switched to neutral. There can be three reasons for this failure:
- The link is loose and does not fix the fork;
- gear and coupling wear;
- displacement of the engine on the mounts and knocking out the box.
The condition of the fasteners of all parts and assemblies should be completely checked. The gearbox is rigidly fixed to the engine. However, when the motor slides on cushions, the first speed may be knocked out. Tighten all bolts and check the rigidity of the mounting on the body. You can do this kind of work yourself.
Fasten the link more rigidly to the shift lever, select the backlash, because it is responsible for fixing the lever in the desired position. To do this, you need to put the car in a pit. Open the lid and check
Pay special attention to the condition of the gearing
When worn, gears can slip and jump out without transmitting torque. When you press the lever with your hand, the clutch adheres forcefully and engagement occurs.
New box
There are problems when the car is picked up from a service station, but the gearbox of the VAZ 21093 does not engage the speed. At the same time, when the engine is not running, the shift lever moves smoothly, without a crack. As soon as you start the car, the gears stop shifting. First of all, check the movement of the gear and yoke along the splines - along the axis of the shaft
Since you have opened the box, pay attention to the position of the driven disk, whether it is installed correctly
If malfunctions are discovered shortly after servicing the car at a service center, you should not tinker with it yourself. Send your car back and let the locksmiths find and fix their problems themselves. Remember that you do not have to pay for reworking low-quality repairs.
Causes of gearbox failure
The complex mechanism constantly works under load and under extreme conditions. Constant vibration, rising temperatures, dust and dirt. If one or more speeds fail to turn on, you should check:
- cable tension and integrity;
- fastening the scenes;
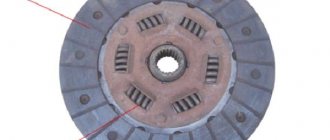
- wear on the clutch disc;
- petals on a basket;
- bearing integrity;
- plug condition.
Clutch
When the clutch discs wear out, the pedal moves up and its position becomes higher than the others. In this case, when turned on, a crunching sound may be heard and the lever does not move, as if it is resting against an obstacle. You should not force the assembly, as this can lead to more serious damage - the gears will fly.
It is typical for such wear that the clutch pedal falls to the floor and you can hear from drivers that the VAZ 2109 does not engage the gears. Usually this applies to all gears, but only first and reverse can fail.
You can check by removing the rubber plug. The destroyed disc leaves fibers that look like tangled strands of hair. If such a phenomenon occurs, then a new clutch disc should be installed.
Due to constant loads, the cable stretches and must be periodically adjusted and tightened. In this case, the VAZ 21093 does not engage the first and second gears, and the rear may also fail. To fix the breakdown, you need to drive into the pit and tighten the cable. If it is worn out, replace it immediately. You can do this yourself.
A similar breakdown can also manifest itself in the failure of the gears to engage while the engine is running. Sliding along the splines is limited and fixation does not occur.
Basket
The reason for difficult shifting of individual gears, especially if there is a crackling sound that gradually fades while moving, may be the destruction of the spacer ring in the basket. Notice that there are drops of oil on the outside. Then remove the basket and check the O-ring and disc blades. Pay attention when purchasing new parts, because on some models the disk is missing and then you have to install pins and secure it yourself.
Backstage
A loose link must be tightened with an assistant. No special knowledge or skills are required, just the ability to hold the lever in the desired position while you crawl under the car and tighten the bolts. When the scenes on the VAZ 2109 are loosened, the speeds do not engage, and especially the rear ones.
How to Engage Reverse Gear on a VAZ 2109
Why? reverse gear
VAZ-2109 does not include what to do
Many motorists constantly face problems with their permit. They can arise for various reasons. They are hidden in the transmission system, namely in the gearbox itself. Let's see why reverse gear
not included on VAZ-2109. We will also talk about how to solve the problem.
Causes of transmission problems
Almost every owner of a domestic car has at least once encountered problems with partial failure of the gearbox. If you need to stop the transmission on a VAZ-2109, one of the malfunctions may be caused by:
- The coupling is not completely disconnected. There are problems with this when all gears are engaged, but sometimes only reverse gear
does not work. - The gearbox levers are damaged or broken or securely attached. This problem can only be solved by diagnosing the box and replacing damaged parts. In this case, the movement of the lever may be accompanied by a crunching sound.
- If only reverse gear
If this doesn't work, then it's less likely to say that the transmission fluid just came out. Typically this problem does not affect all transmissions. If you still notice that the transmission oil level is very low, simply add it. - In practice, there was a case when the reverse “speed” could not be engaged due to the poor quality of the fluid in the gearbox. In this case, it must be replaced.
- The most common gearing problem is an unbalanced power take-off shaft. You can see it on this basis: the backlight was unclearly turning on at first, and then another mode was working instead. Later the box stopped working normally.
The last two problems will be discussed in more detail because the problem is often hidden within them.
How to change gearbox oil
If you need to change your oil, then first of all, buy it. A four-speed gearbox will require three liters of transmission fluid. You will need to pour 3.3 liters into a five-speed gearbox. If you are changing the oil for the first time, then buy 80W-85 class fluid. It is perfect for use in the VAZ-2109 gearbox. Car owners prefer to purchase Lukoil brand products.
The work of changing the oil in the box is carried out as follows:
- Place the car on an overpass or over a pit, warm it up slightly so that the liquid is not viscous. Locate the oil drain plug on the bottom of the box.
- The unit has a rubber cap that needs to be cleaned along with the breather. After cleaning these parts from dirt, return them to their place.
- As soon as the preparatory work is completed, place the container, twist the plug with a wrench, and begin draining the transmission oil.
- The waste liquid will drain completely within half an hour.
- Screw on the plug, tighten it well, but do not strip the thread.
- Under the hood, find the transmission dipstick and remove it. In place of the probe, stretch a hose, at the other end of which a regular watering can or funnel is installed. Pour transmission oil into the box through the hose. On older units, the fill plug is located next to the drain plug.
After the work is completed, check the lubricant level with a dipstick and take a control measurement after 2-3 days. If necessary, add oil; if it becomes critically low, inspect the box for leaks.
The transmission goes out
If you lose speed while driving, the gear assembly is most likely worn out. The locks on the gear and clutch also fail. These elements are replaced entirely with new ones.
It is worth noting that the gear on the “nine” can also fall out due to too fast shifting. The manufacturer recommends a two-second pause when switching to increased speed. If you continue to ignore this problem, you may encounter failure of the synchronizers.
Each box has its own noise limit, which is not a symptom of a malfunction. The transmission has gears that constantly rub against each other. And no matter how technologically advanced the design is, it is impossible to completely eliminate sound. As for the 5th gearbox VAZ-2109, its noise regulation is 78 dB. Anything higher is equivalent to a malfunction. And the box may make noise due to insufficient oil level in the box. As you know, gear oil has a higher viscosity than motor oil. And it is not sprayed by the pump. This oil is located in the gearbox housing. When the gear rotates, it dips itself into the lubricant. If the liquid level is below the permissible level, the element will run dry. This entails increased gear wear and wear. As a result, even if the oil level is restored, the problem will not disappear.
Noisiness also occurs due to increased loads on the box itself. This happens after tuning the engine (for example, installing “evil” camshafts), which the owners of “nines” love so much. As a result, the engine never drops below three thousand rpm. Both the engine and gearbox suffer wear and tear.
The noise may disappear while driving and appear only when the clutch pedal is pressed. In this case, the box itself has nothing to do with it - the clutch is to blame. It is not the disc itself that is worn out, but the release bearing. Its resource is about 60 thousand kilometers. The element produces a characteristic hum and whistle, which intensifies over time.
Characteristic
As we said earlier, a 4-speed transmission was also installed on the car. The assembly of the gearbox for the VAZ-2109 of this type did not last long. Therefore, it is now very difficult to meet “short-winged” cars with a 4-speed manual transmission. It's practically a rarity. 95 percent of the “nines” came with a more modern, 5-speed manual transmission. It was two-shaft, with synchronizers in all gears (except reverse). Structurally, this gearbox is combined with the main gear and differential. It differed from the 4-mortar in a different location of the crankcase ventilation pipe. It was located on the clutch housing (previously it was on the rear cover). A dipstick also appeared. But the gear ratios remained the same.
In Russia, these cars stopped being produced back in 2004. But you can still find spare parts for the VAZ-2109 gearbox in stores. Their price is quite reasonable. If necessary, you can buy a complete transmission for 5-6 thousand rubles.
If you have a mechanic
Gears shift poorly in a car with a manual transmission for three reasons. The first of these is a malfunction of the clutch when it does not completely disengage (drive). The first sign of this malfunction is that the reverse gear is engaged with a characteristic crash. The rear one reacts to this anomaly more noticeably than other gears, because it is the only one not equipped with a synchronizer.
The second reason is a defect in the gear selection mechanism of the gearbox. And finally, the third is excessive wear of the gearbox synchronizers.
There are also several clutch malfunctions in which manual transmission gears shift poorly:
- Air in the clutch release hydraulic drive or fluid leakage from it. The malfunction is eliminated by replacing failed components of the hydraulic system and pumping it.
- Worn or broken clutch release fork. The part requires replacement or repair.
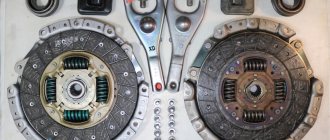
- Warping (runout greater than 0.5 mm) or too thick new driven disk.
- Failure of the basket (temperature deformation of the pressure plate or its distortion).
- Loss of mobility of the support bearing of the gearbox input shaft (at the end of the crankshaft to which the flywheel is attached).
- Jamming of the clutch driven disc hub on the splines of the gearbox input shaft. To eliminate the defect, clean the splines of the gearbox hub and input shaft. It wouldn’t hurt to lubricate them a little with lithol.
- There is too much free play in the clutch release fork. Its value needs to be clarified with the manufacturer, since it is slightly different for different cars. Until you find out the value of this parameter for your car, set it from 5 to 8 mm. Too little free play of the fork is also undesirable, as it leads to clutch slipping and increased wear of the release bearing.
Excessive wear of synchronizers mainly occurs in those gears that are engaged more often: these are usually first, second and third. The rear one is not included in this list because it does not have a synchronizer. When your gear shifts poorly, and you assume that the reason for this is wear of the synchronizers, firstly, you should only have difficulties with this while driving. Secondly, in this case it switches better if you use double squeeze.
For those who don’t know what double squeeze is. To shift to a higher gear: depress the clutch, engage neutral, release and depress the clutch again, engage the gear.
Backlash in the so-called “helicopter” is one of the reasons for unclear gear shifting
To switch to a lower gear: double squeezing must be combined with re-engaging, that is, when the clutch pedal is released and the gearbox is in neutral, you need to press and release the accelerator pedal. This is how gears are changed in cars that do not have synchronizers. If the gearbox shifts easier using double squeezing, then the culprit for poor gear shifting is most likely worn synchronizers.
Look for damage or check that it is adjusted correctly. Don't even think about the clutch and synchronizers.
Lever link
The link pivotally connects the gearshift lever with the gear selection rod.
There is a notch on the rod for better adhesion to the link that encloses it like a clamp.
If the rocker is installed incorrectly or is turned, the lever travel may not be enough to engage the “extreme” gears – reverse or 5th.
This usually happens after repairs, when the removed slide was installed incorrectly. If, after replacing the clutch on a VAZ 21099, reverse gear suddenly disappears, check that the rocker is installed correctly.
Reverse gear does not engage on VAZ 2114: reasons, repairs
Often, an attempt to engage a gear is accompanied by a strong crunch of gears, and if the gear is able to be engaged, the gearbox makes noise when moving in reverse. Other owners are faced with a situation where the gear shift lever moves forward all the way, but reverse gear does not work. At the same time, there are no complaints about shifting forward gears.
Before you climb deep inside the box, you need to go through the primitive, but more common options.
Elementary thing:
For some reason the oil seal was not in the right position, and oil leaked out of the gearbox through the rod. It is checked by the presence of an oil puddle in the appropriate place. Adding fluid and installing the oil seal in its normal position solves the problem in half an hour.
Repairing the rocker or replacing it is another reason for disabling the reverse gear. By the way, it may remain, but it will be the 5th abyss.
Needs adjustment. There are 2 ways.
- the car is running), the clamp on the rocker is loosened, and the lever is moved to where it should be according to the schedule. The clamp is tightened, the success of the adjustment is checked with the engine running;
- If the knob is not set to reverse speed, the adjustment is made in first gear. The lever is moved to position 1, the clamp is loosened again, the rocker drive rotates against the clock until the gear shift lever hits the reverse speed lock.
In both cases, the neutral is adjusted to the desired depth of seating of the link on the box driveshaft. All the described procedures will also help in the case when the clamp spontaneously loosens over time.
Replacing and adjusting the gearbox driveshaft
So, if only reverse does not work, and all other modes do not fail, then you will need to replace the universal joint and adjust it. To do this, prepare a new spare part, a gear selector shaft seal, a set of keys, a hammer and several screwdrivers of different sizes.
Carry out the work according to the instructions:
- Place the machine on an overpass or over a pit. Find the gearbox from below and loosen the clamp bolts on its drive rod. Remove the actuator completely from the stem.
- Using a screwdriver, pull the boot towards the unit. Often during this step the boot is completely damaged, in which case it can be removed and then a new one installed. Unscrew the fixing screw on the universal joint.
- Carefully tap the driveshaft off the assist shaft with a hammer. Remove the boot if you have not damaged it previously. Install a new oil seal on the speed shaft.
- Install a new boot, place the cardan on the shaft so that the position of the fixing screw coincides with the recess on the shaft.
- Tighten the retaining screw and place the rod on the rod, but do not tighten the clamp.
- To make the adjustment, ask an assistant to move the gearshift lever to the neutral position and a short distance to the right. He should hold it in this position while you tighten the clamp.
If the reason for the failure of the reverse gear was hidden in the cardan of the carriage, then you will no longer have problems after this repair.
Types of boxes
What to do if reverse gear is difficult to engage? The answer to this question is not difficult to find; you need to look at the structure of the checkpoint. First of all, you need to study the features of gear shifting. This usually causes a problem with the reverse gear. Modern manual transmissions use 2 types of switching:
- The lever goes into the box and acts on the switch fork through a ball joint;
- Switching occurs using the scenes.
Direct switching
.
Various limiters are usually installed here to avoid engaging another gear instead of reverse. On a VAZ classic, for example, the hinge needs to be pushed down so that you can engage the gear. It is with this limiter that problems usually arise. Its increased wear prevents it from engaging reverse gear in a timely manner. To fix the problem you will have to disassemble the box. Usually this mechanism is changed along with the fork and support. Rocker switch
. There may be several reasons for this. First, let's look at the structure of this system. The lever here does not go into the box. A pair of scenes (sometimes cables) go from it to the gearbox. One of the scenes is responsible for changing gears, and the other for selecting them. Shifting problems occur when the lever that engages reverse gear is unscrewed. To fix the problem, just drive into the inspection hole and screw the bolt into place.
Experienced craftsmen recommend installing a new bolt. This malfunction is typical for the “tenth” VAZ family. If there is a problem when turning on with all gears. At the same time, you have to “catch” the transmission with a lever, then the problem is most likely in the wings. During use they lengthen. If you notice such a problem, then measure the length of the drawstring. It will be longer than recommended by the manufacturer. The malfunction is eliminated by installing a new part.
Causes
What could be the reasons why the reverse gear in a VAZ car does not engage? In fact, there can be a lot of them, because the problem with switching gears, one way or another, lies in the transmission system and, in particular, in the gearbox itself.
Gear shift lever in a VAZ 2109 car
- Incomplete release of the clutch. As a rule, if the clutch is not disengaged correctly, all speeds may not engage well, but sometimes this problem affects only the reverse gear.
- The gearbox drive levers or rods are damaged. The fastening may also be loose. To eliminate such a malfunction, it is necessary to conduct a thorough inspection of the unit and transmission system. If necessary, it is recommended to replace all damaged system components.
- The lubricant in the gearbox has run out. In this case, the problem with switching gears will affect all gears without exception. Therefore, the likelihood of such a problem, unless only reverse gear is engaged, is very small. As you understand, you should check the level of consumables in the system and, if necessary, add oil to the gearbox.
- Bad gear oil. The transmission fluid has already lost its properties and cannot fully ensure lubrication of all gearbox components. In this case, the problem will also affect all gears without exception, although in practice there have been cases when problems occurred with engaging the reverse gear. In this case, an oil change will be required.
- Poorly adjusted rocker: the gearbox rocker cardan needs to be adjusted. Due to poor adjustment of the rocker, the reverse gear sometimes not only does not engage, but also falls out. This problem is one of the most common among VAZ 2109 cars, so we will consider fixing it first.
Reverse gear does not engage: common breakdowns
So, if engaging reverse gear is difficult or completely impossible, this breakdown is a common problem that can be encountered in different vehicles when changing gears.
Moreover, the rear does not engage both on manual and automatic transmissions (the reverse speed of the automatic transmission has disappeared)
Naturally, in such a situation, it is important to discover the cause of the malfunction and eliminate the breakdown, since it is simply impossible to operate the car normally without reverse gear (the vehicle is actually deprived of reverse gear). Let's figure it out
Let's start with a manual transmission and consider the question of why reverse gear does not engage in a manual transmission. First of all, with a manual transmission the reverse gear fails much more often than with an automatic transmission. As a rule, the first signs of problems are a grinding, crackling or crunching sound in the reverse gear when engaged, the reverse gear is difficult to engage, it is difficult to engage the speed after a while, etc.
As for the main malfunctions, we can highlight the following:
The clutch does not disengage completely. As you know, the clutch connects the engine and the gearbox, and at the moment of changing gears the driver must depress the clutch pedal and “disconnect” the internal combustion engine from the gearbox. After engaging the gear, the pedal is released, the clutch “closes” and the torque is again transmitted to the wheels.
So, if the clutch is not completely disengaged, the gearbox is not completely disconnected from the engine. This leads to the fact that all gears are difficult to engage. At the same time, on many cars, first speed and reverse do not have synchronizers. As a result, clutch problems are most noticeable when engaging reverse gear.
In such a situation, when trying to engage a gear, a crunching and grinding noise is heard in the box
To eliminate the breakdown, you need to pay special attention to the clutch (condition of the clutch disc, basket, release bearing, etc.). You also need to check the clutch adjustments, the quality of the pedal, etc.
The oil level in the gearbox is low or the gear oil has lost its properties. As practice shows, there is a common misconception among drivers that the manual transmission is filled with oil for the entire service life of the car. In fact, a maximum of 100 thousand km. Even the highest quality gear oil becomes unusable. And this is subject to fairly gentle operation.
If the car is used in difficult conditions (driving around the city, irregular pace, constantly switching speeds “up” and “down”, short trips, temperature changes, etc.), then the oil in the box requires replacement every 50-60 thousand. km. The fact is that the properties of the liquid change, additives are activated, dirt, products of mechanical wear of the box and various deposits accumulate in the oil.
The gearbox linkage needs to be adjusted; the rods or gearbox drive levers are deformed. Often, it is after diagnosing the condition of the rocker that it becomes clear why reverse gear on a Lada and various foreign-made cars (especially old ones or with high mileage) does not engage. Owners of front-wheel drive VAZ models are well aware that a poorly adjusted rocker is the reason why the reverse gear does not engage or is knocked out.
The solution in such a situation is to adjust the manual transmission gate, which can significantly improve the clarity of the inclusions and obtain the necessary softness. Also, in some cases, owners remove the standard mechanism and install a short-throw slide, but in this case you need to be prepared for the need for more careful adjustment. As for the gearbox rods and drives, these elements must be inspected for possible damage or breakage, after which they are replaced.
Design features of the gearbox. Often on budget cars, reverse and first gears do not have synchronizers. The absence of these elements, on the one hand, simplifies the design of the box, but on the other hand, difficulties arise when engaging reverse gear and first speed.
Extending the service life of gearboxes
You will be able to use your car for many years without going to car repair shops if you can follow basic recommendations. They will extend the service life of the gearbox, minimize possible problems, breakdowns and the need for repair work.
Transmission shaft assemblies
There are only two recommendations.
- Always try to monitor the oil level in the gearbox. If it drops, be sure to top it up immediately, do not delay the procedure until later. When the oil becomes unusable, change it completely, rather than fill in the missing amount.
- Avoid aggressive use, do not jerk the gears sharply, accelerate smoothly, and brake similarly. A simple caring attitude towards the gearbox will allow you to avoid wear and tear and numerous breakdowns.
As you can see, solving problems with checkpoints is not so easy. Therefore, the best option is to prevent their occurrence.
How to eliminate a crunching noise when engaging reverse gear on a VAZ 2115,2114,2113,2199,2109,2108
When the gimbal adjustment is completed, you should check how the gears on the lever are reduced. If the problem due to which the rear gearbox in your VAZ 2109 was not cut was the driveshaft, then most likely, after replacing the element, the problem should disappear.
In addition, one of the common reasons why the reverse gear in a VAZ 2109 is not cut is poor gear oil. As stated above, the liquid has already lost its characteristics, and its subsequent operation is impractical. However, how can you tell if the transmission fluid has already reached the end of its service life? This issue should be taken seriously as the procedure for changing the water is not so accessible. Therefore, you need to know for sure that the gear oil has lost its characteristics.
- Remove the dipstick from the hole in the gearbox to measure the level and place a drop of water on a white cloth. If any of the following criteria is not excluded, change the oil immediately.
- The oil is bleached, you will like the color a little darker. Even in a small drop of oil it is easy to see iron particles, in other words, other dust.
- Transmission fluid is opaque and very viscous. When touched, the substance will stick to your hands. Today, if you drop oil onto a piece of cloth called a napkin, it will be absorbed very slowly compared to new oil.
- Very cloudy or foamy liquid. This may mean that transmission oil has entered the engine. If so, then the problem of engaging the reverse gear is the first thing you feel. If the vehicle continues to run on bad transmission water, the checkpoint and anything that allows for record keeping (software) needs to be overhauled.
Checking the TM level in the window using buttons
If you know your transmission fluid has already failed, it may be time to change it. Moreover, if this influences the decision to obstruct with the inclusion of a pad. Prepare:
New transmission oil (hereinafter referred to as TM)
Please note: if your VAZ 2109 is equipped with a 4-speed gearbox, it will be a full 3 liters for you. TM If your car has a five-speed, you will need 3.3 liters of consumables
For VAZ cars, it is recommended to introduce transmission water with a viscosity of 80 W-85. VAZ drivers almost certainly fill up their Lukoil cars at the checkpoint. Container for collecting consumables. An old bucket or basin will do. If not, you can take a regular plastic water eggplant and cut off the top. Set of wrenches.
To complete the job, call a garage with an inspection pit.
- Reach under the car and locate the transmission drain cover. It is located at the bottom of the gearbox.
- Find it on the device itself - the rubber cover: this needs to be removed. Also clean the breathing gearbox and put a rubber cap on the area.
- After this, you can begin discharging wastewater. Take a wrench and unscrew the gearbox drain housing. Be sure to replace the pre-prepared container for collecting consumables under the drain hole.
- Now you need to wait 20-30 minutes until all mining is connected. Consider the fact that the car is expected to warm up. If the temperature of the gearbox is not high, then the TM will be denser and will not be able to leak out of the gearbox at all.
- Once all the gearbox material has been drained, you can tighten the drain cap. Pull tightly, unfortunately, don't overdo it to break the thread. Next, open the hood and locate the dipstick to check the transmission fluid level. Remove it and insert the hose into the hole that has a regular funnel at the other end. Fill with fresh TM.
- When refilling consumables into the transmission system, periodically check the level of the substance in the transmission using a pin. In the correct version, the TM level should slow down at the center between the MIN and MAX marks.
- When adding new oil, check the gearbox level just in case. It is also better to check the TM level after a specified number of days. This should be able to find out if there are any leaks in the system.
Features of replacing transmission fluid
Transmission oil must be changed at regular intervals, usually every 15-20 thousand kilometers. However, it may exhaust its resource earlier. This can be determined using a probe. Take a piece of white cloth and use a dipstick to transfer a drop of oil onto it. It is necessary to change the lubricant in cases where a drop of oil:
- colorless or has a black tint;
- contains metal particles or grains of dust;
- opaque and viscous;
- sticky to the touch;
- absorbs into fabric for a long time;
- cloudy or foamy.
Most often, reverse gear is difficult to engage if the oil has become cloudy. This is a sure sign that it has entered the engine. If the problem is not detected in a timely manner, you will soon need to carry out a complete gearbox repair or even an expensive transmission replacement.