Replacing the generator on Lada Granta 16 valves
At the preparatory stage, we will need the same tools and materials as in the case of the 8-valve Granta.
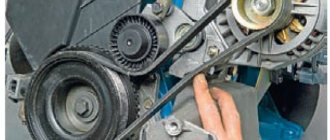
The design of the 16-valve modification of the Lada Granta has an alternator belt tensioner installed. This must be taken into account during repairs.
- The car is in the perimeter of the repair area, the battery terminal has been removed, the oil pan is protected.
- By analogy, we disconnect the power terminals from the converter and the protective cap.
- The key is set to “13”, release the upper lock of the generator, move it to the right until it stops.
- Remove the belt from the pulley.
- Unscrew the lower fastening and remove the bushing.
- We remove the generator from its regular place.
How to replace the Grant alternator belt
The replacement process is not simple and depends on the equipment of the car: whether there is a tensioner, air conditioning. In the latter case, you cannot do without a lift and dismantling the engine mount due to the air conditioning compressor clutch pulley.
For a Granta with air conditioning, for installation you will need to hang the wheel and remove one engine mount.
How to change a belt on a Grant 8 and 16 valve without air conditioning and tensioner
What you will need for work :
- a knife, if you just need to cut off an old part;
- crank or ratchet with head 13;
- long strong wire;
- flat screwdriver;
- partner – you can replace it yourself, but it’s easier with an assistant.
Step 1. Dismantling
The car is on a flat surface, neutral is engaged without the handbrake. The battery is disconnected .
If the old belt is not needed, we cut it in an accessible place and take it out.
If you need to save the old one, do everything up to step 3.
A replacement is needed with a length of 8223mm, six-wedge. Called 6RK 823. PHOTO: www.zr.ru
Step 2. Remove the generator mount
We approach the generator mount with head 13:
- we remove the lower bolt by 2-3 turns;
- Use it to completely unscrew the top bolt.
In this situation, we proceed to installation. PHOTO: www.zr.ru
Step 3. Raise the part
Scroll the generator up. The top mount becomes higher than the bracket to which it is screwed.
We press the part to the engine. We fix it with strong wire. For example, we hang it from the cylinder head bolt.
In this situation, we proceed to installation. PHOTO: www.zr.ru
At this stage, you can remove the old part if you did not cut it. We engage fifth gear and push the car back, squeezing the belt with a screwdriver from the generator drive pulley.
We pull the new one onto the pulleys.
The installation takes place in the position of the generator when it is pressed against the engine. PHOTO: www.zr.ru
Engage fifth gear , push the car back, pressing the belt against pulley 1 in the picture. This is where a helper will come in handy.
As soon as we put it on, we work in reverse order:
- unplug the generator;
- press it into working position;
- return the upper mounting bolt and tighten the lower one.
Replacing the alternator belt on a Grant with air conditioning
It's more difficult here. Step by step :
- we drive the car onto a lift or overpass;
- remove the tensioner;
- take off the front right wheel;
- we support the internal combustion engine and dismantle the pillow;
- change the required part.
The whole problem is in points 5 (air conditioning compressor clutch) and 7 (right engine mount) - our belt passes through them (number 6). The rest: 1-drive of auxiliary devices, 2/3-tensioner, 4-generator. PHOTO: www.zr.ru
What you need
- new belt marked 6РК 995;
- spanners 8, 19;
- socket wrenches 8, 10;
- Torx keys T20, T27;
- ratchet with extension and heads E14, 17.
Step 1. Tensioner
The car is on a lift or overpass.
The front right wheel studs are loose.
Open the hood. Remove the terminals from the battery.
We find the tensioner, take out the spanners 19 and 8:
- 19 we put on the lead screw;
- 8 hold the locknut;
- we touch;
- Turn the lead screw clockwise to loosen the tension.
We remove the lock nut and loosen the tension. PHOTO taken from: www.zr.ru
Step 2. Get under the car
You need keys 8, 10 . Filming:
- central shield (numbers 1, 5, 7);
- right shield (number 2).
Step 3. Wheel
Remove the front right wheel. Using keys 8, Torx t20, t27, we dismantle the fender liner according to the diagram.
To work with the fender liner you need three different keys. Having removed it, we gain access to the engine support. PHOTO: www.zr.ru
Step 4: Engine Mount
- Getting ready to remove the engine mount.
- We securely support the engine under the crankcase - the support should take the weight of the internal combustion engine.
- Using a wrench or ratchet with an E14 head, unscrew the screws securing the support to the engine .
- Use head 17 to unscrew the screws securing the support to the body.
We remove the support. Make sure the weight of the engine is securely supported in the crankcase!!! PHOTO: www.zr.ru
Step 5. Dismantling and installation
We remove the belt from the pulleys and rollers and pull it out.
install the new one in the reverse order.
Do not mix up the screws that secure the mount to the engine. The top one (included in the triangular part) is shorter than the bottom one!
Confusion is dangerous for the further operation of the machine. PHOTO: www.zr.ru
The final tension can be adjusted by adjusting the tensioner.
Instructions on how to assemble a tensioner on a grant
Any Grant has space for installing a tensioner. To assemble this you will need:
- generator bracket from Kalina;
- tension roller and its bracket;
- screw tensioner;
- new belt from Kalina;
- bushings and bolts.
Tension check
There are two approaches: visual assessment and physical.
Visual assessment of condition:
- the car is on a flat surface, the gear is in neutral, the handbrake is off, the hood is open;
- We don’t start the car - we put it in 5th gear;
- We opened the hood and found a generator: we push the car back, resting against the bumper;
- We inspect the required part along its entire length: are there any breaks or cracks? It needs to be changed.
Poor quality will lead to unexpected problems on the way.
Physical assessment:
- if you have a tool that measures pressure force: press the belt with a force of 10 kg*s - the deflection should be no more than 10 mm;
- there is no special tool: we try to turn it across - it should turn no more than 90 degrees.
How to tighten the alternator belt on a Grant
This section applies only to machines with a tensioner. No - change the part or see above how to install it.
Subsequence:
- we use ring wrenches 8, 19;
- Throw key 19 onto the lead screw;
- wrench 8 for locknut;
- we touch;
- Now you can turn the lead screw: clockwise to loosen, counterclockwise to tighten;
- got the desired result - tighten the locknut.
It is better to take ring wrenches, since a head with a ratchet or a wrench will not work.
When to change: technical regulations for replacing a VAZ 2190 belt
AvtoVAZ requires checking the condition of this part every 15,000 kilometers .
every 30,000 kilometers, regardless of condition.
How to remove a generator on a Grant
It needs to be removed for repairs, replacement of bearings or rollers.
The step-by-step process involves:
- remove the negative terminal from the battery;
- working with the generator: disconnect the wiring harness from it;
- remove the cover of the power wire nut, remove the nut and remove the wire from the bolt;
- unscrew and pull out the upper and lower fastening bolts - to work with the lower one, you may need to climb into a hole, throw off the tin protection of the internal combustion engine and dismantle it from below;
- move the part to the right mudguard, remove the belt, and remove it.
Let's summarize
To work with the generator and to replace the belt you need:
- set of spanners, Torx t20 and 27, ratchet with heads or wrench, knife;
- if there is no tensioner, you can assemble and install it;
- if there is no air conditioner, replacement is easiest;
- is there air conditioning? To work, you need a pit or a lift with dismantling the engine support;
- They change consumables every 30 thousand mileage according to regulations.
Source: https://car-fact.ru/marki-i-modeli/otechestvennye/lada-granta/granta-remen-generatora.html
Replacing a generator on a Lada Granta with air conditioning
At the preparatory stage we will need the above tools and materials.
- After unscrewing the converter mounts, hang up the front of the car, unscrew the bolts, and remove the right wheel.
- Through the opening in the wheel arch we unscrew the tension roller and the engine mount mount.
- We lower the car with a jack until access to the generator opens.
- The further dismantling algorithm is no different from that described above.
We carry out preventive maintenance, replace the unit with a new one, and assemble the structure in the reverse order.
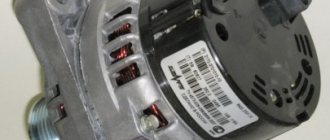
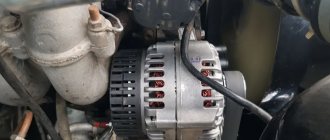
Where is the generator located on the Lada Grant?
On cars of the Lada Granta family, the current converter is located in the engine compartment, on the left side.
Engine compartment When carrying out repairs, you may experience difficulties with access to the converter mounts. For convenience, remove the oil pan protection and hang the front of the car.
Instructions for removing the generator
Let's start by describing the process of removing the generator from an eight-valve car that is not equipped with air conditioning. You need to start by disconnecting the “ground” from the battery, for which you remove the negative terminal (this manipulation must be carried out when removing this unit from any modification of the Grant, this will help to avoid a short circuit). Further actions are performed in the following order:
- the bolts on which the motor protection is attached are unscrewed, after which it is removed;
- disconnect the block with wires from the generator;
- after removing the protective cap of the nut holding the power drive, the nut itself is unscrewed and the wire is disconnected from the generator;
- then the upper mounting nut of the generator is unscrewed, and the unit is pressed out using a mounting spatula, and the upper mounting bolt is also removed at the same time;
- the lower fastening nut is unscrewed, the generator is carefully moved away from the engine, and the fastening bolt located below is pulled out;
- the generator is shifted to the right mudguard, the belt is removed from its pulley, the generator itself is pulled out;
- The process is completed by removing the belt from the crankshaft pulley.
Now let's look at a similar process carried out on a sixteen-valve Grant without air conditioning. Such machines are equipped with belt tensioners, and therefore the work described has some differences. So:
- First, the mounting bolts are unscrewed and the block is disconnected from terminal “D”;
- then the cap covering the “B+” terminal is removed;
- then the nut holding the wire tip is unscrewed and the nut holding the tension bar is loosened;
- the adjusting bolt of the tension mechanism is turned counterclockwise, and at the same time the belt tension is loosened with a 10 key;
- the generator is moved towards the motor, and the belt is removed from the pulleys;
- then the tension mechanism adjustment bolt is unscrewed and removed, and the tension bar is dismantled;
- the fastening nut located at the bottom is unscrewed;
- the spacer sleeve is removed, after which the mounting bolt located at the bottom is removed out;
- Finally, remove the tension bar and remove the generator out.
Now let's move on to describing the process of removing the generator from a car equipped with air conditioning. Since the air conditioning devices installed on Grants operate from the generator belt, they must be carefully moved to the side, after which you can proceed directly to the removal itself.
To successfully carry out this procedure, you must sequentially perform the following steps:
- to begin with, all the bolts that hold the cushions and bracket are treated with WD-40;
- then the mounting bolts are unscrewed and the protection is dismantled;
- after the WD-40 starts to work, unscrew the bracket nut;
- the jack is installed in front of the car, on the right, while the bolts holding its right front wheel are loosened;
- lift the jack, while hanging the wheel, and then remove it from the car;
- Next, the tension roller is dismantled, then the bolts that secure the pillow are unscrewed;
- the car is carefully lowered, hanging it (thus, the cushion moves towards the motor, opening a direct path to the generator).
At the final stage of work, you will need to remove the generator using one of the methods described above.
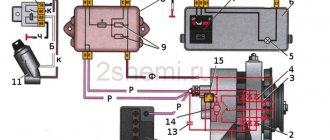
Signs of generator malfunction, ways to eliminate them
| Sign | Cause/remedy |
| The warning light on the dashboard does not light up | Open circuit in the power supply from the converter to the battery. Check the integrity of the electrical circuit |
| The warning light does not go out after the engine starts | Insufficient belt tension, insufficient tension in the chain. Measure the voltage in the circuit. |
| —/— | Worn brushes, faulty diode bridge. Measure the voltage with a multimeter and replace worn elements with new ones. |
| Short to ground | The insulation of the power cable is damaged. Check the condition of the insulating coating. |
| The converter does not produce the proper voltage of 14 V | Oxidation of terminals, cleaning with a metal brush, replacement |
| —/— | The battery is worn out, replace the battery |
| —/— | Loose belt tension. Adjust the tension. |
| —/— | Diode (rectifier) bridge is unusable, replace with a new one |
| The battery is not receiving a charge | Replacing the diode bridge with a new one |
| —/— | Rectifier failure. Replacement of components |
| Voltage drop in the network (circuit) | Checking the quality of connections of terminals and clamps. Tightening, replacing with new ones |
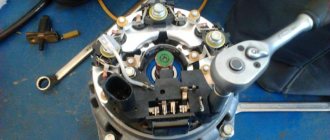
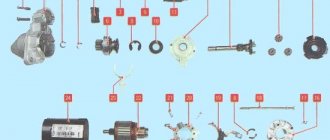
Disassembling the generator
We disassemble the generator to check and replace the voltage regulator, rectifier unit, rotor, stator, and bearings.
Having pressed the casing latch, use a screwdriver to lift the generator casing. Similarly, press out two more housing latches...
...and remove the generator casing.
Using the “8” head, unscrew the two bolts securing the brush holder.
Use a 12mm wrench to unscrew the threaded bushing...
...and remove the brush holder lead from the contact bolt.
Using a screwdriver, pry up the tip of the wire... ...remove it from the terminal of the rectifier unit...
...and remove the brush holder with the voltage regulator assembly.
Using the “8” head, unscrew the three bolts securing the rectifier unit.
Using a screwdriver, press the spring clamp and disconnect the stator winding terminal from the rectifier unit. Similarly, we disconnect the remaining five terminals of the stator winding from the rectifier unit.
Use a 12mm wrench to unscrew the nut...
...and remove the rectifier block. We clamp the generator in a vice by the mounting eye.
We insert a screwdriver between the fan impeller and the generator cover jumper...
...and holding the anchor from turning, use a 24mm head to unscrew the pulley mounting nut.
Remove the generator pulley. We use a marker to mark the relative positions of the generator covers.
Using a 8mm socket, unscrew the four bolts holding the covers together.
Using a screwdriver to pry off the back cover...
...we disconnect the generator covers.
Remove the stator from the back cover.
Remove the contact bolt from the back cover.
Remove the plastic bushing from the rear bearing. We screw the pulley mounting nut onto the rotor shaft flush with the end of the shaft...
...and striking the end of the shaft with a hammer with a plastic striker, we press the rotor shaft out of the front bearing...
...and remove the rotor from the front cover. To replace the front bearing...
Replacing the Lada Granta generator - KZATE with Bosch. Comparative characteristics and disadvantages
| Characteristics | KZATE 115A |
2170-10
2170-13
Due to its smaller height, Bosch 110A is 10 mm lower than its analogue. Despite the minor advantages, BOSCH has one “fat” drawback - there is no possibility of quick (cold) replacement of the diode bridge in the event of its failure.
The electrical contacts are soldered into the bridge; quick replacement of the rectifier on the road will not work. At KZATE it is quite possible and acceptable to replace the rectifier on the road.
Addresses of companies providing generator replacement services (Moscow, St. Petersburg, Kyiv regions)
| Maximum current (output) at 14.5 V / 6000 rpm | ||
| Voltage setting limits at a speed of 2500 rpm and a current of 5.0 A | 13.6 – 15.2 | 13.6 – 15.2 |
| Gear ratio according to the principle: motor - converter | 1 : 2.4 | 1 : 2.4 |
| № | Name | Address |
| 1. | "Autopoints" | Moscow, Varshavskoe highway, 33 |
Difference between belts of 16 and 8 valve engines
For Lada Granta models, an alternator belt with the following markings is used:
- 1118-1041020-07: search index 6RK 823, length 823 mm, thickness 3.0 mm;
- 6PK1123 with air conditioning;
- 6PK1113 without air conditioning, with power steering;
- 6PK745 without air conditioning, without power steering.
How to remove a generator on an 8-valve Grant without air conditioning
To work you will need:
- socket wrenches for 8, 10 and 13;
- mounting blade.
Before removing the generator on a Grant without air conditioning, you should disconnect the ground from the battery by removing the negative terminal. The procedure is as follows:
- unscrew the 2 rear engine protection mounting bolts;
- unscrew the 4 front engine protection bolts;
- remove the engine protection (mudguard) from the car;
- disconnect the wiring block from the generator;
- remove the protective cap of the nut holding the power wire;
- unscrew the nut and disconnect the generator power cable;
- unscrew the top nut securing the “Grant” generator;
- press out the generator with a mounting spatula and remove the upper mounting bolt;
- unscrew the lower bolt securing the generator;
- move the generator away from the engine with a mounting blade and remove the lower mounting bolt;
- move the generator towards the right mudguard;
- remove the generator belt from the unit pulley;
- pull out the generator;
- Remove the alternator belt from the crankshaft pulley.
To put the LADA “Grant” generator in place, you need to perform the steps in reverse order.
Important: when installing the generator belt, make sure that the pulley grooves and the groove tracks on the belt match.
Review of prices of generator manufacturers for the Lada Granta
| 2. | "ZenitAuto" | Moscow, Perovo metro station, Kuskovskaya st., 20A (near Enthusiasts Highway) |
| 3. | "RemZone" | St. Petersburg, Vasilievsky Island, st. Uralskaya 17A |
| 4. | "Autopoints" | St. Petersburg, Lesnoy prospect, 78 |
| 5. | "Dzigora Complex" | m. Darnitsa, st. City Shalet 1A |
| 6. | "VseSTO" | Kyiv, st. Kikvidze 43 |
| Manufacturer article number | Price, rub.) | Resource (thousand km) |
| KZATE 9402.3701-14 | From 4900 | 90 — 110 |
| BOSCH 21700-3701010-13 | From 5300 – 5500 | 90 — 110 |
Preparatory stage before modifying the Lada Granta generator belt bracket
Necessary tools, materials:
- a set of car keys, sockets, ratchet, screwdriver with a flat, cross-shaped bit;
- rags;
- liquid for removing deposits and rust WD-40;
- hammer, drill, metal drill bit for “6”, “8”, “10”;
- graphite-based lubricant;
- additional lighting, since visibility in the engine compartment is limited;
- metal mounting;
- torque wrench;
- bolt with a diameter of "8", length 100 - 110 mm.
List of online stores providing goods (Moscow, St. Petersburg, Kyiv region)
| № | Name | Address |
| 1. | "Autopasker" | https://avtopasker.ru/ |
| 2. | "TopDetail" | https://topdetal.ru/ |
| 3. | "Close" | https://spb.blizko.ru/ |
| 4. | "Avtosklad" | https://www.avtostore.spb.ru/ |
| 5. | "Almaz-Auto" | https://almaz-auto.com.ua/ |
| 6. | "Doka-Market" | https://doka-market.prom.ua/ |
Reviews
| № | Positive |
| 1. | Victor: This is my second year driving a Lada Granta, there are no comments, the mechanisms work properly. At 35,000 km I tightened the converter belt. I didn’t contact the service, I did everything on my own. |
| 2. | Vitaly: I’ve been actively using the car for three years now, I haven’t made any special investments, only the purchase of consumables, oils, filters. I think it is important to comply with technical inspection deadlines and buy original parts. |
| 3. | Ivan: I bought a car at the dealership, the managers recommended strictly observing the maintenance deadlines. I don’t break rules, I always put down marks on time. I take care of my equipment and treat it with care. |
| 4. | Kirill: at 45,000 km I tightened the converter belt and visited the service center. The master assured that the old one was still worth several tens of thousands. |
| 5. | Valentin: during the year of using the car, the converter creaked once, I thought about changing it, but the creaking disappeared on its own. There are no complaints about quality, all mechanisms work properly. |
| 6. | Ignat: at 97,000 km I replaced the converter belt. I consider the resource quite worthy of a domestic car. |
| 7. | Vladislav: I’ve heard negative criticism of the Lada Grant, but I can’t confirm it, since the car works like a watch. I systematically carry out inspections, fill in high-quality oils, and do not exceed the speed limit. |
| Negative | |
| 1. | Gennady: for the first time the converter flew 40,000 km. I visited the service center and they replaced it under warranty. We'll see how long the new one lasts. |
| 2. | Vasily: despite the manufacturer’s warranty of 100,000 km, my generator lasted only 60,000 km. The workmanship is low. The Granta model is raw, not run-in. |
| 3. | Ignat: I do not recommend the Lada Granta, since during the year of use I visited the service station twice unscheduled for diagnostics and replacement. In addition, the generator failed ahead of schedule. |