Cars admin26.02.2020
You will need: keys “10”, “12”, “13”, “14”.
1. Disconnect the wire from the negative terminal of the battery.
2. Disconnect the block with the wire from the generator excitation winding terminal.
3. Unscrew the nut...
4. ...and remove the terminal from the “+” terminal of the generator.
5. Remove the generator drive belt (see “Replacing the generator drive belt”).
6. Loosen the locking bolt...
7. ...and the nuts of the bolt for the upper mounting of the generator to the bracket.
8. Unscrew the nut of the bolt from the lower mounting of the generator to the bracket and remove the bolt.
9. Remove the two bolts securing the upper bracket of the generator to the cylinder head and remove the generator from the vehicle.
10. Install the generator in the reverse order of removal.
The on-board power supply began to jump, on xx without consumers it generally began to drop below 12V, as if I had been waiting for this moment and was ready, but there was a catch, I googled it on the Internet, searched the drive and could not find the answer to the question - which generator installs without modifications instead of a spark, There are a lot of options on how to remake something, but I couldn’t find it for interchangeability. In general, here in the pictures below is a complete analogue from , I stupidly took a photo of my own, and compared it in the store from the photos.
There were no problems with the replacement at all, I took a 32 key, unscrewed the viscous coupling, took off the casing, removed the belt, and replaced the generator. By the way, I read everywhere that people sharpen keys, something they come up with to remove the carloson, I didn’t have any problems at all, I took a regular key, put it on the nut, didn’t touch the impeller bolts, hit the key with a hammer and then just twisted the impeller so that the nut came loose - all without any questions at all.
At the same time, I replaced the pulley with a previously stored aluminum one, so as not to wait for this plastic one to fall apart unexpectedly.
I took the pulley from s100no, it fit perfectly, it even fit on the pump with a little tension, I just had to replace the bolts because... its wall is thinner than a plastic one, or you can saw it off by 5mm so that it doesn’t rest against the pump body
I already had a 2100 strap, instead of the original 2140, the tension was enough for the reduced pulley, in general, when I changed the belt, I immediately figured that I would change the pulley later
I assembled everything in place, first filed the casing so that it could be removed without removing the fan, and washed the throttle just in case, once I disassembled the intake so that it would not interfere with removing the casing.
after launching on xx everything became very confusing
but having turned on all possible consumers completely, at xx the power dropped completely
Of course, I understand that it will never be like this, that I will turn on everything at the same time: heated mirrors and windows, emergency lights, low beam + high beam, air conditioning, additional heater pump, brakes, reverse gear, PTF, heater at 3rd speed. But I still think that this needs to be corrected somehow so that at least it doesn’t fall below 12.5...
In addition, I discovered some play in the pump, it is of course not very big and the pump does not leak, but I think it’s worth buying a spare pump, I also found out why there is a lot of play on the steering wheel - the steering cardan is loose, what I tightened there with a clamp did not help much because. To. There is still some play there and at the same time the crosspieces are loose - so it will definitely need to be replaced later, but I didn’t want to do that. I also checked the compressor of the air conditioner... the clutch is now working, the problem was in the connector for the electric coupling, but still the air conditioner does not work properly, there is no pressure in the system - it needs to be refilled, but first I will move it so that later there will be a place to install a winch, so as not to drain the system again later .
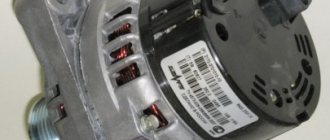
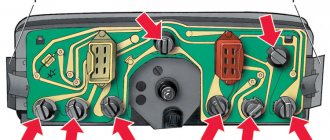
Generator UAZ Patriot: design features
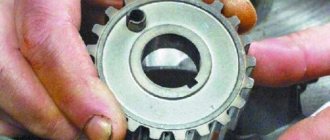
The Ulyanovsk Automobile Plant equips the UAZ Patriot with synchronous generators Iskra, Pramo Electro or BATE. Electric generators are equipped with a silicon diode bridge and automatic voltage adjustment. There is a pulley on the rotor axis, secured with a key and a nut. Torque is transmitted from the engine crankshaft thanks to a belt drive with a manual tension mechanism.
Adjustment of the tension force must be done carefully, adhering to the manufacturer's instructions, since excessive tension can damage the bearing supports.
The silicon rectifier bridge has a removable and reliable design, which is very convenient when repairing equipment. The rectifier bridge is sealed, which prevents dirt, water, and dust from getting inside. The technical characteristics of the silicon block are as follows: rated output voltage 14 V, current - no more than 90 A (for cars with installed air conditioning - no more than 120 A).
The bridge is located on the outside of the rear cover of the generator and serves to convert alternating current into direct current. Diodes are made of silicon and allow voltage to flow in only one direction. Heat removal from the diode is carried out by convection and air, the flow of which is created by a fan located on the rotor.
The main problem that UAZ Patriot car owners face is insufficient voltage to charge the battery. Instead of 14 V, the voltage actually comes in much less.
There are four ways to solve the problem:
- replace the generator;
- replace flint bridge;
- check the contacts powering the unit;
- install a three-level regulator.
Device and features
UAZ Patriot is equipped with a generator of the Iskra 120A type, which has a voltage relay and a silicon rectifier that maintains the required voltage. Using a belt drive, the rotor (shaft) of the generator is driven. The device has a diode bridge that converts alternating current to direct current. Due to the fact that it consists of diode rectifiers, the current flows in one direction. This device has a one-piece sealed design, this is made specifically so that dirt, dust or moisture does not get into it, and this design is also more reliable.
The resulting current, which is converted from alternating to direct due to the diode bridge, powers all electrical appliances in the car, and also thanks to it the battery is recharged.
Car owners of this SUV may be faced with the fact that there is not enough voltage to charge the battery, and instead of 14.2 Volts, less is supplied. This problem is solved in the following way:
- The generator is being changed;
- The diode bridge is changed;
- The contacts that power the device are checked;
- A three-level regulator is installed.
Installing a three-level generator is a reliable solution to the problem.
To install it, you do not need to completely remove the generator, just remove the generator cover, take out the original brushes and insert the brushes of the three-level regulator, you can do all this yourself. After that, we put the cover back, screw the regulator itself to the engine itself to ground, so that it is convenient to switch it. The regulator itself has three switching positions, the highest position is when the car is operated in cold weather, then the generator needs the highest charging power. The optimal position is in the middle, for any everyday weather with low beams on. Minimum position without the lights on, during hot rides, so that the battery does not boil. With the Prama Electra generator number 5122377110, after installation the engine runs reliably.
This device has one feature: the voltage that comes from it is regulated depending on the temperature of the environment.
Removing the electric generator
Below is the process of removing the UAZ Patriot generator step by step:
- Disconnect the negative terminal from the battery.
- Disconnect the cable from the generator.
- Unscrew the positive terminal nut in the device and disconnect the cable.
- Release the tension on the drive belt.
- Remove the belt from the pulleys and unscrew the locking bolt of the generator housing.
- Remove the nut securing the top of the generator to the adapter bracket.
- Remove the nut securing the bottom of the generator. Remove the bolt from the hole.
- Unscrew the 2 nuts connecting the bracket and the cylinder block and dismantle the electric generator for repair or maintenance.
The instructions described above are suitable for removing electric generators in gasoline UAZ Patriots. In cars with a diesel engine, a single belt is used to drive the generator, which rotates a fan pulley attached to the water pump rotor. Before dismantling the UAZ Patriot generator, you need to remove the impeller; the remaining steps will be the same as for cars with a gasoline engine.
Why does the generator fail?
One of the reasons for generator failure is careless operation of the vehicle. An unpleasant sound that will come from the generator during a trip can warn of a breakdown.
Also, it is not the generator itself that may fail, but its constituent elements, and in this case, repairs alone can be sufficient. But if the situation is not corrected in time, the generator will break down and will need to be replaced.
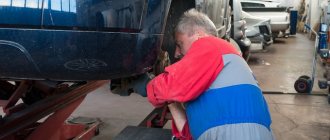
To replace the generator, it is recommended to contact specialized service stations, where real professionals are ready to take on the work. They will conduct high-quality diagnostics, determine the cause and quickly repair the generator or install a new one. If necessary, you can replace it yourself. But for this you will need to familiarize yourself with how the UAZ Patriot works and the generator connection diagram. In addition, you can watch various photos or videos of similar processes.
Do-it-yourself replacement involves performing several steps.
Preparatory stage
In this case, the car owner needs to prepare the required tools, as well as buy a new generator - this can be the original model or its analogue. The tools you will need are:
- screwdrivers;
- wrenches for various diameters;
- extension;
- hammer.
After this, you can proceed to the next stage.
Main stage
The main stage of replacing a generator involves removing it and installing a new unit. The removal process is divided into several steps:
First, you will need to install the car in the repair site and take care of fixing its wheels. You will also need to turn off the engine and remove the terminals from the battery. This is necessary to ensure the safety of the work being carried out. Next, you need to disconnect the connectors with wires from the generator
This must be done as carefully as possible so as not to damage the wiring and the holes where the wires are attached. After this, you need to unscrew the nut from the negative terminal and remove the main cable connected to the generator
The fourth step is to remove the drive belt. To do this, you will first need to loosen the rollers to which the belt is attached, and then proceed directly to removing it.
The next step is to loosen the tension of the counter-bolt and nuts of the upper fastening
It is important to hold the generator at this time to make it easier to unscrew the fastening element.
The same is done with the bolts and nuts at the bottom of the generator.
Finally, the Patriot owner will only have to unscrew the two bolts securing the upper bracket and remove the generator. After this, you can either repair the failed unit, if during the inspection it turns out that this is possible, or install a new one.
Reinstalling the generator is done in exactly the same way as disassembling the structure, but you need to proceed in the reverse order
Therefore, it is important to mark bolts, nuts and other fasteners during work so that you can understand which element they are responsible for fixing.
Functionality check
When the assembly of the structure is completed, all that remains is to check the functionality of the new generator. To do this, you need to connect the terminals to the battery and start the engine.
The absence of any sound from the generator will indicate that the work was completed successfully and you can continue to operate the vehicle. The same work is carried out for UAZ "Patriot" with air conditioning.
To prevent such problems from arising too often in the future, and to avoid having to spend a lot of money on purchasing a new generator, it is recommended to regularly inspect the condition of the entire vehicle and carry out timely repairs of failed elements.
Source
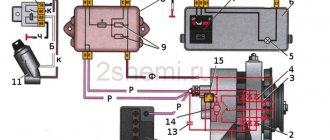
Installation of a three-level regulator
To install a three-level regulator you must:
- Dismantle the generator and remove the protective housing located on the back cover.
- Disconnect the standard voltage regulator, check the condition of the collector plates on the rotor of the electric generator.
- Install the three-level regulator: secure with standard nuts and wires.
- Make an output of an additional cable with corrugated protection through an auxiliary hole in the protective housing.
- Mount the control controller and set the necessary operating parameters.
- Replace the electric generator.
The regulator body is installed on the car body, the plug with the letter Ш is used to connect to the modernized brush assembly. The other output from the brushes is connected to the 3rd contact of the B-regulator. Block B is connected to the positive terminal of the battery via a relay, which is powered from the ignition switch.
Signs of a generator malfunction
In modern cars, breakdowns of the electrical system are one of the most common. A large number of electronics requires particularly careful monitoring of the operation and condition of the generator and battery, because their failure can immobilize the car. The most common signs of a generator malfunction are:
- battery indicator light on the instrument panel;
- unstable operation of the battery (its boiling over or undercharging);
- different intensity of headlights;
- extraneous sounds from the generator.
If you notice incorrect operation of the car, then perhaps the battery charging current from the generator is insufficient.
All malfunctions of electrical equipment, which includes the vehicle’s energy-generating device, are mechanical (deformation or breakage of fasteners, housing, malfunction of bearings, pressure springs, drive belt, etc.) or electrical (winding breaks, diode bridge malfunctions, burnout or wear of brushes , short circuits between turns, breakdowns, etc.).
Don’t write off a non-working generator: find out if there are repair kits and spare parts. Replace them if possible. If you cannot carry out repair work yourself, then take the generator to a workshop. Many craftsmen will be able to restore the unit at no extra cost and in the shortest possible time.
However, some breakdowns require the purchase of a new device that generates electricity. For example, a failing bearing that is soldered into the generator housing cannot be restored or replaced in most cases.
Remember that failure of this unit can be caused not only by wear and corrosion, but also by poor quality of elements and components; excessive load; external influence of salts, liquids, temperatures.
Replacing the diode bridge on a UAZ Patriot
The problem with the low voltage of the electric generator may be hidden in an incorrectly functioning silicon bridge.
To check the functionality of the generator, you will have to completely disassemble the diode bridge and remove the spare part.
Ringing will help determine whether the bridge is in good condition or not. The rectifier bridge consists of six diodes conducting voltage in one direction. When ringing, we find out the resistance value. If the resistance differs between the diodes by more than 5 ohms, then it is necessary to replace the silicon bridge, since the difference in resistance will greatly affect the flow of current.
When purchasing a new diode bridge, the choice must be made based on resistance tolerances, otherwise problems with the electric generator will not disappear.
see also
Comments 58
Try dubbing + and - from the generator to the Akum cable kg -35. Personally, it helped me so much, there was no drawdown
Yes, I plan to do this... I just recently got the car, not all at once
Try dubbing + and - from the generator to the Akum cable kg -35. Personally, it helped me so much, there was no drawdown
the generator should have been installed immediately
I read somewhere that the life of a conventional generator is limited by the life of the brushes and copper rings on the rotor. And the resource of the brushless gene is limited by the resource of the bearings, and this (I don’t remember the numbers) is an order of magnitude greater. Examples of installations WITHOUT BRUSH generators on UAZ engines. The idea is clear, moving the bracket into place will not be difficult.
It was necessary to immediately install a normal launch vehicle, such as Cargo.
But don’t tell me it didn’t help me, I probably got a defect, replaced the diode bridge and put in a regular tablet and everything was fine
It was necessary to immediately install a normal launch vehicle, such as Cargo.
the generator should have been installed immediately
I read somewhere that the life of a conventional generator is limited by the life of the brushes and copper rings on the rotor. And the resource of the brushless gene is limited by the resource of the bearings, and this (I don’t remember the numbers) is an order of magnitude greater. Examples of installations WITHOUT BRUSH generators on UAZ engines. The idea is clear, moving the bracket into place will not be difficult.
RN is much cheaper than genes
FROM THE FACTORY I HAVE A BELARUSIAN GENA WITHOUT LOAD 14.4 A WITH LOAD 13.5. ON WORKING GAZELLE 14.5, REGARDLESS OF LOAD (CUMMINS)
There is one nuance, on a Patrick with a condenser, it’s difficult to install the generators from a gazelle
IT'S ME WHO MUCH WHAT IMP. GENES DON'T SHAK OUT
Yes, I know, I’ve been tinkering with foreign cars for about 10 years now
There is one nuance, on a Patrick with a condenser, it’s difficult to install the generators from a gazelle
I had a 100A from a Gazelle with an air conditioner, everything is fine
FROM THE FACTORY I HAVE A BELARUSIAN GENA WITHOUT LOAD 14.4 A WITH LOAD 13.5. ON WORKING GAZELLE 14.5, REGARDLESS OF LOAD (CUMMINS)
the generator should have been installed immediately
I read somewhere that the life of a conventional generator is limited by the life of the brushes and copper rings on the rotor. And the resource of the brushless gene is limited by the resource of the bearings, and this (I don’t remember the numbers) is an order of magnitude greater. Examples of installations WITHOUT BRUSH generators on UAZ engines. The idea is clear, moving the bracket into place will not be difficult.
For myself, I chose the gene option suggested by SergeiSmile. He has a blog entry about a Volga generator. Its performance characteristics are such that, unlike the UAZ, it produces more than half the power at low speeds, which allows you to use devices without a strong voltage drop; modern calcium batteries also do not suffer from undercharging. It's not expensive, but it's clear that it's well made. It is also visually clear why it has better performance characteristics. In the place where the windings are located, the diameter of the genes is clearly larger than the stock one. The contact bolt is M8, not M6. That is, everything suggests that it was originally designed for greater productivity. It is surprising that products for GAZ are often better and more thoughtful than for UAZ, although for Patra, the need for safety margins and other things is initially higher in terms of tasks. It is also a huge plus that in this gene you can install a modern, integral, multifunctional LV type 844.3702, 845.3702 and the “orbit” analogue, which allow gentle starting of the generator and produce a higher voltage relative to the original LV. This LV also allows you to take voltage readings directly from the battery, which allows you to equalize the voltage directly across the battery. Moreover, unlike the stock gene, where you have to remove the diodes from the bridge, in this gene there is no need to do this. It already implements an additional contact for this LV. I have implemented a remote pH, which also allows me to output voltage more consistently in the upper range.
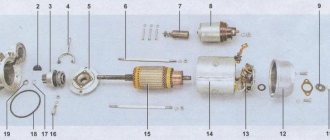
Checking and replacing the UAZ Patriot generator bearing
The electric generator has two bearings; special attention should always be paid to the rear one. The electric generator may be in a faulty state precisely because of the bearing.
The performance of the bearing is checked as follows:
- rotation speed is checked;
- the next step is to rock the bearing from side to side;
- Turn the bearing clockwise.
The part needs to be replaced if the bearing seizes, a cracking sound is heard when turning, or there are vibrations.
Bearing replacement is often carried out together with the generator cover, but sometimes it is done separately.
The procedure for replacing a bearing is as follows:
- You will need an old alternator belt: fold it in half and clamp it tightly.
- Unscrew the bearing using a 24mm socket.
- Using a 8mm head, unscrew the generator cover.
- Remove the cover and unscrew the four bolts.
- Use a rubber hammer to knock out the bearing.
- We install the new bearing in its original place using the head of the wrench and assemble the electric generator in the reverse order.
Video - Do-it-yourself diagnostics and repair of generators
Diode bridge faults
The diode bridge is also a weak point of the generator and its repair or replacement is carried out on a removed and disassembled car generator.
Before carrying out repairs, it is necessary to carefully inspect the part. Most likely, the contacts from the semiconductor elements were simply unsoldered on it. In this case, they are simply soldered into place and all the parts are installed back. Another thing is when burnt marks appeared on the surface of many diodes. In this case, it is best to replace the entire bridge and install a new element on the generator stator.
It is worth saying something about the features of diodes. These elements are designed to rectify voltage and have conductivity in one direction only. If this conductivity is broken, it means that the semiconductor is faulty and requires replacement. It is impossible to detect this by external examination, but there is the following way:
Using a lamp tester, check the conductivity of all bridge diodes. To do this, one contact of the tester is applied to one side of the diode, the other to the other. If the lamp does not light, then swap the contacts. Only in one of the positions should the lamp light up and this applies to all other diodes. If the lamp does not light up at all, or lights up in both directions, then the diode needs to be replaced. It is unsoldered, squeezed out, a new one is installed in its place and the contacts are soldered.
Other malfunctions. These may include disruption of various contact connections. In this case, the contact surfaces are cleaned or the entire contact is replaced. It is worth recalling that poor contact, at least in one place, leads to a decrease in the efficiency of the power supply or failure of the entire unit.
It's worth returning to the alternator belt again. Even if it is tensioned normally, feel it for moisture. It is possible that oil or antifreeze has dripped onto it, and it simply slips, disrupting the normal transmission of torque to the generator pulley. This also happens.
Separately, one can note the increased noise when the generator is running. The culprit for this noise is most often the rotor shaft bearing. Its noise indicates that it has worn out and needs urgent replacement. It is highly not recommended to delay this matter. The fact is that imbalance of the shaft will lead to contact of the rotor with the active steel of the stator, a short circuit will appear, which will also affect the voltage level of the on-board network.
This problem can be fixed. To do this, the generator is disassembled, the rotor is removed along with the bearing, which is then pressed out of the rotor. After this, a new bearing is mounted using special equipment, and the rotor is installed in its place.
This is all that is associated with generator malfunctions. If after eliminating the above the problem does not disappear, then you need to look for it elsewhere.
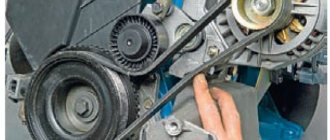
Replacing the UAZ Patriot alternator belt
The alternator belt has a certain service life (15-20 thousand km), so sooner or later it will have to be replaced. It is recommended to replace the poly V-belt every ten thousand kilometers or when cracks appear on the inside of the belt.
In order to replace the belt, you need to lift the hood, remove the air filter and loosen the tension roller using a 15mm wrench. After this, replace it with a new belt and tighten the tension roller for smooth operation. If you are not confident in your abilities, then it is better to entrust this work to a specialist.
Video “Visual instructions for dismantling the generator and lubrication”
You can learn more about how to disassemble the unit at home and how, and most importantly, how to lubricate the bearing, from the instructions given in the video below (author - Sergey Rotanov (RSV)).
The generator bearings whistled, and when turning the pulley, the unevenness of rotation was clearly felt. Before that, at a mileage of about 40 thousand km, I foolishly changed the bearings - the roller whistled, and I immediately attacked the generator, installed KOYO bearings, but before installing them, I opened them and added lubricant, which is STRICTLY NOT supposed to be done! As a result, the boot was squeezed out and it spun somehow separately from the bearing
For use in generators, bearings that are sealed on both sides are required; the index 2RS is added to their number, plus the index C3 or CM (radial clearance greater than normal or normal radial clearance). To repair the Pramo 5122.3771-30 generator, bearings 6303 (front) and 6202 (rear) are needed, I ordered KOYO again, but I didn’t open them
How to check the voltage of the electric generator on the battery
Electromotive force or potential difference can be determined by the following methods - using generating equipment and through a battery. The electric generator is directly connected to the power source with a thick cable, so to check the level of potential difference, you can measure the voltage at the power source. When using this method, you will need special measuring instruments - a voltmeter, multimeter or load fork.
The device wires are connected to the battery in any order. The plug must be connected to the battery terminals, and the polarity must be strictly observed. The permissible voltage in the network should not be less than 12.5 volts. At idle speed with the electrical devices of the machine turned off, this figure should be about 13.5-14 V. Reducing the voltage values to 13.3-13.8 volts is acceptable.
Based on the above, the main types of failures of the UAZ Patriot electric generator can be problems with the poly V-belt, bearing failure, or failure of the diode silicon bridge. You can also solve the problem of voltage drop on the UAZ Patriot generator by installing a three-way regulator, but this will not solve all the existing problems. If problems are detected in the operation of the electric generator, it is necessary to immediately begin diagnosing it to identify the causes of the breakdown.
How to choose a drive belt for an engine with air conditioning
> Questions and answers
16.12.2019
To select a belt for a UAZ Patriot 409 engine generator with air conditioning, you need to know the features of your car model. Cars of this brand may have 1 or 2 such components. The main parameter by which you need to select a new spare part is length.
Alternator belt characteristics
UAZ Patriot cars use engines with air conditioning of Euro-3 and Euro-4 models. They have a poly V-belt installed. It is a closed loop. On the inside of the product there are several longitudinal strips, also called rivulets or wedges. Due to this design, it got its name.
On the UAZ Patriot, spare parts with the numbers can be used for the generator:
- 6РК2120;
- 6RK2100;
- 6РК1275;
- 6РК1220.
This code contains all the parameters necessary for selecting a component part. The last 4 digits of the code indicate the length. The first number is the number of streams.
For example, a spare part with catalog number 6RK2120, used on a UAZ Patriot, has the following characteristics:
- length - 2120 mm;
- number of streams (wedges) - 6;
- product width - 21.4 mm;
- weight - 280 g.
Location of the element in the car structure
To quickly and correctly install a new belt, you need to have a diagram of how this spare part should go around the rollers and pulleys. A detailed image can be found in the vehicle's operating instructions. Owners of a car of this brand are recommended to always have with them not only a spare part, but also a visual explanation.
In the 409 engine with air conditioning, the alternator belt is positioned so that to remove it, you just need to press the tension rollers. No need to remove fan or diffuser
The old part can be pulled between them by carefully rotating
A new spare part is installed using the same scheme. In this case, you must first wrap the belt around all the rollers and only at the last stage put it on the generator.
How to choose the right drive belt
First of all, you need to decide on the required length. Starting from 2012, when the Patriot was equipped with a Euro 4 engine, a model with a length of 2120 mm was used.
On cars manufactured between 2007 and 2012, a belt with a length of 2100 mm was initially installed. When replacing a failed spare part, it is permissible to choose a longer length. Experienced car enthusiasts claim that in this case the installation process will be much simpler. However, one may come across the opinion that a longer component part will begin to “whistle” much earlier.
Also in models released between 2007 and 2012. You can find engines that have 2 belts installed. In this case, depending on the modification, components with the number are used:
Therefore, before buying a new belt, you need to open the hood or technical documentation for the car in order to find out which engine version is installed
One of the key points is the material from which the belt is made. If a manufacturer used cheap waste from the production of rubber products, then its products will not last long. This material hardens in the cold and becomes “oak”. This leads to cracks appearing on the surface.
To ensure that the belt does not crumble and lasts a long time, it must be made of EPDM. This is a generalized international name for materials manufactured using ethylene-propylene rubbers. This spare part is resistant to aging and temperature changes.
Therefore, it is most often recommended to give preference to products from European or Asian manufacturers.
Manufacturers of spare parts
As a replacement for the original belt installed at the factory, any analogue that matches in length and width can be used for a UAZ Patriot. Such products can be found from companies:
- SKF;
- Gates;
- Globelt;
- Bosch;
- TANAKI Co. Ltd;
- LYNXauto.
Poly V-belts of this configuration are used in car engines of such brands as Ford, Lexus, Opel, etc. Therefore, choosing a quality spare part is quite simple.
Experienced auto mechanics do not recommend purchasing components produced by companies such as Luzar or Zommer, despite their lower cost.
How to choose a drive belt for an engine with air conditioning Link to main publication
Meet UAZ 452
The car was a cargo-passenger version of an off-road vehicle with a 4x4 wheel arrangement. The Ulyanovsk Automobile Plant mastered production of the model back in 1965.
You can evaluate its capabilities by watching the following video:
The UAZ 452 is capable of transporting cargo weighing up to 700 kg in the back. In addition, it can tow a trailer weighing 850 kg. The vehicle became very popular not only in Russian off-road conditions, but was also successfully used in large cities in various capacities (pictured in the article).
In particular:
- Like a traffic police car;
- As a fire engine;
- Ambulance car;
- Grocery store;
- Utility vehicle, etc.
Electronic components
The electrical wiring of the UAZ 452 was a simple single-wire circuit.
Structurally, it had the following solutions:
- The role of the second wire was played by the metal body and the components and assemblies attached to it;
- All electronic components and actuators had a “-” displayed on the housing. The cost of such a solution justified the imperfection of the scheme.
For reference: The instructions provided for regular checking of contacts. When oxidized, they should have been cleaned with sandpaper.
Power unit
The engine compartment is located directly inside the car, as this is due to its design.
Access to components and assemblies is also provided from the passenger compartment by removing the cover, which:
- Provided protection for the driver and passengers from the penetration of exhaust gases;
- Protected from dust and dirt;
- Served as an additional heating element (passive - from heating).
The previously used engine from Pobeda was replaced with a more modern engine from the 21st Volga. This was facilitated by the launch of a production line at the Zavolzhsky Motor Plant in 1964.
Note! Despite some skepticism regarding the inconvenience of servicing a cabover car with your own hands, years of operation have proven that there are no difficulties.
Passive vehicle safety
The design of the "Baton" with a cabover layout also initially raised a number of questions regarding safety. However, a series of crash tests conducted back in 1971 at the Dmitrov test site proved that in most emergency situations the driver and passengers of the UAZ 452 have a chance to avoid injury.