In what cases do you have to remove the bumper?
Removing and installing a car bumper is required in strictly defined cases; it is not recommended to simply remove it from its standard place and install it back, since in this case its standard fasteners will wear out and become loose.
Among the situations in which such an operation must be performed are:
- repair after an accident.
- performing repair work and periodic maintenance of other components and assemblies of the vehicle.
- performing tuning work.
- damper modernization.
- the need to carry out repair work on standard fastenings.
Most often, replacement of the rear bumper is required, since it is the one that usually suffers in accidents and various types of emergency situations. The front bumper is usually replaced after it has been seriously damaged for various reasons, mainly a collision with an obstacle. In addition, the front damper often undergoes a tuning procedure and that is why it must be removed periodically.
Why remove bumpers on VAZ 2113-2115
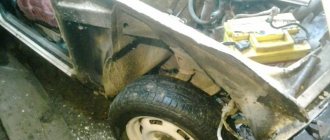
What kind of “blows of fate” do the front and rear body kits experience during operation? Either a stone will fly, then someone in the parking lot will catch it and scratch it, or even the driver himself will drive into a snowdrift where an iron pipe is hiding. Not to mention such little things as traces of insects crashing on the front. Some of the listed defects can be eliminated without removing parts from the car, but in case of serious damage, dismantling is inevitable.
Such damage cannot be repaired, the body kit is easier to change
A separate story is a collision during an accident, as a result of which the bumper often turns into outright trash, unsuitable for repair. Fortunately, spare parts for Russian cars are freely available and their prices are quite affordable.
Reference. The cost of the front and rear body kits is almost the same and starts from 2,600 rubles. for an unpainted part. Prices for products with color coating start from 3,250 rubles.
The main reasons why owners of the “thirteenth” and “fifteenth” VAZ models have to dismantle the bumpers are as follows:
- It is necessary to completely repaint the car and perform body repairs.
- To repair or replace a broken body kit.
- It is easier to install fog lights on the removed front element.
- You need to get to other body parts located under the bumper.
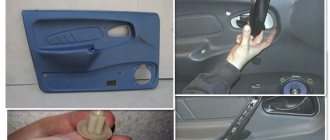
- It was decided to throw away the stock factory body kits and install beautiful elements of the original shape, that is, to do partial styling of the car.
This is what the VAZ 2115 styling front body kit looks like
Note. To this day you can find budget black bumpers on VAZ 13-15 series cars. The owners of these cars, as soon as possible, remove unsightly parts in order to paint them in the desired color or replace them with painted ones.
The first 2114 models came with black body kits
How to remove the front bumper
The dismantling procedure occurs according to a certain algorithm. It can be described step by step as follows:
1. placing the car on a jack or inspection hole. 2. dismantling the front wheels.
3. de-energizing its electrical wiring. 4. removing the radiator grille, and this procedure directly depends on the design of the damper installed on a particular car model.
5. in the case when there is a hole in it for the towing cable, use a hex wrench to find the heads of the fastening bolts and unscrew them. 6. in the case when the arch protection is screwed to the car body, you need to unscrew three of them and remove it. 7. The part is carefully “torn off” from the latches located on the wings.
8. All existing fastenings of the described device to the body and energy-absorbing beams are checked. These could be the lower bumper mounts, other types of screws located under the fender liner, as well as in the radiator area.
Sequence of dismantling work
Preparation
Some operations to remove the front buffer of the car will have to be performed from below, so for convenience it is better to drive the car onto a viewing hole, overpass or lift. Next, you should inspect the bottom and fender liners of the car, remove dirt so that it does not fall down your collar while doing work.
- Work should begin from the bottom of the car, that is, by unscrewing the screws that attach the underbody protection element to the bumper (instead of unscrewing three screws, you can pull out two clips, and then the protection will be removed along with the bumper). We perform a similar operation on the other side.
- The next step is to unscrew the bumper from the fender liner. To do this, take Torx T20 and unscrew two screws, near the left and right wheels.
- Having unscrewed the fender liner, move it slightly to the side, and we will notice the lower bumper mounting bolt. We take the head at “10” and unscrew the fastening bolt that holds the bumper on the car’s fender; we carry out the same procedure near the other wheel of the car. Having unscrewed the bolts, we remove the ends of the bumper from the engagement, slightly moving them to the side.
- In the lower front part, the bumper is secured with three screws with Torx T30 socket heads, unscrew them. By removing these screws we finish the work under the car's underbody.
- In the front part under the hood of the engine compartment there are four more Torx T30 screws; we remove them.
- Having finished unscrewing the last screw, we proceed to removing the bumper. Carefully grab the bumper by the ribs and, slightly pulling it towards you, dismantle it.
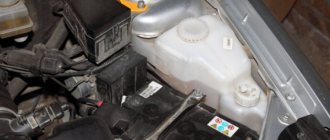
- If fog lights are installed on the front bumper of your Renault Logan, then before dismantling it, be sure to remember to disconnect them from the central electrical connector. Its location: in front of the left wheel in the lower part of the body.
Video tips for DIY dismantling
Removing the bumper from a Renault Logan car is very simple and takes about 25–30 minutes. Sometimes, to make it easier to unscrew screw joints, use WD-40, a special aerosol that corrodes rust and dirt at the joints.
This is interesting: How to remove the headlight on a Renault Logan - we study in order
Installing the front bumper
Installation of the front bumper of the car occurs in the reverse order, and it is necessary to thoroughly clean the seats and fastening points of this element of the car's structure from dirt and rust. It is worth installing it back with the help of an assistant, since you need to correctly place the product in the fastening areas and its normal location. As a last resort, this procedure can be performed independently, but in this case there is a high risk of damaging the fragile antennae of the plastic latches.
Removal and replacement
Now let's talk directly about how to remove and replace the front bumper on a VAZ 2114 car. We advise you to first watch the training video, which will give you a visual idea of the upcoming work.
To work you will need a certain set of tools. It includes:
- A set of screwdrivers or a Phillips screwdriver;
- Open-end or socket wrench 10 by 8 millimeters;
- Head with a 13 mm collar;
- Free time;
- Pit or lift.
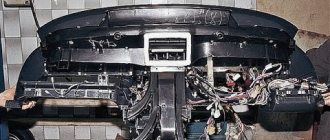
Clearly in need of restoration
On average, the replacement job takes about an hour. But if you are new to this business, then get ready to spend a little more on the procedure. Regardless of the time spent, you can save a lot on car workshop services. In addition, you can never be completely sure that specialists will do a better job than you could do with your own hands.
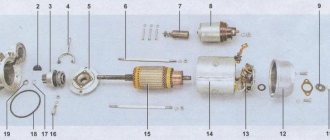
Amplifier
The sequence of work is now as follows.
- Unscrew the protection on the front wheels. To do this, remove three screws using a screwdriver.
- Move the protection aside and give yourself access to the inside of the bumper.
- Using a 10 mm wrench, unscrew the two mounting nuts located inside.
- Carry out dismantling work on the side of the second wheel in the same way.
- Remove the license plate. Everything is simple here. Unscrew two screws under the number and two more of the same screws in the windows just below the license plate.
- Using a little force with your hands, remove the front end.
- The assembly procedure is performed in reverse order. You can first repair the damaged bumper, or immediately install a new body element. The choice is yours.
Amplifier replacement
In the case of the front bumper, everything is very clear with the fasteners and their dismantling. But before installing a new body element, be sure to check the condition of the amplifier. If it is damaged, we strongly recommend that you replace the front end component.
To replace the amplifier yourself you will need:
- Remove the front bumper following the instructions above.
- Remove the two mounting nuts using a 13mm socket. In the case of the VAZ 2114, there are two such nuts on each side.
- Leave the adjusting washers on the studs.
- Unscrew the brackets located on the sides from the old bumper and install them on the new one. There are a total of three screws on each side.
- Adjust the new amplifier to the required height, set the gaps between the amplifier, fender and headlights. This is done through slits.
- Put the entire structure back together.
Obviously, removing the front bumper is not that difficult. This must be done if this element of the front part of the car is damaged. Operating a car with a damaged bumper can lead to serious consequences.
Loading …
Removing the rear bumper
Removal of the rear bumper is also carried out according to a specially developed algorithm and step by step it looks like this:
- The car is placed on a jack or driven into a viewing hole.
- The rear wheels are being removed.
- The electrical wiring is de-energized.
- The fastening of the arch protection to the bumper is unscrewed, if this is provided for by its design. To do this, use a screwdriver to remove self-tapping screws or a wrench for “8” and “10”.
- The rear light is removed.
- Under the lantern two latches snap off.
- the condition of all types of fasteners is checked, with special attention paid to the bracket, the fastening of which has a complex structure. Those of them that are secured with screws and self-tapping screws are unscrewed.
- Using moderate physical force, the rear damper is removed.
It is worth noting that the repair algorithm is general and not always worth following. The fact is that on many car models, gaps are specially left so that you can carry out the necessary technical work on your own. As a result, there is no need to dismantle the device, spending a lot of effort and time.
Articles
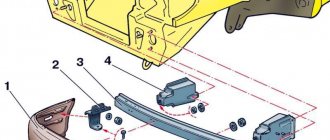
Here are the part designations for first generation machines:
- 622230010R or 622231300R or 622236764R – mounting bracket, left side;
- 622220011R or 622229216R or 622223926R – the same, right side;
- 8200597650 or 6001549321 – right PTF holder;
- 8200597649 or 6001549322 – left PTF holder;
- 620220030R – bumper “under PTF”;
- 620220025R – bumper without PTF holes;
- 620931777R – absorber (plastic liner).
We recommend: How much and what kind of oil to fill in Renault Duster
Of course, each of these parts has branded analogues:
- 620220025R – Api DC6000000-0000; Breckner BK71303; NPA NP513-07211;
- 620220030R – Api DC6000000-1000; NPA NP513-07212;
- 622230010R – ASAM 80133; NPA NP513-07235;
- 622220011R – ASAM 80132; NPA NP513-07236;
- 620931777R – Body Parts RNDUS10-240 (Taiwan).
ASAM is a supplier to Dacia. Well, Breckner and NPA are well-known brands from Germany.
Clarifications for restyling
We will talk about the second generation of crossovers. The designations will be as follows:
- 620224960 R – bumper;
- 622229960 R – right bracket;
- 622239404 R – left bracket;
- 620931777R – absorber (inherited from generation I);
- 622542036R – lower grille.
It is difficult to find analogues, since we are talking about a new product. There are a couple more items:
- 623103564 R or 623827948 R – radiator grille assembly (generation II).
The last node has analogues, but they differ from the original (tuning).