Removal, replacement and operating instructions for the windshield washer reservoir
Every modern car is equipped with a washer system designed to clean the windshield and, depending on the car body, the rear window. This system includes various elements, including windshield wiper blades and a washer fluid reservoir (WHC) into which cleaning fluid is filled. Read more about what malfunctions the expansion tank is susceptible to and how to repair it.
Characteristics of the element of the windshield washer system - tank
Before we tell you how to remove the washer reservoir and repair it, we suggest you understand the main characteristics of this element of the system. It is a container, usually white, designed to hold cleaning liquid.
Design Features
In addition to the container itself, the BO includes in its design the following components:
- nozzles through which liquid is supplied to the glass;
- an electric motor used to supply consumables to the glass;
- small-diameter hoses located between the nozzles and the electric motor, through which liquid is supplied;
- depending on the car, the system can be supplemented with a sensor designed to measure the volume of consumables in the container and warn the driver about a critical level;
- washer reservoir cap and retainer;
- tee for connecting pipes.
Location
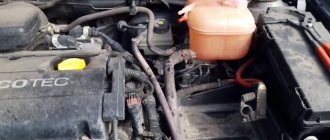
Where is the washer reservoir located? Inexperienced motorists often confuse BO with expansion tanks for antifreeze or brake fluid. But in fact, finding this element is easier than ever. For example, in most domestically produced cars this component is located in the engine compartment, to the right or left of the engine. There can also be two of them - for the front and rear glass.
In foreign-made cars, the BO is usually located under the front bumper or under the windshield. As a rule, a special symbol in the form of a watering can is applied to the lid of the container - this is how BOs are marked.
What is the best way to seal the washer reservoir?
The simplest, most affordable and effective way to eliminate cracks in the windshield washer reservoir is soldering using a soldering iron and a fine metal mesh.
The essence of this method is simple and clear: a soldering iron melts polyethylene and fuses it, forming a strong monolithic seam.
Metal mesh is used as a reinforcing material. It is necessary to eliminate large cracks; if the damage is small, you can do without a mesh.
Metal mesh can be found at the car market; it is sold as a reinforcing base for repairing plastic bumpers in sheets measuring 15x11.5 cm. One such fragment costs about 100-150 rubles.
seal a cracked washer reservoir using special glue.
- Suitable for gluing various types of polyethylene and polypropylene, especially strong special adhesive for plastics DP 8005 3M.
This two-part acrylic-based structural adhesive is capable of bonding polymers without prior surface preparation.
Glue is a modern alternative to popular methods of mechanical joining and soldering.
The adhesive joint formed by DP 8005 3M glue is resistant to water, high humidity and aggressive solutions, so this composition can be used to repair the windshield washer fluid tank.
The only drawback of this glue is its high price (it costs about 1,300 rubles for a 38-gram package), but if you need to repair the tank of a rare foreign car, then such expenses can be justified.
- WEICON Easy-Mix for PE-PP is another effective two-component structural adhesive for bonding polyethylene and polypropylene. This special methyl acrylate based adhesive has high adhesion to low energy polymers (PE, PP and TPE). It glues quickly and, as they say, tightly, but it costs even more (about 3 thousand for 38 grams).
- A two-component adhesive-welding for polymers from the German company Hosch will help you repair a rare, expensive part.
This glue effectively seals holes and cracks in any plastic products. The adhesive seam remains elastic in cold weather and can withstand pressure up to 12 atmospheres.
Instructions for replacing and repairing the tank
Replacing the washer reservoir is usually done as a result of its failure, which cannot be repaired. In particular, if the CP is cracked and it is no longer possible to restore its integrity.
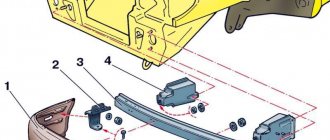
Using the example of a VAZ 2114 car, let’s look at how to remove the washer reservoir:
- First open the hood. Before removing the BO, it is necessary to drain all remaining liquid from the container. If the liquid level in the container is high, then unscrew the cap of the washer reservoir, this will reduce the pressure in the system.
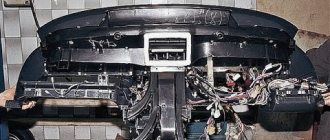
- Then the BO is removed from the grooves; to do this, it can be pulled up, and placed in such a way that you can easily dismantle the electric motors.
- You need to disconnect the contacts from the motors, as well as the water supply pipes.
- Next, the electric motors are removed from the container body - for this you can use a regular screwdriver to pry them off (the author of the video is the menstimecom channel).
Design features of the washer reservoir
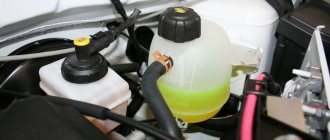
A tank with water or “anti-freeze” is a white container installed in the engine compartment and intended for storing washer fluid. Moreover, the tank itself is one of the elements of the windshield washer system.
In addition to this, the device includes the following components:
- Washer jets (nozzles).
- A pressure pump that pumps liquid to the windshield from a container.
- Tubes between the jet and the motor (they supply water or an antifreeze compound).
- A special sensor that monitors the fluid level in the system and issues a corresponding signal to the driver.
- Mounting bracket, as well as tank plug.
- Special tee.
Above we looked at how to remove the washer reservoir, check the system sensor and change the container (if it is damaged). But there are situations when the container body is intact, and the only thing that needs to be done is to add liquid.
In such a situation, proceed as follows:
- Pull the hood handle located in the cabin.
- Open and secure the hood.
- Unscrew the cap that is installed on the tank. In this case, unscrew only the cover that does not have wires.
- Add liquid (water or anti-freeze). If the container is empty, it holds about five liters.
An equally important question is what to put in the tank. It is important to consider the time of year here. So, in winter it is recommended to pour non-freezing liquid, which will protect the system from freezing.
As for the summer period, water with the addition of a cleaning additive is suitable. To ensure the best effect, first pour the additive into the container, and then add water. With this sequence, the liquids mix more easily and quickly. Good luck on the roads and of course no breakdowns.
The nuances of operating the device “by season”
What you need to know about operation:
- In the warm season, it is allowed to use a washing solution or water with the addition of a special additive.
- In winter, you need to fill in a special anti-freeze liquid, since the water can freeze and ruin the container itself. You can find the appropriate fluids in domestic auto stores.
- Use heated washer fluid reservoir. As practice shows, most cases of cracks in tanks are due to consumables freezing in them. To prevent this, you can use a heated washer reservoir, which is installed on cars as standard or as additional equipment.
Professional tips for removing the tank
Many car enthusiasts prefer not to do this themselves, but still turn to professionals. In a standard car, to remove this element, as a rule, you need:
- Place the car on a jack;
- Remove the wheel and fender liners;
- Afterwards, you can remove the tank and start sealing it;
- Wait until everything sets and dries completely;
- Then repeat all the manipulations, only in reverse order.
As you can see from all this time, this will take a lot of time, so it’s better to go to a service station. According to the manager of one of the technical centers, this element rarely fails on cars of a foreign manufacturer. You can often find damage in the form of various chips after minor accidents.
It may also burst after an impact during an accident; in this case, the optimal solution would be to replace it with a new one. Previously, if this element was damaged in a car that was rare and was released not long ago, it was quite difficult to find a suitable replacement, and you had to order it from another city, all of which could take several weeks. Nowadays such a situation is very rare, especially for cars from a Japanese manufacturer, for which there are many spare parts on the market.
In any case, if such a problem occurs, experts recommend not to do anything on your own and contact a car service center, where professionals will determine the nature of the damage and the course of further work, which will determine whether it is worth repairing or whether it will be easier and more reliable to completely replace it.
Washer reservoir design
Windshield washer reservoirs are unified and consist of the following main structural elements:
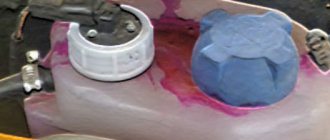
- A housing used to store coolant and mount other parts. The case has a rear neck with a screw cap.
- A pump that supplies fluid to the injectors.
- Many tanks have a washer fluid level sensor.
- Fastening the tank (brackets and clamps).
The tanks also contain various structural parts, listed below:
- Filler neck into which the screw cap is installed. The lid must be screwed tightly to avoid loss of liquid. However, the lids are often provided with plastic bridles for safety.
- The screw cap itself.
- Holes for mounting a liquid supply pump.
- Hole for mounting a liquid level sensor.
- Washer fluid level marks and vertical grooves.
When repairing a tank, pumps are installed through holes with inserted rubber bushings. The pump installed on top can be fixed with a plastic cap nut. The pumps at the bottom of the tank are held in place by the elasticity of rubber bushings. The tanks are attached to the body either using brackets molded on them, or using separate baskets or clamps.
What is a glass washer tank?
The tank is a special container, most often white. It contains liquid for cleaning glass in case of contamination. Barrel components:
- Storage tank;
- Nozzles, with their help the washer gets onto the glass itself;
- Electric motor supplying liquid;
- Hoses between the electric motor and the nozzles, through which the washer is supplied;
- The sensor measures the volume of liquid consumed in the tank and warns when this amount is critical and needs to be added;
- Fixing element and tank cover;
- A tee with which the pipes are connected.
Types of washer reservoirs
The volume of the tank depends on the model of the car in which it is installed. Most often it ranges from 1.5 to 5.2 liters. A tank with a larger volume needs to be filled less often, but its size most often interferes with its correct installation under the hood. To solve this problem, tanks began to be manufactured in various shaped shapes. Tanks are also classified according to the number and location of pumps:
- Tank with one pump at the top . These are classic containers installed on older models. Now they are mainly used on GAZ, UAZ and trucks.
- Tank with one pump at the bottom of the tank . Such containers are installed on modern cars. The pump is compact and is installed obliquely at the lower edge of one of the side walls.
- Tank with two pumps at the bottom of the tank . Such tanks differ from the previous type only in the presence of an additional pump.
Seal up a burst washer reservoir on a car step by step
Let's take a closer look at two methods of repairing a burst washer reservoir - glue and glueless (soldering).
Method one - using two-component Hosch glue:
- Preparation. Both surfaces to be bonded should be cleaned of dirt using acetone.
- Applying glue. The liquid cyanoacrylate component is applied in a thin layer to the crack or hole. Welding granules from the second bottle are added on top and again covered with a small amount of glue for impregnation.
- Gluing. The glue sets almost instantly, so within a few minutes after applying the composition, the tank can be returned to its place and filled with windshield washer fluid.
Note! When a liquid adhesive component interacts with welding granules, an exothermic reaction occurs with the release of heat and steam, so care should be taken to ensure safety.
Do not inhale the vapors generated during the reaction process.
VIDEO REVIEW
Method two - soldering:
- The surfaces to be joined must be degreased with acetone.
- Heat the soldering iron to maximum temperature.
- We apply the mesh to the seam so that the edges of the mesh extend to each side by at least 2-3 centimeters.
- We gradually heat the metal mesh, fusing it into the plastic.
- Smooth out the top layer of polyethylene so that the layer becomes monolithic.
- We check the tank for leaks and install it on the car.
When performing work, safety precautions should also be observed. Soldering may only be carried out in a well-ventilated area.