If the starter on a VAZ 2110 or its solenoid relay malfunctions, it must be removed from the car for diagnostics or complete replacement. In most cases, the cause of device failure is the failure of the retractor, but there are cases when the starter itself is the culprit. If you need to remove it from the car, then you will need:
- Open-end wrench 13
- Head with knob
- Socket head 13
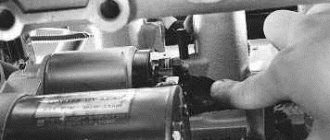
The layout of the VAZ 2110 engine is such that before proceeding with the removal procedure, it will be necessary to remove the air filter housing to gain access to the starter.
Shown above is its location when the air filter housing is removed. Now you need to disconnect the negative terminal of the battery, as well as the starter power wires. One of which must be unscrewed with a 13 key, having first bent the rubber protective cap:
And the second one can be easily removed, just pull it to the side:
Next, you can begin to unscrew the starter mounting nuts. Depending on the model of the device that is installed on your VAZ 2110, it can be secured with either two or three studs. In this case, the starter is secured using two studs, the nuts of which must be unscrewed:
After you have completed this task, you can carefully move the starter to the side:
And finally we take it up, the result of which is shown in the photo below:
If necessary, we buy a new starter, the price of which for a VAZ 2110 ranges from 2000 to 3000 rubles, depending on the manufacturer and type: gearbox or regular. Of course, the ideal option is a gearbox, since it turns the engine at a higher speed and starts much more confidently.
Replacing the starter on a VAZ 2110, VAZ 2111, VAZ 2112
Welcome! Starter - there are many important electronic things in a car, but the starter and generator are the most important and therefore they need to be looked after and not allowed to wear out, for example, if you want to kill the generator very quickly, then it will be enough to remove the minus terminal from the battery and wait for the moment until the diode bridge fails, with the starter everything is also simple, it will be enough to turn it (There are cases when the engine does not start) until it fails (In general, you should not turn the starter for a long time, 10 seconds without stops are already long for him, so keep breaks of 30 seconds if the car does not want to start for more than 10 seconds) and you can go buy a new one and what is most important is that without a starter it is very, very inconvenient (You will have to constantly push the car), and without a generator, you won’t even be able to go anywhere (or rather, you can, until the battery completely runs out and the car stalls as a result), so be careful with these things and don’t put too much load on them, which can damage them.
Note! To replace the starter with a new one, you will need to take from the tools: A set of wrenches and gloves (We recommend working with gloves, because the distance is small and it’s easy to skin your hands) and also an inspection hole would be useful, or just hang the front part of the car and remove the wheel , because the starter is located at the very bottom and you can’t reach its bottom bolt from above!
Summary:
Where is the starter located? If you look from the top of the car, it will be a little difficult to see it, because some details will interfere with seeing it, but still, if you look at it from a certain angle, then everything is clearly visible, for clarity, in the photo below, the starter is indicated by a red arrow .
When should you replace the starter? Any part wears out from time to time, the same thing happens with the starter, but most often one problem happens to it, it starts to click (When you turn the key to start the car), because of these clicks the car does not start and from time to time the starter may then grab, then click, in addition, another reason that indicates that the starter has become unusable is its weak rotation, that is, you turned the key, it began to turn and turns very weakly, and therefore the car does not start properly and you have to wait for a long time until the engine starts (in this case, also check the battery, it may be discharged), in addition to these faults, there are others, such as turning on the starter repeatedly and turning it off, or when you turn the key and you can hear the sound of the starter, but it spins at idle or when you turn on the starter, you hear an unusual noise (crackling or as if the starter’s armature is touching something and similar noises that you will immediately understand).
This is interesting: Methods that will make car care easier
general information
As mentioned above, the starter provides current support due to permanent magnets. Producing a power of 1.55 kW, this element provides the starting frequency that is so necessary for the cylinders of the car’s power unit. Different motor types have different frequencies, but there is an average starting frequency. It is equal to 40-50 revolutions per minute, if we mean the operation of a gasoline engine, which is the VAZ 2112 engine.
Note. As a comparative example, diesel engines will require the starter to rev at 100-200 RPM.
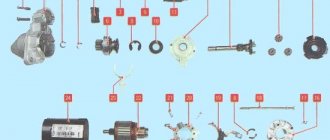
Consists of the following components:
- Permanent magnets in the amount of 4 pieces. They are mounted inside the starter and perform one of the important missions.
- An anchor that rotates the flywheel, and with it the crankshaft of the car engine.
- Brush unit with 4 brushes. Two of the brushes are called positive, two are called negative. The brush assembly is designed to provide electrical connection.
Note. This assembly has been proven to be one of the least reliable parts of the starter. It is the brushes that are the first to be questioned when the stator is performing poorly and are subject to testing, followed by replacement.
- The planetary gearbox is the next component. It is also the most important element, as it is responsible for transmitting torque to the drive shaft. The gearbox itself consists of several gears that reliably perform their functions.
- A drive that is designed to insert the stator gear into connection with the engine flywheel. The mechanism of this drive is located on the armature shaft.
- Covers, front and back, which are cast mainly from aluminum, or rather from its alloy. The front cover is needed to mount the relay, which is connected to the drive through a plastic lever and ring. Brush holders are located on the back cover.
- Solenoid relay, also called traction relay. Thanks to this component, the drive gear meshes with the ring gear. As soon as the driver turns the key, voltage will not flow anywhere, but to the windings (holding/retracting) of this relay. As soon as the contact relay closes, the pull-in winding is switched off.
Note. It will be useful to know that 8V is the normal voltage of the traction relay, of course, if the ambient temperature is average. It is by this parameter that electricians determine the malfunction of this relay.
- Light weight and small dimensions, making it compact, are among the obvious advantages of this element.
- On the other hand, this is the most loaded part in the entire car system, because being small in size, it must spin the heavy flywheel of a strong car engine. In addition, the starter is also responsible for rotating the crankshaft along with connecting rods and pistons. Because of this drawback, the starter cannot serve for a long time and after a certain time (usually 5-6 years) fails.
Briefly, you can imagine the work of the starter. Through the ignition switch, power is supplied to the relay windings. The windings create an E.M.F. that is transmitted to the relay core. This, in turn, closes the power contacts, transferring power to the stator motor. At the same time, the relay influences the drive, which, with its gear, engages with the engine flywheel.
Note. To prevent reverse transmission of torque, the overrunning clutch disengages the rollers as soon as the machine's engine starts.
How to replace the starter on a VAZ 2110-VAZ 2112?
Note! The first and most important rule when working with electricians is to disconnect the battery so that it does not supply current, this is done by removing the minus terminal from the battery; how to do this in more detail, read the article: “Replacing the battery in a car,” point 1!
Removal: 1) First, drive the car into a viewing hole, overpass, or lift the front part very high with a good jack (it will be enough to lift only one side, two at once are not necessary) and remove the wheel from the car, after the operation, remove the boot or if If you have a crankcase protection installed, then remove it too, because it will prevent access to the starter, immediately after which, by the way, in the engine compartment or under the car (Whichever is more convenient for you), unscrew the top nut securing the starter (see large photo) and also unscrew the nut that attaches the terminal to the solenoid relay (see small photo) and remove this terminal so that it does not interfere (Next to this terminal there will be another wire that is attached to the starter, you will also disconnect it).
2) And finally, unscrew the nut that secures the starter from below (see photo 1) and after that, carefully pull it out of the clutch housing and put it on the ground or put it where you need it, if you suddenly decide to check the starter for serviceability, we’ll give you a couple of tips on how this is done, first use a flat screwdriver to move the coupling back and forth along the shaft and make sure that it moves easily and does not jam anywhere (see photo 2), then twist the gear with the same screwdriver or with your finger (see photo 3), it it should also spin easily and spin only in one direction, it should, if it spins both clockwise and counterclockwise, then the starter will have to be disassembled and repaired, in addition to this, you can also check the solenoid relay, which sometimes clicks and the starter does not engage, to do this, pull two wires so that they have crocodile clips at both ends (it will be easier this way, you can also run clean bare wires), so place the red wire on the plus terminal of the battery and its other end on the control terminal (a wire is also attached to this terminal) of the solenoid relay , as for the black wire, then throw one end to the minus on the battery, and connect the other end to the starter housing as it is all shown in figure number 4, after this operation you will hear a click and the clutch will come forward, when you remove the wires it will be the same again the same click and the clutch will run back, well, the final check is to disconnect this very wire from the control terminal of the traction relay and connect all the wires with the alligator clips in the same way, but only with this wire removed and when the voltage goes back, the armature at the starter should rotate with frequency of more than 5000 min, if this is the case, then the starter is fully operational and by the way, do not hold the wires that come from the battery and that you connected to the starter for more than 10 seconds, otherwise problems may begin with the starter.
Installation: Installation of a new starter occurs in the reverse order of removal; if you do not want to completely change the starter, but you want to overhaul it, then study the article entitled: “Repairing a starter on a car.”
Additional video clip: You can see the process of replacing an element such as a starter in the video located just below, but it shows how to remove the starter from the top without crawling under the car, the article describes a slightly different method, which way you will go, it’s up to you to decide just for you, by the way, in addition to the replacement, this video also describes the test for the functionality of the starter in detail, although the entire operation is performed on a VAZ 2114 car, there are practically no differences from the tenth family.
Structural features
Drivers call a device such as a starter a starter, as it helps to start the car. It is practically no different from similar mechanisms. However, if you need to purchase a starter relay for a VAZ-2112, then you need to remove the part from the car and take the store with you. This element differs from similar ones in size. You can purchase a device from the VAZ-2111 or 2110 models, as it is completely identical.
On the twelfth model of the Zhiguli, the installed starter is of modest size. However, this small device is very functional. The technical documentation describes how the structure of the mechanism differs and where the VAZ-2112 starter relay is located. In the photo you can see the main and additional blocks.
These cars were equipped with injection power units with 16 valves. To prevent electrical current fluctuations, a relay is used. When the electrical circuit is turned on, this device passes current, gradually equalizing the voltage to a value of 80-340 amperes. This scatter of indicators is explained by the fact that the relay produces the first parameter in a resting state, and the second in operating mode. As soon as the vehicle stops, this circuit opens and the circuit shuts down.
The process of replacing the starter on a VAZ-2112
Old and new starter
We will need the new starter itself, keys “13” and “15”; we can also use heads and ratchets for convenience.
- First of all, remove the negative terminal on the battery (this is necessary for safety, to avoid a short circuit).
Unscrew the starter fasteners
Installing the starter is done in the reverse order, but for simplicity, here is a small and clear diagram of the connection to the starter relay:
Connection diagram of the starter to the car relay
Or according to this scheme:
More details here
What is a starter for?
Let's introduce a little theory about the ignition system and the starter itself.
The ignition system is necessary to start the engine; the starter itself is designed to create a powerful current (by passing, so to speak, through the starter winding). This is done so that this energy turns the flywheel half a turn.
This is interesting: Repairing small dents without painting
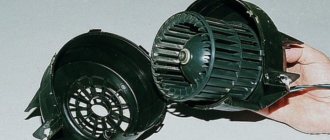
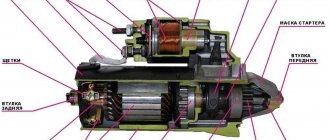
Main starter components:
You can see more details in the picture.
- Front cover with plain bearing.
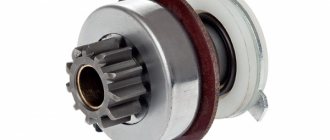
- Bendix (engagement drive).
- Planetary reductor.
- Rotor with collector.
- Housing with stator.
- Solenoid relay.
- Brush unit.
- The back cover has a plain bearing. You can see more details in the picture.
Reasons why it is necessary to replace the starter
- The solenoid relay armature is broken.
- Broken wiring.
- Short circuit to negative.
Most of these reasons can be diagnosed if you try to start the engine by closing the contacts on the starter.
Signs and causes of trigger malfunction
Fortunately, the element in question is not a non-separable structure and, having identified the cause of the breakdown, you can get by at much lower costs than replacing the entire assembled mechanism. Let's look at the signs and their corresponding malfunctions:
Removing and installing a starter on a VAZ 2110 car
The article describes a detailed step-by-step procedure with photo accompaniment for removing and installing the starter with its own rocks on a VAZ car.
If your car has problems starting, or the starter turns off on its own (the car stalls), or there is an incomprehensible sound (noise) when starting, then these are signs of a starter malfunction.
In this case, it is necessary to repair the starter or completely replace it with a new one. If there are minor consequences, then you can repair it yourself, although by opening it, you can always find and replace internal faulty or damaged parts, which will significantly reduce waste if you buy a new one. It is also not as difficult as it seems at first glance.
In any of these cases, you will still have to remove it and reinstall it. We removed the starter on a VAZ 2110; the procedure is similar on other models.
Required Tools
In order to carry out repairs yourself and replace the starter on a VAZ 2112, you need the tools from the table below.
Table - Tools required to replace the front strut
- VAZ 2107 starter relay: purpose, malfunctions and repairs
| Name | Note |
| open-end wrench | "at 13" |
| Spanner | "at 13" |
| Head | "at 15" |
| Ratchet | With extension |
| Rags and wire brush | To clean dirt |
| Penetrating lubricant | For example, WD-40 |
Instructions for removing and installing the starter:
1. First of all, disconnect the wire from the battery at the “–” terminal.
2. Dismantle the crankcase on the engine.
3. Next, from the top of the engine compartment you need to unscrew one nut that holds the starter mount.
4. The wire must be disconnected from the traction relay terminal at the bottom of the machine.
5. Unscrew one nut from the contact bolt of the traction relay and disconnect the wire.
6. The starter is secured from below with one nut, which should also be unscrewed.
7. Now calmly remove it and do the repairs. A new or repaired starter should be installed in the same way as it was removed, only in the reverse order.
Original parts and their analogues: which is better
Despite the fact that this vehicle model ceased production more than 10 years ago, it is not difficult to purchase original starters made by AvtoVAZ. Moreover, their quality is not always higher than their analogues. Original part:
| Manufacturer's name | vendor code | Options | Cost, rubles |
| AvtoVAZ | 2112-3708010. | 9 bendix teeth 3 mounting bolts | From 4 000 |
There are many analogues on sale from a variety of manufacturers. The cost fluctuates quite significantly. The following manufacturers have proven themselves to be good:
| Manufacturer's name | vendor code | Options | Cost, rubles |
| StartVolt | 2110-3708010-00 | 1.5 kW | From 2 800 |
| KENO | KNV-3708010-31 | 2 kW | From 3 000 |
| ELPROM ELHOVO | ST2110E | 1.5 kW | From 3 100 |
Bosch starters have proven themselves to be good. This manufacturer carries out quality control. There is no chance of purchasing a product that does not work. It should also be noted that different manufacturers may produce parts of different sizes.
For example, the Bosch starter is slightly larger than the KEHO starter. The price of the part will vary significantly depending on the manufacturer. The difference between the dimensions can be seen in the photo. Larger parts will be difficult to install.
Lada 2110 PhiX › Logbook › Repair and replacement of VAZ 2110 starter
Hi all. Recently the starter has started to work poorly. Sometimes it didn’t work the first time, the retractor shoots, but the starter doesn’t turn. Sometimes it would turn with a crunch.
I decided that it was the Bendix, but it turned out that it was not the problem, it was perfect.
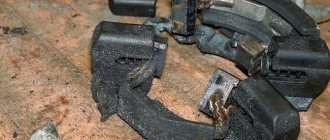
To begin with, I sentenced the retractor. Although it worked, the contact of the supply pin was burnt. The pin got so hot that it melted the attachment point. It is clear that this is most likely not a cause, but a consequence.
Further disassembly of the starter revealed a broken planetary gear. It is plastic, burst and crumbled. Now it’s clear why the starter jammed.
The cost of a new metal gear is 150 rubles. The cost of the assembled gearbox is 750 rubles. There is no point in taking it as a collection, because... All other parts of the gearbox are in excellent condition. I also purchased a tool to remove the retaining ring for RUR 170
I assembled the gearbox with a new metal gear. Lubricated it with CV joint.
I put the starter in place, and a miracle happened: the car started up normally.
But it was too early to rejoice; after driving for a couple of days, the problem partially returned. The starter sometimes jammed and in general began to turn noticeably slower. I had to take it off again. This time, I was not lazy and disassembled it completely. It turned out that the magnets had fallen apart.
Most likely, this happened as a result of the starter jamming on an old, broken gear and its subsequent overheating.
As a result, I didn’t bother with further repairs and bought a new, factory, KZATE gear starter for 3200 rubles.
Now it starts just fabulous. The new starter spins like a hurricane. I should have not been too lazy right away and disassembled the starter completely, it would have saved money and time. But there is also a plus: I gained interesting experience in repairing gear starters.
Measures to increase operational reliability
The complication of the electrical control circuit of the starter is inevitably accompanied by the introduction of new elements into its composition and an increase in the number of connections. To paraphrase a well-known rule, we state that electrical engineering is the science of contacts. When installing a relay, we take special measures to ensure that the circuit it implements works flawlessly for a long time. To achieve this, the process of upgrading the circuit and making the connection requires:
- tighten the fastening nuts tightly;
- do not allow contamination of the relay contacts on which the tips of the connecting wires are placed;
- use wires of minimal length without forming loops;
- It is advisable to form the circuit wires in the form of a bundle with fastening with clamps at the maximum length;
- the resulting bundle is placed in a corrugated hose to protect it from mechanical damage;
- It is advisable to protect the relay contacts from splashing water with heat-shrinkable tubing and/or electrical tape.
This is interesting: Necessary tools and equipment:
The fuel pump does not work, the relay turns on.
Checking relay power.
In the case when the fuel pump relay turns on when the ignition is turned on, but the pump itself does not work, you need to check the power at terminal 87 of the fuel pump relay. To do this, touch terminal 87 of the relay socket with the output of the control lamp connected to the vehicle ground, and the lamp should light up. If the lamp does not light, it means the fuse has blown or there is a break in the wire.
If there is power at terminal 87, you should remove the relay from the socket, and instead place a jumper between pins 87 and 30. In this case, if the pump and connecting wires are working properly, the pump should start working and if this happens, the relay should be changed. If the pump does not start working, then, without removing the jumper, you need to touch the power wire on the fuel pump with a test lamp connected to the vehicle ground.
Checking the fuel pump power circuit.
If a submersible pump is installed on the car as part of the fuel module, you need to remove the connecting connector and touch one of the thick wires. When you touch one of them, the indicator lamp should light up. If the lamp does not light up on any of the wires, then it is necessary to eliminate the break in the wire from the fuel pump relay to the module connector or the pump itself, if the pump is of a remote type. One of the reasons for the break may be the anti-theft blocking of an installed non-standard alarm system.
In the case when the test lamp lights up on one of the thick wires of the connector or one of the terminals of the remote pump, you need to connect these terminals with a test lamp to each other. In this case, the control lamp should light up. If the lamp does not light, it is necessary to eliminate a break or poor contact in the wire connecting the pump to the vehicle ground.
If, when checking the wires and relay for turning on the fuel pump, no malfunction is detected, the electric motor of the fuel pump or its connection to the module connector is faulty. It is not difficult to find the cause by removing the fuel pump module from the tank. If there is poor contact with the connector, melting of the plugs will be visible. If melting is not noticed, then to check the pump itself, you can connect it to the battery. It should be taken into account that operating a submersible pump without liquid will damage the pump. A faulty pump should be replaced.
Additional fuses and relays are located to the right of the center panel. Unscrew the screws and remove the cover:
How to repair a fuel pump on a VAZ 2112?
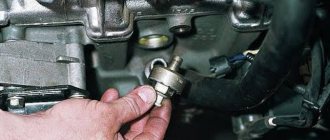
Note! Before you say with certainty that it is the pump that has become unusable, you should check whether your fuel filter is dirty and not the pump but the filter itself needs to be replaced, or due to dirty injectors, in principle, all the same symptoms may occur, so to If the pump is more likely to be at fault, first check the pressure in the power system and finally, thanks to this check, you will be able to identify the malfunction! (You can learn about how to check the pressure in the article called: “Checking the pressure in the fuel rail on a VAZ”
Disassembly: 1) Before you begin disassembling, you will need to remove the pump itself; for this you will need wrenches and one screwdriver; for more detailed instructions on how to remove this pump, see the article: “Replacing the fuel pump on VAZ cars”!
Note! Don’t forget to look into the car’s tank when you remove the pump, there is just a storage cup at the very bottom of it, you can still see it in the large photo below, it can be disconnected from the pump module and remains in the tank, so you will need to remove it from there and install it back on the pump in its place (It is held on by clamps), but you are going to disassemble the pump, so you do not need to install it, and if it remains on it, then by pulling it down, disconnect it and thereby remove it!
2) Now that the pump is removed, take the screwdriver in your hand again and use it to unscrew the two side screws (Indicated by arrows in the photo below) that secure the fuel level sensor to the pump module. After unscrewing, you can remove the sensor from the module and put it aside. (A float is installed at the end of the sensor; you can see it in the small photo below, so take a look at this float; it must be intact and free of wear, otherwise, for example, if there is a hole in it, then this sensor will no longer correctly indicate the fuel level will be and you will have to replace it with a new one)
Note! Also, do not deform the sensor itself and be careful with the rod that holds the float, because if it breaks, the fuel will also not be displayed, and if it bends, the fuel level will not be displayed correctly, so be careful with the sensor!