For a number of reasons, it becomes necessary to remove the interior mirror: windshield replacement, mirror repair, installation of additional equipment, windshield tinting, etc. That being said, it is important to know how to remove the mirror from the windshield and reattach the rear view mirror when reinstalling it.
To dismantle and install the rear view mirror you will need:
- remove clamps and clamps;
- heat the adhesive base or use a string;
- prepare the surface, use the appropriate type of adhesive for installation.
At first glance, the procedure is not complicated. However, there are a number of nuances that you need to pay attention to in order not to damage the glass and/or mirror during removal and to obtain reliable fixation during installation. Read more in our article.
When is it necessary to remove an interior mirror?
You may need to remove the mirror from the windshield of your car for a number of reasons. As a rule, the windshield mirror is removed:
- when replacing a windshield;
- for repairing electronics built into the mirror;
- to solve problems with mirror mounting (extraneous sounds, vibrations);
- as part of car windshield tinting;
- when replacing the rear view mirror itself;
- for the purpose of installing additional equipment in the area of the rear view mirror, etc.
In this case, the main task is the safety of the mirror and windshield when performing certain work. To perform all the work correctly, you need to know how to remove the rear view mirror.
Tuning Kia Koup interior mirror
After purchasing the car, the question arose about installing rear parking sensors, the indicator screen of which is located in the cover on the interior mirror.
The cover is made in the form of a mirror on a salon mirror, pardon the pun.
In principle, the idea is good, but the implementation of the Chinese leaves much to be desired. The mirror is fixed using 4 claws on springs that wrap around the standard mirror. And all this works while the mirror is new, but after half a year in the heat and shaking it begins to fly off this mounting option. In addition, the mirror shakes when moving, although it is not particularly bulky.
I had already solved this problem earlier on a previous Galant EA car by making a custom mirror out of two – a standard one and an overlay.
Foreign and domestic cars: mounting the rear view mirror
Many domestic cars produced before 2010 are not particularly difficult to mount a rear view mirror. To understand how to remove a mirror from the windshield, just carefully examine the design:
- there are a couple of bolts closed with plugs;
- the plugs are removed, then the bolts need to be unscrewed;
- after unscrewing, you can remove the mirror from the windshield;
- Additionally, it may be necessary to degrease the mirror mounting area;
- After performing repairs or other manipulations, you will need to tighten the bolts (the main thing is not to move the “patch” on the windshield).
As for foreign cars, in this case it is more difficult to remove the mirror, since it will require a lot of effort and accuracy. It is important not to put pressure on the glass itself, and also not to damage the mirror. The dismantling process is as follows:
- the mirror mounts have plugs that will need to be removed;
- then the mirror is pulled up (towards the ceiling);
- care must be taken not to break the fastening or damage the ceiling in the cabin;
Also, foreign cars often use a separate rear-view mirror lock in the form of a latch or “step” (lever). In any case, by pressing the lock, the mirror can be removed from the bracket.
In any case, having removed the element from the car, you can then disassemble the rear view mirror, replace the mirror element, carry out repairs, install additional equipment, etc.
At the same time, repairing mirrors after removal is not difficult, since after disassembling the case, access to all elements opens. The only caveat is that you need to know how to disassemble the rear view mirror. To do this, it is recommended to separately study the design on a specific car model.
How to install and secure heated side mirrors
To assemble and connect the side mirrors yourself, you will need minimal electrical knowledge and dexterity. You must act in the following sequence:
- A set of mirrors equipped with an internal heating system is purchased.
Heated mirrors for Lada Granta - The standard side mirrors are removed from the car in the manner described above.
- After installation, the top cover on the side mirror housing opens. This gives access to the wiring socket (it is supplied with the mirrors).
The side mirror housing is opened and the electrical wiring is connected. - The wires are connected to the socket and inserted into the door through the mirror housing.
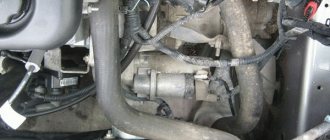
- Use a Phillips screwdriver to remove the plastic trim from the door.
Plastic trim removed from car door - The wiring runs through the door and dashboard to the fuse box, next to which there is a relay with a plug for turning on the heated mirrors.
Mirror wiring is connected to the heating relay - The wiring plug is connected to the socket shown in the photo, after which the car door trim is reassembled.
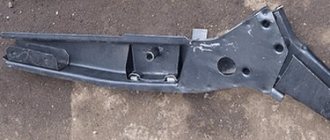
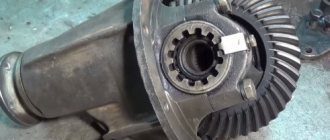
How to remove the rear view mirror bracket from the glass
As for the bracket, unlike the mirror itself, it is very difficult to remove it from the glass. The reason is that the bracket is glued to the glass using special glue.
Unless there is an urgent need, it is better to immediately abandon the decision to remove the bracket. If dismantling is unavoidable, you should pay attention to the recommendations discussed below.
- First of all, to remove the mirror mount from the windshield, you should not try to tear it off using force. Great force can cause the windshield to simply crack.
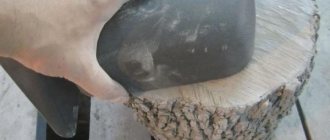
- To remove it, you need to heat the glue using a hair dryer, warming up the glass. Then use pliers to carefully remove the bracket.
The windshield at the location of the “patch” is heated in a circular motion, parallel to the pliers, the mount must be moved from its place, swinging in different directions (do not pull on yourself!)
Be careful, as once removed from the glass, the hot bracket may fall into the interior, damaging its parts, and may also cause burns if it comes into contact with the skin. You should prepare a rag in advance to hold the hot bracket through it.
After removing the element, the place where it is attached must be cleaned and degreased so that after finishing the work you can reliably glue the patch back.
Disassembly procedure
Once the structure has been removed, disassembly can begin. If it is required, of course. Perhaps you have found a new mirror whose price suits you completely. Then you can skip this point.
If it is necessary to disassemble an element, we start from whether it is internal or external.
The interior mirror is disassembled as follows:
- there is a place where the glass and the body are connected;
- spin is inserted;
- pressed with little force;
- a gap appears;
- use a mediator to pass along the entire length of the gap;
- the body is divided into 2 parts;
- the mirror is removed;
- everything else is located underneath it;
- We carry out the necessary work.
You may also need to disassemble your car side mirror.
It doesn't matter whether left or right
The task here is to remove the reflective element. Be prepared for the fact that the instructions below will not fit your specific car. There are cars on which everything is not quite like that. Sorry here, the guide is not universal.
But it is the following scheme that is suitable for most cars.
- Using a hairdryer, the area between the case and the glass is heated;
- Do not heat to high temperature. Use a household hair dryer on medium power;
- Use a flat-head screwdriver to separate the body into 2 parts;
- Sometimes it is necessary to bend the terminals;
- If you are afraid of damaging the mirror, wrap the instrument with electrical tape;
- On some cars you need to slightly press the mirror to the center and move it to the side;
- The glass is carefully removed;
- Remove the screw from the plastic frame, if there is one;
- Under the frame we see the entire mechanism;
- Use a screwdriver to remove the broken structure and replace it with a new one.
That's it, the work is almost completed. But since we disassembled everything and changed the necessary components, now we need to assemble the structure and install it back on the car.
https://youtube.com/watch?v=MXU1IOJ-Vzs
Installing a mirror on glass: how to glue it
To attach the mirror to the windshield, you need to properly prepare the surfaces and select the adhesive. The installation site should be degreased (alcohol will do). The patch on the bracket is also cleaned and degreased.
Regarding the adhesive base, there are different types of glue:
- chemically or light-curing adhesive base;
- adhesive compositions based on epoxy resins.
At the same time, not all types of glue can be used to mount the interior mirror mounting bracket on the glass. Please note that you cannot use glue, superglue, double-sided tape, etc.
The fact is that these types of glue and tape are not designed for high temperatures. After the windshield warms up in the sun, the rear view mirror will simply disappear.
How to glue a mirror in the salon
To attach the interior mirror, it is optimal to use glue that hardens under the influence of chemicals. This adhesive base can be two-phase (the adhesive must be treated with an activator after application) or active single-phase.
Epoxy glue also holds well, but takes a long time to dry and requires strong pressure on the surfaces being glued. In the case of a salon mirror, this option will not work.
We also recommend reading the article on how to clean the air conditioner in your car yourself. From this article you will learn how to clean a car air conditioner yourself, how to clean the air conditioner in a car, etc.
In turn, glue that hardens when exposed to light will also not be effective without a special lamp. The reason is that it hardens in ultraviolet light, while sunlight or artificial lighting does not affect the gluing process.
Installing a rear view mirror on glass
After selecting the glue, you can proceed to installing the bracket. All work must be carried out at a temperature of about +20 degrees Celsius.
- The mirror holder is cleaned of old glue, the gluing area must also be roughened using fine sandpaper and degreased;
- The place where the holder is attached to the glass is processed in a similar way;
- Apply a small layer of glue to the mount;
- An activator is applied to the windshield at the gluing site;
- During gluing, you need to accurately hit the mounting pad on the holder at the place where the activator is applied;
- Apply slight pressure on the gluing point for the time specified in the instructions for the adhesive;
- After gluing, it is necessary to remove any remaining adhesive or activator from the glass and holder using a degreasing agent.
- It is better to install the mirror on the holder one day after gluing the bracket.
We also add that it is not advisable to park the car in the open sun or leave it in the cold for 2-3 days so that the glue dries normally and does not suffer from severe temperature changes.
You should also avoid for several days the stress that the mirror on the windshield is usually subjected to (after gluing, do not touch it with your hands, do not adjust the mirror with great force, etc.).
Restoring a headlight reflector: the best way, do it yourself
- curved screwdriver;
- flat screwdriver;
- wrench to match the size of the fasteners;
- hair dryer;
- degreaser;
- rags;
- high-quality glue;
- some free time;
- clean garage;
- good mood.
Add to this set of tools a couple of skillful hands, and everything will go great.
As you understand, rear and interior mirrors are removed differently.
Work in the salon
Let's start with the interior design. A lot depends on what kind of car you are working with.
Automakers use different mounting systems. Therefore, start from the specific situation. So, for example, different fasteners are used on cars such as:
- Deo Lanos;
- VAZ 2110;
- Niva Chevrolet;
- Ford Focus;
- Renault Logan;
- Chevrolet Cruze;
- Lada Priora;
- Lada Kalina;
- Hyundai Solaris, etc.
Still, owners of inexpensive cars mostly do this work on their own.
And here you may encounter glue and suction cups, or bolts and screws. These are the most common installation methods.
Domestic cars mostly come with bolts. Therefore, it will be easy to remove the structure. The plug is removed, the key is taken and the fasteners are unscrewed.
But there are also brackets glued to the glass. Here you will first have to figure out whether it is actually possible to separate the fastening element from the glass. Most often, designers use clamps or rotating mechanisms. If this is not possible, you will have to remove not only the bracket, but also the windshield itself. The glue holds the element very tightly, and therefore it will not be difficult to damage the front cover.
Please refer to the instruction manual. There you will probably find a hint on what exactly to do in this situation. Sometimes it’s better to visit a car service center, where specialists will do everything carefully and clearly.
Side dismantling
Everything is clear in the cabin. Now you need to dismantle the exterior mirror structure. Left or right, it doesn’t matter much here. What is more important is what type of design is used. The side mirrors are power driven. And it can be mechanical and electrical.
Almost any car is structurally designed to allow access to fasteners through the doors. You just need to remove the casing. Again, look in the manual for your car, since there are no universal instructions on this matter.
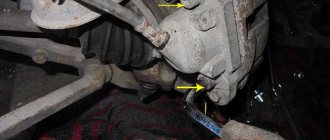
If you have a mechanical drive, then:
- The locking bracket of the existing regulator is removed;
- The fastening screws are tightened on the inside of the door;
- The mirror itself is removed.
In the case of an electric drive, everything is somewhat different. You need:
Recommendations
- If the mirror holder is glued to the glass with epoxy glue (rubber), this glue is simply heated and the coin is gradually torn off from the glass.
If the penny is held on by glass glue, in this case the adhesive base is cut off with a string. When heating the windshield at the mounting location with a hairdryer, it is important to remember that the glass is fragile. Strong heating or sudden temperature changes should not be allowed, especially at one point. - Experts recommend turning on the glass heating to warm it over the entire surface, and only then heating the place where the mirror is attached.
- When working with glue, it is important to be careful and accurate.
Also, mistakes are not allowed when gluing, since it will not be possible to move the holder after the glue has hardened. We also recommend reading the article on how to remove a car radio without keys. From this article you will learn about available methods for removing a car radio without a key. - Before removing the rear view mirror, it is important to make sure that various devices and elements are not connected to it: cameras, video recorders, parking sensors, light and temperature sensors in the cabin, etc. Errors during dismantling can lead to breakdowns and malfunctions of such devices.
Common device problems
Let's look at a few troubles that every car enthusiast may encounter.
Peeling off the mirror surface
Sometimes this kind of trouble happens even on new cars. The reasons can be very different.
- the manufacturer decided to save money and used a low-quality adhesive;
- during the work, the master did not allow the glue to set properly;
- the mirror came unstuck due to too sudden temperature changes (and this is the most common reason, especially in frosty winter).
In all these cases, the car owner will have to use two-component glue, as shown above.
Glass replacement procedure
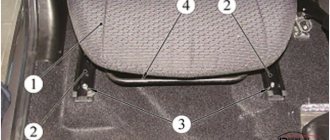
The mirror element of both the exterior and interior mirrors may be damaged. Below is the sequence for replacing it:
- The glass is removed from the mirror body.
- The new mirror element has several plastic hooks (in our example there are 4). These hooks are inserted into the mounting holes in the mirror body, after which you need to press very carefully on the mirror element.
The new mirror element is installed into the mirror housing manually - A characteristic click will be heard, indicating that the plastic hooks have engaged and the glass has “settled” into place.
The procedure for replacing mirror elements in interior mirrors is similar to that given above (the only difference is that there are usually 2 plastic latches in the interior mirror, not 4).