VAZ cars, despite their age, are still popular among car enthusiasts. Based on the number of shortcomings of domestic cars, owners are forced to resort to improvement and modernization of certain elements of vehicles. This article will talk about tuning the VAZ-2107 stove, since it is the weak link of the vehicle.
It often happens that the standard VAZ 2107 stove cannot cope with severe frosts
Everyone knows how important the heating system of a car is for the comfort of the driver and passengers during cold winter periods. Freezing windows and cold in the car create great discomfort. Let's look at the main options for improving the vehicle's stove.
You can improve the operation of the heating system on the “seven” in the following ways:
- redo side window ventilation;
- modernize the damper;
- modify the foot airflow system to increase its efficiency;
- improve the operation of the rear cabin heating system;
- modify the thermostat;
- improve the functioning of the steam exhaust line;
- install an additional water pump.
User Egor Panther spoke about options for upgrading the heating system in VAZ 2107 cars.
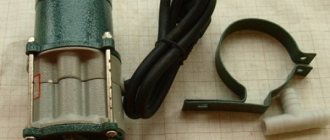
Improved side ventilation
The side ventilation system needs to be modified after purchasing an additional fan. The device is mounted in the left line, which will allow forced air flow to the deflector.
The tuning procedure looks like this:
- At the first stage, the deflector device is dismantled from the main line. To perform this task you need to use a screwdriver. The deflector in the cabin is pryed up and removed; it must be pulled forward. Similar actions are performed on the other side of the stove.
- Dismantling the device is carried out carefully so as not to leave any traces of damage on the center console.
- If the deflector is removed, it is necessary to remove the holding device from the dashboard. This element is mounted in the center console using special antennae. The essence of this modernization is that a classic computer fan is installed to force air flow into the heating system.
- To install the ventilation device, the element must first be fitted to the deflector body. After applying it to the plastic with a marker or pencil, you need to apply markings. Using a utility knife, a cut is made in the plastic on the deflector.
- If the dimensions are marked accurately, the ventilation device will be tightly installed in the housing. This is important, since such installation will prevent the part from loosening while driving.
- After completing the installation of the fan, you need to make sure that its blades rotate normally and nothing interferes with them. If problems arise, the device is adjusted. If necessary, the blades can be trimmed a little.
- To ensure efficient air flow and no backdraft, the entire structure must be sealed. Therefore, using sealant or the remains of plastic that appeared after cutting the deflector, the cracks are clogged.
- If all steps are completed, the ventilation device is installed in the main line area, and then mounted on the body of the deflector element.
- After completing all the installation steps, you need to work with the electrical component. It is recommended to connect the fan electrical circuit to the conductor where the current appears when the ignition is activated. This option is more convenient. It is possible to connect the device to the heating unit control cable.
Damper modernization
Modification of the VAZ 2107 stove, which consists of upgrading the lower damper of the system, is the easiest option to implement. If all actions are performed correctly, the device will not open or close randomly when the car drives over bumps. This will ensure efficient and equal airflow on both glasses.
The upgrade procedure is carried out as follows:
- It is necessary to visually evaluate the housing of the heating unit. In its corner there is a hole of the required diameter to carry out the work. If it is not there, then it is drilled. For this, a drill with a diameter of 6 mm is used.
- A bolt is installed into the hole made from the inside. The valve itself closes.
- After this, using the same drill, a hole is drilled directly into the handle of the device. It is necessary to drill so that the hole is located at the level of the bolt installed earlier. In this case, the length of the screw must be such that when lifting the damper, the element can freely fit into the hole made.
- If everything is done correctly, the bolt is tightened with a nut. It is recommended to use a black part, then it will be difficult to see.
User Nail Poroshin spoke about the features of modifying the air damper thrust.
Rear seat heating system upgrade
To modernize the rear seat heating system, you will need to install an additional “snail”, which can be used from the VAZ 2108:
- First you need to make a housing to fix the “snail”. To perform this task, you need to cut plexiglass.
- Using a regular hairdryer, you need to carefully make bends on the glass so that it turns out as shown in the photo.
- Then, using a hair dryer, you need to carefully change the shape of the case. It is necessary to act carefully, otherwise the “snail” may not fit into the landing site.
- When completing the task, you can remove the device plug using a utility knife. This will reduce the dimensions of the part by approximately 3 cm.
- Then the side walls of the structure are manufactured. For this you can use duralumin or other similar material. The wall thickness should be 1.5 mm.
- The next step is to remove all the cracks. To do this, the joints of the device must be sealed using adhesive-sealant or other means.
- Then you need to work with the channels through which air will flow to the blower openings. It is recommended to make these elements collapsible. For manufacturing it is desirable to use a similar material.
- In order to reduce the amount of resistance and remove turbulence, the turns of the air channels must be smooth. They can be made from duralumin.
- At the next stage, we need to build slots that will be used to warm the feet. We are talking about front airflow - for the driver and passenger. The slots must be equipped with shutters. You can additionally install a variable resistor device, which will be used to regulate the speed of the electric motor. This element can be used instead of a resistor designed to change the brightness of the backlight.
- The main stage in this modernization is the construction of a system for effectively heating the feet of passengers sitting in the rear. To do this, it is necessary to additionally install several longer pipes. The radiator device is quite powerful and its power will be enough to supply air flow back. All connecting points of lines and blowers are sealed to prevent leakage of warm air flow.
Using a hair dryer, a body for the “snail” is made from plexiglass
Removing the snail plug
Modernization of the housing for the production of air channels
We recommend: Removing the driver's door trim
Improved foot airflow efficiency
To improve the efficiency of blowing the legs, you will need to replace the standard fan with another; you can use a device from a VAZ 2108.
The upgrade procedure is performed as follows:
- The first stage is performed inside the car. It is necessary to dismantle the lower part of the heating unit. A standard ventilation device is installed here.
- The fan is being dismantled. It will no longer be needed and can be recycled.
- Next, the plastic ridge is cut, which supplies the air flow to the floor of the machine. On “eight” units, the fan motor is larger in size.
- A ventilation device equipped with two blades is dismantled. A knot with five elements will be used instead. Before installing a new device, it is necessary to diagnose the quality of its operation. To do this, the node is connected and checked.
- If the device works correctly, then it is installed instead of the old one. After installation, the unit must be properly fixed. This will prevent the negative impact of vibrations during movements and rapid failure of the device.
- In order for the ventilation unit to function more smoothly, it is necessary to replace the resistor element. This is due to the fact that the device allows for a larger volume of air flow and operates noisier. Therefore, a resistor element is installed, which can be used from a VAZ 2108.
- The buttons, as well as the control components of the ventilation device, must be replaced with new ones. It is allowed to use parts from the VAZ 2108. The standard key from the “seven” is suitable in size and mounting. But it quickly fails as a result of a large difference in current. At this stage, the modernization procedure can be considered complete.
Modification of the thermostat
Thermostat from a Chevrolet Niva car
The procedure for modifying the thermostat on a VAZ 2107 involves replacing the standard device with a part from a Chevrolet Niva:
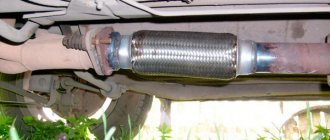
- First, the refrigerant from the cooling system is drained. The car engine warms up, a container is placed under the heater tap and the liquid is drained.
- The engine compartment is opened, the thermostat with the lines connected to it is dismantled. It is necessary to disconnect the outlet pipe located at the bottom; it goes from the radiator device to the element being replaced. The bypass line is disconnected; it is installed on top, as well as the hose going from the thermostat to the pump. The condition of these pipes is assessed. If they are worn out or damaged, then new ones must be prepared.
- The refrigerant outlet pipe and the copper pipe are disconnected. The last element is unscrewed from the pump; to do this, you need to unscrew two nuts and remove the flange from the studs.
- The lower removed line is taken and the middle part is cut out of it. The length of the segment should be about 7-9 cm.
- A new thermostat device is being installed. Its connection is made using a pipe with a water pump. The hose must be slightly bent in advance.
- Then a thick pipe from a VAZ 2108 is taken and adjusted to the place where the lower standard hose was installed. You need to cut off identical parts from both ends of the element and connect it to a new device. In principle, it is also possible to install a standard line, but this option is simpler.
- The upper hose is being installed; we are talking about a standard pipe.
- Instead of the dismantled line, a plug is made; it went from the heating unit to the water pump. To do this, you will need a copper tube; a connecting flange is soldered off from it. A sealing element is made from rubber, then the surface of the pipe is treated with sealant. The structure is screwed back to the water pump.
- The next step is to connect the pipe that removes the refrigerant from the heating device with the inlet on the thermostat. To complete the task, take a dismantled copper hose, remove the excess part, then bend it a little.
- A bracket is made that will be used to fix the pipe to the exhaust manifold device.
- The outlet line from the heating unit with the hose, which was previously disconnected, is connected. The output from the stove remains the same, but the input will go not to the pump, but to the thermostat.
- The end of the line with the corresponding input is connected to the thermostat device; this will require a shorter and curved pipe. It is used to remove refrigerant from the cylinder head to the heating unit. This element must be adjusted to length in advance. Difficulties may arise when using an aluminum thermostat because the walls of such devices are thicker. This means that the line must be used with a large diameter.
- The thin pipe of the heating system of the intake manifold is fixed to the thinnest outlet of the thermostat. First you need to disconnect the end going to the lower line from the heating device to the water pump. The pipe is measured and, if necessary, the excess part is sawed off. The connection point is treated with sealant. To prevent leakage, the volume of glue must be large.
- Then the junction of the pipes and the thermostat is tightened using clamps. Refrigerant is added to the heating system. The engine is started. If an air lock has formed in the system, it must be removed.
We recommend: Do-it-yourself refilling of car air conditioning
Valery Imenov spoke in detail about installing a thermostat from a Lada Granta car on classic VAZ models.
Installing an additional pump
Installing another pump on the heating unit will provide better heating of the car interior. Typically this device is installed next to the battery and pipes in the engine compartment. When performing the task, it is necessary to dismantle one line coming from the cylinder block. This pipe is connected to an additional pump. From the cylinder block, the line should go to the front of the water pump, and the outlet pipe will connect to the heating system.
The power supply to the auxiliary pump is taken from the activation key for the rear window heating system. This will allow the device to turn on together with this node. There is one positive conductor coming from the electric motor of the additional water pump. The negative contact is the mass of the device.
To provide power to the pump, do the following:
- The first connector with conductors is dismantled. Several electrical circuits are connected to it. The gray conductor is designed to activate the rear window heating system; this is the main cable.
- The power cable from the water pump is connected through this wire. The cable itself is led out into the engine compartment through a technological hole.
- For better fixation of the conductor, it is recommended to solder the contact element.
- Once the pad installation is complete, the auxiliary water pump is ready for testing and operation.
The Avtopodogrev channel spoke about the installation and features of connecting an additional pump on classic VAZ models.
If necessary, connecting the water device can be done using another method:
- To complete the task, you will need a block from the injectors or a detonation controller. This item can be purchased at any auto store.
- Two conductors are soldered to the ends of the block, and then the cables are installed in a corrugation and wrapped with electrical tape.
- Then an electrical circuit is drawn out to connect the ground; you can use any conductor available on the bracket near the installation site.
- The harness itself is installed upward, the resistor elements of the heating unit are connected to the connector where the positive contact was taken. This will automatically activate the water pump, which draws about 1.5 amps during operation. This connection method allows you not to use additional relays and connect directly to the positive output in the connector.
Many car owners install not “VAZ” pumps, but “foreign-made” pumps on their cars. You can use device model 0392020034 from the manufacturer BOSCH. The productivity of such a pump is 750 liters per hour, but additionally you need to purchase clamps, as well as about 10 meters of corrugation. Before performing the task, be sure to drain the refrigerant from the system.
The difficulty of installing a branded water pump is that the diameters of the hose and fittings of the device do not match. The first is 1.6 cm, and on the pump - 2 cm. Therefore, it is recommended to use more elastic hoses. This will allow you to tighten the line onto the fitting. For better passage, the element can be treated with motor fluid.
The problem with the stove tap and its modernization
The first problem area of the VAZ 2114 is the valve at the antifreeze inlet into the stove. On the one hand, its undoubted advantage is that if you accidentally break off the fitting on which the pipe is placed, it is enough to replace the tap. For example, on most foreign cars produced in the 90s, these fittings are an integral part of the heater radiator. If they are broken during repairs, you will have to replace the entire radiator. But on the other hand, due to this design, the quality of coolant circulation is much worse. And that means comfort from being in the cabin.
In addition, the supply of hot antifreeze for the stove is controlled mechanically on the VAZ 2114 using a cable. And this cable becomes dirty and “pulled out”. The fastening of this cable itself may weaken over time. As a result, the stove will not work properly.
Usually, if problems arise with cold air from the stove, it is recommended to tighten the cable.
Adjusting the heater tap cable
The problem arises due to the general unreliability of the mechanical cable system for controlling the interior heating controls on the VAZ 2114. We have already talked about this. Loosening or pulling the cable over time leads to the fact that the stove tap no longer closes (opens) completely when moving the slider on the control panel.
To solve this problem, you need:
- Find the control cable for the stove tap. It runs under the panel near the gas pedal.
- Pull the cable so that when the damper is fully open, it also opens fully. Sometimes, with a strong stretch, the cable is shortened a little for this purpose. Do not overdo it, otherwise the tap will not close. Warm air will continue to blow in summer.
This basically works. But it may happen that you have to tighten it regularly. Often the problem returns periodically. The fundamental measure to solve it is the following method: removing the tap from the system.
Removing the stove tap
This modernization allows you to exclude an “extra” element from the system, improving the overall efficiency of the system (by improving circulation) of the VAZ 2114.
The operating procedure is as follows:
- Remove tap.
- Make (you can’t do without a lathe) a tube of the required shape, connect the pipes to it.
- To improve circulation, a pressure pump is additionally installed in the system (this is standardly installed on GAZelle, you can find it in GAZ spare parts stores). The pump runs on electricity. We recommend turning on power to it through a switch installed in the cabin in order to be able to forcibly turn on the pump if necessary.
We recommend using this tuning method only in regions with cold winters (where the temperature is around -20 degrees Celsius or lower for more than one and a half months a year). In all other regions, a standard stove should be enough!
Diagram and design of the heating system in the VAZ-2110
The heating unit itself is represented by several components:
- Electric motor. A ventilation device is fixed on it, designed to pump a hot air flow.
- A radiator device, the failure of which will lead to the inoperability of the stove. On old-style heating systems, the radiator assembly is not equipped with a valve designed to shut off the flow of coolant through the device. Therefore, the unit practically does not leak, since leaks are usually associated with the faucet. The absence of this element ensures the fastest heating of the car interior.
- Three dampers. One of them is designed to close and open the heating channel, the second is used for recirculation, and the third is necessary to control the heater.
- The resistor device is designed to regulate the blowing speed.
Components of the heating system The main parts of the heating system for the interior of the VAZ 2110 car:
- 1 - electro-pneumatic valve device;
- 2 — front housing of the air intake of the heating unit;
- 3 - water deflector device, presented in the form of an air intake flap;
- 4 — valve device for controlling the damper of the air flow recirculation system;
- 5 — recirculation system damper;
- 6 — rear part of the air intake housing of the heating unit;
- 7 — heating channel damper;
- 8 — damper of the heating unit control system;
- 9 — radiator unit;
- 10 - protective plastic casing of the radiator device;
- 11 - bushing installed in the steam outlet pipe;
- 12 — bushing for the supply line of the heating unit;
- 13 — bushing of the outlet pipe;
- 14 - electric motor of the heating system;
- 15 — electric motor housing;
- 16 - supporting surface of the damper drive lever used to control the stove;
- 17 — drive handle for controlling the damper of the heating system;
- 18 — gear motor of the drive device, presented in small sizes;
- 19 - resistor element;
- 20 - protective cover for the heating unit lining.
Connection diagram for blowers and controls
Main components of the stove:
- 1 - air ducts designed to warm up the rear of the car;
- 2 — plastic lining running from the center console to the rear seats;
- 3 - blowers designed to blow feet;
- 4 - main nozzles for ventilation of the car interior;
- 5 — side nozzles for interior ventilation;
- 6 — nozzles intended for heating the glass installed in the front doors;
- 7 — control knob for the interior heating unit;
- 8 — plastic housing of the air distribution device;
- 9 — damper for the foot warming system;
- 10 - plastic flap designed to warm up the windshield;
- 11 - heating unit.
The difference between old and new stoves
Old and new type heating systems have some features in connection diagrams as a result of the following differences:
- Radiator design. Heats in cars of different years of manufacture have different radiator assembly designs. In older heating systems, radiators are equipped with taps to drain the refrigerant.
- Different designs of SAUO controllers. Cars manufactured before 2003 used five position controllers. In newer versions of the car, devices numbered 4 and 5 were removed from the design.
- Micro-gearbox design. The main difference is the different type of resistor elements. When replacing elements, you need to consider whether these parts are interchangeable or not.
Problems with stove dampers and their modernization
Another problem with the VAZ 2114 stove is the operation of the dampers. In the car, their position is regulated by three more cables. They also tend to become loose and malfunction over time. An indicator of a violation of their adjustment is the fact that hot air comes only from the central air duct, while cold air goes to the passenger seats and to the front window heater.
Adjustment of these cables is carried out similarly to the cable of the stove faucet. When the slider is moved to the extreme right, the dampers should be fully open.
If you plan to adjust the heater while replacing the radiator, you should also pay attention to the condition of the dampers themselves. If they are not airtight, they should be glued with foam rubber or any other insulation. Any leaks lead to the dilution of the hot air flow with cold air and, as a result, to a deterioration in the operation of the stove.
Correct modification of the left deflector
The left deflector (driver's) is located farthest from the hot air entry point. As a result, all losses affect him more than anything else. It also happens that there is warm air everywhere except it. Naturally, the driver will not like this much, especially if he usually drives alone in the car.
To improve the heating system and provide the driver's air duct with a sufficient flow of warm air, an additional fan is installed in it.
A computer processor cooling fan is ideal for this purpose (it can be bought at any computer store, it costs about 500 rubles). They come in different sizes and power, choose the right one based on the supply on the market. Or if there is an old computer somewhere in the garage, take it from there - it will do.
The order is:
- Pull out the deflector.
- Prepare a hole for installing the cooler.
- Prepare the wiring. If an additional pump is installed in the system, it is worth installing the power supply through the same switch. You can make a separate switch or, as a last resort, connect it from the ignition. It will turn on automatically when the engine starts.
- It is important to completely seal the remaining holes, otherwise the expected result will not be obtained.
By performing all these manipulations, you can achieve restoration or even significant improvement in the operation of the stove. If your work involves constantly moving around the city by car, these measures are simply mandatory.
Causes of malfunctions
Depending on the design of the stove, the damper may cause a disruption in the efficient operation of the heater for the following reasons:
- deformation;
- wear of seals;
- deterioration or damage to control levers and rods;
- skew.
Deformation is a problem with old-style heaters. The first dampers of the VAZ-2110 stove were equipped with plastic elements that bent under the influence of temperature. Because of this, even when completely closed, cold air from outside leaks in and mixes with the heated air, and the efficiency of the stove decreases. Subsequently, the designers replaced the plastic flaps with aluminum ones and the problem with deformation disappeared.
To ensure tightness, the dampers have seals that reduce air leakage. Initially, foam rubber seals were used, which quickly wore out and became damaged. Later, foam rubber was replaced with rubber, but this only extended the service life of the seal; over time, the rubber ages, cracks and collapses.
Some checks and tests
However, before you start disassembling the stove and making technological changes to its operation, find out that other components of the system are working correctly. Improvements will not yield results if the problems lie elsewhere.
- Make sure the pump is working properly. Breaking off the impeller impairs heat transfer. If the car begins to overheat frequently in the summer, and the heater does not work well in winter, this may indicate this problem.
- Make sure the thermostat is working properly. If it is stuck closed, the stove does not heat up at all. Antifreeze does not go into a large circle. If it is stuck open, the car (and with it the stove) heats up very slowly, the air comes out only slightly warm.
- Make sure the stove fan is working. It should work in all speed modes.
- Make sure your cabin filter is not clogged. Where is it? This is probably your problem. Open the hood, you will find it in the part between the engine compartment and the passenger compartment, approximately in the center.
- Make sure your heater core is not clogged. It is recommended to wash it periodically (every 2-3 years) using special products.
And only after making sure that modernization is necessary and everything else works, proceed to disassembling the VAZ 2114 stove and modifying it. This is quite possible and even necessary to do it yourself. Car service centers are unlikely to undertake such work.
conclusions
Thus, through far from the most complex manipulations, you can achieve a truly amazing effect. Just sealing the cracks of the VAZ 2110’s thermal channels can improve the temperature balance inside the interior of your car, not to mention a lot of simpler and more reliable methods.
Before you jump into upgrading your heating system, it’s still worth checking the operation of the stove itself. Do not forget to change the air filter of the VAZ 2110-2112 furnace every 15 thousand kilometers. Poor heating of the interior can also be caused by a faulty fan or a leaking coolant radiator.
Heater radiator tuning
Approximately 30% of uneven heating of the interior is a clogged VAZ 2114 heater radiator. To clean it, you need to perform the following steps:
- Remove the radiator and rinse with strong water pressure. In this case, disconnect the pipes and connect hoses instead. Water must be supplied to the outlet. Then the dirt will be “squeezed out”;
- Use any sewer pipe cleaner for flushing.
Pour it into the system and drain it after 20 minutes. After repeating this procedure three times, complete the rinsing with clean water.
- Attach the pipes in place and fill in antifreeze or antifreeze;
- When installing the radiator, seal it.
It is also important which heater radiator is installed on the VAZ 2114 - aluminum or copper. In the first case, it heats up quickly and also cools down instantly. But it has a larger number of fins and channel width, which gives better heat transfer at idle speed. Minus - cannot be repaired.
Copper heats up more slowly, but also cools down much longer. It has fewer ribs and narrower channels. At idle speed the air flow is cold. But if a leak occurs, it can be easily repaired.
A painted radiator is not suitable for tuning. It has little heat transfer and an unpleasant odor.
Sealing the cracks in the front panel of the torpedo air ducts
The main problem with good blowing of side windows is the presence of a large number of cracks in the dashboard air duct system, which should only be sealed, thereby reducing heat loss and significantly increasing the pressure of the air flow for blowing the side windows of the car.
Heater duct routing
You will need silicone or anti-squeak (modelin). We seal around the perimeter all the cracks in the upper and lower parts of the torpedo panel. Also, do not forget to “silicone” all the mounting holes. At this point, you can consider the first stage of work completed.
Refinement of the stove pipe
When the air flow from the left deflector is too small, you can force its intensity. To do this, you need to insert a small (about 50 mm) fan into the pipe. A cooler used in computers is suitable for tuning.
First remove the deflector. Make a hole for the cooler and install it. Seal. Put the branch pipe with the fan in place. Restore electrical. An alternative is to connect the cooler directly to the heater contacts. In this case, it will only work when the ignition is on.
Properly carried out modernization will add warmth to the interior and save the owner of the VAZ 2114 from many problems.
About the procedure for such a replacement
The work can be done approximately in the following sequence:
- In the removed plastic casing of the stove, you need to cut off the shell at the bottom of the casing. This is due to the fact that the “eight” fan is slightly longer than the standard device;
- It is necessary to cut the ridge that supplies air to the floor of the machine;
- The next step is to install a new unit instead of the standard fan and securely fasten it;
- Connect the device to the car's on-board network. In this case, they use a button and additional resistors from the VAZ 2108
.
After this modification, the interior will be noticeably warmer.
Heater modification
Good day! I think what is written below will be of interest to the happy owners of SAMAR with a Euro-torpedo, as well as to some extent to the owners of all other chisels and the like.
I wouldn’t say that I complained about the stove in my 2114... I especially remember my four, where the stove is like the rest of the classics, and the interior volume is noticeably larger.
I just didn’t like one feature of the stove’s operation. In short, the essence of the problem is this. On a well-warmed-up car, very hot air always came out of the central air ducts, almost scalding. But at the same moment slightly warm air was blowing onto the glass and into the side air ducts. And even if the central air ducts were closed, the situation did not change. This state of affairs has not suited me for a long time, especially remembering that I once had an old nine with a low torpedo and there was no such problem.
After the first noticeable frosts this winter, I decided to try to correct the situation. I won’t describe the process for a long time; everything turned out to be extremely simple. It turned out that it was enough to adjust the heater cables. The same ones that come from the sliders and open/close the dampers in the stove and the heater tap itself. It turned out that it was enough to unscrew the side of the tunnel on the driver’s side and visually check how the dampers work. I’ll say right away that for this you need to take a position that is not even in the Kama Sutra... well, a small flashlight is simply necessary. There should be two cables on the driver's side. One closes the cold air damper.
Another regulating air flow either into the legs or up. So we lie on the floor and look at the cable, while simultaneously moving the heater levers. It will immediately become clear which cable is responsible for what. Well, then you should make sure that in the extreme positions of the lever the damper is completely closed or open according to the position of the lever. To do this, it is enough to leave the lever in the most extreme position and simply try to close or open the damper further with your hands. If you succeed, then you need to adjust the length of the cables.
Both of my cables were quite loosely tensioned... One was so tight that I was surprised how it didn’t fly out of its place. The cable at the end is wound into a ring and fits onto a pin in the damper. Where possible, I simply wound another turn and put it back on the pin. Where there was no chance, I simply bent the cable with pliers, thereby shortening it a little. Then, in order to achieve maximum results, you will have to remove the central part of the torpedo, since there is no other way to get to the other two cables.
One of them changes the air flow either to the windshield or on the sides, and the other opens and closes the heater valve itself. The principle of action remains the same. I would like to note that two cables are connected to the Cold/Hot lever at once. One closes and opens the cold air intake, the other opens and closes the heater valve. I think four cables are not difficult to figure out if you want.
After my acrobatic performances, I was pleased with the result. Now almost the same hot air is blowing from all air ducts. Of course, in the central air ducts it is hotter, but there the air travels the shortest and most direct path. The air flow in the side air ducts has increased quite significantly. And the flow adjustment itself now works more radically, that is, if it blows on the glass, then it blows on the glass, and not anywhere.
In short, I am now 100% satisfied with the stove. If I know that the trip will take more than 15 minutes, you can safely take off your jacket right away, even if it’s 20 below zero outside.
In general, a VAZ remains a VAZ. As always, the idea itself is excellent, and the execution is from the series “after assembly, modify with a file.” The heater is in good condition, but during assembly they either didn’t want to adjust the roofing felt cables or didn’t have time...
I apologize for the lack of photos, but there was nothing to take pictures with. To make it clear what I'm talking about, I added a few photos from the Internet. I hope it will be clear...