Do-it-yourself timing belt replacement
The gas distribution mechanism (GRM) synchronizes the operation of the piston group, the fuel injection system and the exhaust of combustion products.
If you are wondering how to change the timing belt, we will provide the necessary minimum information that will help present this procedure as a whole. This will make it easier to decide whether replacing the timing belt is worth your own efforts, or whether it is better to entrust this work to specialists. The timing belt is the most responsible and important belt drive in a car. Its breakage is a big nuisance. You'll be lucky if the problem is limited to bent valves. Therefore, the answer to the question of how to replace the timing belt should be given immediately as soon as you suspect a problem with its operation. In this case, it is better to play it safe than to have serious repairs in the future.
Recommendations for choosing: which company is better?
Modern belts for gas distribution mechanisms of automobile engines are high-tech products, and therefore not cheap. They are made on the basis of artificial rubber (neoprene, polychlorprene) with various additives, reinforced with a cord of durable threads. The latter are made from fiberglass, nylon and cotton.
This is interesting: Punishment for fleeing the scene of an accident
To choose the right new belt, it is suggested to follow these recommendations:
- The best way to avoid making mistakes with the size and shape of the teeth is to take an old belt with you to the store and compare it with the samples offered. Everything must match - length, width, profile of the teeth.
- Don't try to save money by choosing cheaper products. And if your car is used in extreme conditions, then you should choose the best option - the original, in the end it will pay for itself.
- Check the rigidity of the rubber product. The more elastic it is, the longer it will last on the car. Please note: the cheaper the timing belt, the stiffer it is (experts say “oak”).
- Externally, the new product should not have sagging on the teeth (small burrs are allowed), cavities or pores. The surface should be smooth to the touch, not rough.
- If possible, check the catalog number or article number if it is printed on the back of the belt.
It is difficult to follow the listed recommendations when buying a part in an online store. You make such a purchase at your own peril and risk.
Since the auto parts market is saturated with all kinds of counterfeits, there is always a chance of running into a low-quality product. To protect yourself, try to buy a timing belt and pulley at retail outlets from authorized dealers. Original spare parts are sold in sets, sealed in one package.
Set of original parts - belt and two rollers
The most popular manufacturers of belt drives are the Gates and Bosch brands. They are most often counterfeited, so much so that it is quite difficult to distinguish them. The following verification method is practiced: ask to show you several identical products and check the numbers printed on the back. For “correct” belts, combinations of numbers should not be repeated. If the numbers are the same, then you are probably looking at counterfeit products from the Middle Kingdom.
Different numbers are a sign of the authenticity of the product
Where is the timing belt located?
First, let's remember where the timing belt is located and what it looks like. Its location is in front of the engine, but do not forget that motors come in longitudinal and transverse locations. In most cases, gas distribution mechanisms use a toothed rubber belt, but in a considerable number of car models from different manufacturers, a steel chain is also used for this.
Engine cylinders can be equipped with two or four valves with one and two camshafts (CV), respectively. The kinematics of the gas distribution mechanisms of such engines differ. We will show them using the example of 8- and 16-valve power units for the VAZ 2110, 2111 and 2112.
The scheme with two shafts is more complicated, and in it, in addition to the pulley of the second RV, a support roller is added. This also complicates the belt replacement procedure. It is most difficult to perform this operation after a break or severe stretching of the belt, when the factory timing settings can be completely lost. Replacing in normal mode is not so difficult that you can’t try to do it yourself.
What is needed to replace the timing belt
The leading link of the gas distribution mechanism is the crankshaft. It sets the pace of operation of the timing belt. Rotation at high speed and friction forces lead to fairly rapid stretching and wear of the belt. However, the decision about what to change when replacing the timing belt is made after a careful inspection of the mechanism.
It is checked for the presence of play in the tension and support rollers, the absence of oil leaks, and the serviceability of the water pump, the drive (pulley) of which is part of the timing belt, is determined. Therefore, when repairing the gas distribution mechanism, you may need more than just a belt. To replace it, you will definitely need the following set of tools:
- a set of open-end, socket and ring wrenches Nos. 10, 13, 17, including a special fork wrench for fixing the tension roller;
- a torque wrench for tightening the nuts with the required force;
- a device for checking belt tension;
- screwdrivers;
- jack.
Before you begin replacing the timing belt, you should prepare the vehicle. First of all, the car needs to be fixed so that it does not rock back and forth. Remove the front right wheel and the protection under it, as well as other parts that may cause you inconvenience when working. After removing the protection, return the wheel to its place. It is most convenient to combine marks and marks on timing pulleys and engine body parts.
Nuances and difficulties
Now some recommendations on the not obvious features of the procedure for replacing the timing belt:
- When checking the condition of a belt drive, you need to inspect the entire thing, and not just the upper “open part”. Damage and oil stains can be anywhere.
- When carrying out any manipulations with the timing belt, force should be used very carefully. Yes, this part is very strong, but a strong jerk can lead to damage.
- When buying a new belt drive, you need to take into account that there are a huge number of low-quality fakes on the market. Therefore, it is better to make purchases through official sources and keep all receipts in case you receive defective products.
- Checking and, if necessary, replacing the timing belt must be carried out in a timely manner. A belt drive failure often results in damaged valves, which cost a significant amount of money to replace.
- The service life of the belt drive directly depends on the condition of the pump. When it wears out, it should also be replaced. As a rule, the safety factor of the pump is twice that of the timing belt, so it must be replaced every second time the belt drive is replaced.
Difficulties may arise when replacing spare parts of the gas distribution mechanism. Inexperienced mechanics note the difficulty of dismantling parts that block access to the timing belt.
Do-it-yourself timing belt replacement
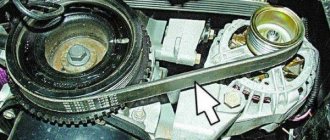
Here we suggest looking at a photo report on how to change the timing belt on a VAZ with a 16-valve engine. The procedure is performed in the following sequence of actions:
- Remove the alternator belt from the pulley on the crankshaft.
- Remove the timing belt guard cover.
- Align the marks of the RV pulleys according to the marks on the casing.
- Remove the generator drive pulley, check again and set the marks, adding the crankshaft to this, after which you can remove the tension roller, and after it the belt.
- Check the condition of the belt and rollers.
- Reinstall the belt.
- Install the tension roller.
- Tension the belt.
- Finally check the correspondence of the labels.
- Perform a test run of the engine and complete assembly.
Step-by-step instruction
- We dismantle the expansion tank.
Expansion tank. - Before removing the generator belt, loosen the four pump pulley bolts (10mm wrench).
Fastening the pump pulley. - We cut off the alternator and air conditioner belts.
- Unscrew one bolt and nut securing the generator bracket and power steering reservoir. (head 14)
Fastening the power steering barrel. - We dismantle the generator by unscrewing the bottom bolt and disconnecting the positive wire and connector (head 14).
Generator mounting. - Next, unscrew the pin and remove the generator (Torx head).
- We hang the engine and remove the support.
Engine support. - Remove the upper plastic protective cover of the timing belt (head 10). The location of the bolt holes is shown on the removed cover for convenience.
Timing mechanism cover. - Unscrew the two bolts securing the engine mount bracket at the front.
- And two on the intake manifold side.
- We unscrew the technological plug from the cylinder block, near the right CV joint.
Plug for crankshaft clamp.
Set top dead center (TDC)
- Screw the crankshaft clamp into the hole until it stops. Rotate the crankshaft clockwise until it stops in the lock.
The crankshaft clamp is installed. - We fix the VCT couplings with a butterfly camshaft clamp.
The marks should be on top.
Camshaft retainer installed.
Removing the old timing belt
- Unscrew the bolt of the auxiliary drive pulley. We block it in any convenient way, we used a universal lock, you can also block the crankshaft through the flywheel, but to do this you will have to remove the starter. We dismantle the pulley itself.
- Having unscrewed three bolts, we dismantle the lower timing cover (head 10).
Lower timing cover. - We fix the tension roller with any convenient object, unscrew it and remove it together with the timing belt. If desired, you can also change the crankshaft oil seal.
Tension roller.
Replacing the pump
- We remove the old pump by unscrewing five bolts (head 10).
Pump mount. - We install a new water pump, having first lubricated its gasket with a thin layer of sealant. Pull the bolts evenly in several passes.
New pump.
Installing a new timing belt
- We put the tension roller in place.
- We check that the crankshaft rests against the retainer.
- We begin installing the timing belt from the crankshaft pulley to the VCT couplings and tension roller. The descending branch of the belt must be tensioned.
- Remove the roller lock, thereby tightening the belt.
A new timing belt has been installed. - Reinstall the lower timing cover and the auxiliary pulley. The crankshaft bolt must be replaced with a new one; reuse is not allowed.
- Tighten the crankshaft bolt (40 N/m + 90 degree turn).
- After we remove all the clamps, turn the crankshaft two turns, make sure that the pistons do not meet the valves. We check the correct valve timing by temporarily installing the crankshaft and camshaft clamps
- We install all parts in the reverse order of removal. Don't forget about antifreeze.
- We install the generator belt, also known as the drive belt for mounted units, using a special device.
Installing the alternator belt. - The air conditioner belt is the same.
Installing the air conditioner belt.
Everything is quite simple, so this procedure can be performed by any car enthusiast with his own hands in a regular garage without a visit to a car service center.
Timing belt tension: algorithm of actions
The timing belt is an element in the engine design that connects the camshaft and crankshaft, organizing the timely opening and similar closing of the valves. The belt drive must always be well tensioned; as a result, engineers have introduced special tensioners into the design of the gas distribution mechanism. Few people know, but not only the service life of the belt itself, but also the unit as a whole depends on proper tension settings. We will talk in more detail about how to tighten the timing belt, and when such an operation may be required, in the article given today.
A few words about the importance of correct tension
Many motorists know that improper functioning of the timing belt can cause very serious engine damage. This is due to the principles of operation of the mechanism, which boil down to the timely and high-quality opening/closing of the engine valves. This approach not only allows you to adjust the valve timing of the internal combustion engine, but also differentiates between sensitive valves and constantly knocking pistons.
If the timing belt begins to work incorrectly, the gas distribution order is disrupted, as a result of which engine elements begin to wear out at an accelerated rate. Similar disturbances in the functioning of the engine can also occur due to improper belt tension.
Note! A break in the belt drive while driving not only negatively affects the condition of the engine, but can actually severely bend the valves. Repairing a car with such a breakdown often costs motorists five-digit sums of money.
In addition, drive tension that does not meet the standards accelerates wear of the main timing elements, the list of which includes:
- directly the belt drive itself;
- rollers;
- torque clutches;
- guides;
- tensioner
Repair of each of the marked timing parts takes much longer than normal belt tensioning. Well, there is nothing to say about the cost, if you can tighten the drive yourself and completely free of charge, then you will have to pay for replacing the components of the mechanism.
About the timing and frequency of replacement according to the regulations
The exact frequency of replacing the timing belt drive is indicated in the operating instructions supplied with each vehicle. It also indicates whether the tension roller needs to be changed at the same time as the belt. As a rule, it is also replaced with a new one.
As already mentioned, the service life of products depends on the brand of car and lies in the range of 50-150 thousand km. But the condition of the timing drive should be periodically monitored and early replacement made in the following cases:
- longitudinal cracks appeared on the back side of the belt;
- the edges of the rubber product are “frayed”, threads from the cord stick out from it;
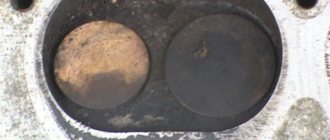
- if there are transverse cracks on the inside between the teeth;
- the teeth began to peel off or were noticeably worn out, and the parts of the mechanism and the walls of the casing were covered with black rubber dust.
Transverse cracks are the first warning sign.
To conduct a visual inspection of the belt drive and assess its condition, simply unscrew and remove the upper protective casing (usually made of plastic). Along the way, it’s worth inspecting all the gears and the walls of the cylinder block, looking for leaks of engine oil or antifreeze from the pump.
Advice. If the engine suddenly begins to operate unstably at idle and while driving, and shots appear in the injector receiver and exhaust pipe, then do an emergency inspection of the timing drive. These problems arise due to shifted valve timing, which is caused by a loose belt that has jumped 1-2 teeth.
When does the belt need to be tightened?
Having considered the previous paragraph of the article, it was probably not difficult to understand that monitoring the correct functioning of the timing belt is quite important. In particular, it is worth keeping the belt drive tension at the proper level. By the way, stretching is carried out only in two main cases:
- During a routine check of the gas distribution mechanism and the tension does not comply with the norm. The normal tension of the timing belt is checked in a very simple way, for which you will need ordinary spring scales and a ruler or caliper. To check, the hook of the scale clings to the belt and pulls until the display shows a load of 10 kilograms. Without loosening your grip, all that remains is to measure the deviation of the drive from the normal position. If the belt has been pulled back by more than 5.5 millimeters, but its tension is inevitable. Otherwise, you can leave everything as is until the next timing check, which is recommended every 10-15,000 kilometers;
- When repairing the timing belt, when the belt was removed or its tension was weakened.
In situations that do not correspond to those noted above, it is simply not worth touching the belt drive of the mechanism. Especially if the motor runs stably, without pronounced problems.