It is not difficult to do a wheel alignment on a VAZ-2107 with your own hands, but you will have to adhere to a number of requirements and recommendations. Otherwise, the rubber will not last long. Camber is a term that defines the angle at which a car's wheel is mounted relative to the vertical. In cases where the top edge of the wheel protrudes outward, this is positive camber. If she looks inward, then negative. When adjusting on computerized stands, the angles are indicated with the prefixes “+” and “-”.
Basic adjustments
If the wheel camber is adjusted incorrectly on one side, then the car will drift sideways when driving. While driving in a straight line, take your hands off the steering wheel and watch where the car will “pull”. But before doing this, be sure to make sure that the tires have the same normal pressure. In case of problems, you need to do the wheel alignment yourself on the VAZ-2107.
Toe-in refers to how the front wheels are positioned relative to each other when driving on the road. But during adjustment, the angle relative to the normal position is measured. On sevens, the toe angle is positive; for front-wheel drive models it should be negative. This is necessary so that after starting off and while driving, the front wheels become level.
If you incorrectly set the wheel alignment yourself, the VAZ-2107 will very quickly “eat” the tires. Therefore, it is extremely important to monitor the angles of the front wheels, because the cost of the cheapest tire is approximately 2,000 rubles. And the adjustment procedure takes no more than an hour. After successful repairs, you will receive the car in perfect condition. The car will drive smoothly and will no longer pull to the side, which will increase safety and convenience.
What does this adjustment provide?
The point of adjusting the wheel alignment comes down to the fact that the wheels of the car are set at a certain angle to the horizontal, as well as to each other. This is necessary to try to give the wheels the maximum possible vertical position when moving, i.e., no matter what position the wheel occupies relative to other structural elements, it must remain in a vertical plane. It is in this case that close to ideal contact of the tire with the road is achieved.
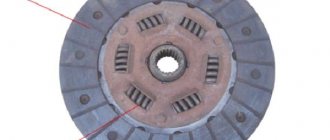
Wheel camber concept
Camber determines the angle at which the wheel is set relative to the road surface. A visual representation of this parameter can be obtained by drawing the angle between the plane of rotation of the wheel and a vertical line intersecting the center of the so-called rubber contact patch with the road.
Camber is the angle between the vertical and the plane of rotation of the wheel
Camber angle values
It is generally accepted that if the top of the wheel deviates from the central axis of the car, then the camber is positive, otherwise the angle is negative. Each manufacturer recommends its own camber adjustments depending on the technical characteristics of the car.
The most accurate way to determine the camber angles of a VAZ 2107 is when a load weighing 320 kg is placed in the car: this is approximately how much 4 passengers and the cargo in the trunk weigh. The tank must be filled with fuel. The camber angle should be:
- for a loaded vehicle 4°30'+20';
- for unloaded - 0°5'+20'.
As a rule, a negative camber angle creates a larger contact patch between the rubber and the road surface, but due to accelerated wear of the inner edge of the tire, its service life is reduced. The car will not drive straight if the wheel camber is off by 30′ or more.
If the wheel is inclined towards the arch - the camber is negative
Concept of convergence
If we imagine the angle between the plane of rotation of the wheel and the conditional axis dividing the car lengthwise into two parts, then this will be the toe-in of the wheel. In relation to one wheel, the toe is considered separate: two separate ones add up to a total toe.
The value of toe angles
When the front part of the wheel is turned towards the longitudinal axis of the car, we are dealing with positive toe-in, otherwise - with negative toe-in. A positive toe angle is used more often, but in some cases a negative toe angle is recommended: this increases the stability of the car, but also increases tire wear.
Normal toe-in for the VAZ 2107 is:
- 2–4 mm for a loaded car;
- 3–5 mm for the machine without load.
Toe is the angle between the plane that passes through the center of the wheel and the longitudinal axis of the vehicle
Custer
In addition to camber and toe, there is another wheel tilt adjustment called caster. This adjustment is also an angle, but between a vertical line and the projection of the wheel's turning axis onto the longitudinal plane of the machine . The value of this angle, as a rule, does not exceed 6°. A properly adjusted caster self-aligns the drive wheels as the vehicle picks up speed.
The nominal size of the boat is:
- 4°±30′ for a loaded vehicle;
- 3°±30′ for a car without load.
In addition to camber and toe, there is another wheel tilt adjustment called caster.
Car malfunctions associated with incorrect adjustment
Unadjusted camber and toe, as a rule, make it difficult to drive a vehicle and cause a number of vehicle malfunctions.
Road instability
A car with incorrectly adjusted camber and toe most often spontaneously “slides” to the left or right, and the driver is forced to make additional efforts to keep the car going straight. In this case, we are no longer talking about comfortable driving, and besides, the driver gets tired much faster when driving such a car.
Increased tire wear
The most common consequence of improper wheel alignment is rapid wear of your vehicle's tires. Obviously, too large a positive camber angle causes accelerated wear on the outer part of the tires, while a negative camber angle causes accelerated wear on the inner part. You should know that tires wear out quickly also due to incorrect air pressure in them (high or low) and due to angular vibration of the wheel.
Tires wear out prematurely due to unadjusted camber, incorrect air pressure, wheel angular wobble
Other
In addition to instability on the road and increased tire wear, unadjusted camber and toe can cause premature failure of oil seals, bushings, and steering and suspension pins.
When to adjust camber and toe
Before adjusting the installation angles, be sure to make sure that you have the following set of tools:
- Calipers.
- Open end and box type wrenches.
- Ticks.
- Strong thread.
- Metal hooks or pushpins.
- Wooden blocks - 2.2 cm and 6 mm thick.
This is the minimum set that will be required. The presence of WD-40 penetrating lubricant will not hurt, since the nuts and bolts are close to the road surface and dust and dirt constantly accumulate on them. Rust may occur, so you need to thoroughly clean the threaded connections before starting repair work on the car. All dirt accumulations must also be removed from the inside of the wheels.
How to understand that you need to set a wheel alignment
The following may make you think about the need for such a procedure:
- While driving, the car pulls to the side and you constantly have to correct the course. Make no mistake, a similar effect can occur when driving on uneven or inclined roads. Ride in different places and in different directions on a flat road so as not to be deceived.
- There is rapid and uneven wear of tires and suspension parts. The car began to react more harshly to bumps. Fuel consumption has increased unjustifiably.
- If the car is involved in an accident, even not a very serious one, it is recommended to at least check the toe angle of the wheels, since the shock impulse, even when hitting a hole, can throw off the suspension settings.
- Checking is also recommended after traveling 15,000 km.
We have already written that replacing some suspension parts also requires subsequent adjustment of the wheel alignment. These do not include:
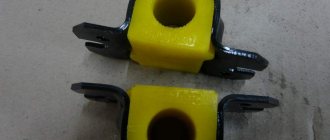
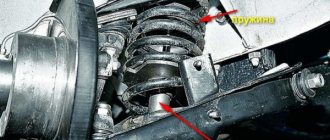
Stabilizer bushing for VAZ cars
- Stabilizer bushings;
- Stabilizer assembly;
- Shock absorber bushings and itself;
- Wheel bearings.
But after replacing the following parts, checking is strictly necessary:
- Steering ends and rod assemblies;
- Shortened or extended springs;
- Steering pendulum;
- Steering column;
- Upper and lower arms;
- Beams assembled;
- Silent blocks;
- Spacers.
When to make adjustments
Make sure that you really need to adjust the wheel alignment yourself on the VAZ-2107. You definitely need to make adjustments if the following symptoms are present:
- The trajectory of movement changes, despite the fact that you hold the steering wheel straight. The car is still gradually moving to the side. But this needs to be checked when driving on a flat road, with the same tire pressure.
- If there are visible deviations in the alignment of the front wheels. If such symptoms are present, the tires will wear unevenly and gasoline consumption will increase. Suspension and steering components often fail.
- If you were involved in an accident in which components of the car's suspension or steering were damaged, you must do a wheel alignment on the VAZ-2107 yourself. Photos of the stages of the procedure are provided for clarity and understanding of the processes.
- When repairing suspension or steering components, be sure to check the wheel alignment.
When is it worth adjusting the wheel alignment on a VAZ 2107?
The wheel alignment of the VAZ 2107 is subject to adjustment in the following cases:
- The car pulls to the side when driving on a straight road.
- Tires wear unevenly, which causes them to wear out quickly along with suspension parts. This also increases fuel consumption.
- Repairs were carried out with the replacement of suspension parts that affect the wheel alignment angles. All parts can be included here except shock absorbers and springs.
- The car drove into a pothole, receiving a strong blow to the suspension, or the front wheel hit the curb, which often happens when skidding on a winter road.
Prerequisites
The most accurate verification is possible only in workshops at stands. But in the absence of such attributes, you can use the proven “old-fashioned” method. It is advisable to install the car on an inspection hole, since you will have to unscrew the nuts and bolts of the suspension, and without it it will be problematic to do this.
When carrying out work, carefully inspect the entire suspension, the condition of the silent blocks and ball joints, and the tie rod ends. If there is play in them, then setting the wheel angles will not bring any result, and all the work will be done in vain, the car will change its trajectory spontaneously.
Preparation and procedure for adjusting wheel alignment angles of VAZ 2107
Having a level area, balanced equal-sized wheels and tires with the required pressure are far from the only requirements. It is equally important to remove the decorative caps before starting the adjustment and ensure:
- lack of free movement in “running” units;
- permissible play in the steering;
- proper tightening of all connections in the chassis;
- serviceability of the depreciation system.
It is advisable to check and adjust the chassis by first placing 70 kg on each seat and 40 kg in the trunk. However, adjustments can also be made on an empty car. With the steering wheel in the direction of straight-line motion, you should remove all the play in the suspension by shaking each of the four bumpers several times.
Preparatory work
Do-it-yourself wheel alignment on the VAZ-2107 is not carried out on the rear wheels, since the hubs are installed in one position and cannot be shifted to the side. The procedure is done only on the front axle of the car. Moreover, this does not depend on whether the car has rear or front wheel drive. Before starting work, do the following:
- To make the adjustment as accurate as possible, you need to load the machine. The load must weigh 320 kg and be distributed evenly across all four wheels. You can seat four people with approximately the same body weight in a car and throw a bag of cement into the trunk.
- A prerequisite is a full tank of gasoline. The capacity of the fuel tank in the VAZ-2107 is 39 liters. Make sure the gasoline level is close to the maximum mark.
- Tire pressure must be kept at a normal level - equalize it if necessary. Depending on the type of rubber, the pressure can fluctuate in the range of 1.8-2.5 Atm.
That's all, now you can do the wheel alignment on the VAZ-2107 with your own hands, the preparation for the procedure is completed.
Preparing for wheel alignment adjustment
It is recommended to adjust the wheel alignment angles when the vehicle is loaded. The load must be such as to correspond to a car with 4 people in the cabin, with 50 kg of cargo in the trunk and with a full tank.
It is also necessary to check the tire pressure, which must be correct.
Self-adjustment allows you to save on service station fees. Adjusting the angles does not require too high precision, so even at specialized stations it is performed in accordance with the old technique, which does not require specialized equipment. The adjustment accuracy that can be achieved at home is quite sufficient for trouble-free operation of the car. The adjustment process is not an irreversible action and, if you have doubts about the correctness of the adjustment, you can always contact a specialized service station equipped with the latest technology.
Controlling the camber angle on the front wheels
It should be noted that it is quite problematic to set the camber angles yourself, since there are many difficulties. But you can check how much the angle deviates from the normal position without much difficulty. To do this, you need to follow the following algorithm:
- Place the car on a level surface and secure its position by placing chocks under the rear wheels.
- Sit in the car and turn the steering wheel until it is level. The wheels must be parallel to the car body.
- Press the shock absorbers 2-3 times until the car's suspension is in its normal position. The force should be approximately 40-50 kg. The operation is carried out on all four shock absorbers.
- Take the thread and fix it on the top of the car's fender so that it passes clearly through the center of the wheel. To achieve a vertical position, tie a weight to the lower end. Measure from the top and bottom edges of the wheel to the thread. The difference in values is the wheel camber.
For example, the difference is 2 mm. This means the camber angle is 20 minutes (not degrees). Normally, the angle should be 4 degrees and 30 minutes. An upward deviation of no more than 20 minutes is permissible. But this is the case when the car is loaded with a mass of 320 kg. If there is no load, the angle should not deviate by more than 20 minutes. from 0 degrees and 5 minutes.
Preparatory procedures
In order for the adjustment to be more accurate, it is necessary:
- check wheel runout;
- eliminate gaps in hub bearings;
- find out how much fuel is in the fuel compartment; if it is not enough, then the volume should be brought to normal, because the tank must be fully filled with fuel.
- check the tire pressure, the indicator must correspond to the norm;
- check that the steering wheel is adjusted correctly, i.e. Is it necessary to make the same number of turns of the steering wheel to turn in one direction and the other?
Many people have one question: whether it is necessary to load the car before adjusting the wheel alignment. Some manufacturers, such as BMW, explicitly indicate the need to load the car. At stations, wheel alignment is adjusted with the vehicle equipped, i.e. without passengers, with a filled fuel tank, a set of tools and a spare tire.
Checking wheel alignment
As can be seen from the above, you can quickly do a wheel alignment on a VAZ-2107 with your own hands. The procedure for carrying out the work is simple, just have a little patience, mastery will come with time.
Preparation for adjusting wheel alignment is the same as in the case of camber, the only differences are in the subsequent actions:
- Align the wheels, place the machine on a level surface and place additional cargo on it. Only after the preparatory work has been completed can adjustments begin.
- To check the alignment, you need to use a strong thread with hooks tied at the ends.
- Fix the hooks on the front and rear wheels so that the thread passes clearly through the centers of both axles.
- The rear wheels have a 44 mm narrower track than the front ones. Therefore, a block with a thickness of 22 mm must be attached to the front of the rear wheel. The thread is laid on top of this beam.
- Turn the steering wheel so that the thread touches both sides of the front wheel tire.
- Fasten the thread on the opposite side and install 22 and 6 mm thick bars under the back of the wheel.
Tools and accessories for wheel alignment
In this article we will tell you in detail how to adjust wheel alignment on a VAZ-2107 with your own hands. First of all, you will need to prepare all the necessary tools and accessories, which include:
- calipers and a set of wrenches;
- ticks. A Cobra type tool is best suited for the job;
- two threads, one of which can be completely ordinary (just strong enough), and the second - with two small hooks on each side;
- wooden blocks, the thickness of which should be 22 and 6 millimeters.
To adjust the wheel alignment “on a rope”, you will also need to perform several additional simple steps:
- make sure that all suspension elements are in full working order and that their connection to each other is made without play. It significantly complicates the work;
- load your car as much as possible so that its weight is at least 320 kilograms;
- refuel the car to capacity;
- Check the tire pressure and make sure it is completely within the normal range.
After all this, you can begin adjusting the wheel alignment. We will describe this procedure in detail below so that you can easily do the necessary work yourself.
Wheel alignment adjustment
If the wheel alignment is incorrect, adjustment will be required. To do this, follow these steps:
- Loosen the tension on the tie rod end coupling clamps.
- Using Cobra-type pliers, you need to rotate the coupling. Before starting the adjustment, be sure to clean all threaded connections from dirt and dust and treat them with penetrating lubricant.
- Rotate the clutch until the gap between the thread and the front wheel tire is normalized.
- After completing the work, be sure to tighten the threaded connections.
- The adjustment on the second wheel is carried out in the same way.
- The total toe-in of the wheels should be no more than 2 mm.
Theoretical part
First, let’s get a little grounded in theory in order to accurately understand all the actions that will be described. Let's look at the definitions:
Wheel angle
Or in other words – wheel alignment. These are design parameters that determine the current position of the wheels when the car is moving in a straight line and when cornering. Ideally, a car on a flat surface should always move in a given steering position.
If this parameter deviates, directional instability appears; the driver constantly has to pull the steering wheel to the side in order to maintain the desired direction.
Interesting! Due to driving with such wheel alignment settings, tires begin to wear out faster, suspension parts suffer, and fuel consumption increases significantly, since a moving car constantly experiences some kind of resistance.
Angle of longitudinal inclination of the axis of rotation
It is also called caster - a given angle between the axis of rotation of the wheels and the vertical level, when viewed from the side. This angle is set using adjustment washers, which are placed on the bolts securing the lower arm axle. This ensures stabilization of the wheel position when the car moves in a straight line.
Adjusting the toe angle.
- Using a 27 wrench, loosen the tension of the nuts on the steering rods.
- Using a 24mm wrench, we adjust the rod length by unscrewing or screwing in the coupling, depending on our readings on the ruler.
- We put the ruler again, as when taking measurements, in position 0, and roll the machine to measure the angle.
- If the toe-in has become from -1 to +1 mm, then the adjustment can be completed.
During the adjustment process, it is necessary to ensure that the steering wheel spoke is in a horizontal position. And after completing all the work, once again check the tightness of all the bolts that you touched.
.
Since the price of adjustment is $10-15, and it is recommended to carry it out at least once a year. By doing the wheel alignment yourself, you will save money on something more necessary.
Adjusting the toe and camber of VAZ-2101 wheels
To check the wheel alignment angles, you need the simplest tools - a ruler or caliper with a length of at least 100 mm, a plumb line (thread with a weight), a cord about 3 m long - and a horizontal platform. Since in most cases, after checking, it becomes necessary to adjust the angles, it is better to carry out this work on an overpass or inspection ditch so that the tool can be reached to the front axle of the car. The platforms on which the wheels will stand must be in the same plane and located horizontally. It should be noted that correct wheel alignment angles can be ensured only when the position of the wheels themselves is stable while driving. Therefore, the camber and toe are checked after first making sure that the front suspension and steering are in full working order, that there is no increased play in their moving joints - the front wheel hub bearings, the ball joints of the swivel struts, the tie rod ends, the bushings of the suspension arms and the axle of the pendulum arm. In addition, the condition of the rubber bushings of the rear suspension rods is monitored; tighten all mounting points of the front and rear suspensions, loading the car (320 kg). Then check the fastening and condition of the wheels and tires, bringing the pressure in them to normal (or 0.1 atm more than prescribed in the instructions).
Determination of wheel equal runout points
Only after all this do they begin to adjust the unloaded machine. Having hung the front wheels and turning them, we determine and mark with chalk diametrically opposite points of equal runout on the protruding parts of the tire sidewalls. Then we remove the decorative caps from the front wheels and install the steering wheel in a position corresponding to the linear movement of the car - its spoke should be located horizontally.
Wheel position when checking camber
Now we turn the front wheels so that the previously marked points of equal runout of the tires of both wheels are located vertically. By pressing on the bumper, we roll the car forward and backward to eliminate the influence of the supports on the position of the wheels.
Determination of wheel camber
: 1 - cross member; 2 — adjusting washers; 3 - lower lever; 4 - plumb line; 5 — wheel tire; 6 — upper lever; a and b - distances from the thread to the edges of the rim
Finally, you can begin to determine the camber angle of the wheels. To do this, we bring a plumb line to the top of the tire and measure with a ruler the distances “a” and “b” between its thread and the rim at the lower and upper points of the wheels. If the difference between the obtained values (b-a) is in the range from 1 to 5 mm, then the camber angle of the wheels is normal. A difference of less than 1 mm indicates that the angle is insufficient. To increase it, you should remove the required number of shims (washers) located between the axis of the lower suspension arm and the cross member, after first loosening the two fastening nuts. If the camber angle is excessive (b-a more than 5 mm), washers must be added. Remember that the change in their total thickness should be the same under the front and under the rear bolt. Otherwise, the longitudinal angle through which the steering axis of the wheel tilts will be disrupted, and as a result the car will be pulled to the side.
How to make negative camber on a VAZ 2106
Car repair at home. Not only is this a cost-saving method, but it's also ideal to do because not every craftsman worries about the work. to adjust the wheel alignment on a VAZ 2106 , especially if the car is operated at a considerable distance from the city and there is simply no opportunity to visit a car service center.
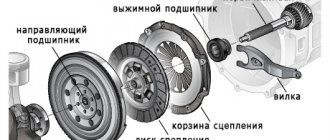
VAZ front suspension 2106
has two main parameters. wheel alignment and destruction, which specifically affect the maneuverability of the car. During major repairs or modifications to the suspension, the wheel angles (CS) are made for adjustment. Violations lead to stability dilemmas and excessive front tire wear.
It is recommended to check and adjust wheel alignment for Russian cars every 10–15 thousand km. run. This is justified by the fact that even with a good stop of such a mileage on roads with poor quality pavement, the characteristics, as a rule, change quite a lot, this will affect maneuverability. One common reason a CAM gets lost is because the wheel falls into a hole at speed. Therefore, even an unscheduled inspection will be required. Additionally, the procedure required in this embodiment is:
- whether the prompts, levers or silent controls have changed;
- for which the design of the standard clearance configuration is intended;
- when the car moves to the side;
- if the tires are heavily worn;
- when the steering wheel does not turn after turning.
Destruction. This is the angle of the wheels relative to the road surface. The parameter a can be negative or positive. If the wheel is tilted from above to the center of the car, then the angle takes a negative value, and when locked, it is outward. positive. With huge differences between parameters and industry values, tires wear out quickly.
VAZ collapse \
Convergence involves a difference between the front and rear points of the front wheels. The parameter is measured in millimeters or degrees/minutes, and can also be positive or negative. With a positive value, the front parts of the wheels are closer to each other than the rear, and with a negative value the opposite is true. If the wheels are parallel to each other, the finger is considered zero.
Adjustment
If the caster angle changes, self-locking nuts M12x1.25 will be needed. VAZ has a suitable article number - 16105011. If the angle is reduced, washers “2108-2904225” (part 24) are also needed. Installing one washer leads to a decrease in caster by 19 arc minutes.
Stretch (saber) and lever
To adjust any parameter, the wheel is hung up and removed. And when adjusting the caster, each of the two wheels is hung in turn. In general, the work ahead is long.
Caster angle
To add or remove washers, you need to remove the stretcher: use a flat 24 wrench to hold the stretcher itself, and use another wrench to unscrew the nut.
Removing suspension braces
Having unscrewed the nuts on both sides, the part cannot be removed immediately. You also need to unscrew the fastening of the lever to the stabilizer link (key “17”). To knock out the mounting pin, use an aluminum spacer.
The maximum number of washers is two in front and four in back (near the fist). Recommended tightening force – 43-52 N*m (stabilizer thrust), 160-176 N*m (stretch).
Camber angle
On all Tens, including the VAZ-2112, the camber is easily adjusted. The upper bolt, which holds the fist, is equipped with an eccentric. The nut on the bolt needs to be loosened and then rotated with a wrench - the camber angle will change.
Adjusting the right wheel camber
Mark the standard position of the adjusting screw cap (Fig. 1). Loosen the nut on the bottom screw. The same must be done with the top screw - do not unscrew the nut completely! After completing the adjustment, tighten the fastener. You need two keys “19” (Fig. 2).
The recommended torque when tightening the nuts is 78-96 N*m.