October 13, 2020 Lada.Online 6 785 2
The Lada 4×4 uses the oldest steering column switches. At the beginning of the year, the SUV received a slight restyling, but this update did not affect the outdated levers. Let's figure out how you can replace the standard steering column switches of the Niva 2121 with modern and functional switches from a foreign car.
Steering column switch VAZ 2107 pinout
The time has come to connect the steering column switches, which is actually why the new steering wheel was installed.
I couldn’t find a clear pinout diagram for switch chips from the VAZ-2107, so all the wires had to be wired and connected little by little.
I bought the necessary relays and button
As a result, we got this diagram:
With the rest of the chips everything is simple, turn signals to turn signals, with wipers it’s generally simple (the chips are identical, you don’t even need to call).
All relays are hidden behind the new fuse block, where the original UAZ was located.
On VAZ 2105, 2107 cars there are three steering column switches.
Diagram: contacts (pinout) of steering column switches for VAZ 2105, 2107 cars
1.To the right side direction indicators (block X2/5 of the mounting block).
2.To the hazard warning switch.
3.To the relay-breaker for direction indicators and hazard warning lights.
4.To the hazard warning switch.
5. To the left side direction indicators (block X3/5 of the mounting block).
6.To the hazard warning switch.
7. High beam headlights.
8.Low beam headlights.
9. To the exterior lighting switch (+).
10.To the ignition switch (short-term inclusion of high beam headlights).
20.On the washer motor.
Notes and additions
— The contact diagram of the steering column switches for VAZ 2105, 2107 cars of different years of production may differ in the color of the wires.
More articles on electrical equipment of VAZ 2105, 2107 cars
As you know, the VAZ 2101 was equipped from the factory with a pre-revolutionary manual windshield washer system in the form of a pump and a heating pad, but on my penny this system was completely absent. In the summer I somehow managed without it, but in the fall it became simply impossible to drive... Therefore, it was decided to install an electric washer, especially since I got a 3-lever guitar from a 7 from friends (though with a broken signal tongue). Having soldered the tongue, I began installation; it took me all day to redo it, and now I want to share my experience.
So, we will need:
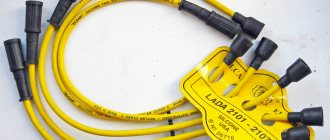
— Three-lever switch (guitar) steering column from VAZ 03-07
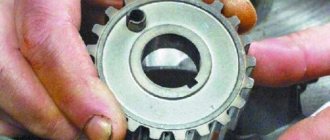
Of all of the above, I only bought the washer motor, steering column and gears with pads, the rest was either from me or from friends =)
Installing a washer reservoir with pump
In the engine compartment we try on and install the tank mount using self-tapping screws, and hang the tank. We use pliers to pull out the old iron jets (you don’t need to unscrew anything, just pull them out), insert and screw new plastic ones in their place (the washer should be on the bottom). We put tubes from the washer system on the jets and on the washer motor. We take the wire and attach the minus contact to ground, pull the wire from the “+” contact into the cabin.
We connect the headlight relay via a relay
We drill two holes in the engine compartment and install the low and high beam headlight relays (2 pcs.) using self-tapping screws. We connect according to this diagram:
Installation and connection of a three-lever steering column switch
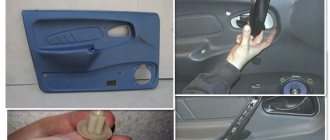
Disconnect the battery by removing both terminals from it. If you have a factory anti-theft system (the steering wheel is locked when the ignition is off), you must insert the key and turn it to the ignition on position to unlock the steering wheel (otherwise you will not be able to remove the steering wheel tube). Remove the steering wheel cover, the steering wheel itself, and the instrument panel. We disconnect the 6-pin block of the steering column switch, disconnect the black wire that goes to the ignition switch; Disconnect the white wire with black stripes from the exterior light switch button. We unscrew the two screws that secure the old switch to the steering tube and remove the switch itself; Unscrew the bolt that holds the steering tube and remove it. We install a new tube (remembering to lubricate it), a new three-lever switch and put the steering wheel in place, but do not put on the cover yet. We switch the three-lever switch according to the following table:
Part of the old and new sample
Selecting a new part for a VAZ-2110 is not such a simple matter. Not everyone knows that there are old and new trapezoids.
Therefore, it is better to remove the old part and take it to an auto parts store. They are not only attached differently, but also differ in the connectors through which they are connected to the motor. If you can’t find an old-style trapezoid, and this is exactly what you have, you’ll have to redo the system or look for a used part.
- As a rule, trapezoids of a new type are available for sale from various manufacturers. One of the popular models has the article number VLT2110–5205010-Р .
If the windshield wiper motor is working properly, you can only change the trapezoid itself.
Welcome to VAZ.EE+ Extended Edition
Since May 2013, our portal has expanded the thematic sections of the forum for the exchange of experience: subforums Americans, Koreans, Germans, French, Japanese have been added, due to the increase in the fleets of our visitors.
In addition to changing the style, our Chat, Mail, Entertainment and photo/video sections, Literature have become built-in and do not require separate registration. In addition, there are other useful and pleasant innovations that you can all familiarize yourself with when visiting the portal.
You can contact the administration with questions and suggestions in a special section of the forum or through the feedback form.
- print version
- Download/Print theme
- Display Modes
- Switch to: Tree-like
- Standard
- Switch to: Linear
Alternative solutions
Most car owners of the domestic “ten” are accustomed to replacing worn out and faulty windshield wipers with similar ones.
Often this happens because they do not see alternatives and are not familiar with them.
For all VAZ 2110 models, regardless of the year of manufacture, it is possible to install windshield wipers for the driver and passenger sides of the same size - 20 inches. The length of the brush is 508 millimeters.
But this size can be increased to 530 millimeters . It is not recommended to install more, since this way the windshield wiper will not be able to work effectively, and the drive simply will not cope with the load. As a result, too long brushes cause squeaking and jerky work. Plus, don’t count on a long service life of the wiper mechanisms.
The original windshield wipers for the 10 are quite good. But there are more expensive, but also more highly efficient, high-quality devices.
Today it is fashionable to use frameless wipers, especially from Bosch. Their advantages lie in their compactness and a special, reliable leash mechanism.
But as practice shows, on the windshield of the VAZ 2110, as well as other VAZ models, they do not look very nice, because the fasteners on the leash turn out to be massive. Although if you modify them a little, you will get a very good result.
We repair the device
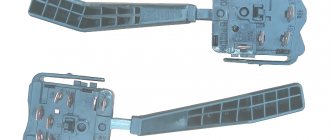
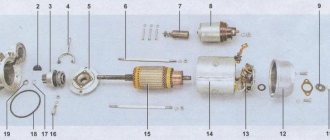
The switches located under the steering wheel of a VAZ-2107 car, at the first sign of a malfunction, require, first of all, to find out the reason why this or that function does not work. To find out the reason, you must first remove the device and try to determine the problem yourself. There are not so many reasons for breakdowns, but often you have to replace the device with a new one. So, in order to determine the reasons for the failure of the steering column switches, let’s look at what parts they consist of, and for this a photo will help us.
The design of the switches is non-separable. In any case, when a problem arises with the operation of the control levers, it is necessary to remove it and try to carry out repairs. Even if it doesn’t work out, you can always buy a new element.
The steering column switch on a VAZ-2107 car is removed in the following sequence:
- Disconnect the car from the power source and remove the steering wheel.
- We proceed to removing the protective casing of the steering column shaft, where the control levers are installed. To do this, use a Phillips screwdriver to unscrew 4 bolts and a self-tapping screw.
- After removing the casing, we move on to the levers of important functions themselves. The block with the power wires is disconnected.
- Unscrew the bolt securing the switches located at the bottom.
- Once the fastening is loosened, the switch can be removed without much effort.
Now you can repair the device by first inspecting any possible damage. If there are none, you need to clean the contacts in the connecting block and bend the sagging springs. It is also necessary to check whether the wiring from the device has been unsoldered. After the repair has been carried out, we need to find out whether we have fixed the problem. To do this, we connect the pads and put the terminals on the battery; if all functions work, then the repair was successful.
How to replace a device
If after repair the steering column switch refuses to work, then there is nowhere to go, you will have to purchase a new one. The cost of such a switch on a VAZ-2107 is around 300-500 rubles. Not that much of a cost for such an important control. Now a replacement is being carried out, which involves removing the old one and installing a new element in its place. How to remove a non-working device is already known, so let’s get down to business. To do this, you need to install the device in place, secure it and connect the power wires. Replacement does not involve any difficulties, after which the functionality of the device is checked and the casing and steering wheel are installed.
The process of repairing and replacing switches under the steering wheel takes no more than an hour, after which this device will work as if the car came straight from the showroom.
Possible causes of wiper malfunction
The causes of windshield wiper malfunction can be either mechanical or electrical. We start troubleshooting first with the fuse, and then we disassemble the rest.
Mechanical problems may include the following symptoms:
- When the windshield wiper is turned on, you can hear the wiper motor running, but the blades do not move. This may primarily be caused by a loose or loose nut that secures the crank to the gearbox axle.
- If the brushes do not work synchronously, the reason may be the driver - its fastening nut has become loose.
Windshield wiper diagram for VAZ 2110
Electrical faults have the following symptoms:
- The brushes do not occupy an extreme position, they stop anywhere and move slowly. The cause may be the ring switch. In this case, you need to bend the contacts. If this does not help, you need to replace the wiper motor assembly, as it is sold with a gearbox.
- The intermittent mode is turned on, and the brushes work continuously, then the problem is in the relay, it needs to be replaced. If the replacement does not help, then it is likely that the contacts on the limit switch have oxidized or burnt.
- If, when you turn on the windshield wiper, the windshield wipers and armature do not work, then the blades may have frozen. Another reason could be a burnt anchor.
- The electric motor does not work, but the fuses are good. In this case, it is necessary to check the contacts that the wiper drive has, as well as the motor. It is possible that the VAZ windshield wiper blades are stuck or the armature is burnt out.
Connecting a steering wheel with buttons
So, a block with wires is already connected to the steering wheel, so maintaining a given speed and the limiter will work immediately after installing the multi-steering wheel (left button panel).
To activate control of the radio or multimedia system (right button panel), you will have to modify the design. We add 5 wires to the block (which already has wires for cruise control), and put a miniISO block on the other end and insert it into the radio (how to remove it).
Wiring diagrams for the Vesta multifunction steering wheel (radio control):
As a result, using the buttons on Vesta’s steering wheel, it will be possible to control the radio, cruise control and speed limiter, and the button backlight will also work.
The only difference from the standard implementation is that there will be no indication of cruise control operation on the instrument cluster. To do this you need to flash it or activate it via ELM327
By the way, during the panel test, pay attention to the cruise control indicators (icons in the speedometer well at about 140 and 160 km/h), if they are on, then the firmware is suitable
Here is the cruise control indication on Vesta, which has a multifunction steering wheel from the factory:
Let us remind you that the “Multimedia” option package includes not only a multifunction steering wheel, but also a rear view camera. We looked at how to connect a camera to a multimedia system earlier. By the way, another way to modify Vesta is to install fog lights.
Photo: logbook vlad21074
Keywords: Lada Vesta steering wheel | cassette player Lada Vesta
7
Found an error? Select it and press Ctrl+Enter..
LADA included in the “CAR DEALER OF THE YEAR 2020” rating
Modification of the frill (installation of a mesh to protect the filter) on the Lada Priora
Drawings for moving the generator to the top Lada 4×4 (VAZ 21213, 21214)
We are improving the work of the wipers on the Lada Vesta