What the public loves about our cars is their simplicity of design, availability of spare parts and ease of repair. As a rule, all basic work is carried out with a standard set of tools, except in rare cases when some kind of puller is desirable. But, as a rule, they can do without it.
The need for dismantling work
This holy simplicity helps to save on the services of masters, and quite a lot. Moreover, given the age category of owners of the VAZ 2110 and others like it, such repair work instills diligence, a love of technology and develops hand motor skills. But seriously, in any garage, any person who is even remotely familiar with threaded connections will be able to dismantle and restore any unit.
The need to dismantle the VAZ 2110 gearbox arises not only when there is a problem in the gearbox itself, but also when for some reason you need to get to the clutch - change the disc, repair the basket, change the release bearing. Despite the fact that the car is inexpensive, the owners have very few complaints about it, which is why they choose the VAZ 2110 among the entire model range. Removing the gearbox is no exception. The work is carried out in several stages, and takes about an hour and a half.
Preparatory work
Before we start removing the VAZ 2110 gearbox, let's prepare for work on the material part. To withdraw you will need:
- set of open-end wrenches;
- set of spanners
- heads and knobs with cardan;
- without a hammer - nowhere;
- a skein of strong braid (although you can do without it);
- jack.
In order to avoid going under the car and getting up from the inspection hole a hundred times, we will try to organize the work according to this principle.
Work on removing the gearbox from the engine compartment
- We place the car on a flat platform with an inspection hole. If it is possible to use a lift, great, it will make the work much easier. We open and fix the hood in the open position, after which the first step is to remove the terminals from the battery, starter relay and speed sensor.
- Disconnect the mass from the clutch housing and disconnect its drive cable. Now you can unscrew the two uppermost bolts securing the clutch housing to the cylinder block and the upper starter mounting nut.
- Now we need to think about keeping the engine in the same position when we disconnect it from the mounting points. For this, the factory has provided a mounting eye, which should be on the manifold stud. We hang the motor with braid either on a beam in the garage, or on a traverse, or on a board laid across the car, resting it on the drainage grooves. We get down under the car.
Work carried out under the car
- remove the engine splash guard and the protective cover of the clutch housing;
- drain the transmission oil from the gearbox, having previously unscrewed the plug;
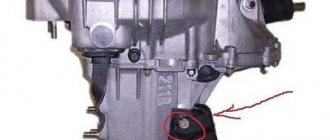
- we find the reverse switch and disconnect the terminals from it; loosen the clamp securing the linkage, remove it from the selector;
- find and disconnect the jet thrust;
- we disconnect the internal CV joints, make sure that the unfixed side gear does not fall into the gearbox;
- use a hammer to knock out both hinges;
- move it to the sides of the drive to the maximum possible distance;
- if it is not possible to dismantle the CV joints on the car, then you will have to remove them along with the box and then knock them out in a vice, if there is such a need;
- unscrew the rear engine mount, the engine is already hanging;
- unscrew the left engine mount;
- unscrew the remaining starter mounting nut;
- dismantle the starter;
- We put a spacer under the gearbox so that you can remove the load from the mating plane, slightly loosen the braid on which the motor is attached;
- unscrew the last bolt securing the box to the crankcase, move it back and remove it together with the clutch housing.
The box has been dismantled. When carrying out work, you must take into account that in no case should you rest the gearbox on the input shaft in order to avoid its deformation, and when removing it, you must carefully remove the shaft from the clutch, there is a danger of damaging the petals of the basket.
Installation of the box is carried out in the reverse order, the only thing that can be strongly recommended is to be sure to change the retaining rings on the inner CV joints. Happy work!
In what cases should the gearbox be removed?
Before removing the gearbox, you should make sure that the malfunctions are related specifically to it and are not caused, for example, by insufficient oil level, loose gearbox mounts, or defects in the clutch release drive.
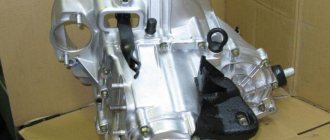
Gearbox VAZ 2110
The need to remove the gearbox occurs when the following malfunctions occur:
- transmissions switch off spontaneously;
- unclear gear shifting;
- increased noise, appearance of extraneous sounds;
- when overtaking, the clutch disappears;
- gears are difficult to shift;
- oil leaks.
In addition, the gearbox should be removed in the following cases:
- when replacing the clutch;
- when replacing an old gearbox with a new one;
- if it is necessary to eliminate the leak of the crankshaft rear oil seal;
- when replacing the front gearbox oil seal;
- when replacing the release bearing;
- when replacing the flywheel;
- when replacing the bushing;
- in cases where the box interferes with any repair work.
The weight of the box without oil is approximately 30 kg, so it is recommended to carry out the procedure for removing it with an assistant. It is advisable that he has experience in auto repair work.
Gearbox under the car
Repair work
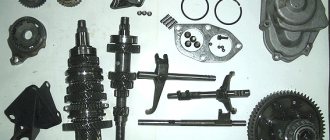
If the adjustment does not give the desired result, you will have to work more carefully with the box. A common problem is knocking out the gears responsible for speeds 1 and 2.
When dismantling, make sure that each individual fastener is in good working order. The latches are springs, of which there are a total of three. The first one is the longest, it is responsible for speeds 1 and 2. The second is medium in size, and its prerogative is 3 and 4 speeds. The third detent is the smallest, and its “guardian” is fifth gear.
The procedure for removing the gearbox on a VAZ 2110
To begin with, you should definitely decide whether you really want to remove the VAZ 2110 gearbox without the help of an experienced specialist. These works are quite complex, so we cannot do without the proper knowledge, skills and equipment.
If you still decide to get down to business on your own, then you should call a friend for help - for some actions one pair of hands will not be enough, and the work will be more fun. The tools we need are, first of all, wrenches and screwdrivers.
In addition, it is worth reading the instructions on how to change the box on a VAZ 2110. Don’t be too lazy to do this, because the process itself is quite complicated, so you can damage the device during dismantling work.
First, we drive the car into the pit. If you want to know how to remove a box on a VAZ 2110 without a pit, then everything happens exactly the same, but the work will be more difficult. After all, having straightened up to your full height, all movements are easier and more convenient. Next, install supports for the wheels. After making sure that the car is immobilized, we begin removing the VAZ 2110 gearbox.
How to remove the box on VAZ 2110 and 2112? A couple of hours and you're done
Novice drivers often wonder how to remove the box on a VAZ 2110 and 2112. But this work may be required in a variety of situations. For some reason, there is an opinion that working with a car’s transmission requires a highly qualified auto mechanic. In fact, this is not entirely true; dismantling can be done by any beginner. But, at the same time, you just need to know the correct sequence of actions. This will not only allow you to remove the box faster, but will also save you from complications in the future. Today we will analyze how such work is carried out in practice, we will consider in detail all the nuances available here. How to remove the box on a VAZ 2110 and 2112 is a question that drivers ask themselves if there are obvious problems with this unit. In fact, there is nothing super complicated here. But, before starting work, it is better to carry out diagnostics so as not to remove the gearbox in vain.
Instructions for removing the gearbox
The procedure for removing the gearbox is labor-intensive and time-consuming. It’s easier to replace it with a VAZ 2110 by visiting a car service center, but you can do it yourself.
Tools
To carry out the procedure, you will need tools consisting of:
- a set of wrenches, socket or open-end wrenches;
- set of heads with extensions;
- flat screwdriver;
- mounts;
- pliers;
- jack;
- clean rags.
In addition, you should prepare a container to drain the used oil. You can use a plastic 5 liter bottle.
Tools should be prepared in advance so that they are nearby while working.
Sequencing
To remove the gearbox, you need access to the underbody of the car, so it needs to be lifted. This can be done using a lift, or driving the car onto an overpass or inspection groove.
Since the removal work is quite complicated, you will need an assistant.
The following video demonstrates replacing the clutch, the first step of which is removing the gearbox.
Removing the gearbox from a VAZ 2110 car consists of a sequence of steps:
- First, you should remove the engine mudguard (protection). To do this, use a socket wrench to unscrew the mudguard mounting bolts and remove the protection.
- Next, we dismantle the engine compartment shield on the right.
- The next step is to drain the oil from the gearbox. To ensure high-quality drainage of oil, it is recommended to warm up the engine before draining, allowing it to run for several minutes. Next, place a prepared bottle or other container under the drain hole and unscrew the drain plug.
Draining oil from the box
- When the oil has completely drained, clean the plug and hole from dirt. Then screw the plug back.
- After draining the oil, you need to turn off the power to the car by disconnecting the negative terminal from the battery.
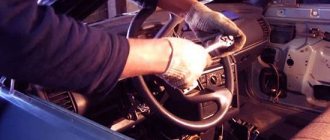
- Next, you need to dismantle the air filter: disconnect the hoses of the crankcase ventilation system, air supply and air flow sensor. The air filter housing is removed along with the throttle valve, sensor and hose.
- Then you need to remove the starter from the car. First you need to unscrew the nut that secures the tip of the clutch wire connecting the starter to the positive terminal of the battery. Next, you need to remove the tip from the contact bolt. Now you need to disconnect the traction relay control wire, unscrew the fastening nuts and remove the starter.
- At the next stage, we disconnect the clutch drive cable from the gearbox bracket and the gear shift fork. To do this, you need to pull the clutch cable out of the fork lever in the engine compartment. Then you should loosen the fastening nut of the cable sheath to the bracket on the gearbox. While holding the sheath, you can pull the cable end out of the bracket.
- Now you need to disconnect the wire connector from the speed sensor, as well as from the reverse sensor.
Disconnecting the reverse sensor connector
- Next, disconnect the jet rod. It is attached to the buffer using two nuts. After unscrewing the nuts, remove the bracket. Now the rod can be dismantled.
- Now we disconnect the gear shift rod from the hinge.
- Then we tighten the fastening bolts on the clutch housing cover and remove the cover.
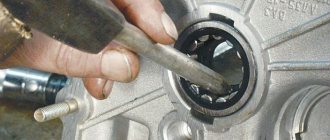
- Now we remove the wheel drives. A wooden plug should be installed on one drive to avoid any problems during installation.
Moment of insertion of the plug into the hole
Then we remove the right drive, but you can simply move it to the side and not remove it.
- To simplify the removal procedure, you need to loosen the ball joint bolts.
- After unscrewing the mounting bolts, you need to remove the lower crankcase cover.
- Then you need to unscrew the lower bolt securing the gearbox to the engine.
- Next, we hang the power unit using the prepared support. You can use a board as a support. After unscrewing the fastening nut, remove the left engine mount.
- Having unscrewed the nuts that secure the rear engine support to the body, and the bolts securing it to the gearbox, holding the nuts from turning, we dismantle the rear support.
- To move the box from the guide bushings, you need to insert a screwdriver between the cylinder block and the clutch housing. When moving the box, it should be held so that it does not rest on the crankshaft diaphragm spring. Due to significant load, the spring may become deformed, which will lead to malfunction of the unit.
- While rocking the gearbox, we move it as far back as possible and dismantle it.
Removing the gearbox from a car
After dismantling the gearbox on the VAZ 2110, you can begin further repair work. Installing the box is done in reverse order.
By mastering the procedure for removing the gearbox yourself, you can save on car service costs and gain experience in car repair work.
VAZ 2110 gearbox device
The Volzhsky Automobile Plant's 10th series vehicles are equipped with a five-speed manual gearbox. It is two-shaft, has five gears for forward movement and one reverse gear for reverse. The main gear, differential and the gearbox itself are combined in one housing. When connecting the crankcase to the cover, it is possible to seal it with a gasket or sealant that is resistant to gasoline and oil.
The two-shaft system is represented by a primary and secondary shaft. The first is a block of driving gears, the second contains driven gears that provide forward movement. The two groups of gears are in constant mesh. The secondary shaft parts can be removed for replacement or repair.
The secondary shaft is made empty inside to lighten the weight of the structure. At the locations of the gears there are circular grooves that ensure the supply of lubricant to the surface of the shaft during operation. The rotation of the fifth gear gear is carried out through the bushing. The shaft splines are used to install synchronizer hubs. The shafts themselves are installed in the box body on bearings - a pair of roller bearings on one side and a pair of ball bearings on the other.
The differential uses two satellites. The pretension of the bearings in it can be adjusted by changing a special ring from thick to more or less thin. This ring can be found under the outer differential bearing cover. The speed sensor is connected to a plastic gear located on the gearbox housing, which, in turn, is driven by the drive gear on the differential housing.
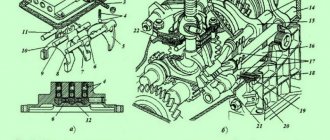
VAZ 2110 gearbox design: 1- clutch release bearing; 2 — guide sleeve of the clutch release bearing; 3 - main gear drive gear; 4 — roller bearing of the secondary shaft; 5 - oil sump; 6 — satellite axis; 7 — speedometer drive gear; 8 — axle gear; 9 — differential box; 10 — satellite; 11 — clutch housing; 12 — driven gear of the main gear; 13 — adjusting ring; 14 — tapered roller bearing of the differential; 15 — axle shaft seal; 16 — driven gear of the 1st gear of the secondary shaft; 17 — synchronizer for 1st and 2nd gears; 18 — driven gear of the second gear of the secondary shaft; 19 — driven gear of the third gear of the secondary shaft; 20 — synchronizer for 3rd and 4th gears; 21 — driven gear of the fourth gear of the secondary shaft; 22 — ball bearing of the secondary shaft; 23 — driven gear V of the secondary shaft transmission; 24 — 5th gear synchronizer; 25 - secondary shaft; 26 — rear cover of the gearbox housing; 27 — drive gear of the 5th gear; 28 — ball bearing of the input shaft; 29 — input shaft; 30 — gearbox housing; 31 — roller bearing of the input shaft; 32 — input shaft oil seal; 33 - breather
When driving on a bumpy road, the engine experiences vibrations, which, if the rubber dampers are worn out or sagging, can lead to displacement of the gearbox shafts. This can result in unpredictable transmission disengagement when the gears on the two shafts become disengaged. To compensate for such vibrations, a reaction rod is provided in the connection between the gearshift handle support and the gearbox housing. It is equipped with a rubber gasket to dampen vibration from the engine, which causes the gearshift lever to shake.
You can find out how much oil is in the gearbox by checking the dipstick. According to factory standards, the gearbox holds 3.5 liters. If the oil level drops, it is necessary to add it, otherwise accelerated wear of the gears can lead to breakdown. Technical regulations require routine oil changes every 90 thousand kilometers.
Clutch replacement is necessary in the following cases:
- If the clutch begins to “lead”, that is, when engine power decreases.
- If the clutch is not fully engaged, that is, it “slips.”
- If you hear extraneous sounds when turning on - clicks, jerking, etc.
- In case of unauthorized disengagement of the clutch.
- In case of vibration when pressing the clutch pedal.
In this article I will tell you how to replace the VAZ 2110 clutch at home without removing the box and draining the oil.
To work you will need:
- Jack;
- Inspection pit or lift;
- Set of socket and open-end wrenches: “19”, “17”;
- Mount or amplifier pipe.
Gearbox adjustment
It is not always necessary to remove it to get the box working properly. Although, if replacement of gearbox bearings or other repair measures is planned, simple adjustment is not enough.
Adjustment is required in several situations:
- Recently, the input shaft bearings were replaced on a VAZ 2110 or another type of repair with the mandatory removal of the gearbox;
- There is a constant overshoot of one of the speeds;
- The gears are switched slowly, poorly, or are knocked out directly while driving.