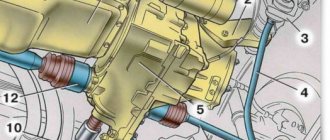
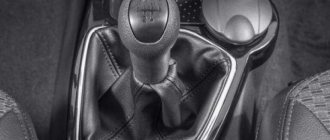
VAZ 2106 gearbox mount
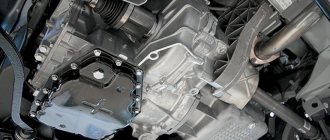
VAZ-2101 cars are equipped with a 4-speed manual transmission, the main part of the gearbox is located under the bottom of the car.
Basic faults
The gearbox used on the Kopeyka is structurally a fairly reliable unit, capable of handling a significant resource without any special intervention. But still there are problems with the gearbox.
The main problems with this unit are:
- Increased operating noise. This happens mainly due to wear of bearings and gears. To restore functionality, it is necessary to replace all worn elements;
- Difficulty changing gears. The reasons for this may be problems with the clutch, deformation of the gearshift lever or shift forks. Troubleshooting is carried out by replacing damaged clutch and gearbox elements;
- Spontaneous transmission shutdown. This malfunction occurs due to wear of the clamps of the sliders of the power forks. The malfunction is eliminated by replacing the springs and the clamps themselves, sliders;
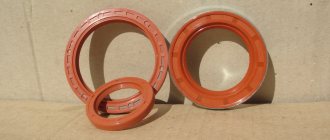
- Oil leaking from the box. Leaks occur due to damage and severe wear of the box seals. Everything can be eliminated by replacing rubber elements;
Of course, there are other types of malfunctions, for example, jamming of the gearbox while driving, inability to engage or disable any gear, destruction of gears or shafts, breakdown of the gearbox housing.
But such problems arise much less frequently and are mainly due to improper operation of the gearbox, as well as design defects in the component elements of the box. Elimination of any of the malfunctions is carried out on the removed box. Therefore, in order to restore the functionality of the gearbox, you must first know how to remove the gearbox on a VAZ-2101.
Moreover, it doesn’t matter whether the VAZ-2101 gearbox is being repaired or replaced, it will still have to be removed.
What you need
This operation is not particularly complicated, but it requires certain skills and knowledge of the sequence of work. The complexity of the operation lies in the fact that many elements have to be unscrewed and disconnected, and access to them is not always convenient.
To remove the box you will need the following tools and accessories:
- A set of keys and sockets (including keys for 10, 14, 17, 19);
- Screwdrivers (thin flathead, Phillips, impact);
- WD-40;
- A section of the gearbox input shaft;
- Long wooden beam;
- Rags;
- Marker;
- Container for draining transmission oil;
All work is carried out in three places - the interior, the engine compartment, and under the car. Therefore >a viewing hole will definitely be required.
Sequence of work
Having prepared everything you need, you can begin work.
The removal sequence is as follows:
- We place the car in the pit and immobilize it with wheel chocks installed under the wheels. We put the gearbox in the neutral position, do not tighten the handbrake;
- First we will do all the work in the salon. At this point it is necessary to remove the lever from the box rod. To do this, pull the lever boot up, which will provide access to the fixing sleeve. You need to carefully pry it up with a thin screwdriver so that it pops out, after which you can pull the lever off the rod;
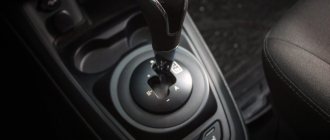
- Remove the upper plastic bushing from the rod by loosening the petals with a screwdriver, then the rubber boot and the lower bushing. As a result, there should be nothing left on the rod;
- Remove the plastic trim located under the floor covering. To do this, you need to remove the seats, their guides, etc. from the car. It is much easier to make a cut towards the rear seats, this will allow you to not disassemble the interior. Having provided access to the cover, unscrew the 4 screws securing it and remove it. We turn on 1st gear at the gearbox;
- Let's go under the car. For ease of work, the exhaust system should be completely dismantled. To do this, unscrew the muffler from the exhaust pipe. To make it easier to unscrew bolts and nuts, you should treat them with WD-40 in advance;
- Having removed the muffler, we go into the engine compartment and unscrew the nuts securing the exhaust pipe to the exhaust manifold. Then we remove this pipe from the car;
- All subsequent work is carried out under the car. Unscrew the driveshaft from the gearbox flange. Next, unscrew the two safety crossbars to lower the cardan down;
- We substitute the prepared container and unscrew the drain plug to remove oil from the gearbox;
- Unscrew the fastening of the clutch slave cylinder. In this case, there is no need to disconnect the pipe from it; after unscrewing the fastening, it should simply be moved to the side;
- Unscrew the 4 bolts securing the clutch housing cover;
- We support the back of the box with a beam and unscrew the nuts securing the cross member. Carefully pull out the timber. In this case, the rear of the gearbox will go down a little, this will provide more convenient access to the remaining elements that need to be removed;
- We disconnect the chip with the wiring suitable for the gearbox. Unscrew and remove the clutch cable;
- We get to the bottom and unscrew the starter mounting bolts. Start with the top bolt. After unscrewing the fastening, move the starter away;
- We place a support under the rear part of the engine, after lifting the box by hand;
- We unscrew the bolts securing the gearbox to the power plant;
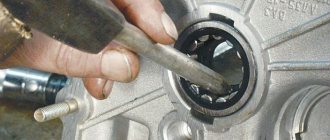
- Supporting it with your hands, rock it up and down to remove it from the guides, and then remove the input shaft from the clutch and lower the box down;
- We install the prepared section of the input shaft into the clutch to prevent displacement of the driven shaft.
Reinstalling the box is carried out in the reverse order. In this case, you should check the installation of all removed elements in place, as well as the reliability of tightening the fasteners.
how to remove a gearbox without a hole
To repair or replace the gearbox, it must be removed. Today we will tell you how to remove or install the gearbox on a VAZ 2106 yourself.
Installation and removal of the VAZ 2106 gearbox
1. Work must be carried out on an inspection ditch or lift.
2. Disconnect the negative cable from the battery.
3. Disconnect the cardan drive from the gearbox and remove it from the car.
4. Remove the exhaust pipe from the mufflers.
5. Disconnect the terminals from the reverse light switch.
6. In the salon, carefully remove the decorative cover from the ring.
7. Use a screwdriver to pry off the rings holding the mat.
8. Moving and lifting the mat, unscrew the four screws securing the cover.
9. Take out the cover with the foam rubber seal from under the mat and lift them up.
10. Pressing down on the gear shift knob, use a thin screwdriver to remove the locking sleeve from the groove of the lever rod
11. and remove the handle.
12. By striking the mounting blade inserted between the engine and the engine compartment partition, we bend the eye washer of the upper clutch housing mounting bolt.
13. Using a 19mm wrench, unscrew the bolt.
14. It is more convenient to use a special curved wrench with a head for this purpose.
15. Using a wrench or a 13mm socket with a cardan joint, unscrew the two upper bolts securing the starter to the clutch housing.
16. Using a 13mm socket with an extension, unscrew the lower starter mounting bolt.
17. Using a 10mm wrench, unscrew the four bolts securing the clutch housing cover.
18. Using your hand or sliding pliers, unscrew the nut securing the flexible speedometer drive shaft to the drive housing.
19. Install a stop under the lower part of the gearbox housing. Using a 19mm socket with a universal joint on the wrench extension, unscrew the remaining three bolts securing the clutch housing.
Source: https://alfcars.ru/transmission-repair-and-replacement/fastening-of-a-transmission-vase-2106.html
What you need
This operation is not particularly complicated, but it requires certain skills and knowledge of the sequence of work. The complexity of the operation lies in the fact that many elements have to be unscrewed and disconnected, and access to them is not always convenient.
To remove the box you will need the following tools and accessories:
- A set of keys and sockets (including keys for 10, 14, 17, 19);
- Screwdrivers (thin flathead, Phillips, impact);
- WD-40;
- A section of the gearbox input shaft;
- Long wooden beam;
- Rags;
- Marker;
- Container for draining transmission oil;
All work is carried out in three places - the interior, the engine compartment, and under the car. Therefore >a viewing hole will definitely be required.
How to Remove a Transmission on a VAZ 2106 ~ AUTOINTERLINE.RU
Box of vases 2106-2103
Before we start removing the transmission
VAZ
2106 , let's take a rough look and determine the main defects that ultimately lead to it being removed. I’ve been thinking for a long time about replacing the front windows of a VAZ 2106 with those of a VAZ 2107 in order to get rid of the ridiculous window that I don’t like so much. The box should be removed if:
- There is excessive noise in the box.
- If while driving you feel that it is difficult to change gears, then this is another sign for the next gearbox repair.
- Speed slippage or unclear gear shifting.
Not counting the above defects VAZ 2106 gearbox , which require removal, the box is also removed when replacing the clutch, when replacing the crankshaft rear oil seal, when replacing the clutch release bearing.
The work of removing and then installing the box itself is very labor-intensive and requires a sufficient investment of physical effort and time on your part, therefore, before you repair the VAZ 2106 gearbox , make sure that the real reason for the breakdown of your car lies specifically at the checkpoint, and not at anything else.
To remove the gearbox from a VAZ 2106 , you will need the help of an assistant, wrenches for “10”, “13”, “19”, a head with an extension or universal joint, prepare for yourself a key for the oil drain plug from the gearbox, well and of course a screwdriver and pliers. How to remove the seat on a Sharan? - Volkswagen - Volkswagen. If everything you need is in your combat arsenal, then let's start repairing.
- First you need to disconnect the ground wire from the battery.
- The handbrake lever must be lowered to the lower position.
- You will also need to remove
the radio panel. - We turn on the neutral position and remove all the decorative body kits and so on from the gearshift knob. It is also necessary to remove the gear shift lever rod; to do this, use a screwdriver to press out the locking sleeve.
After you have removed the lever rod, the remote, elastic and locking bushings will still remain on the lever itself, which also need to be removed
. how to get the ecu into which it is not so easy to remove (in the photo it is removed on the Sharan.
On VAZ 2106 models, the oil change is carried out on a hot engine, that is, immediately after the trip, if the engine is cold or has cooled down, start it and warm it up.
And we will remove them using two screwdrivers, with which we will open the petals of the spacer bushing and then remove all the others.
How to remove the gearbox (gearbox) of a VAZ classic
How to remove
VAZ
car box , details. VKontakte group: group in .
Transmission replacement in less than 15 minutes
Quick replacement of VAZ gearbox
, watch, comment, like.
https://www.youtube.com/watch?v=CYtzF4p9KBU
Now we get rid of the decorative trim of the interior that will interfere with us, namely, look at the fastenings of the floor mat and, if necessary, unscrew it and move it to the side, remove the decorative cover of the parking brake lever, remove the front sill trim, wrap the mat so that the clip of the decorative cover is moved through gear shift lever.
Now let's get to work outside the car, namely you need:
- Unscrew the fastening bolts and remove
the exhaust pipe (see Removing and installing the exhaust pipe). - Unscrew the lower starter mounting bolt and move it to the side.
- Take an empty container and, using a special wrench, unscrew the oil drain plug from the gearbox
, drain the oil and screw the plug back on. - Disconnect the parts attaching the main muffler to the body (see How to connect. The tachometer tx-193 of the VAZ 2106 works on the principle of measuring the frequency of voltage pulses arising in the primary circuit of the ignition system. Replacing the main muffler) and disconnect all additional mufflers (see Changing the oil and oil filter in a VAZ 2106 car, the oil should be drained. Replacing the additional muffler) in this case there is no need to disconnect them from the main muffler, after which we remove the exhaust pipe from the car.
- Next, you need to remove the driveshaft safety bracket from the car. Then unscrew the nuts securing
the flexible coupling to the
gearbox
and, turning the driveshaft, remove the bolts from the coupling one by one. How to remove and replace the abs sensor on an audi a4 b5 body. Remove the coupling from the flange by using a screwdriver to move it away and lower it down.
- Disconnect
the reverse light switch wires from the gearbox - It is necessary to remove from the clutch housing (see Removing and installing the clutch slave cylinder).
- Next, you need to install a stop under the cross member, then unscrew the four bolts securing the clutch housing cover and remove the spring washers.
- After you have installed the stop under the cross member, unscrew the two fastening nuts and remove the washers.
Unscrewing the fastening nuts
crossmembers, remove the stop and smoothly lower the gearbox down; you will need the help of an assistant to support it, then move the stop under the front of the engine in order to fix it at a certain point.
- Unscrew all the nuts securing the clutch housing to the engine, remove the washers and carefully remove the gearbox from the engine.
After carrying out repair work on the gearbox, install it back on your car. How to remove a generator from how to remove a generator from a Daewoo Matiz 169, changing the timing belt on a Daewoo Matiz. All steps to install the gearbox
VAZ
2106
in reverse order. How to remove the VAZ heater motor (heater motor) -. Pour the required amount of oil into the crankcase.
Source: https://autointerline.ru/kak-snjat-kpp-na-vaz-2106/
Main faults on the VAZ 2106 gearbox and how to fix them
Malfunctions of the “six” gearbox have more than one cause. Accordingly, the methods for eliminating them will vary.
Cause of malfunction
Presence of noise in the gearbox (may disappear if you depress the clutch pedal)
There is no noise, but the speeds are difficult to switch on
Between third and fourth gear there is no way to lock the gear lever in neutral
Spontaneous gear shutdown
There is a noise, crackling or squealing sound when shifting gears
How to remove the gearbox on a VAZ 2107
We remove the gearbox on a VAZ 2107 car
The gearbox is one of the main components of the car's chassis. As with We suggest doing the tuning of the VAZ 2107 with your own hands. How to remove and replace the generator on a VAZ 2107 car.
THIS IS INTERESTING: How to connect an additional camera to your phone?
Like oil, it is desirable to always adjust correctly if it does not work properly. To carry out repairs on your own, you should know how to remove the gearbox
for VAZ 2107.
According to the text of the article, a detailed summary is given, not a video, where the process of removing the box is described and shown, and the tools needed to perform the work are listed.
Replacing the box may be necessary in the following cases:
- its failure;
- when noise occurs indicating its malfunction;
- if the gearbox is faulty, it is natural for the wheels to lock while driving;
- An oil leak also indicates problems.
Box removal process
To carry out the removal function, the car must be placed on an overpass, a lift in another inspection hole, because the labor-intensive process is not difficult. Low panel on a VAZ 2109: how to remove it with your own. as on Megan models (see steps 2-4). To remove the rear trim, how do you remove the door trim? Removing the box is impossible without help, so you should call a couple of people with experience in car repair.
Tools
To carry out the gearbox removal procedure, you will need the following tools:
- a set of wrenches, in which the keys should be “10”, “13” and not “19”;
- Socket joints with heads of the same size are used, cardan joints with an extension that will fit the heads;
A set of keys
gearbox support ; clean rags.
Stages
- Work begins with raising the hood of the VAZ 2107. First of all, you should disconnect the negative terminal on the battery. Guide to removing and replacing the VAZ instrument panel (torpedo) on how to remove it on a VAZ 2110, 2111, 2112. Next, remove the radio panel.
- By pressing the gearshift lever, you should insert a screwdriver or other suitable tool into the hole of the locking type bushing, pushing it down, and remove it from the rod cavity.
Remove the handle
Then the lever rod must be pulled out of the gearbox lever. Using tweezers, the rubber damper of the lever is removed from the pulled out rod. Using two screwdrivers, you should unclench the petals of the uppermost bushing and remove it from the lever. How to remove the stove on a VAZ 2110 with your own hands. Main malfunctions of the heating system. VAZ 2107 gearbox Useful tips when installing the stove and spare parts. Then you need to remove two more bushings: the lower rubber bushing (A) and the locking bushing (B).
Removing the bushings from the lever
Having moved the upholstery on the floor, use a Phillips screwdriver to unscrew the four screws holding the cover covering the hole around the handle. The freed cover is removed along with the foam rubber seal from the lever.
Remove the cover with the seal
Using a screwdriver, unscrew the two bolts that hold the handbrake cover. How to remove the seat on a VAZ 2114. Now the cover can be removed. Approach to assembly and disassembly of the VAZ 2104-2105-2107 gearbox. Wash the gearbox and install it on a stand. Next, you should unscrew all the bolts on the floor that secure the carpet in the front of the car. Having moved the front seats all the way back, you should unscrew the bolts that hold the fastenings of the slides on which the seats move in the VAZ 2107. Then you need to remove the metal trims on the sills of both doors, unscrewing four bolts on each side. When all the bolts are unscrewed, you need to roll up the mat, put the ring that is in the mat on the drawstring. Having unscrewed the two bolts holding the rocker cover, you need to remove it from its seat. Then remove the hose through which warm air enters the air filter. Next, you need to remove the exhaust pipe of the exhaust system. Having unscrewed with a wrench all the bolts holding the starter to the clutch housing, the starter should be moved forward. Having unscrewed the plug on the drain hole of the clutch housing, it is necessary to drain all the oil contained in it into a prepared container. Next, the muffler is removed from the car, the cardan coupling is disconnected from the box flange. At the next stage, you need to disconnect the switch from the reversing lights, located on the right side of the box. Using pliers or by hand, loosen the nut holding the speedometer cable, and then disconnect the end of the cable from the gearbox.
Disconnect the cable from the gearbox
Next, remove the clutch slave cylinder, leaving a hose on it. At the next stage, using a 10mm socket wrench, unscrew the bolts on the clutch housing cover (four on the first VAZ 2107 models, two on later models) to remove it. Then you need to remove the cardan drive , unscrew the two nuts that secure the cross member to the body of the VAZ 2107. Since the gearbox is weighty, it is necessary to place a prepared reliable support under it.
Installing a reliable support Using a 19mm socket wrench, you need to unscrew the four bolts that secure the clutch housing to the cylinder block.
Unscrew the nuts securing the gearbox to the clutch housing
Next, you should move the crankcase away from the cylinder block by inserting a screwdriver into the space between these components. In this way, the clutch housing is removed from the guide bushings. To free the shaft, you need to move the gearbox back and keep it in this position until the input shaft is removed from the driven disk hub. At the same time, the input shaft should be pressed out of the inner race of the bearing.
Move the box back
At the final stage, the gearbox is removed.
How to remove the gearbox (gearbox) of a VAZ classic
How to remove the box
VAZ
-2101-2107
cars ,
details. ontakte group: group in .
“Classic of removing the gearbox on a VAZ car”
This video is about how to remove the gearbox with your own hands on a VAZ car.
Source: https://vivauto.ru/kak-snjat-korobku-peredach-na-vaz-2107/
Tips and recommendations for replacing the gearshift lever on a VAZ 2107
When choosing parts to replace failed ones, you must purchase only original spare parts from the manufacturer. Despite the simplicity of the design and easy repair of the product, when purchasing counterfeit material, the service life of the parts is low. When using such products, it is quite possible that there will be negative manifestations in motion in the form of crunching, jamming of gear engagement, spontaneous transition to other gears, howling in the lower part of the tunnel, which can subsequently lead to an emergency situation.
Also, during the procedure for reassembling parts, it is imperative to follow the sequence of actions when installing the linkage hinges. It is necessary to use special lubricants when installing the mechanical parts of the product. Special silicone lubricants with a water-repellent composition are best suited. Such material will preserve the integrity of the composition for a long time and protect the main parts of the scenes. Also, at the first appearance of signs of breakdown, it is necessary to carry out a scheduled preventive inspection with dismantling of the entire unit.
How to Remove the Engine from a VAZ 2106
How to remove a VAZ engine?
So let's start, how to remove a VAZ engine? First of all, let's decide why to remove the engine from the car. This is usually done during major repairs, damage to parts of the crank mechanism and other malfunctions in which the engine needs to be removed.
To work, we will need professional tools and a lifting device to remove the engine from the engine compartment. If the latter is not the case, then invite your comrades to help you remove the VAZ engine.
First, carefully remove the hood. In order to save time and nerves during its installation and subsequent adjustment, you need to mark the places to which the canopies are screwed, to do this, take a black marker and draw a black stripe around the perimeter of the canopy.
After applying the marks, holding the hood, remove the spring and unscrew it.
Now we need a couple of blankets or bedspreads. We cover the front fenders with these blankets so as not to damage the paint.
Now let's get to work. The first thing to do is drain the coolant. If there is water in it, then simply pour it into a container and take it outside, and if there is antifreeze or antifreeze, then you need to take a small watering can with a hose and a canister. unscrew the plug in the cylinder block and drain the fluid.
It is better not to drain the radiator; there is always a clogged tap there and attempts to unscrew it lead to damage to the radiator, so it is better not to touch it. We add the rest of the liquid by unscrewing the lower radiator pipe. After draining the liquid, unscrew the pipes and remove the radiator.
Next, remove the electrical wires from the distributor, from the oil sensor, from the coolant temperature sensor and from the carburetor (if any).
Using a screwdriver, release the clamp and remove the fuel supply hose. We definitely lift it up.
Review of how to remove a VAZ 2106 engine
I’ll explain the words, if you have questions, ask, I’ll answer everyone Subscribe to the channel please!!! Need 100
THIS IS INTERESTING: Skoda Yeti will not start in cold weather
ICE theory: How to remove the engine?
Lectures on the topic “Theory of ICE” Group “Theory of ICE” VKontakte: .
We go to the other side of the engine compartment and unscrew the exhaust pipe from the exhaust manifold.
Be careful, the nuts that secure the downpipe are made of a soft alloy (brass) and excessive force can damage the edges. Also, be careful if there are ordinary metal nuts, they can stick to the studs and when unscrewing, you can break the stud. Recovery is very nerve-wracking :)
After disconnecting the terminals from the battery, remove the starter. To do this, take a 13mm wrench and unscrew the three bolts. And we take out the starter itself.
Next, we disconnect the electrical wires from the generator and for convenience, you can remove the air filter housing.
Now, in order to remove the VAZ engine, we need to unscrew it from the gearbox. The top two bolts can be easily unscrewed using Chinese socket wrenches bent to the side. Unscrew the two top bolts.
We arm ourselves with a screwdriver and release the clamps on the heater radiator pipes, and also remove the accelerator pedal linkage.
We disconnect the choke cable from the carburetor and lower ourselves into the inspection hole.
First of all, remove the clutch slave cylinder. Remove the spring and use a 13mm wrench to unscrew the two bolts. Take him aside so as not to interfere. Attention. Do not accidentally press the clutch pedal, otherwise you will also need to sort out the slave cylinder.
Now all that remains is to unscrew the bottom two bolts that secure the gearbox to the engine.
Next we need to unscrew the four small bolts that hold the protective casing.
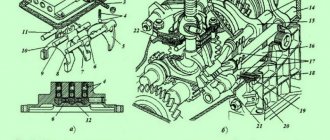
Now, we have come to the final stage of how to remove a VAZ engine. After the above operations, we just need to unscrew the engine from the support pads. Using a 17t socket, unscrew the nuts from both pillows.
We place a jack under the gearbox and lift it a little so that the engine mounts come out of the studs of the support pads.
We hook the engine with belts and lift it slightly with talc. We put the box in first gear and lift the engine out of the guides. As soon as the engine comes off, remove it.
Next, we send the engine for washing and subsequent repairs.
Well, that’s probably all, here we showed how to remove a VAZ engine.
- How to remove a VAZ engine
- Disassembling the VAZ engine. Part 1
- Disassembling the VAZ engine. Part 2
- Disassembling the VAZ engine. Part 3
- Replacing the cylinder head gasket for a VAZ 2109
- Replacing the air filter on VAZ cars
- Replacing the cylinder head gasket VAZ 2106-07
- Replacing the VAZ 2109 pump
Source: https://5net.ru/kak-snjat-dvigatel-s-vaz-2106/
Removing the Gearbox VAZ 2106
11.6. Removing and installing a gearbox on a car with a VAZ- 2106
We carry out the work on an inspection ditch or a lift.
The box can be removed from a car equipped with a VAZ- 2106 only together with the clutch housing and spacer (see “Description of design”). If the gearbox is not meant to be disassembled, then it is not necessary to drain the oil from its crankcase. In this case, the removed box cannot be installed vertically with the clutch housing facing down, so that oil does not leak out of the input shaft ventilation hole.
Disconnect the negative cable from the battery.
In the cabin, remove the floor casing (see “ Removing the floor casing”) and the air supply duct to the rear part of the cabin (see “ Removing the air supply duct to the rear part of the cabin”).
We carry out further operations under the car.
Disconnect the wires from the reverse light switch (see “Replacing the reverse light switch”).
We disconnect the flexible shaft from the speedometer drive (see “ Removing the flexible shaft of the speedometer drive”).
We unscrew the bolts securing the hydraulic clutch working cylinder (see “ Removing the clutch working cylinder on a car with a VAZ- 2106 ”) and move the cylinder forward without disconnecting the hydraulic drive. We unscrew the bolts securing the starter to the clutch housing (see “ Removing and disassembling the starter 421.3708”).
How to remove the gearbox (gearbox) of a VAZ classic
The gearbox (Gearbox) is one of the most important components of a car. The driving characteristics of the car depend on it. Owners of domestic cars (classics) have it a little easier than other car enthusiasts; they can repair and maintain the transmission of their cars themselves. And for those who do not have experience in such work, we have prepared a special article that will help them in this “difficult matter.”
The procedure for removing the gearbox
So, having installed the car on a pit or overpass, let's get started. The first thing we do is remove the driveshaft.
Secondly, we remove some elements of the exhaust system (muffler, “pants”, etc.).
You can, of course, only disconnect the “pants” from the resonator, but if the work is carried out without assistants, it will not be particularly convenient.
The next step is to remove the gearbox working cylinder (it is also convenient to remove it from the pit).
The cylinder can be easily unscrewed with a 13mm spanner; two bolts need to be unscrewed. The gap adjustment is not affected. The next step is the process of unscrewing the bolt securing the ground wire.
Having unscrewed the clutch slave cylinder and the ground wire, we move them to the side so that they do not interfere with us. There is no need to remove them completely, just secure them to the side. Then we remove the “chips” of the reversing light switch terminals.
All that remains is to disconnect the speedometer cable, which is attached to the gearbox.
Don’t forget about the clutch housing shield; it is fastened with four bolts (some have only two left).
While the work carried out from the pit can be considered completed, we move upstairs. We begin to disassemble the gearshift lever, this is done from inside the cabin. Remove the decorative cover and rubber seal.
After this, the lever itself is “pulled off” from the wings. To do this, pry off the nylon ring with some sharp object.
After removing the lever, rubber seals and nylon clamps will remain on the rocker; it is better to replace them with new ones, having previously purchased a repair kit for the rocker.
After completing the “upper” preparatory work, we go down into the pit again, we have to carry out the main part of the work - free the box from the main fastenings - these are four bolts that secure the gearbox bell to the engine (the first attachment point).
The lower bolts unscrew easily; we tear them off with a spanner. But the upper bolts are more “problematic”. To unscrew them, it is better to use a wrench with a head, or you will suffer with a regular cap, but it needs to be wound from the top.
Important! Before removing the gearbox, set the linkage to 5th gear. If the gearbox is 4-speed, then to the 3rd. Otherwise, it will be inconvenient to remove the gearbox.
https://www.youtube.com/watch?v=TfGUjY__iVY
Now we free the gearbox from the second mounting point, this is its rear support, the so-called “swallow”.
They are held on by 13mm nuts, which we pre-lubricate with WD-40, as they often turn sour and can be torn off.
After carrying out all these procedures, we carefully examine the “bell” of the box. We need this to make sure that we have disconnected all the wires and unscrewed the bolts and drives.
Advice! If there is engine protection, then it is advisable to lay a wooden block between it and the oil pan. This will help keep the motor in its original position, making it easier to attach the box to the motor in the future.
Now we proceed directly to removing the box. Having firmly grasped the gearbox housing with your hands and slightly lowered its rear part to remove the rocker, we move the box back, removing it from the splines.
Do not forget that the box and unit is not light, and it is better to invite an assistant to remove it. Installation occurs in reverse order. Advice! Before installing the gearbox, clean the threaded connections and lubricate the shaft splines; this will make installation and fastening of the gearbox easier.
Something else useful for you: