Print this article Font size 16
Crankshaft oil seals or seals work in rotating mechanisms and act as protective dampers. Their main task is to protect the working device from oil leakage. Thus, the oil seal is a sealing element.
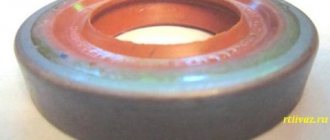
Brand new cuffs
Causes of failure
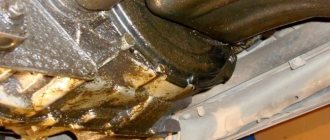
Traces of oil drips are the main and main sign that indicates wear of the crankshaft oil seal. The presence of traces of oil indicates that the tightness of the engine lubrication system has been compromised.
Oil seals can be destroyed under the influence of several factors:
- Natural wear and tear, aging of the rubber used for the manufacture of crankshaft oil seals;
- Incorrect installation, which led to premature wear and loss of functionality. This usually happens during repairs at dubious service stations or when an inexperienced car owner does the replacement with his own hands;
- Mechanical damage to the element;
- Use of a defective, counterfeit oil seal.
The blame should not always be placed solely on the cuffs, which come in front and back. Before you suspect seals, make sure that other potential causes are not to blame.
Checking node status
By checking all elements of the lubrication system, you can make sure that the cause really lies in worn out, deformed oil seals. And then they can be replaced with new elements.
| Object to be checked | Peculiarities |
| Engine oil level | Oil can leave the system for various reasons, including the oil seal. Therefore, it is recommended to be patient and check the level every day, adding a little oil while actively maintaining it. The sensors do not always work correctly, so you need to make sure that there is no pressure violation yourself |
| Crankcase ventilation system | If the ventilation system is clogged, this will lead to active accumulation of crankcase gas. By creating pressure, it pushes the oil through the seals. In this case, simply replacing the cuff will not do anything, since it will be necessary to clean the ventilation |
| Oil hoses | They can bend, become deformed, or crack. As a result, oil comes out and the engine loses lubricant. |
| Lubrication system pressure | If the pressure increases, it causes oil to be pushed out through all sorts of passages. There are quite a few reasons for an increase in pressure, so check why exactly this indicator is increasing |
If problems are detected with the crankshaft seals, the only correct solution is to replace them.
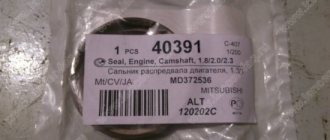
Which crankshaft oil seal to install on a VAZ 2109, when to change it?
Original number 2108-1005034, average price 62 rubles.
Analogues:
- Elring 546.968 — 57 rub.
- Reinz 80-33653-10 — 49 rub.
- Corteco 12016518B — 83 rub.
Replacement frequency : every three years or every time the timing belt is replaced.
1
Using a 17 key, unscrew the oil pan plug and drain the oil into a container with a volume of at least 4 liters. The duration of draining the oil is at least 10 minutes. We wrap the drain plug.
2
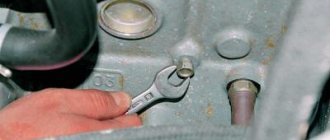
Using a 10mm wrench, unscrew the two side bolts of the front timing cover.
3
And another one in the center. Remove the timing cover. Remove the generator drive belt.
4
Remove the right wheel and the plastic shield of the engine compartment. Using the “19” head, turn the crankshaft clockwise by the pulley mounting bolt.
5
Rotate the lower pulley until the mark on the camshaft toothed pulley aligns with the installation tab on the rear timing cover.
6
By removing the rubber plug in the upper part of the clutch housing, we make sure that the mark on the flywheel is located opposite the slot in the clutch housing cover.
7
This is how the mark is located on the engine flywheel with the gearbox and cylinder head removed.
8
We fix the crankshaft from turning by inserting a screwdriver through the hole in the clutch housing between the flywheel teeth.
9
Unscrew the bolt securing the generator drive pulley.
10
Remove the generator drive pulley.
11
Using a 17mm wrench, loosen the nut securing the tension roller. Turn the tension roller to a position in which the belt will be loosened as much as possible. Remove the timing belt.
12
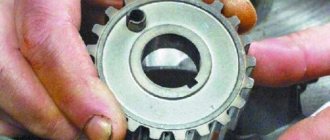
Use two screwdrivers to pry up the crankshaft toothed pulley and remove it from the crankshaft toe.
14
Use a screwdriver to pry up the seal and remove it from the cover.
16
Lubricate the working edge of the new oil seal with engine oil and press it in with a suitable piece of pipe.
17
We assemble and install the timing belt in the reverse order. Add oil.
Welcome! Today you clicked on this link not by chance, since you are looking for detailed instructions on how to replace the front crankshaft oil seal, then we will provide it to you. The instructions for replacing the oil seal will apply only to cars of the Samara family. At the end of the article you can find a visual video that describes in detail the replacement of the crankshaft oil seal!
Summary:
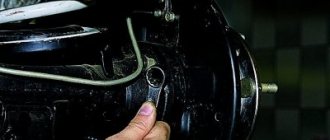
Where is the front crankshaft oil seal located? • It is located in the oil pump cover itself, or to be more precise, it is located on the toe of the crankshaft. In order to see it you will have to remove the timing belt cover. (You will learn how to remove the timing belt cover in this article as we proceed)
• When the cover is removed, turn your attention to the lowest crankshaft pulley, which is indicated by a red arrow in the photo. It is under this pulley that the front oil seal is located.
When should you replace the front crankshaft oil seal? It must be replaced if:
1. The appearance of various kinds of cracks, breaks and defects on it.
2. The oil seal must also be replaced when it becomes oily, that is, when oil leaks are detected on the oil seal.
Note! It is not always necessary to immediately change the oil seal when oil leaks are detected, because oil can also ooze through the oil seal for the following reasons:
- When the crankcase ventilation system is dirty. (You can learn how to clean the ventilation system from the article specifically dedicated to: “Cleaning the system”)
- And also when the hoses of the crankcase ventilation system are strongly pinched. In this case, inspect all system hoses for kinks and correct the problem if possible.
Rear oil seal
It is necessary to replace it if an oil leak appears and lubricant gets onto the clutch discs. Because of this, clutch efficiency drops significantly or disappears completely.
Back cuff
The reason for the appearance of oil on the clutch discs may also be the front oil seal, the replacement of which we will talk about later.
To replace the rear crankshaft oil seal, follow these instructions:
- De-energize the car by disconnecting the negative terminal from the battery;
- Remove the flywheel;
- Remove the clutch housing rear shield;
- Using a socket wrench, remove the rear oil seal holder mounting bolts;
- Remove the oil seal holder, taking the sealing gasket along with it. It will be replaced when installing a new rear oil seal;
- Using a vice, clamp the holder into place. Arm yourself with a mandrel (such as a core) and press the damaged rear oil seal out of the holder;
- Clean the holder with a rag, removing all dirt. Make sure that the holder has no mechanical defects, damage, or chips. If they are, you will also have to change the holder itself;
- Having picked up a new, quality-tested oil seal, arm yourself with a mandrel that matches the diameter of the oil seal. This will allow you to press the element into place. Please note that the cuff must be mounted with the working edge inward;
- Be sure to change the rear oil seal holder gasket. This recommendation does not depend on the condition of the old gasket;
- To facilitate the process of fitting the oil seal onto the crankshaft flange, make a small chamfer around the perimeter with a needle file;
- The edge is lubricated with ordinary engine oil, like the crankshaft flange, after which the element is put on the holder;
- Using a wooden stick, straighten the edge of the cuff;
- Reassemble the structure following the reverse dismantling sequence.
Before assembly, make sure the front oil seal is in good condition. If there are signs of wear, deformation, or oil leakage, it is better to also replace it along with the rear crankshaft oil seal.
Level overflow
As a rule, the distance between Min and Max on the dipstick is 1 liter of engine oil, and 1 cm is 300 ml. The last or even higher value is unlikely to be dangerous for the motor.
Yes, the pressure will increase slightly, but it is not critical, because when developing engines, a safety margin is always built into them. And some people specifically fill the oil above the maximum level when driving on roads with steep ascents and descents, so that the oil receiver does not catch air.
But if a significant overflow was allowed, for example, two or more times, then the upper oil level will reach the crankshaft, foaming will occur, the pressure will increase and the oil seal will squeeze out.
A similar thing can happen if the cylinder head gasket is punctured and coolant enters the lubrication system. The oil becomes gray-brown in color, its level in the crankcase rises, and then you already know what can happen.
Replacement Guide
Before you begin, make sure you have all the necessary materials on hand. Read the instructions carefully and watch the video.
Front cuff
The front cuff is in a more convenient place than the back one and wears out faster, so let's start with it.
Tools
To change the front crankshaft oil seal of a VAZ 2109, you need standard tools that almost any car owner has:
- a set of keys, sockets and screwdrivers;
- rags;
- capacity.
This video shows one of the replacement methods for a VAZ 2109. It also explains what caused this malfunction.
Stages
- As with other work related to the power unit, the first thing you need to do is turn off the power to the car. To do this, remove the negative terminal of the battery.
- Now you need to loosen the bolts that secure the generator.
- We directly remove the belt drive itself.
- Drain the engine oil into a prepared container.
- We dismantle the protection of the power plant.
- Remove the oil pan.
- Remove the camshaft belt. Here you need to act carefully and carefully. The crankshaft and camshaft must under no circumstances turn. Otherwise, the valves may be damaged due to the pistons hitting them.
- Remove the crankshaft pulley. This is done using two screwdrivers.
- The key will also need to be removed.
- After unscrewing the two bolts, we remove the oil receiver.
- Next, unscrew the six bolts and remove the oil pump.
- Take a large flathead screwdriver and remove the old cuff.
- Now you need to thoroughly rinse the pump cover with gasoline and wipe it off.
- The place where the new cuff will be installed must be lubricated.
- We install the new one so that its working part is directed inward.
- We press in the cuffs using a mandrel of the appropriate diameter.
- We return the pump to its place.
- Now all that remains is to install the dismantled components and parts in reverse order.
- Pour the drained lubricant into the motor. You can, of course, take advantage of the opportunity to replace it.
That's it - the procedure is completed.
It is not necessary to remove the oil pump; you can change the front oil seal in place, just like the rear one!
Back cuff
The rear cuff is located in a slightly different place and to replace it we will have to work a little more.
Replacing the camshaft oil seal of the VAZ 2108, 2109, 21099 engine
A leaking camshaft (camshaft) oil seal in engines 2108, 21081, 21083 of VAZ 2108, 2109, 21099 vehicles must be replaced immediately.
Engine oil gets through it onto the timing belt, thereby very quickly destroying it. It is recommended to check the condition of the camshaft seal every oil change (10,000 km), fortunately, to do this you just need to remove the front timing cover. — Wrenches (open-end, socket or socket) for 10, 17, plus a special key for tensioning the timing belt. — Thick slotted socket.
— A hook made of steel wire (for removing the oil seal - you can make it yourself).
— Mandrel or head 30 (for pressing in a new oil seal).
— Sealant for gaskets.
— New camshaft oil seal (aka front crankshaft oil seal, gearbox oil seal).
Preparatory work
— Remove the front engine timing cover
Using a 10mm wrench, unscrew the three bolts securing it and remove it by sliding it upwards.
— Remove the washer fluid reservoir
— We combine the timing marks of the engine timing drive
We turn the crankshaft clockwise by the teeth on the flywheel with a thick slotted screwdriver through the hatch in the clutch housing until the marks align.
— Remove the timing belt from the camshaft pulley
To do this, use a 17mm wrench to loosen the tension roller mounting nut (counterclockwise) and remove the belt by sliding it off the pulley. The belt does not need to be completely removed from the engine.
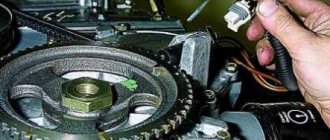
— Remove the camshaft pulley
We fix it through the anti-rotation hole with a socket wrench by one of the nuts securing the rear timing drive cover and, using a 17mm wrench, unscrew the bolt securing the pulley. Carefully slide the pulley off the shaft.
We remove the key from the groove on the shaft shank.
Procedure for replacing the camshaft oil seal on engines 2108, 21081, 21083
— We remove the old oil seal from the seat
We hook it and pull it towards ourselves. When prying, we try not to scratch the surface of the camshaft. You can also remove the camshaft oil seal using a screwdriver, bent-nose pliers, etc., whichever is more convenient for you.
— Install a new camshaft oil seal
We clean the seat under the oil seal from any remaining sealant (if there was any), engine oil and dirt. Lubricate the surface of the camshaft under the oil seal with engine oil. If you are not sure that the oil seal will fit tightly in the socket, apply a thin layer of sealant to its outer part in contact with the socket.
By hand, push the oil seal all the way along the shaft into the seat, trying not to damage its working edge. Using a mandrel (or a 30mm head), with light and gentle blows of a hammer, we press it into the seat.
— Assembling the timing drive
Reinstall the key and camshaft pulley. Apply sealant to the pulley bolt and tighten it to a torque of 98-109 N.m. Align the installation mark on the pulley with the mark on the protrusion of the rear timing cover.
Install the timing belt. If it is in oil, replace it with a new one. We check the alignment of the installation marks on the camshaft pulley and on the flywheel (in the hatch on the clutch housing). We tighten the belt with a tension roller using a special wrench (for more details, see “Replacing the timing belt 2108, 2109, 21099”).
We wait until the sealant hardens and start the engine. Check to see if the engine oil is leaking again. If it leaks again, see below for reasons for leakage.
Notes and additions
— The camshaft oil seal replacement described above is applicable to both carburetor engines 2108, 21081, 21083, and injection 2111.
— There may be several reasons for an engine oil leak under the camshaft oil seal: wear of the working surface of the oil seal itself (their service life is 40-50 thousand km, provided that the product is of high quality), wear of the working surface under the oil seal on the camshaft (age-related or in the presence of risks and scratches from careless previous replacement), increased pressure in the engine crankcase due to wear of the piston or clogging of the ventilation system, etc. For more details, see “Oil is driven under the engine seals, causes, troubleshooting.”
Preface
Replacing the crankshaft oil seal is a rather troublesome and time-consuming process that requires certain technical knowledge. For example, a person should know, not in theory, but in practice, what parts a car consists of, how to remove the timing belt or gearbox.
Oil seals are necessary to prevent fluid, in this case engine oil, from leaking out of the engine compartment. Oil seals are installed where there is a shaft coming out of a mechanism that operates in a lubricating fluid. There are quite a few different components in the car where oil seals are installed, but the most important of them are installed in the engine. In VAZ 2109 engines, like everywhere else, two oil seals are installed: front and rear. The rear one is usually larger; in order to get to it you need to unscrew half the car. Engine oil seals protect the engine from loss of precious engine oil; if it is insufficient, engine wear increases, which promises serious and expensive problems in the future.
An oil seal is a ring that has a rigid outer part and an elastic inside; a shaft is inserted into this ring. The outer part of this ring is reinforced by a spring, which presses it tightly against the shaft. Usually the oil seal is replaced when it is time to replace it, but there are other reasons for replacement, usually premature.
How to change liners without removing the engine on a VAZ 2109?
Most not-so-informed car enthusiasts, when presenting their stories on forums, adhere to the point of view that replacing liners on an engine without removing it from the engine compartment is something out of science fiction. However, it is not! Replacing connecting rod bearings without removing the crankshaft is a typical repair procedure for shipwrights. Parts of marine engines have a significant mass and size, so removing a multi-ton power unit over and over again is not rational. But they have a technique that can be applied to ordinary cars.
Depending on the condition of the crankshaft journals, replacement of the liners is carried out both on site and after dismantling the power unit.
To measure the gaps on an installed engine, you need to lift the crankshaft up. For diagnostics, as a rule, a micrometer is used, however, measurements can be taken, as they say, “by eye.” You should immediately evaluate the possibility of boring the crankshaft. Without question, the liners are changed in the situation when they are turned. How do you know this happened? Yes, the mechanism will begin to make a noticeable knock, and the power unit will constantly try to stall. There are also cases in which the crankshaft simply jams. When this happens, you will no longer be able to drive your car any further. So, let's work...
1. The first thing a car enthusiast who wants to deal with defective liners should worry about is a hole or overpass.
This will help us gain easy access to the engine.2. If any protection for the power unit is installed, dismantle it and drain the oil.3. We remove the crankcase, oil supercharger and spark plugs. We disconnect the cover of the main bearing in which the liners need to be replaced.4. We bridge the device for installing liners. If we don’t want to bother with this, we use an ordinary cotter pin, bending it in place.5. We turn the crankshaft clockwise, oriented towards the front of the engine. With this maneuver, the liner will rotate along with the shaft, which will cause it to come out.6. We lubricate the new product and place it on the side without the lock. The liner should fit with its smooth surface. We turn it into place and remove the mounting device.7. Lubricate the new liner and insert it into the main bearing cover.8. We adjust the cover into place. The arrow marked on it should be directed towards the front side of the power unit.9. Tighten the cover bolts with a force of 50 Nm + (40–60).10. We assemble everything in reverse order. In conclusion
The topic discusses the replacement of crankshaft liners without removing the engine and the shaft itself. However, the car enthusiast should also know that whatever the reason for replacing the liners, it is better to bore the shaft. So, experts say. Even if troubles occurred with only one neck, then all the rest will have to be adjusted to it. When producing power units at the Volzhsky Automobile Plant, the manufacturer installs standard liners. For VAZ models, there are two pairs of repair types, and it follows that the shaft itself can be bored no more than four times. As for purchasing liners, they are sold in sets. This applies to all their varieties. InformationSimilar materials
Replacing the VAZ timing belt and tension pulley with your own hands
RepairEngine and its components
How to check compression in engine cylinders - gasoline / diesel
ArticlesEngine and its components
Video “Correct replacement of the rear cuff”
This video shows you step by step how to properly replace the crankshaft rear oil seal.
We hang up the right front wheel and remove it. Drain the oil from the engine crankcase.
| Using a 10mm wrench, unscrew the four bolts securing the front protective timing cover. | . and remove it. |
| Using the “8” wrench, unscrew the six bolts securing the right half of the lower engine protective casing and remove it. | Using a 17mm wrench, loosen the nut securing the generator to the tension bar and, moving the generator, remove the drive belt. |
| We engage first gear and use a 19mm wrench to unscrew the bolt securing the pulley to the crankshaft. | Remove the pulley from the crankshaft. |
| Before removing the timing belt, align the timing marks on the camshaft pulley and the rear protective cover by rotating one suspended front wheel with 5th gear engaged.
| Using a 17mm wrench, loosen the bolt securing the tension roller. |
| . and remove the timing belt. | Using a 10mm wrench, unscrew the four bolts securing the lower clutch housing cover and remove it. |
| Using a 10mm socket, unscrew the 16 bolts securing the oil sump to the cylinder block. | . and remove the crankcase along with the gasket. |
| Using a 10mm wrench, unscrew the bolts securing the oil receiver to the pump housing and the cover of the second main bearing; remove the oil receiver. | Use two screwdrivers to move and remove the toothed pulley from the crankshaft. |
| Use a screwdriver to pry up the key and remove it from the crankshaft groove. In this case, we act carefully, the key is small and quite insidious - it is easily lost. | Using a 10mm wrench, unscrew the six bolts securing the oil pump to the cylinder block. |
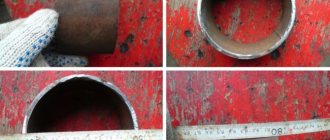
| After lightly tapping the oil pump body, remove it along with the oil seal. |
Attention! Don't forget to remove the old oil pump gasket. It usually remains stuck to the cylinder block.
| The wear of the working edge of the oil seal exceeded 2 mm. The diagnosis of incontinence was completely confirmed. | Using a screwdriver, remove the oil seal from the oil pump cover. |
We carry out assembly in reverse order.
Don't forget to lubricate the new oil seal with engine oil. We press the oil seal into the cover until it stops, using a mandrel of a suitable diameter, for example a socket head. We place a new gasket under the oil pump, coating it on both sides with sealant (it’s more convenient to stick it to the cylinder block). When installing the oil pump, make sure that the two guide pins of its body fit into the corresponding holes in the cylinder block and that the working edge of the oil seal is not crushed.
We also install a new gasket under the oil sump, lubricating it with sealant on both sides. After installing and tensioning the timing belt, check the alignment of the installation marks (photo 7). All that remains is to pour engine oil into the engine.
Sergey GORBONOSOV. Technical
Source
How to replace the front cuff
Regardless of whether your VAZ-2109 has a carburetor or is driven by an injector, the work of replacing oil seals follows the same principle. The front oil seal wears out the fastest. It is easier to change, since it does not require dismantling the clutch system.
To carry out the work you will need to have on hand:
- standard sets of keys and screwdrivers;
- clean container;
- rags.
Since the work is carried out on the engine, disconnect it from the power system - remove the negative terminal from the battery. If you are not confident in your abilities, watch the video instructions in advance.
After such preliminary preparation, you can begin work on replacing the front oil seal:
- Loosen the generator mounting bolts.
- Remove the belt drive.
- Drain the engine oil into a prepared container.
- Remove the protective casing from the power unit.
- Remove the oil pan.
- Gently and carefully remove the belt from the camshaft. Make sure that the crankshaft or camshaft does not rotate while removing the belt. Otherwise, the pistons will hit the valves and deform them. This will result in the need to install new valves.
- Using two screwdrivers, remove the crankshaft pulley.
- Remove the key.
- Find the 2 oil pickup bolts, unscrew them and remove this unit.
- The oil pump is held in place by 6 bolts, remove them before removing this unit.
- Use a flathead screwdriver to remove the old seal from the crankshaft. It is important that it has a fairly impressive size and is made of durable metal. Otherwise, the blade of the screwdriver may break off while performing this procedure. Remember that work with the shafts must be carried out carefully, avoiding rotation.
- Clean the oil seal location and lubricate it.
- Place the cuff, tucking its working part inward.
- Crimping is carried out using a frame of the required diameter.
- Wash the oil pump cover with gasoline and return it to its place.
- Starting with the oil pump, reassemble the mechanism in reverse order.
The final stage is the return of oil to the mechanism. If it is dark enough, then it is best to replace the lubricant with a new one. If you don't have time to do a complete disassembly, you can do without cleaning the oil pump cover. However, it is better to spend time servicing it, so as not to disassemble these units again later. The same can be said about preventative oil changes. If you pour a new compound into the power unit during repairs, the performance of the car will only improve.
labavto.com
For those who don’t know yet, let’s say right away that the crankshaft oil seal is a small but extremely necessary part, without which the functioning of a car is impossible. Its main purpose is to prevent lubricant leakage from the motor through the gap between the block and the shaft pulley.
The VAZ 2109, like others, has two oil seals - front and rear. They change differently, primarily because they are located in different places in the power unit.
VAZ 2109 car
Front oil seal
To understand how you can change the front crankshaft oil seal yourself, refer to the instructions, and also be sure to watch the videos provided.
Front cuff
- Drain the oil from the lubrication system.
- Remove the oil pump.
- Then everything is done quite simply. You need to use a screwdriver to remove the old, worn front cuff from its socket.
- The front crankshaft oil seal is located directly in the oil pump cover.
- Using kerosene or gasoline, thoroughly rinse the oil pump cover, and then be sure to wipe it dry.
Replacing the front crankshaft oil seal with your own hands: methods
The operation should be performed with an assistant. A job such as replacing the crankshaft oil seal on a VAZ 2109 car is a fairly lengthy process and depends on which oil seal is being replaced: front or rear. If the first, then this is not such a complicated operation, which cannot be said about the rear element. To get to it, you need to remove the gearbox, clutch, unscrew the engine flywheel, and then begin dismantling and installation.
Replacing the crankshaft oil seal on a VAZ 2109 (2 methods):
- in place, without removing the oil pump assembly;
- with removal of the pump assembly.
The first method is much faster. But sometimes you have to work in tight spaces. Although drivers and auto mechanics most often use this method. You can work both from the hood side and in the inspection ditch.