Initially, the car bumper was conceived and used as a fender that protects the engine. It was often made in the form of a heavy metal beam, which could actually prevent damage to the power unit in a frontal collision.
Today this device performs more of a decorative function than a protective one. But, be that as it may, the bumper is an element of the body, and its damage does not have the best effect on the aesthetic appearance of the car.
Design and features of bumpers on Lada Priora
Previously, bumpers were made of metal; they were durable, but easily scratched. Nowadays, metal elements are installed mainly on SUVs and sports cars. The basic configuration of the Lada Priora uses plastic bumpers, which serve more of a decorative than a protective function. Therefore, the likelihood of damage is higher.
The front bumper is fixed at sixteen points, the rear bumper at only ten. The original part is marked 217 04-280 30 15-10. Starting from the second release of the Priora, it comes without an internal grille. Therefore, instead of a built-in grille, the original spare part should have a burr-free slot. Another difference from analogues is that all the holes for the bolts coincide with the slots in the body.
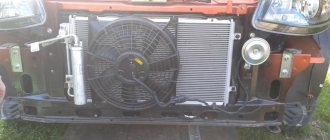
On Priora 2, the original grille comes with black honeycombs. There is no reinforcement for the brand logo badge that was present on older models. If dismantling is carried out, the bumper is often removed along with the amplifier - an additional metal beam that gives the structure strength. This part is always curved and must match the shape of the grille. The design of the amplifier depends on the year of manufacture; if desired, it can be removed and not put back. However, it performs a protective function and reduces damage in the event of an accident.
One of the types of amplifiers for the front bumper of a Priora
Bumper replacement is required in the following cases:
- after an accident;
- in case of cracks in the plastic caused by severe frosts;
- bad parking;
- tuning cars.
How to remove the front bumper on a Priora
The operation is simple, it will take no more than ten minutes; Naturally, provided that the bolts and screws are not stuck. On sedans, station wagons and hatchbacks, removal is carried out in a similar way. If the element is severely worn, dismantling the amplifier may be necessary.
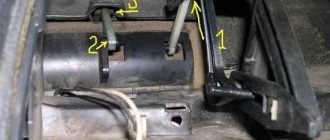
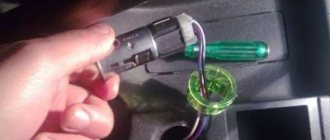
The first step is to disconnect the negative cable from the battery. If fog lights are installed, disconnect their wires before carrying out the operation. To do this, you need to find a plug in the engine compartment. There are such plugs near each headlight; they need to be pulled out.
To turn off the fog lights, you need to remove the plug with wires from each of them
The Lada Priora of the latest configuration has parking sensors. Parking sensors are installed in both bumpers. Therefore, you will have to turn them off on both sides.
Removal begins with the fender liner, unscrewing three screws on each side. During this process, it is recommended to turn the left wheel to the right and the right wheel to the left to make it easier to unscrew the lower bolts.
Next, the hood opens and two plastic trims located above the headlights are unscrewed. They are held in place by 4 bolts. Then the pads are removed.
Removed trim
Next, you need to unscrew the two central screws from the protective casing in the radiator fan area.
Advice!
You can unscrew these two bolts not completely, then after all subsequent manipulations it will rest on them and will not fall when the lower bolts are unscrewed. Then all that remains is to unscrew these bolts and calmly remove the bumper.
Next, you need to go down under the car and use a 10mm wrench to unscrew the 5 nuts that hold the bumper on the bottom of the body.
Finally, all that remains is to unscrew three screws on each side located under the front wings.
Now you need to carefully remove the bumper. It is recommended to start from the side of the fender liners, carefully moving the bumper in this part towards you. Once this part is disengaged, the bumper can be easily removed.
Advice!
It is not recommended to snap off the bumper using rough and sharp objects such as screwdrivers, pry bars, steel rods, etc. It is recommended to do everything by hand. If you cannot manually snap off the bumper, it is recommended to wrap the screwdriver with a cloth or electrical tape so as not to damage or scratch the car’s paint.
Useful video instructions:
How to remove the rear bumper on a Priora: hatchback, sedan, station wagon
The steps are approximately the same as when removing the front bumper. The main dismantling method is described below.
First, use a screwdriver to unscrew the fender liners, which are held on by three screws: 2 at the bumper and 1 at the mudguard.
Next, you need to open the trunk and, depending on the type of body, unscrew a certain number of fasteners.
- U Priory sedan you need to unscrew 6 bolts: 4 in the center and 2 on the sides (in some models - only two, on the sides).
- In the Priora Hatchback, you will need to unscrew 4 bolts: the 2 central ones are unscrewed with a 10 key, and the two outer ones with a 13 key.
- For bumper on Priore station wagon You will need to unscrew 5 bolts.
Next, you need to move under the car and unscrew 2 nuts on the sides of the bumper and 4 more screws along its length (the number of nuts and screws may vary depending on the version of the car, but they are all located there).
Everything is unscrewed, all that remains is to take the rear bumper on either side of the wheel arches and, as in the case of the front, pull it towards you.
To make everything go faster, you can use the following tools:
- Screwdriver. Use it to unscrew the bolts at the rear wheel arches.
- Head with extension . She unscrews the bolts of the upper bumper fastenings. They also unscrew the nuts on the bottom.
Useful videos with examples of rear bumper removal:
Tool
Dismantling a buffer in a garage does not require special knowledge or outside assistance. One person can successfully handle this job. In order to remove the front bumper on the Lada Priora, you need to prepare the following tools:
- a Phillips-head screwdriver;
- 10 mm ratchet wrench.
They will be needed to dismantle the fasteners holding the part to the car body. A screwdriver will be used to unscrew the screws, and a wrench will be used to unscrew the engine protection bolts. For ease of work, you will need to install the car on an inspection hole or overpass. If there are no such structures nearby, then you can raise the front of the car using a jack and securely secure it in this position.
Tips and tricks
The Priora's bumper is attached on the sides only to the fender liner, as in many foreign cars. At the joints the element simply fits into the grooves. This greatly simplifies the dismantling process. But sometimes you additionally have to remove the protection from the motor. After unscrewing the bolts, simply pull out the bumper.
To unscrew the lower screw that holds the fender liner in place, it is better to unscrew the wheel to the side in advance. If this is not possible, you can reach the hard-to-reach area using a small short screwdriver. When the bolts do not budge, they must be pre-treated with WD-40 lubricant.
The bumper contains upper and lower radiator grilles, as well as headlights. If replacement is necessary, all these elements can be easily removed. The grille is held on by metal latches. These latches can be pryed with a screwdriver and removed using pliers. The grille will then detach. The headlights are held on by self-tapping screws and can be easily unscrewed in one or two minutes.
Location of the radiator grille to bumper mounts
Metal elements under the bumper can quickly rust, so it is recommended to remove it along with the body kits. Parts must be cleaned of dirt and thoroughly washed in warm water. To avoid the formation of rust, it is advisable to treat the body with a protective compound. To do this, its surface is cleaned with a solvent, after which the anticorrosive agent is applied with a brush.
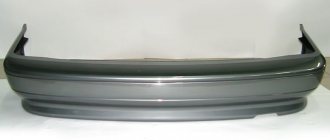
Appearance and Features
This element is made in the shape of the Priora front end. The front bumper of the Priora is plastic, the design has a streamlined shape. Includes projections for headlights, grille protecting the radiator. In the center of the radiator grille is the famous AvtoVAZ “rook”. Below is a recess for the front license plate, with an air intake grille underneath it. Through the grille, atmospheric air enters the engine filter, and then into the intake manifold. On the sides of the air intake grille there are round recesses for installing fog lights.
The bumper also protects the energy-absorbing beam, which protects the power unit. The overall design, due to the fact that it is made of plastic, is not super durable. It may crack due to severe frost. Often cracks appear along the bend line.
The material of the product is thin, and even a moderate impact can deform the coating. This is the most common reason why this element is replaced.
But if the damage is minor, how to repair the product? Defects can be leveled by soldering, straightening, and stripping. Dents can be “blown out”. In any case, before repairing the bumper, it must be dismantled. Let's figure out how it is attached to the body.
What to do after replacing the bumper
When parking or driving in a traffic jam, you can easily damage the headlights or scratch the body. Therefore, it is better to install the bumper in its old place as soon as possible. Until the repair is completed, the motorist has the right to drive without a bumper. Traffic police officers can impose a fine only if the person has removed the part permanently and deliberately changed the design of the car. They have the right to fine you if you don’t have a rear bumper, since it must hold license plates.
Installation of a repaired old or new bumper is done using self-tapping screws. If a skirt or a tuned bumper is added, these elements are secured with screws. Before installation, it is important to ensure that there is a thread for the towing eye. Cars produced since 2011 have such a thread. The eyelet can be used either the original one or any other one that is suitable in size.
Conclusion
Removing the bumper does not require special knowledge from the driver; the most important thing is to remember which bolts need to be unscrewed. Even in minor accidents, it is this part that often suffers, so information on how to dismantle it will always come in handy. This operation does not require an assistant, but when installing a new part, it is better to ask a friend for help. This is due to the fact that it is difficult to fit a new element alone.
How to remove the front and rear bumper on a Priora hatchback, sedan, station wagon
5 (100%) 1 vote
Types of restyled bumpers and their prices
How to remove the front bumper on a VAZ 2114 with your own hands: video instructions
Today, buying a new bumper for a Priora is not a problem at all. The fact is that the VAZ-2170 and its modifications are the most popular model for tuning. Taking advantage of this popularity, a large number of enterprises produce many varieties of bumpers and other body kit elements for Priora.
At the same time, you can buy them either as blanks (unpainted, without seats for additional headlights), or ready-made (painted in the desired color, with spaces for headlights, or with built-in headlights). Here are just a few popular models:
- "I am a robot";
- "Tokyo";
- "Fan" -2;
- "Boxing ring";
- "Ring"-2;
- "Sniper";
- "Strike".
Tuning bumpers can be made of ordinary polyethylene, ABS plastic, fiberglass or fiberglass. Prices for such products vary between 3000-5000 rubles. A stock bumper (catalog number 2170-2803015) produced by AvtoVAZ will cost from 2,400 to 4,000 rubles.