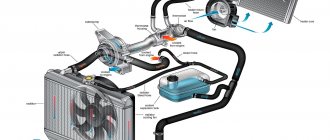
Interior heating systems on different vehicles have a similar design. In a VAZ-21124 car, the heater functions as follows:
- the stove control unit controls the set air heating temperature with an acceptable error of about 2 degrees;
- Air heating for interior heating is carried out in the heater radiator. It has a standard design and is made of copper or aluminum alloys;
- To supply air into the cabin, special deflectors are provided that regulate the direction of its flow;
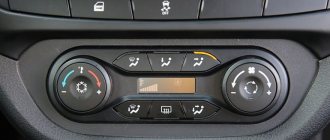
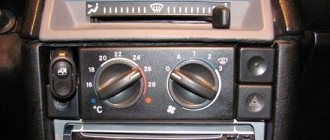
- On the heater control panel there are: a fan operating mode switch with sliders that control the heater dampers.
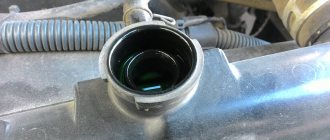
One of the most common problems with the heating system on the VAZ-2112 is its depressurization, which is characterized by leakage of coolant from under the central panel. One of the reasons for this is the failure of the radiator, in which case it needs to be replaced.
Aluminum VS Copper: which radiator to choose?
Many years of experience in operating radiators made of various materials on domestic cars (including the VAZ-2112), it was noticed that its performance is not affected by the material from which it is made. Both copper and aluminum devices heat equally well.
The only criterion when choosing a radiator is its originality, since only a serious manufacturer is capable of producing a quality product. Therefore, when purchasing a heater radiator, it is necessary to pay attention to this criterion.
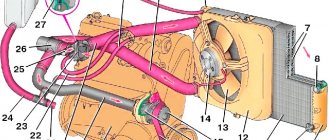
So, where exactly is the radiator of the VAZ-2112 stove? In the design of the interior heating system, the radiator is located inside the heater housing, occupying a horizontal position in relation to the central panel.
What to install?
Brand Pekar
Heating radiators used for the VAZ 2110 are usually divided into two types:
- Old style;
- New sample.
Until the fall of 2003, old radiators were installed on the “tenth” model, and then cars with new units began to be offered. There is practically no difference between them, but the repair differs in approach and complexity.
In addition to the standard aluminum radiator, a copper analogue is perfect for the VAZ 2110. This unit has fewer fins, but is characterized by more efficient heat transfer. This will make the stove work much better. The only drawback of a copper radiator is its cost. Ideal for installation on a VAZ 2110, a double-row copper radiator marked 2110-8101060 will cost you up to 2,000 rubles.
https://youtube.com/watch?v=7FXfxxBYNaU
If you don’t want to spend that kind of money, but want to get an effective device with high quality indicators, then choose the DAAZ model. This radiator is made of aluminum, works well, and the price does not exceed 1000 rubles.
How to remove and replace the heater radiator on a VAZ-2112 (old model)?
A leak of cooling fluid in the cabin is a direct prerequisite for the need to change the heating radiator, since it is already out of order.
Note that models older than 2003 have an old-style stove installed. However, towards the end of this year, the cars were already equipped with a new heater. Accordingly, they have some structural differences, and therefore are removed and installed differently.
Replacing the radiator on the VAZ-2112 stove:
- We free the system from antifreeze by draining it through the hole in the power unit block or through the expansion tank. If you choose the second option, you must remove the ignition module. Next, remove the lid from the tank, and then uncork the drain plug. If there is no sediment in the coolant, that is, it is in a clean state, it can be reused.
- It is necessary to remove the hood seal, which is located next to the frill.
- The screw fixing the frill should be unscrewed, and then the screws securing its upper part should be unscrewed.
- Loosen the clamps and remove all wires and hoses from the frill.
- Disconnect the vehicle's power supply by removing the terminals from the power source.
- On the left side of the frill there are two screws that must be unscrewed to remove the element. There is no need to remove it.
- Remove the front cover.
- You will need to remove the terminal (if any) from the liquid level control sensor in the system, as well as the steam removal hose from the expansion tank.
- Remove the hose from the front windshield washer.
- After unscrewing the four screws, you need to remove the windshield wipers with the windshield trim.
- The stove fan is dismantled, as well as the mounting brackets for its housing.
- The mounting screws are removed from the protective casings of the air filter and fan.
- It is necessary to remove the front heater blower housing and the cabin filter housing.
- The rear part of the fan shroud is removed.
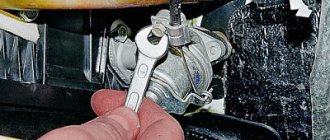
- The steam outlet line and the antifreeze supply hose must be disconnected, having first loosened their fastenings.
- The heater core can now be removed.
Before installing a new radiator, it is necessary to clean its seat in the stove body. When assembling the heater in reverse order, it is very important to control the tightness of all connections and the correct location of the parts. Otherwise, the heater may simply not function, and then the entire described sequence of work will have to be done again.
Replacing the VAZ 2112 stove yourself
Replacing a VAZ 2112 stove yourself is a type of work that is the most popular repair with the arrival of cold weather. The thing is that during the warm period, the radiator, which is also called the stove, can wear out, but due to the fact that it is not in use, it is almost impossible to notice this, but when the heater is started for the first time, when antifreeze begins to spill, everything becomes clear .
If this is your first time encountering such a problem, then most likely you will need instructions for replacing the radiator, which we will present as part of this publication. You must understand that the VAZ 2112 was produced with two designs of heaters
, so in order to carry out the replacement, you will have to pay attention to the year of manufacture of your car. VAZ 2112 cars produced before 2003 are equipped with an old-style heater, and those produced in a later period were equipped with a new-style heating system.
How to replace an old-style heater on a VAZ 2112?
To begin with, we will look at the question of how to change the VAZ 2112 stove on cars manufactured before 2003
. To make it easier for you to understand the process, we will present the instructions in the form of a step-by-step guide.
1. First of all, you must drain the coolant from the car's heating system. To do this, you should unscrew the cap of the expansion tank and relieve pressure in the system. After this, disconnect the rubber pipe, as well as the heater hose. Move under the car and remove the drain plug, drain the antifreeze into a container that should be large enough - at least 6 liters.
2. Now, you need to remove the rubber hood seal, which is located near the frill.
3. Next, we begin to release the frill. To do this, unscrew the screw, which is located just below the main brake cylinder, as well as four mounting screws, which are located on the right side of the frill. After this, you should loosen the clamps that attach the wiring and hoses to the frill, disconnect the negative terminal and unscrew two more screws that are located on the left side of the frill. Now you can move the frill up; it is not necessary to remove it completely.
4. Next, you must remove the plastic windshield trim. To do this, you need to remove the five screws and two nuts that hold it in place.
5. Now you need to disconnect the power from the sensor, which is responsible for the antifreeze level, as well as the hose that removes steam from the expansion tank and the hose that is used for washing the windows.
6. Next, you must remove the windshield wipers, windshield trim, electric fan and heater housing clamps. This is done by unscrewing the mounting screws.
7. Now, you can remove the cabin filter housing and the fan housing, and then get to the clamps and hoses securing the radiator.
8. Pull out the old radiator, clean the seating area from dust and dirt, install a new radiator and reassemble the structure in reverse order. As you can see, the solution to the problem of the old-style VAZ 2112 stove not working is a fairly simple procedure and does not require complex equipment, although it will take you quite a lot of time. The main thing is to be careful and consistent.
We are replacing the heater radiator of a new VAZ 2112
As we said above, VAZ 12 series cars that were produced after 2003
, were and are being equipped with new-style heating systems. Replacing the radiator in them is carried out somewhat differently than described in the previous section of this article, therefore, we will present separate detailed step-by-step instructions for them, which should be useful to you.
Replacing the VAZ-2112 heater radiator (new model)
The procedure begins with dismantling the stove, which is attached to the car body with two nuts on the side of the intake manifold, a screw in the windshield area and a nut near the cabin filter. It is also necessary to remove the rear window washer barrel.
The sequence of actions is as follows:
- Remove the air filter.
- Unscrew the screws from the outside of the stove.
- The heater body, consisting of two halves (left and right), must be separated and the steam exhaust hose released.
- Remove the old radiator, clean its seat, and then install the new element.
- The right half of the heater should be disassembled, which also consists of two elements fastened with metal brackets. Now the stove damper is freely accessible, and if necessary, it can be cleaned or replaced.
- The new heater damper must be in a position where the heater radiator is closed.
- The temperature sensor is set to the minimum mode, after which the ignition is turned on. This is necessary in order to correctly install this sensor, since after this it must take its initial position.
- You can reassemble the heater in reverse order.
After replacing the heater radiator, you will need to replenish the coolant level in the system and test the performance of the heater. If everything is done correctly, all heater elements are in working order, and cold air begins to blow from the deflectors in the cabin, which means that the system has become airy. After eliminating it, the stove will work as before, and maybe even better.
Auto-chip
A large number of motorists are accustomed to not noticing that problems begin with the heater radiator, at first these are slight “fogging”, which then develop into a “small leak”. All this can be tolerated for the time being. But no matter how much you want it, repairing the stove radiator is inevitable. Since a coolant leak will, over time, lead to the failure of the stove.
This problem may not be relevant in warm seasons, but in cold seasons it will create real problems, including complete inability to move in a car.
Although this repair is more complicated than replacing filters, it can also be done independently, without turning to a professional auto mechanic.
Heater radiators VAZ 2110, 2112, 2111 types
Before you begin repairs, find out what model of radiator is installed on your car. For simplicity, remember the year the car was manufactured. Until the fall of 2003, old-style radiators were installed on cars of the VAZ-21XX family; in the subsequent period, new ones were installed. In general, the design of the radiators is very similar, but small differences make them not interchangeable. In this regard, their repair and replacement also takes place differently.
Removing the heater radiator
- Before installing the radiator, it is necessary to drain the coolant (antifreeze or antifreeze). If the fluid has a dirty, rusty color, replace it. Unscrew the expansion tank cap, thereby relieving the pressure in the system. Having found the drain plug behind the ignition module, drain the coolant.
Provide containers for it in advance.
- Inspect the heater pipes for cracks and leaks. If they are found, their replacement is also strongly recommended.
- Prepare new clamps; old ones, when reused, will not provide proper fixation.
- Prepare a tool - a small Phillips screwdriver.
Replacing the old-style VAZ 211X heater radiator (stove)
Remove the casing covering the stove, secured with clips.
We dismantle the frill (a plastic windshield that covers the space from the hood to the windshield). To do this you need a Phillips screwdriver.
Disconnect the washer hoses that are attached to the frill.
Disconnect the fan. Resetting the power terminals (“+” and “-“).
Disconnect the coolant level sensor connector.
Then we unscrew all the screws and unclip all the latches connecting the stove casing. The procedure is very long and tedious.
Then disconnect the heater pipes and the expansion tank hose. Then remove the stove from the housing.
Inspect the radiator, if you are the happy owner of a copper device and the leak is insignificant, then contacting a specialist who specializes in soldering, it is quite possible to restore it.
After this, it is necessary to reassemble, as in most cases, in the reverse order.
Replacing the heater radiator (stove) of a new VAZ 2110 model
1. As when replacing the radiator of an old-style stove. Drain the coolant, remove the frill, the sound insulation that blocks access to the stove casing, and the wipers along with the levers.
2. Remove both hoses connected to the heater radiator (just disconnect the clamps and pull the hoses off the fittings), as well as the hose that discharges steam into the expansion tank.
3. Disconnect the fan power connectors.
4. Remove the gearmotor, having first disconnected it from the power supply
5. Find the heater mountings to the body and also dismantle them.
6. Unscrew the four screws securing the air filter cover. Remove the cover and take out the filter, for convenience.
7. Both halves of the stove body are secured with 3 self-tapping screws - we also unscrew them. Then, unscrew the self-tapping screw, which is located under the air supply hose (L-shaped).
8. Divide the heater halves into 2 parts: first take out the left part, then the right part.
9. Release the brackets holding the right side of the heater.
10. After this, we take out the damper and replace it with a new one if necessary.
11. Install the radiator, rinse if necessary with a special engine cleaner, and reassemble the heater in the reverse order.