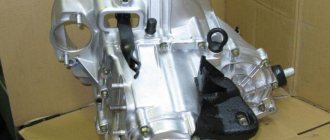
You noticed that the reverse lamp on your car does not light up, what to do in such cases, where to start troubleshooting.
For cars with gearbox.
- The first thing you need to do is check the fuse, it’s as easy as shelling pears, look in the manual and find the fuse that is responsible for turning on the light bulb.
- Second. If you have a manual transmission, then you need to check the connector on the reverse sensor; as a rule, it is located alone on the gearbox, not counting the speed sensor; it is located on the gearbox between the battery and the engine. We remove the connector from the sensor, see if the contacts are oxidized, bridge them with a piece of hardware with the ignition on and check whether the rear lights are on or off. If the lights come on, then change the (frog) sensor.
- The third thing you need to check is the light in the rear light, you may ask, “How is it possible, I have two reverse lights, have two bulbs burned out at once?”
Yes, such incidents also happen when two light bulbs burn out almost immediately, or, for example, the lights are installed in the trunk lid, they slammed it harder, and the filaments of half the light bulbs fell off. It is also worth paying attention to the contacts of the light bulbs; if they are oxidized, be sure to clean them, for example on the VAZ 2107 they definitely oxidize.
But of course, this rarely happens when two lamps burn out or are shaken off at once; here it is more likely to look for a malfunction of the reverse sensor, popularly called the reverse frog. This name comes from ancient times when everyone drove a VAZ, Volga and ZAZ. By the way, on the VAZ 2110, as I said, there are two reversing lights and the connector there, as a rule, is constantly oxidized. There is no particular need to repair anything, just clean the contacts and install the connector in place.
After you have checked everything and nothing, the reverse light still does not light up, the problem remains unresolved, you need to dig into the wiring, look for a break and call.
Approximate wiring diagram on a car:
- The first wire goes from the fuse box to the lamp
- The second wire from the body ground to the rear speed sensor at the gearbox
- The third wire runs from the sensor to the reverse lamp
Sometimes it happens the other way around, the rear lights are constantly on , well, it’s more likely that the sensor is jammed or the wires are frayed and shorted.
How to replace a faulty sensor?
- On some cars it is located on the top of the gearbox such as Peugeot and you can replace it without much difficulty by unscrewing it with a 21 socket.
- On domestically produced cars such as VAZ , it is located below the oil level; when replacing it, you need to remove the crankcase protection, if present, and place a small container in case you are not very fast with your hands
Video on replacing the sensor on a VAZ 2110, 2111, 2112 car.
On a car with an automatic transmission or CVT, the situation is much more complicated, due to the presence of a gear controller, which may have malfunctions.
The reverse lights of the VAZ 2110 do not light up - what to do?
Leaving your garage one evening, you notice that nothing lights the way. The situation, frankly speaking, is unpleasant and makes you think about it. After all, the rear lights of a VAZ 2110 should be on in normal mode. This means that there is some kind of malfunction that needs to be found and eliminated. Who knows what the reason is, we will have to figure it out. If the reverse lights of a VAZ 2110 do not light up, then, in all likelihood, it is possible that they have simply burned out. Maybe it's a simple failure of a fuse or sensor.
Reasons why the reverse lamps do not light up
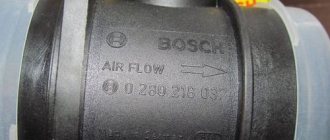
It is not difficult to see that when the reverse light on a VAZ2110 does not light up, the reasons can be of a very different nature. But be that as it may, everything needs to be corrected, and for this the cause must be eliminated.
To do this you need to do the following:
- It is necessary to determine the condition of fuse No. 19. It is designed for a power of 7.5 A. Its location is the rear light board of the VAZ 2110 mounting block under the dashboard.
- Next you need to make sure that the light bulbs are working properly. If it turns out that there are no problems with them, you need to check the reverse sensor.
In the latter case, the question of its location may arise. When viewing the car from the front, it is on the right side. If we consider it in projection in the direction of travel, then it will be located in the gearbox, in its lower left part.
Halogen lamps H1 for VAZ reverse lights
The point of the modification is to install halogen taillights with even more power. To improve the light of the reversing lights, it was decided to install an H1 60W lamp.
The rear light board is removed and disassembled from the reverse lamp side. Let's mark as precisely as possible the place where lamp H1 will be (in the center of the reflector, we focus on the position of the standing lamp), drill 2 holes with a diameter of 3 mm and grind off the plastic between them with a file. We also drill 2 holes for fasteners with a diameter of 4 mm.
I soldered the wires directly to the board. For good contact and the lamp body, the minus was brought to the screw through the terminal.
H3 halogen bulbs in the reversing light
I installed an H3 lamp on the second side of the rear headlights. You needed: a spring of the required length, a wire with a male terminal and half a paperclip.
For the lamp wire, make a cut in the socket using a file (Fig. 1).
The lamp has flat holes. There we insert the male socket with the wire.
We fix the lamp in the socket using a spring, and use a paper clip to make hooks for hooking
We bring the wires out through the cut and solder them to the board (for the wire from the lamp we use an additional connection). Now the brightness of the reversing light is slightly better.
Checking the functionality of the sensor (frog)
When you manage to find it, you need to check its performance status:
- The wires connected to it must be disconnected.
- A tester is connected to their ends. The device is switched to “resistance” mode and the measurement is carried out.
- Then reverse gear is engaged.
- The ignition is switched to the on state.
- The instrument readings are taken.
The device may show 0 Ohm. This means that there are no problems with it. If there are other indicators, it needs to be replaced. This must be done not only when the VAZ 2110 does not have reverse gear on, but also when the lights are on and reverse gear is not engaged.
Algorithm of actions when replacing a sensor
Changing it is not particularly difficult, but you need to do the following:
- To replace the car, you need to put it in a pit or drive it onto an overpass.
- If there is engine protection, it must be removed.
- You should first prepare some kind of container for the oil, since the moment the sensor is unscrewed, a certain part of the oil will leak out.
- Then you need to unscrew the wires that are connected to the sensor.
- The old sensor must be removed and a new device installed in its place.
- The oil that leaked out during the sensor replacement process must be added to the box.
- Next, the wires are connected. They must first be wiped dry to remove any oil that has got on them.
- Then you should start the car and check for light from the bulbs when reverse is engaged.
Such measures are one of the options for eliminating the problem in which the reverse lights of the VAZ 2110 do not light up.
Replacing the sensor
And now it’s time to consider the process of replacing the reverse sensor on various VAZ cars - from 2106 to 2115. Here are the instructions.
VAZ 2107
Let's start with the VAZ 2107 car. On VAZ Classic models everything is done exactly the same.
Advice! Before replacing the sensor on any car, clean the gearbox housing from dirt to make it easier to find the sensor and to prevent dirt from getting into the oil.
So:
- First, we look for the sensor - it is located on the right side of the gearbox, if you look at the car as it moves. It is very difficult to make a mistake - this is the only part in the gearbox where two wires fit.
- If the wires are broken, then look for protruding contacts.
- If the wires are still on the sensor, then disconnect them.
- Next, you will need a 22 key. They need to unscrew the sensor. For convenience, it is better to take a longer wrench, since over time the sensor will stick to the crankcase.
- If you cannot unscrew the reverse sensor using a wrench (head), then you need to do this using a hammer and chisel.
Note! The gearbox housing is very fragile. Therefore, be extremely careful not to damage it with hammer blows.
- Then clean the seat from dirt using a knife.
- Remove the metal washer along with the dirt and replace it with a new one.
- Insert the sensor and tighten it using the same wrench until it stops.
- Next you need to put the wires back on. If necessary, crimp the contacts with pliers.
- And now, the replacement of the reverse sensor on the VAZ 2107 is completed!
Some people have a question about oil - whether it will leak or not. In this case it will not leak.
VAZ 2109
Let us remind you that this point applies to the Samara family as a whole, and not just to the VAZ 2109 car:
- Remove the protection from the car engine, if any.
- The location of the sensor on a VAZ 2108 and similar cars is slightly different than on a Classic, since the car has front-wheel drive.
- As the vehicle moves, the sensor is located on the left side.
- If the Classic had to be driven into a viewing hole, then cars with front-wheel drive can simply be lifted under the left front wheel using a jack.
- Again, the electrical wiring leads to the sensor.
- Remove the wires.
- To remove the sensor you will need an extended 22mm socket and a wrench.
- Using the head, remove the sensor.
Remember! Replacing a reverse sensor on a front-wheel drive vehicle is characterized by small oil leaks from the gearbox housing.
- Prepare a container and, as soon as you unscrew the sensor, place it so that the oil does not spill on the floor.
- Insert the new sensor as quickly as possible.
- Screw it in by hand first and then tighten it using the same socket and ratchet.
- Connect the electrical wiring wires.
- Add the required amount of oil.
All is ready!
VAZ 2110
Cars of the VAZ 2110 family are equipped with engines from the VAZ 2108. Therefore, there is no point in writing the same information a second time. The answer is: VAZ 2110 replacement of the reverse sensor - see the information above.
VAZ 2114
Replacing the reverse sensor on a VAZ 2114 or cars of the Samara-2 family. Instructions:
- The essence of the process is the same.
- Raise the car using a jack.
- If necessary, remove the engine protection, but this may not even be necessary.
- Find the sensor; on new Samara-2 models it has a slightly different location, but finding it will also not be difficult.
- Disconnect the electrical wiring connector from the sensor.
- Using a 22mm wrench (it’s more convenient to use a head, but you can also use a wrench) unscrew the sensor.
- Before removing the sensor from the connector, place an oil container.
Note. It is best to replace the sensor on a cold car, as less oil will leak out. Although this is not important.
- Take out the old sensor and insert the new one along with a new ring.
- Screw the sensor using a wrench or socket.
- Wipe the gearbox housing from oil traces.
- Connect the wires.
- Top up the level to the required level.
- Reinstall the engine protection (if necessary).
So, the sensors have been changed. Now you can start checking their functionality.
Other causes of rear light malfunctions
But it may also happen that the reverse light on the VAZ 2110 does not light up, and the sensor is not the reason for this. Then it might be a nutritional issue. It also needs to be checked. When turned on, no power is supplied, which means you should look for a break in the wiring. Check the area where the fuse is connected to the sensor and the section where the sensor is connected to the lamp.
When reverse gear is engaged on a VAZ 2110, the white light bulbs should light up at the same time.
Their purpose is to perform the following functions:
- parking is much more convenient with lit lights;
- burning lights give pedestrians an indication that the car is about to reverse;
- Reversing lights are used to prevent emergency situations.
If a problem arises in which the reverse lights do not turn on, you can try to fix the problem yourself, or contact a car service center.
The problem can be resolved on your own, since the reasons for this, as a rule, are the following situations:
- The light bulb just burned out. In this case, it must be replaced. But before replacing, it is recommended to check the integrity of the wiring in order to eliminate the possibility of a situation in which a short circuit occurs.
- The reason may also be that there is no voltage on the flashlight board.
- The fuse that is installed to protect against short circuit has blown. It just needs to be changed. The fuse doesn't just blow. This means that this is due to some problem in the circuit. To do this, you need to “ring” each section and determine the location of the problem.
- Contacts may burn. Because of this, the light bulb will stop lighting. In this case, the burnt contacts should be cleaned.
- It is possible that the electrical cable is damaged. A malfunction can be detected by visual inspection or instrumentally using a multimeter.
- If the car is operated for a long time in conditions of high humidity, this can lead to oxidation of the contacts. As a result, the reversing lights will no longer work normally.
- The reason may lie in the incorrect operation of the gearbox mechanism. It is this mechanism that should lead to the inclusion of the rear lights.
- The malfunction may be caused by a broken reverse sensor. It is not at all necessary to take your car for professional diagnostics. You can check its performance yourself. To do this, the sensor must be removed and the ends of the wires connected to each other. If the light starts to light up, then the problem is in the sensor.
Troubleshooting
As I said above, the lights may not light if the reverse sensor is broken. But there are other malfunctions that cause the same effect, and they occur no less frequently than sensor failure. Their list:
- the reversing light bulb has burned out;
- the power wires for the lights are broken;
- the contacts of the pads have oxidized;
- fuses have failed;
- There is no ground on the flashlight board.
Now let’s start troubleshooting, and start with the reasons that are easiest to diagnose. But before we begin, let’s digress a little and take a look at the electrical diagram of the VAZ 2110 lighting devices. It will be useful to us.
Electrical diagram of lighting devices of a VAZ 2110 car
In this scheme we are interested in the following positions:
- 4 – ignition switch;
- 2 – mounting block;
- 10 – reverse sensor (switch);
- 13 – reverse lamps.
How it works? You turn on the VAZ ignition, and power from the battery or generator is supplied to the mounting block (block Ш2, pin 16). In this block we are interested in fuse F19, through which the reversing lights are powered. Having passed the fuse, the voltage leaves the mounting block through contact 17 of the Ш4 block. Then it goes to the reverse sensor and through it powers both lights (green wire). The second contact of the lights is connected to the body of the VAZ car, which is the negative wire. As you can see, the scheme is very simple, but you need to know it. Now you can start troubleshooting.
Reverse sensor
To check it, all you need is an inspection hole and a regular paperclip or piece of wire. If there is no hole, then, as I said above, everything can be done from above, through the hood. However, to do this you will have to remove the air cleaner.
On a VAZ 2110, the reverse sensor (marked with an arrow) can also be reached through the engine compartment
Find the reverse sensor, let me remind you that in the VAZ 2110 it is located on the left side of the power take-off box if you stand in the direction of the car. Pull out the connector (block) with two wires from it. To do this, simply pull the connector housing.
Removing wires from the reverse sensor on a VAZ 2110
Now your task is to close the contacts on the block that you just pulled out (look into it and you will see these contacts). This can be done with a paper clip or a piece of stripped wire. Did the reverse lights come on? This means that the sensor is faulty, and you can proceed with the replacement, which I described in the last section (Step-by-step instructions for replacing the sensor for the VAZ 2110). If the lights still don’t light up, then we’ll continue searching.
Fuse
So, we are interested in fuse F19, located in the mounting block. The mounting block itself on the VAZ 2110 is located under the steering column on the left.
Location of the mounting block on the VAZ 2110
Remove the block and find fuse F19. If the fuses on your mounting block are not marked or are marked with obscure pictograms, then use the photo I provide below as a guide.
Numbering of fuses in the VAZ 2110 mounting block
Pull the F19 out of the holder and look at it in the light: if the fuse is blown, it can be seen with the naked eye.
A burnt-out jumper is clearly visible - the fuse has blown
If everything seems to be in order by eye, don’t be lazy to run it with a tester, so that after a week of troubleshooting in all possible places, you won’t be excruciatingly painful for wasted time. So, is the fuse good? You can move on to the next point. If it's burnt, then hold on to it.
Many owners of VAZ cars in such cases simply replace the burnt one with a working one and, as a rule, get another burnt one. If you have a lot of extra 10 A fuses, you can experiment. But it's better to think a little about why this happened.
A blown fuse causes a malfunction only in one case: it is defective. Then simply replacing the burnt one with a new one will be successful, and everything will work. But it may turn out (and most often this happens) that a blown fuse is not the cause, but a consequence of the malfunction. There was an overcurrent in the circuit for which it is responsible, and the device, saving this circuit, burned out. Why can an overload occur on a VAZ 2110? There are few reasons:
- The reversing lights of the VAZ 2110 are equipped with lamps of greater power than those provided for by the VAZ design.
- There is a short circuit in the power supply circuit of the reversing lights (see electrical diagram above) to the car body.
If it is known that the reversing lights on your VAZ have more powerful lamps (this is often done to make parking easier at night), then it is quite possible, although not necessarily, that this is the problem. If you have very little understanding of electrics, then, of course, you will ask why the fuse did not blow immediately after installing powerful lamps, but, say, a month later. There is nothing strange here. Typically, the fuse rating is selected 20-30% higher than the rated current.
By installing slightly more powerful lamps, you increased the current consumption, but not enough to go beyond this threshold. The fuse “held”, but worked at the limit of its capabilities. The slightest voltage surge in the on-board network (say, a bad contact at the battery terminal) - and the fuse runs out of patience, it burns out. And it would instantly fail only if you installed very powerful lamps.
If you know that your VAZ has more powerful lamps in the reversing lights, you can try to take a risk and install a new fuse of the same rating as the one installed. All such an experiment threatens is the loss of a fuse.
If the new one burns out immediately, then the problem is a short circuit. This could happen when the power wires fray and short to the body. We will look for this short circuit by elimination, using a tester in resistance measurement mode.
Tester in resistance measurement mode
First of all, turn off the ignition and remove the positive terminal from the VAZ battery. Disengage the gears by placing the shift lever in neutral. Connect one tester probe to pin 17 of block Ш4 of the mounting block, and connect the second one to the car body. You can find the pads on the side of the mounting block opposite the fuses. All of them, as well as their terminals, are marked.
The pads in the VAZ 2110 are located on the reverse side of the mounting block
If the device shows “0” (low resistance), then the problem is in the wire connecting the VAZ mounting block to the reverse sensor. Inspect this wire (it may be in the harness, but it has its own color) along its entire length, find the short circuit and repair it.
If the device shows “infinity”, then everything is in order with the circuit to the reverse sensor, we move on. Engage reverse gear and repeat the measurement. Now the resistance of the circuit should drop (the reverse lamps are connected to it), but still, with standard lamps for the VAZ 2110, it should not be lower than 2-3 Ohms. If the resistance is lower, look for a short in the wires from the reverse sensor to the lights (green wire in the wiring diagram above).
If the resistance cannot be measured (the device shows “infinity”), then the problem is either in the lamps, or in poor contact of the connecting blocks, or in a broken power wire. Install a new fuse to replace the burned one and proceed to the next diagnostic step.
Is the resistance ok (a few ohms)? You can install a new fuse to replace the burnt one with the same rating and call it a day - the problem was in a defective device.
Burnt out light bulb
The VAZ 2110 has two reversing lights, which means there are two lamps. It is unlikely that two burned out at once, and nothing else from the lighting equipment burned out, but it happens. Let's check the lamps. To do this, alas, you will have to “bomb” your VAZ a little, since the reverse lamps can only be reached by disassembling the rear light units.
Open the trunk and empty it if necessary. Remove the trim and unscrew the plastic protective cover. All you have to do is remove the back panel and you will have access to the lights and control board.
Opened light blocks on a VAZ 2110: access to the lamps and power supply is open
Arm yourself with a tester and test the reversing lamps. If they are faulty, replace them, and most likely the issue can be closed. If the lamps are working properly, then the problem is different. Put the lamps in place, but don’t assemble the VAZ lights yet: you may still have to climb into them.
Contacts in blocks
The next possible cause of the malfunction: the contacts in one of the blocks supplying the reversing lights have oxidized. There are 5 such pads in total, I marked them with blue arrows.
Blocks responsible for the operation of the reversing lights in the VAZ 2110
Each of these pads must be disconnected, inspected and, if necessary, cleaned. At the same time, lightly tug the wires that go into them - any of them could easily rot and hang on the same insulation, giving the impression of service. Still not working? The last option remains: a break in the wire supplying the reversing lights.
The power wires for the lights are broken
There are only three wires that could break (fray, burn out, etc.):
- From the mounting block (pin 17 of block Ш4) to the reverse sensor.
- From the reverse sensor to each of the lights.
- From the lights to the body of a VAZ car (there is no “ground” on the light board)
Turn off the ignition again, remove the terminal from the battery and, armed with a piece of long wire and a tester, ring them all. The one that does not ring, of course, will have to be inspected visually to find the location of the damage. If the damaged wire cannot be repaired, then, as an option, you can run a new one along the same harness, and disconnect the old one and simply leave it in its place.
For these purposes, use a special automotive wire with reinforced wear-resistant insulation and a core cross-section of at least 1.5 square meters. mm.
Automotive wire PGVA with a cross-section of 1.5 is perfect for VAZ flashlights
Modification of the rear lights of the VAZ 2110
Often, to fix the problem, it is necessary to modify the rear lights of the VAZ 2110. To do this, you first need to dismantle the old reverse lights. If the lamp simply burns out, then replacing it will not be a problem.
It won't be difficult to replace a blown fuse. But replacing a failed sensor is much more difficult. The algorithm of actions has already been announced within the framework of this article. But to replace it, you will need to drive the car into a pit or overpass. Without this, fixing the problem will be problematic.
Having read this review, the reader now has an idea of what could cause the reverse lights to turn off. If practical skills allow, this problem can be solved independently. Anyone who is not very familiar with the structure of the car and does not have practical repair skills is recommended to contact a service center, where qualified specialists will help solve the problem.
Reverse sensor for VAZ 2110
Driving out of the garage in the evening, did you notice that nothing behind you illuminates the path? This is not good. After all, the reverse lights should be on. And if they don’t light up, they either burned out, or the fuse has failed, or the reverse sensor of the VAZ 2110 has broken down. We’ll talk about the latter today.
To find out for sure whether it is really out of order, do the following:
- Look at the condition of fuse No. 19 at 7.5 A. It is located under the instrument panel in the mounting block.
- Now check the light bulbs. If they are also in order, then you need to check the functionality of the reverse sensor. Only a question arises...
How can I check its functionality?
- Disconnect the wires from it. Just take them out.
- Connect the tester to them and set it to the mode: measure resistance or continuity.
- Engage reverse gear.
- Turn on the ignition.
- And look at what resistance the tester shows.
If 0 Ohm, then everything is fine with it. If not, then it needs to be changed (by the way, it definitely needs to be changed if the reverse lights are on even when the reverse gear is not engaged). Just then you will find out...
How to change?
- Place the VAZ 2110 in a pit or drive it on an overpass.
- Remove the engine protection, if any.
- Have a small container for the oil. Because when you open the sensor, oil will begin to flow out.
- Get under the car and disconnect the wires going to the part.
- Open the old sensor, immediately insert the container and screw in the new one.
- Add the leaked oil into the box.
- Stick in the wires, wipe the surfaces on which oil has gotten.
- Start the car and check if the lights come on when you put the vehicle in reverse.
For reference: A new one is inexpensive - from 100 rubles. Usually at the factory they install them from the VAZ 2108.
What to do if the reverse lights do not light up
In a situation where the reverse lights of a VAZ-2110 car do not light up, it is necessary first of all to identify the cause of the problem. For this purpose, you can either contact a specialized car service, or save money and do everything yourself. This is not difficult, since breakdown of the rear lights can occur for just a few main reasons:
- the lamp burned out. This part needs to be replaced, but first we recommend checking the voltage in the circuit and making sure that the risk of a short circuit is completely eliminated. Otherwise, the lights will remain on continuously;
- no voltage is supplied to the flashlight board;
- The fuse that protects the circuit from short circuit has blown. If this is the case, it is necessary to “ring” all elements of the system to find out which one is causing the problem;
- the contacts on the headlight film are broken or burnt;
- The electrical cable is damaged. Its break can be detected by visual inspection or using a digital multimeter;
- as a result of prolonged use and exposure to moisture, the contacts have oxidized, which is why the reversing lights do not want to work;
- the gearbox mechanism, which should turn on the rear light, does not work properly;
- The reverse sensor has failed. You can check its serviceability yourself, without resorting to professional diagnostics. To do this, remove the wires from the sensor and connect them to each other. If the light comes on, then the problem is either in the device being tested or in the gearbox.
Reasons why the reverse lights of a VAZ car do not light up
First, you need to find out why the reverse lights do not light up - maybe the bulbs are just burned out (see) and you don’t even need to change the sensor? Here are some reasons:
- The reverse lights are burnt out. You can check their performance by removing them from the flashlights and checking them with a multimeter.
- Damaged wiring is another reason. Everything is more complicated here - you will have to search longer. And it is checked in the same way - using a multimeter for continuity or resistance.
- Poor contacts on the reverse sensor. As you know, nothing with poor contact usually works.
- Violation of the insulation on the wires near the sensor leads to their short circuit.
- The fuse has blown (see). Which one needs to be clarified for each car in the repair manual.
- Well, the breakdown of the sensor itself - this is evidenced by both the lights not turning on when reverse gear is engaged, and the constant glow of the lights.
To fix a malfunction of the lights, you may have to perform all the repair points, but you can start with the sensor. The price for it is small - usually about 100 rubles, so you can buy it and change it, and then solve problems as they arise.
Tools
So, what do you need to replace the reverse sensor yourself:
- A set of keys. Although this is even said loudly. You will need a 22 key and in some cases a 24 key
- Multimeter
- Small container for oil
- Screwdriver
- Pliers
- Insulation tape
- Hammer
- Chisel
How to restore normal operation of reverse lights
First of all, you will need to dismantle the reversing lights, as follows:
- open and empty the trunk of the car;
- carefully removes the casing to prevent damage during repair work;
- unscrew the protective casing made of plastic;
- We remove the back panel, which gives access to the sensor, lights and control board.
If the problem lies in a burnt-out lamp, it can be easily replaced without resorting to any additional actions.
If the problem is caused by a damaged fuse, you will also need to find it in a special block located under the steering wheel of the car, then carefully remove the broken part and install a new one.
A more difficult task is replacing the sensor, which has stopped responding to gear shifts and turning on the lights. To perform this operation you will need:
- drive the car onto the overpass and put it on the handbrake;
- remove the protective cover;
- place some container for transmission oil;
- remove the sensor and disconnect it from the electrical circuit;
- install the correct part. After this, it is necessary to check the oil level and replenish it if there is not enough lubrication in the gearbox;
- the last stage is assembly of the unit, performed in reverse order.
The safety of vehicle operation directly depends on the performance of the reversing lights. That is why it is necessary to promptly identify any malfunctions described above and efficiently eliminate them either on your own or with the involvement of experienced car service specialists.
What to do if the reverse lights on a VAZ 2110 do not light up when the reverse gear is engaged? In fact, there may be several reasons, and one of them is a faulty reverse switch (frog).
How to improve the reversing light on a VAZ-2110
Many owners of "ten" cars complain about the lack of light when reversing. Meanwhile, moving “into the dark” is unsafe and inconvenient. What can be done?
On old cars, such as “classics”, the fight against darkness from behind is often solved “head-on” - by installing an additional headlight under the rear bumper. For the “ten”, this solution is partially suitable - a fog lamp hanging from the rear will definitely ruin the good appearance of this car. Meanwhile, you can attach additional lighting from behind, but in a slightly different way.
First, we will consider the easiest options, and then, at the end of the article, we will install an additional headlight on the rear bumper of the VAZ-2110.
Rear light intensity
If the “ten” does not have enough light when reversing and you want to improve the lighting, first you should make sure that the corresponding lights work as they should. There are more than enough reasons why they can shine dimly. This:
– Old light bulbs with blackened bulbs, working on the verge of burning out. It is necessary to check the condition of the lamps and, if necessary, replace them with new ones.
– Lamp lamps contaminated from the inside. They are not easy to wash. This will have to be done with a thin long stick with a rag wrapped around it through the hole in the light bulb.
– Poor-quality clouded plastic of the lampshades (relevant for replaced non-factory lamps, for example, after an accident). In this case, you need to replace the lampshades with factory ones, which, as a rule, do not become cloudy.
– And, of course, the “trademark” sores of VAZs are the rear light trains. We will analyze this malfunction separately.
Voltage is supplied to the rear light bulbs on the VAZ-2110 not by wires, but through a cable. It is a flexible green tape with conductive tracks. In one place, a block with wires is connected to the cable and then the current flows along the paths to the lamps.
The problem is that the cables are extremely unreliable: they break, wear out, which is why the tracks are able to electrically communicate with each other. All this leads to the taillights starting to work at random. Surely everyone has seen how on a “ten”, when you press the brake, instead of a brake light, for example, the right turn signal and the left tail light turn on. This “miracle” happens precisely because of the trains.
The taillights are also connected to ground via a cable. Accordingly, if the “mass” track is not entirely serviceable, then the “mass” will also be bad. The lamps will glow dimly. This can also cause poor reverse lights on the VAZ-2110.
Advice:
If the lights shine normally, but there is still not enough light and you don’t want to bother with installing additional devices, then you can turn on the rear fog lights when driving backwards. This is at least a little, but it will add light.
Additional reversing lighting on the VAZ-2110
If everything is fine with the standard lights, then you can install an additional taillight on the “ten”. This is somewhat more difficult to do than with the same “classic”, because you need to perform the installation beautifully. Based on the same beauty considerations, it is better if the headlight is narrow. Then it won't be conspicuous. Instead of a fog lamp, you can use a powerful LED daytime running light.
A headlight suspended from the rear bumper on a 10 will look strange, so it needs to be installed directly into the bumper. It is plastic, so preparing the hole for the headlight will be quite simple. It is necessary to accurately observe the dimensions so that the headlight fits tightly into the hole. You can attach it to the bumper with strong waterproof glue. The bumper does not experience heavy torsional or bending loads, so fastening with glue will be quite reliable.
You need to connect the additional headlight from the wire that powers the standard taillights. Then the additional light will light up in parallel with the main one when reverse gear is engaged. The easiest place to connect to the wire is in the trunk. To do this, you need to peel back the floor carpet from the left wing and find the wiring harness.
The green wire is responsible for powering the rear lights. This can be checked if, with the ignition on and the engine not running, engage reverse gear and check for the presence of voltage on the indicated wire. Accordingly, when the reverse gear is turned off, there should be no voltage on it.
You can connect your wire to the standard one using the twisting method or “officially” using terminals. In any case, the connection point must be insulated with electrical tape. Next you need to run a new wire from the trunk under the bumper. To do this you will have to drill a hole in the trunk floor. After completing the work, it is important to seal the hole with any sealant to prevent water from entering the trunk. The “ground” wire from the additional headlight must be connected to the metal of the car body in any convenient place using a “bolt” terminal.
Now, when you engage reverse gear, your additional headlight will turn on along with the factory lights. As a rule, reverse gear is not engaged for long, so the headlight does not have time to heat up. If you have concerns about the plastic of the bumper, then you should choose an LED daytime running light. LEDs do not heat up very much during operation, so such a headlight will be absolutely safe for the bumper.
Reverse diagram of VAZ 2110
To determine a malfunction in the operation of the reverse lamps, just look at the diagram for switching on the external lighting:
1 — side light lamps in the headlights. 2 - mounting block. 3 — external lighting switch. 4 - ignition switch. 5 - indicator lamp for external lighting in the instrument cluster. 6 — side light lamps in the external rear lights. 7 - brake light lamps in the internal rear lights. 8 — license plate lights. 9 — instrument lighting switch. 10 - reverse light switch. 11 - brake light switch. 12 — block of the on-board control system. 13 - reversing lamps in the internal rear lights. K1 - relay for monitoring the health of the lamps (contact jumpers are shown inside the relay, which must be installed in the absence of a relay). A - to power supplies. B - to instrument lighting lamps.
Power to the reversing lamp (No. 13) is supplied through the switch (No. 10), which is installed in the gearbox, and is supplied to it from the mounting block (Ш4-17) through the reverse fuse F19 (10A).
Diagram of the VAZ engine management system with BOSCH controller - ECM 21104 1.6 16V
1 – block of the ignition coil wiring harness to the ignition system harness; 2 – block of the ignition system harness to the ignition coil wiring harness; 3 – ignition coils; 4 – immobilizer warning sensor; 5 – immobilizer control unit; 6 – spark plugs; 7 – nozzles; 8 – diagnostic block; 9 – block of the ignition system harness to the ABS cabin group harness; 10 – controller; 11 – electric fuel pump; 12 – block of the ignition system harness to the fuel level sensor harness; 13 – fuel level sensor harness connector to the ignition system harness; 14 – block of the ignition system harness to the injector harness; 15 – injector harness block to the ignition system harness; 16 – block of the ignition system harness to the side door harness; 17 – speed sensor; 18 – idle speed regulator; 19 – throttle position sensor; 20 – coolant temperature sensor; 21 – mass air flow sensor; 22 – oil pressure warning lamp sensor; 23 – phase sensor; 24 – oxygen sensor; 25 – crankshaft position sensor; 26 — knock sensor; 27 – solenoid valve for purge of the adsorber; 28 – oil level sensor; 29 – coolant temperature indicator sensor; 30 – block of the ignition system harness to the instrument panel harness; 31 – instrument panel harness connector to the ignition system harness; 32 – ignition relay; 33 – ignition relay fuse; 34 – fuse for the electric fuel pump power supply circuit; 35 – electric fuel pump relay; 36 – electric fan relay; 37 – controller power supply fuse; 38 – ignition system harness block to the air conditioner connector; 39 – instrument cluster; 40 – ignition switch; 41 – electric fan of the cooling system; 42 – on-board control system unit; 43 – starter relay; 44 – contacts of the 8-terminal blocks of the instrument panel harness and the front harness; 45 – contacts of the 21-terminal blocks of the instrument panel harness and the rear harness; 46 – trip computer; 47 – diagnostic connector.
The QG16DE engine uses a phased distributed fuel injection system. This means that each cylinder uses its own fuel injector (port injection), and fuel injection is carried out by the injector only of the cylinder in which the intake valves are in the open position (phased injection). The amount of fuel injected varies depending on the duration of the electrical pulse supplied to the injector solenoid valve from the electronic engine control unit (ECU). In general, the electronic engine control system performs the following functions:
Checking the reverse frog
To get to the reverse switch of the VAZ 2110, it is not necessary to drive the car into a pit. You can access the sensor through the engine compartment; it is located on the left side in the direction of travel, at the bottom, on the side of the box.
Before replacing the reverse sensor, make sure that it is the faulty circuit. To do this, remove the connector from it and close the contacts on the connector. If the reverse lights come on after turning on the ignition, the sensor is faulty.
Principle of operation
Connection
This regulator works more than simply:
- You shift the gear stick to reverse;
- Simultaneously with turning on the reverse speed, the shift fork is pressed against the sensor;
- A wire short to ground is created;
- The light turns on, indicating that the car is starting to move in reverse.