It's no secret that a spark is needed to ignite fuel. It is formed by the so-called ignition system. And no, the system does not represent one or several elements - it is a real system, which in modern cars is also smart, if you can talk about it that way. The system is responsible for timely ignition and the most efficient use of available fuel. The ignition coil is just one of its components. Many people confuse the coil with the ignition module. These devices have the same operating principle, but differ, firstly, technically, and, secondly, in their areas of application. Let's figure out how the ignition module works, what can damage it and how to find a replacement for it.
What is the difference between a module and an ignition coil?
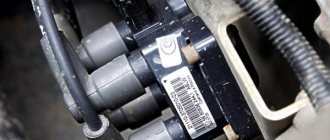
The ignition control module, as it is more correctly called, is essentially one of the control elements. It controls the ignition coil, and also sets the ignition timing and, if necessary, changes it. Of course, in accordance with the commands given by the car ECU. The design of the ignition module includes the following elements:
- Keys ( high voltage );
- A pair of ignition coils.
Optionally, an electronic switch can be used. The control unit is responsible for generating control signals that are clearly consistent with the position of the vehicle's crankshaft. As soon as the signal period comes to an end, spark ignition begins - this is how the ECU controls the module, which controls the coils. Typical module malfunction: loss of ignition in a pair of cylinders. In this case, they say that one channel is out. Often the ignition remains normal, but is unstable when the engine is cold. We will look at these points later.
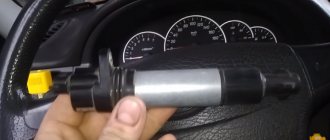
In the vast majority of modern cars with modern internal combustion engine control systems, the module has given way to four-terminal ignition coils. Let us recall that the ignition coil is essentially a step-up transformer - there is a low voltage at the input and a high voltage at the output. On cars with 16V , there are four ignition coils, so there are problems with the ignition system. There is only one module, it is controlled by a computer and, roughly speaking, is an evolution of the usual ignition coils (many call this a new generation of coils).
Symptoms of a faulty ignition coil
The module's task is to transmit voltage to the spark plugs through high-voltage conductors. In this case, the electronic control unit (ECU) controls the transmission process by sending charged pulses to the winding. As a result, a spark is formed necessary to ignite the fuel inside the combustion chamber.
If this circuit is broken, the engine will run intermittently, which will affect the safety of the car. There are several signs that make it clear to the car owner that the coil and the ignition system as a whole need to be checked:
- Insufficient engine power when accelerating the car;
- When you press the gas pedal, the car does not pick up speed, especially when overtaking;
- When the car is idling, the engine runs intermittently;
- The spark plug does not produce a spark.
Advice. When the first signs of a vehicle malfunction appear, the first thing you need to do is look at the spark plugs, then make sure the crankshaft position sensor is working, and only then move on to the module.
So what is the advantage of modules?
Older carburetor engines had a coil that worked in tandem with a distributor. Engineers decided to use a module in injection engines. According to experts from Beru[/anchor], one of the leading manufacturers of ignition system components, the future of internal combustion engines lies in the ignition coil block ( module ), in which the elements operate independently of each other. Structurally, this is advantageous because each element does not require a large number of connecting wires. And the system itself turns out to be more reliable, especially when compared with the ignition of older models. Car enthusiasts are thinking about replacing conventional coils with a module for other reasons:
- Misfire . It is more difficult to start the engine when cold, the car consumes more fuel, etc.;
- The coils are burning . Many people complain that the coils fail very quickly and literally one after another;
- Repair price . Rather a corollary from the previous point. Good reels made in Japan or Germany cost a lot of money. The module includes everything necessary for the operation of the ignition system and boasts high fault tolerance and reliable operation in almost any conditions.
Ignition models also have their own “diseases,” but they are few and progress slowly. As a rule, module failure occurs due to an interturn short circuit. It is preceded by a break in the high-voltage wire. The module will still work , but much less efficiently. Perhaps this is the only serious problem that those car enthusiasts who decide to remake the ignition system may encounter.
Ignition module malfunctions
It is very easy to identify the main malfunctions of the ignition module. A car enthusiast should acquire an accurate device for measuring active resistance. The reasons for its use may be the following:
- Weak discharge on a candle, several candles or all of them;
- No spark discharge.
Obviously, all of the above is the cause of increased fuel consumption, malfunctioning engine operation, and increased exhaust toxicity. Everything that is typical for faulty spark plugs is transferred to the module. You can check it yourself, as in the case of a spark plug: between spark plugs (more precisely, terminals) 1-4, as well as 2-3, the resistance should not be less than 4000 Ohms . If it is smaller, then we can talk about a turn circuit. The normal resistance depends on who manufactured the module. In most cases this is 4000-5000 Ohms .
Some problems with automotive ignition modules are related to the switch. It is a board consisting of a number of microcircuits that are filled with a special heat-removing gel. The device can be found behind the module on a large metal plate. Module malfunctions are observed when the connections of the coils and the switch become unusable. The easiest way is to replace the entire module, but car enthusiasts who are well-versed in repairing electronic boards can try to make the repairs themselves.
How to improve the spark or modify the circuit of individual VAZ ignition coils
| The problem of floating engine speeds, sluggish acceleration with jerks and increased fuel consumption are familiar to almost every owner of a VAZ car. One of the reasons for these ailments lies in the ignition system. Let's consider the modification of individual ignition coils (ICC), which will help cope with unstable sparking. |
What is the reason
We are talking about the VAZ 21124 power unit (1.6 liters, 16 valve) and other similar engines with IKZ. The reason for the bad spark: dips in the ICD accumulation phase with a duration of about 2 ms and a swing of 2.5 V. Reducing the maximum current (accumulation) at the moment of rupture by 18%, which is equivalent to reducing the energy accumulated in the coil and transferred by the coil to the spark plug by 33.6%. Solution:
- dips need to be smoothed out by installing capacitors, as close as possible to the load itself;
- simplify the power supply chain of the IKZ.
Installation of capacitors
Required: capacitors (2 pcs) 2200 µF 25V
- it is possible for a higher voltage 35/50/63V, but not 16V;
- capacitance range 3000 - 4700 µF, the upper limit does not need to be exceeded;
- recommended manufacturers: Jamicon (TX, TL, TZ, WG, TK, TM), Samwha (WB, WF, WL, RD), CapXon (KF, LZ, KM, GL);
- 105 degree, low impedance (LowESR).
We twist the terminals of the capacitors, solder the wires, terminals and insulate the entire structure with heat shrink. You can install them in two ways:
- We cut the insulating tape of the IKZ harness under the corrugation between 2-3 cylinders, we find 5 blue wires. We connect the plus of twisted capacitors to twist S1.
- In order not to touch the twist, you can solder the positive wire of the capacitors to the lead (thick) blue wire that comes from the ECM connector (stripe 5-8mm in a circle).
We connect the negative signal with a separate wire to the mass point under the M6 bolt on the cylinder head (next to the oil pressure sensor). It is undesirable to use a lot of high-voltage coil windings to connect capacitors. Installation example on the ECM 21124 diagram (January 7.2, Bosch 7.9.7): After installing the capacitors, the ripple range decreased by 3 times from 2.5 V to 0.8 V!
Reducing the number of connectors in the IKZ circuit
The power circuit for the ignition coils is built from wires of different sections, the circuit has about 4 connectors and the power comes from the ignition switch. All this increases resistance and negatively affects the operation of the IKZ. A similar problem occurs in the power supply circuit for the rear lights. It was decided to take the IKZ power supply from the main relay of the ECU, where it is powered by a separate wire from the battery. To do this, we bite off the blue wire from the “S5” crimp and solder it to the pink and black wire coming from the main relay of the ECU. The S5 crimp is located in the branch of the ECM harness towards the connector to the instrument panel or IMMO. To find it, you should trace the thick blue wire powering the coils in the common harness in the branching area. Bite it off the twist and pull it towards the engine shield. In the circuit used, it is recommended to replace the fuse (No. 33 from 7.5A to 10A). After this connection, the ripple on the IKZ decreased by another 2 times from 0.8 V to 0.65 V.
Result
After two revisions, a number of improvements were noticed:
- ─ the car accelerates better;
- ─ failures disappeared;
- ─ response to the gas pedal has become clearer;
- ─ idle speed became stable;
- ─ gasoline consumption decreased by 0.7-0.9 liters to 7.8 l/100 km in the city.
- ─ the engine starts faster, the starter does not turn for more than 2 seconds.
It feels like the engine has become 100 thousand km younger. Let us remember that the spark can also be improved on engines with an ignition module.
By the way, do not forget that sparking is affected by high-voltage wires. xn--2111-43da1a8c.xn--p1ai
If the module does not have a built-in switch
Some modules do not have a switch. The manual for them says “dual ignition coil”. Since such modules do not have switches, their main faults are related to the coils. In rare cases, the problem lies in the ECU. Note: the ignition system still has a switch, but it is a separate element. Checking the coils with a multimeter should show the following:
- The primary winding must have a resistance of over 3000 Ohms ;
- The resistance of the secondary winding cannot be less than 4000 Ohms .
An important point: the measuring device has a measurement error, but it should not be greater than the difference between the coils of different pairs of leads. One more point: in very rare cases, the secondary winding shorts to vehicle ground. Such a malfunction is very difficult to identify. In almost all cases, the breakdown of the secondary winding occurs through microcracks that cover the module body after long-term operation. One output breaks through, so that out of a pair of candles only one stops working.
What errors are associated with the ignition module?
Fortunately, the ECU system controller will help us determine whether the ignition module is faulty. She constantly “monitors” that there are no breaks in the ignition system. The DTC is displayed under the following conditions:
- The driver turns on the ignition;
- The system checks whether the condition for setting the code is met;
- It is determined whether there is an open circuit, whether there is a short to ground or a short to battery;
- The lamp lights up, signaling a malfunction;
- The controller records a diagnostic trouble code.
These errors are directly related to the operation of the ignition module:
- A break in the coil of cylinder 1-4 was detected;
- A broken coil of cylinder 2-3 was detected;
- P3000, as well as P3001 to P3004. Multiple misfires detected.
Please note: errors could occur due to non-functioning spark plugs or a broken high-voltage wire. They need to be checked, as well as the ignition module . It is recommended to replace the latter if it is faulty - the unit can be called repairable only conditionally.
What a car enthusiast can do on his own
Everything that was stated above. Working with a measuring device does not always give the result in which you can be confident. The fact is that the winding resistance values of different modules may be different. It's best to do the following:
- Go to the service center and ask the technician to check the module on a special stand. Such stands can be either made at the factory or made in a garage. The second option should not scare you: homemade stands are usually made from a distributor removed from a carburetor “nine” and a drill drive;
- Install a known working ignition module on the car and see how it behaves. Obviously, the car enthusiast will need to monitor the operation of the spark plugs.
All 3 options are good in their own way. The vehicle owner should always have measuring instruments - the lion's share of automotive electronics can be diagnosed in a garage and determined whether sensors, coils, modules, etc. need to be replaced. The remaining 2 options are more accurate, but require compliance with conditions.
How to choose a car ignition module
When choosing a module, a car enthusiast may be faced with the fact that in the store there are two modules that look identical at first glance: an old one and a new one. They are not interchangeable. There is confusion in concepts: sellers in stores call modern coils modules, although they essentially are not them. But let’s not deviate from the “store concept” and look at the features of both modules.
Spare parts for Opel astra
Ignition module (switch)
ASTRA G sedan (F69) (09.98 - 12.09)
Spare parts for Mercedes e-class
Ignition module (switch) E-Class sedan (W124) (12.84 - 06.93)
Old-style modules (roughly speaking, having 4 connection wires) have a built-in signal amplifier. The new model modules do not have such an element, and the transistors, also known as high-voltage switches, are located directly in the “brains” of the engine. If you really want to install a new type of module, you will also have to change the ECU with wiring or try to introduce transistors into the system. The work is not easy, and there is not much point in it. To accurately select the module you need, use the following search methods:
- By VIN code . This is the simplest and most accurate method of searching for original spare parts and their closest analogues;
- According to the car . We are interested in: car make, model, engine data. The ECU data is directly connected to the engine. Simply put, if you select a module according to the technical data of the car, then you definitely won’t have the idea of looking for a part for a car with a 16-valve engine or an 8-valve one;
- According to the spare part code . Usually the car owner does not have the code for the required module. You can find the spare part code in the electronic catalog using the above method: brand - model - ... - the spare part you are looking for. Advanced systems automatically add analogues to the list of suitable ignition modules, which is very convenient.
Choosing the wrong module risks at least the fact that the device will not be able to be installed on your car. Modules of old and new models differ from each other - this should not be forgotten. If a car enthusiast decides to remake the ignition system with individual coils, then he needs a new model module (often sellers describe it simply as a “small” module), connector and wiring. The ECU will need to be flashed.
Repair
So, for the VAZ 2110 the most common problem is the disappearance of voltage on cylinders 2 and 3. After some time, the engine starts working normally again if you press the rear plate of the module.
You should not put up with such a situation; it is better to immediately check the functionality of the unit, restore or replace it completely.
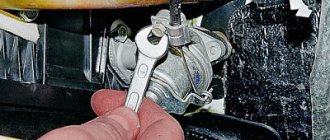
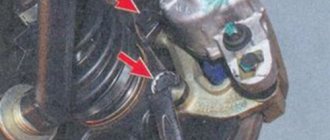
Removing the module
The procedure is quite simple.
- Disconnect the negative cable from the battery.
- Remove the plastic cover that covers the motor.
- Remove the wires from the spark plugs.
- Disconnect the wires from the ignition module. Their numbering is indicated on special white rings. And the cylinder number is indicated on the ignition module housing.
- Disconnect the connector from the ignition module.
- Using a 10mm socket, unscrew the three nuts that hold the block we are looking for.
- Carefully remove it, after which you can begin further work.
Now let's move directly to working with the module:
- Open the aluminum plate on the ignition module. A flathead screwdriver is useful for this.
- Inside you will find a small printed circuit board with electronic components. It is covered with a transparent layer of silicone, which will have to be removed.
- There are also wires that connect the board to the connector contacts. They are made of aluminum, so they can tear quickly.
- Tear off all the wires from the contacts, don’t be afraid. Others will be installed in their place. By the way, experts recommend using stranded wires used in computer mice.
- The ignition module circuit includes two switches and two powerful transresistors. If you decide to change these elements, you need to know that the switches are manufactured by SGS-THOMSON (model L497D1), and the transistors are of the BU931 type.
- The contacts are made of aluminum, so you will need a special flux to work with this metal.
- We solder the wiring to the board. It is more difficult to solder to the transistor collectors, since they are covered with a special material, the soldering of which is problematic. Therefore, try to hide the top coating from the element as carefully as possible. To prevent the soldering iron from transferring all the heat to the plate, place it on the stove and heat it to 180 degrees Celsius.
- Solder the wires to the contacts on the module so that they are as short as possible.
- Cover the areas where you soldered with varnish. Regular nail polish borrowed from your wife will do.
- Check if the ignition module is working.
- If everything is fine, coat the inner surface with a special autosealant, then reassemble in the reverse order.
- Upon completion of assembly, the wiring should be positioned fairly freely. Make sure that they are not compressed inside the box and that the integrity of the connections is not broken.
Carrying out such a repair of the ignition module on a VAZ 2110 with your own hands will not be difficult. But be careful, act carefully and consistently. Pay special attention to the soldering process.
But keep in mind that we have addressed the problem of bad contacts. She is not the only one for the “ten”. You may need to pinout the ignition module on the VAZ 2110. For this, it is better to contact specialists.
If the cause of the malfunction lies elsewhere, then there is a high probability that it is better to simply replace the VAZ 2110 8-valve ignition module with a new one. The search may drag on without yielding results. Replacing the element will completely solve the current problem.
Brand tour
Today, most ignition modules are manufactured by only a couple of companies. They control most of the market, and, which is favorable for the car enthusiast, the quality of the products is consistently high. He can’t go wrong by purchasing an original module or the closest analogue from the following companies:
- Bosch (Germany);
- Lucas (UK);
- Era (Italy);
- Stellox (Germany);
- Delphi (UK).
With the exception of Stellox, the car enthusiast will be able to find the same original under the name of the above brands. For example, Era is a packer and works closely with Siemens VDO, Pierburg, Bosch and many others - those whose products are the standard of quality. It is also worth noting the ]NGK[/anchor] ignition modules (Japan) - they are not inferior in quality to Delphi , but are often cheaper.
Estimated cost
A new ignition module for Lada 2110 can be purchased for 950-3860 rubles . Prices for parts of different brands are shown in the table.
| Parts brand | Company manufacturer | Country of issue | Which VAZ 2110 engine is the part compatible with? | Cost in rubles |
| BOSCH K101 | BOSCH | Germany | 1.6L, 8 valves | 3860 |
| SOATE | SOATE | Russia | 1.6L, 8 valves | 1400 |
| OMEGA K101 | OMEGA | Russia | 1.5L, 16V | 2190 |
| SOATE | SOATE | Russia | 1.5L, 16V | 2690 |
| REMCOM | REMCOM | Russia | 1.6L, 8 valves | 950 |
| StartVolt SC 0111 | StartVolt | Russia | 1.6L, 8 valves | 1040 |
| FENOX IC16004O7 | FENOX | Belarus | 1.6L, 8 valves | 1550 |
| HOFER HF750304 | HOFER | Germany | 1.6L, 8 valves | 1000 |
A used ignition module for a VAZ 2110 can be purchased for 500-900 rubles .
The approximate cost of used parts, depending on the car brand and condition, is shown in the table below.
| What car is the spare part from? | State | Cost of the part in rubles |
| Lada 2110 | good | 500 |
| Lada 2110 | perfect | 700 |
| Lada 2112 | good | 600 |
| Lada 2112 | perfect | 900 |
| Lada 2109 | good | 500 |
| Lada 2115 | perfect | 850 |
If the part is purchased in another region, or online store, then you will have to order its delivery. This service costs about 300-500 rubles .
Conclusion
If the ignition module fails, the problem cannot be ignored. Firstly, the power performance of the engine will drop significantly. Secondly, the ride will become less comfortable. Thirdly, the exhaust will become more toxic, and this causes great harm to the environment. In fact, choosing the right module is very simple. You just need to be guided by the technical data of the vehicle, spare part code or vehicle identification number. There is also no difficulty in choosing a manufacturer: all products from well-known companies can boast of high quality workmanship, high fault tolerance and durability.
Factors influencing the cost level
Buying an ignition module for a VAZ 2110 can cost varying amounts of money. The price of such spare parts depends on the following factors:
- Originality.
- State.
- Quality.
- Company manufacturer.
- Place of purchase.
- Delivery required.
- Sales region.
- Seller's pricing policy.
HOFER ignition module