Front caliper device for VAZ 2110
Content
Braking of the front wheel is created by a disc type device. The brake discs are permanently attached to the hub.
The mechanism that stops the rotation of the wheel includes:
- caliper VAZ 2110;
- pad guide;
- working cylinder with piston, sealing ring;
- brake pads;
- guide bushings, fingers;
- mounting bolts, washers.
The fixed part is mounted on the steering knuckle and hangs over the working disk. Contains channels into which fingers are inserted. The brake cylinder is bolted to the caliper, creating a caliper, with spring-loaded pads located inside. There are car versions where the VAZ 2110 caliper is equipped with a control indicator, the inner pad contains a wear sensor. The moving part is bolted to the guide pins.
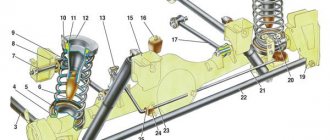
Front caliper design for VAZ 2110: 1 - wheel cylinder; 2 — fitting for bleeding the brake drive; 3 - sealing ring; 4 - piston; 5 — protective cap; 6 — retaining ring; 7 — caliper; 8 — pad guide; 9 — brake pads; 10 — protective cover; 11 — guide pin; 12 — guide pin fastening bolt; 13 — brake hose; 14 — bolt securing the cylinder to the caliper.
The mechanism is hydraulically controlled through a flexible hose connecting the cylinder fitting to a metal pipeline. A protective cover is placed on the finger, preventing contamination of the channels. It is a thin-walled, corrugated rubber tube. It is fixed with the edges by the protrusions of the guide and the finger, compressed and unclenched during operation.
The guides are filled with special lubricant. Brake pad linings undergo wear during operation. The elastic sealing ring automatically adjusts the gap, compensating for abrasion of the linings. An additional bleeder fitting, covered with a boot, is installed on the cylinder body.
Replacement of rear brake cylinders
Rear brake caliper repair kit.
car repair. tools. spare parts The best rear brake cylinders on the VAZ 2110 can work for a long time. An example of a defective product would be a brake cylinder in which the pistons extend out of the cylinder only a few millimeters, which is not enough to move the brake pads apart.
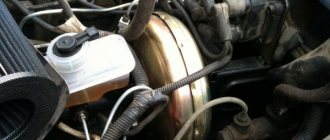
The quality of the brake fluid also plays a role in the service life of the brake cylinders. The instructions indicate that the rear brake cylinders are removed with the brake drum removed.
Advice: It is advisable that the replacement of the rear brake cylinders of the VAZ 2110 be carried out simultaneously on both brakes. Wear of one of the elements indicates that the second one will soon fail.
And the price of the work will be reduced by disassembling the car once.
- The machine is installed on an inspection pit or a lift.
- The front wheels are fixed.
- The rear ones are removed.
- Using a rubber hammer, the brake disc is pulled out of its place.
- Carefully remove the end of the upper tension spring, position 7 in the first photo.
- Previously, it was connected to the brake pad.
- The handbrake handle is raised all the way. In this case, the brake pads move apart and are removed without much effort.
- The brake pipe is unscrewed from the cylinder.
- The rear brake cylinder is removed.
Removing the rear brake cylinder of a VAZ 2110
- If necessary, the rear brake cylinder of the VAZ 2110 is replaced with a new one.
- Assembly of the unit is performed in reverse order.
- The job ends with bleeding the brakes.
Tip: Replacing the brake cylinder on a VAZ 2110 car is carried out in strict sequence - both dismantling and installing spare parts. The main condition is serviceability and tightness in the hydraulic system.
How the rear brake cylinder is replaced on a VAZ 2110 car can be seen in the video.
Repair of rear brake cylinders of VAZ 2110
There are times when, to save money, it is enough to replace worn parts of an assembly. In this case, after removal from the vehicle, the rear brake cylinder is disassembled.
Dismantling the rear brake cylinder of a VAZ 2110
- Remove the protective caps, pos. 10 in the picture above.
- Pistons are pressed out of the cylinder body along with parts to automatically regulate the gap formed between the drum and the brake pads.
- After installing the piston pos. 9, turn it onto a special device and remove the thrust screw, pos. 3.
- Remove the sealing ring pos. 8 and support cup pos. 7 with crackers pos. 5 and spring pos. 6 from the screw.
- The thrust ring pos. is disconnected. 4 and a stop screw.
After disassembling the unit, the parts are checked for faults:
- The working surfaces of the pistons, cylinder and thrust rings must be smooth, without scratches or roughness. Otherwise, fluid leakage and premature wear of pistons and seals may occur.
- Defects on the mirror surface can be eliminated by grinding or lapping.
Tip: Care must be taken not to increase the internal diameter of the cylinder.
- The thrust screw, springs, support cup and crackers are visually checked. If they are damaged, parts are replaced.
- Seals pos. 8 are replaced with new ones.
- If necessary, change the protective caps pos. 10.
- The structure is assembled in the reverse order.
In this case, you need to take into account:
- All parts are generously lubricated with brake fluid.
- The thrust screws must be tightened to a torque of 3.9 – 6.9 Nm.
- The slot located on the thrust rings is directed vertically upward, the deviation should not be more than 30 degrees. This ensures that all air is removed from the drive mechanism when bleeding the brake.
- Using the device, the pistons are pressed into the cylinder body.
- After assembly, the movement in the housing of each piston is checked, which should be from 1.25 millimeters to 1.65 millimeters.
- Protective caps are installed.
- Timely repair or replacement of rear brake cylinders is a guarantee of road safety.
Didn't find the information you are looking for? on our forum.
We recommend reading:
How to remove the head on a VAZ 2109
Low beam on VAZ 2114 went out
VAZ 2109 gasoline consumption, carburetor, highway, city, combined cycle
Connection diagram for tow bar for VAZ 2104
How to remove the window regulator on a VAZ 2114, step-by-step description with photos
There are oil in the air filter corrugation - VAZ 2112 - 16 valves, the main reasons
How to check injectors on a VAZ 2110
Lamps used on VAZ 2114
Possible malfunctions of the front caliper of the VAZ 2110
The VAZ 2110 non-ventilated caliper is used in an aggressive environment and is exposed to temperatures, water, and dust. Contamination, acidification of parts, rupture of casings, and wear of fingers occur. The result is extraneous knocking noises in the device, possible piston jamming, skewed pads, squeaking brakes, and increased braking distance. It is necessary to periodically maintain structural elements, clean surfaces, and add lubricant to the caliper guides. A neglectful attitude will cause an emergency, repairing the VAZ 2110 caliper.
Preventive Maintenance
At a car company, before the daily departure, a mechanic inspects the car. Few car enthusiasts do the same. Motivation will appear after receiving an answer to the question of how much the front caliper of a VAZ 2110 costs. Online stores indicate prices of 2000 - 2500 rubles without delivery costs. A complete repair kit for the VAZ 2110 front caliper costs three times less. A repair kit for quickly wearing rubber parts costs 140 rubles.
The next forty thousand kilometers on the car’s speedometer is an indicator of mandatory caliper maintenance. You should stock up on time, spare parts, tools, special and universal WD-40 lubricants.
Step-by-step instruction:
- Place the car on a horizontal surface.
- Block the rear wheels with special blocks.
- Loosen the wheel bolts.
- Raise the front end on a jack. If work is carried out in a garage, provide an insurance support.
- Unscrew the fasteners and remove the wheel. If there is no support, put it under the front end.
- Turn the steering wheel towards the VAZ 2110 caliper being repaired for easy access.
- Release the brake hose from the fork.
- Bend the corner of the washer.
- Armed with an open-end or combination wrench, unscrew the upper mounting bolt and loosen the lower one. Use a ratchet wrench.
- Move caliper 2110 with cylinder to the side.
- Remove the finger with the protective cover and inspect it. If the protection is destroyed, there are traces of acidification, dirt, liquid - clean and lubricate the channel. Severe contamination, jamming, and wear of the guides lead to the replacement of the pad guide. Security is more expensive.
- The condition of the channels is satisfactory - remove the old grease. When cleaning rubbing parts, it is not advisable to use degreasing compounds. Use special napkins, soft fabrics soaked in liquid oil.
- Take a new pin, lubricate it, insert it into the channel, rotate it around the axis, evenly distributing the lubricant. Extract.
- Put on the cover, assemble the structure, secure the edges of the boot.
- Prevent lubricant from getting on the disc or pads.
- Screw on the caliper without fully tightening the bolt.
- Do the same manipulations with the bottom side.
- Tighten the fasteners and bend the locking washers.
- Insert into place and tighten the brake hose fitting.
- Test the brakes.
Replacing brake pads
- Follow the first 9 steps of the previous instructions.
- Open the brake fluid reservoir cap. If the tank is filled under the plug, use a syringe to reduce the level.
- Inserting a powerful flat-head screwdriver between the pads and the disc, increase the clearances by retracting the piston.
- Move the moving part to the side.
- If there is a control sensor, disconnect the connector.
- Remove the old pads, clean the seats, insert new ones.
- Check the mobility of the fingers, the condition of the protection, and the disc.
- Reassemble in reverse order.
- Operate the brake pedal until the pads adjust the gap.
Replacing the caliper cylinder of a VAZ 2110
- Carry out preparatory activities in accordance with the eight starting points of the first list.
- Unscrew, lift up, and temporarily plug the flexible hose.
- Use a hexagonal L-shaped wrench to loosen the cylinder. Treat rusted fasteners with WD-40.
- Release the fastening, unscrew the bolts that secure the VAZ 2110 caliper bracket.
- Disconnect the old cylinder and attach the replacement one.
- Using a clamp, press the piston.
- Assemble the mechanism.
- Connect the hose.
- Bleed the brakes and check the fluid level.
Installing a new caliper
Installation of the device is carried out in the reverse order. To do this you need to do the following:
- Install the brake caliper housing and tighten the mounting bolts.
- Tighten the bolts using a 17mm wrench.
- Push back the locking plate and unscrew the bolt with a 13mm wrench to remove half of the caliper.
- The piston must be completely pressed inside the mechanism and new brake pads must be installed.
- Reinstall the caliper half and tighten the nut. Bend the locking plate using a chisel.
- Screw on the brake hose.
- Bleed the entire system to get rid of any air in it.
After bleeding the system, it is imperative to put rubber plugs on the fittings. With their help, these elements are protected from moisture and dust. And the next time you pump, unscrewing the fittings will be much easier.
Modification of the VAZ 2110 caliper
Trying to eliminate the causes of breakdowns and increase the reliability of the braking system, craftsmen make changes to the design. We often hear questions about what to do if the calipers of the VAZ 2110 are knocking. How to change the caliper 2110. How to improve the operation of the mechanism. Similar components of domestic and foreign cars are compared.
The VAZ 2110 is equipped with 13” (inch) discs, type p 13. Brembo produces brake discs p 14”. The VAZ 2110 caliper bracket allows you to use this size in conjunction with pads with a larger lining area made by Fiat. The contact surface increases, the braking distance decreases.
Plastic rings are used on the fingers of foreign cars, reducing knocking in the mechanism. Home craftsmen make transverse grooves and select rubber rings. The modified design is designed to eliminate the beating of the bracket.
It is necessary to take into account the compatibility of the ring material with the lubricant used to prevent jamming. In an effort to improve the design of the braking system, it is logical to use the medical motto - do no harm.