On any vehicle, various problems are possible during operation. Owners of cars with injection engines have the opportunity to carry out diagnostics themselves. For this purpose, a diagnostic connector is installed on vehicles from the factory. The article describes where the diagnostic connector of the VAZ 2114 and VAZ 2115 is installed, when diagnostics are carried out, instructions are given for its implementation.
Connector location and features
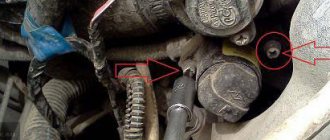
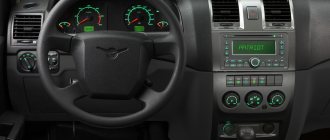
On VAZ 2114 and 2115 cars, where a Europanel is installed, the diagnostic connector (DR) is located on the central control panel under the cigarette lighter. It is closed by a decorative plug. To access the connector, just pry off the plug and it can be easily removed.
Location on VAZ 2114
VAZs can be equipped with a 12-pin rectangular connector of the old style OBD 1 (GM-12) or a 16-pin OBD-II connector in the form of a trapezoid USB-KKL. If the adapter is intended for OBD-II AR, you can buy an adapter.
Pinout
Depending on the DR installed on the vehicle, diagnostic equipment is connected.
1. Diagnostic block diagram
2. Old style pinout
3. OBD-II cable pinout
By purchasing a diagnostic adapter and learning how to do the diagnostics yourself, you can save yourself from visiting a car service center, unnecessary expenses and be able to monitor the health of your car.
Loading …
When is diagnosis necessary?
Many car enthusiasts are frightened by the “Check Engine” signal appearing on the panel, which reports malfunctions in the operation of the vehicle systems. The easiest way out in this case is to visit a service station. But this is associated with both financial costs and loss of time. Thanks to the DR that has appeared on modern cars, computer diagnostics of the VAZ 2114 and VAZ 2115 has become possible, which you can do yourself. To do this, you need to purchase a diagnostic adapter and have a device to which it can be connected: a computer, laptop or other device.
The ability to independently diagnose a car will allow you to:
- quickly identify vehicle malfunctions;
- obtain the necessary information from sensors;
- change settings;
- save on visiting a service station.
The need for diagnostics arises primarily when the “Check Engine” sign is displayed, but it is not a bad idea to carry out regular diagnostics for prevention.
"Check Engine" sign
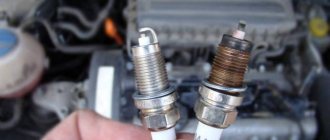
You can carry out additional diagnostics using a compression meter and a multimeter. During an additional check, you should check the level of fluids in the car systems, do a visual inspection of the car body and components for mechanical damage. Next, you need to check the compression in the cylinders, the battery charge, the condition of the valves, high voltages and spark plugs. Having made a preliminary diagnosis, you can begin computer diagnostics.
Connecting a GM12 and OBD2 scanner to VAZ, Lada cars
This article will discuss ways to connect diagnostic scanners to the OBD2 and GM12 connectors of VAZ, Lada, and the following models: 2107, 2108, 2109, 21099, 2110, 2111, 2112, 2113, 2114, 2115, Granta, Priora, Vesta, X -ray, Kalina, Largus, Niva The work of the ELM327 OBDII and Master Kit BM9213 scanners with VAZ, Lada cars and diagnostic programs Torque, OpenDiag and their correct configuration will be considered. We’ll also look at connecting these scanners using the example from the videos.
.
Connecting a diagnostic scanner via GM12 and OBD2 connectors to VAZ, Lada cars
Let's start right away with where most novice diagnosticians of VAZ or Lada cars fail. For its injection cars, AvtoVAZ installed connectors for connecting GM12 type ECUs. The ELM327 scanner is designed to work with OBD2, so contacting the “brains” of the car by using this scanner to diagnose VAZ and Lada cars up to model 2114 will be a little problematic, but, in general, with certain “dances with a tambourine” it is quite possible (although cars with Bosch firmware 7.9.7 will be visible from 2011 without problems). But first of all, we will look at connecting a diagnostic scanner via the GM12 connector, which is connected to a car with a GM12 (OBD1) connector via USB.
Connecting the scanner to the GM12 connector of VAZ, Lada 2107, 2108, 2109, 21099, 2110, 2111, 2112, 2113
For diagnostics (as well as CHIP tuning, firmware) of injection engines of VAZ cars with a GM12 (OBD1) connector via the K-line, a scanner from Master Kit BM9213 and its upgraded version BM9213M are used.
User manual and pinout Master Kit VM9213
Operation Master Kit VM9213
- You can check the device using the Setup CE v1.7.exe utility https://masterkit.ru/zip/Setup CE v1.7.zip
- Apply 12V to the module, according to the connection diagram, the 5-24V power indicator should light up.
- Connect the device to the PC, the 5V power indicator should light up.
- The operating system should automatically install the driver. If this does not happen, download the driver https://www.ftdichip.com/Drivers/VCP.htm and install it manually using the generally accepted method. Please note that the latest drivers are available on the chip manufacturer’s website www.ftdichip.com/Drivers/VCP.htm
- Install the Setup CE program and run it. In the settings, select the device COM port assigned by the operating system.
- In the program menu Service - Settings, select the COM port issued by the operating system and click OK.
Instructions for performing diagnostics via a laptop with your own hands
For diagnostics you will need a laptop and a diagnostic adapter. The laptop can be of any power, it does not matter for diagnosis. The adapter is universal and suitable for all VAZ models (the author of the video is KV Avtoservis).
There may be a mismatch between the diagnostic pads. In this case, you can buy an adapter. A diagnostic program is supplied with the adapter, but the software can be downloaded from the Internet on specialized sites. They have the same set of functions, but may differ in unique features.
When connecting a laptop, the ignition must be turned off.
One end of the adapter is inserted into the DR, and the other directly into the USB port of the laptop. After connecting the adapter, turn on the ignition. At the next stage, we launch the program and begin diagnostic work. When the program starts, the computer connects to the electronic control unit.
Basic steps in diagnosis
When you have found the VAZ 2114 diagnostic connector, you can begin the required diagnostic work.
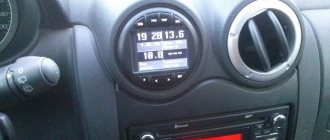
By the way, before installing the device, think about what exactly it will be used for. When choosing an on-board device, you need to take into account the characteristics of the car, so inexpensive models are suitable for the VAZ 2114. It will be enough to choose a system that has a monitor, a set of wires, and the processor itself.
Next, you will need to find a place where you can mount the monitor. It is necessary to take into account the individual characteristics of the machine; the optimal place is the central part of the console. When there is not enough free space on the dashboard, you should mount the monitor on the dashboard.
Remember that you need to find a place for the processor, and it is important that the ventilation holes must be freely accessible. The case should be fixed in a certain place for greater reliability.
see also
The wires deserve special attention; they must not be damaged during operation. To do this, experts advise passing them through a special tube.
After the connector for diagnosing VAZs has been found, other work has been completed, and the wiring can be connected.
After the installation is completed, you can install the software and make the necessary settings.
Now you have access to car diagnostics.
Video “Diagnostics on a computer using a KKL adapter”
This video demonstrates how computer diagnostics of a VAZ 2115 is performed using a KKL adapter (the author of the video is KV Avtoservis).
Pinout of connectors for connecting the OBD-2 USB-KKL cable to the OBD-1 (GM-12) VAZ connector.
Pinout of the old-style OBD 1 (GM-12) diagnostic connector for VAZ 2107, VAZ 2110, VAZ 2112, VAZ 2114, VAZ 2115 cars for connection to the USB-KKL cable if there is no adapter.
Connection (pinout) of the OBD-2 USB-KKL cable for connection to the old-style OBD-1 (GM-12) connector to VAZ 2107, VAZ 2110, VAZ 2112, VAZ 2114, VAZ 2115 cars without an adapter.
Also, if you wish, you can buy an adapter from OBD2 to OBD1 (GM12) VAZ 16pin here. Then the process of connecting a USB-KKL, ELM327 or other OBD2 adapter with OBD-1 (GM-12) will go much faster