Signs of a malfunctioning steering column switch
The main symptom of a malfunctioning steering column switch is a lack of response to pressing. But as a rule, the switch itself rarely breaks, so below I will provide links to articles when you should look beyond the steering column switch.
Malfunctions of the right steering column switch:
Malfunctions of the left steering column switch:
- The turn signals do not turn on or turn off.
- High beam does not turn on.
- The high beams do not blink.
Pinout of contacts and wires of steering column switches VAZ 2114
When diagnosing faults and repairing the electrical equipment of a VAZ 2114 (2113, 2115) car, quite often you have to deal with steering column switches since many electrical circuits of the on-board network are tied to them.
To quickly solve problems, you need to know exactly which and where the wire comes from to these switches, which contact is connected to them (pinout), as well as the switching (closing) of contacts when moving the levers.
Here is a diagram where you can see it all.
Pinout of contacts and wires of VAZ 2114 steering column switches, diagram
Pinout of wires and switching of contacts of steering column switches of a VAZ 2114 (2113, 2115) car
Description of the scheme
Right steering column switch
53ah (yellow-blue wire) - plus (input) from the ignition switch (via fuse F7 in the mounting block and ignition relay).
53H (blue and white wire) - to the rear door window wiper motor.
WH (pink-black wire) - to the rear window washer solenoid valve.
W (pink wire) - to the windshield washer motor.
53b (gray-red wire) - to the windshield wiper motor, the second (high speed) wipers.
j (yellow-green wire) - on the windshield wiper relay “K3”.
53a (orange wire) - plus (input) from the ignition switch (via fuse F16).
53 (gray wire) - to the windshield wiper motor (first low speed or intermittent wiper mode).
53e (black and white wire) - intermittent positive with the windshield wiper relay.
Left steering column switch
49aR (two blue wires) - one to the starboard side indicators (via the mounting block), the other to the indicator lamp for turning on the turn signals in the instrument cluster.
49a (two blue-red wires) - one input (intermittent plus) from the turn signal breaker relay in the mounting block - “K2”, the other plus to the emergency light switch.
49aL (two blue-black wires) - one to the left side indicators (via the mounting block), the other to the indicator lamp for turning on the turn signals in the instrument cluster.
30 (pink wire) - plus (input) from the ignition switch.
56 (two green wires) - one positive from the exterior lighting switch, the other positive to the fog light switch in the rear lights.
56b (gray-red wire) - plus to the winding of the “K9” relay in the mounting block (low-beam headlight relay).
56a (blue-white wire) - plus to the winding of relay “K8” in the mounting block (relay for turning on the high beam headlights.)
Notes and additions
— On VAZ 2114 (2113, 2115) cars of different years of manufacture, the color of the wires may differ slightly.
Twokarburators VK - More information on the topic in our VKontakte group, on Facebook Twokarburators FB and on Odnoklassniki - Twokarburators OK
More articles on electrical equipment of VAZ 2114, 2113, 2115 cars
— Fog light in the rear lights of the VAZ 2114, connection diagram
— VAZ 2114 instrument brightness control, connection diagram
— How is the heater motor connected to the VAZ 2114, 2113, 2115?
— Pinout of the alarm system VAZ 2114 (2113, 2115)
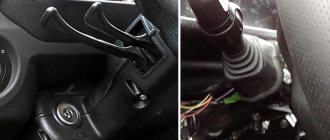
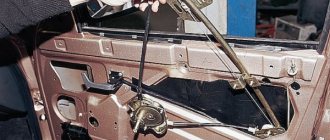
How to remove the steering column switch?
As mentioned above, removing the switch takes two minutes. For this we need a Phillips screwdriver.
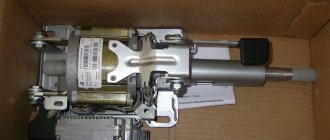
- First of all, use a Phillips screwdriver to unscrew the lower and side fastenings of the steering column (shown in the figure).
- Push the steering wheel locking lever all the way down and remove the lower trim.
- Disconnect the hazard warning wire block from the button.
- Remove the upper steering column pad.
- We compress the spring clamps of the steering column switch and remove it from the column.
- We remove the contacts from the steering column switches.
Contact closure when switching steering column switches (table)
The numbers of closed contacts are displayed on the body of the switch itself.
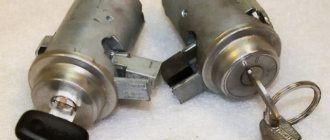
Welcome! Turn switches - most of them are made mainly of plastic and therefore these switches very often break, in most cases, as happens, you stop somewhere, for example, you need to turn around and you immediately start turning the steering wheel sharply so as not to interfere with the movement and then bam and you hit it , this very switch and even with average force it breaks, but few people know how to replace it, but in fact everything is very simple, so so that you can easily replace these parts in the future, then in this case, read our article which is aimed at replacing the turn switch, as well as replacing another side switch (the windshield and rear window wiper switch of the car)
Note! To replace the switch, you will need to stock up on: Firstly, a screwdriver, as well as a wrench to loosen the nut securing the negative battery cable, because replacing the switch can only be done with the car de-energized!
Summary:
When should switches be replaced? It must be replaced in different cases, some change it when it breaks, some for other reasons, but so that you understand at least a little what functions it performs in the car, we will briefly tell you: The switch firstly turns the turn signals on and off, and also regulates the speed of operation of the car windshield wipers (This is the second switch), but if it fails and its terminals to which the wires are connected fail, then nothing will work at all, that is, your turn switch terminals have burned out or take off something else that happened, then when you press the switch while turning it will not work at all, neither left nor right!
Steering column switches from a foreign car in a VAZ using the example of GM
@id2013
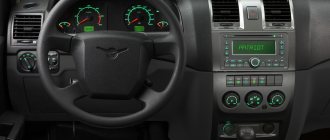
External differences:
2108
Priora
G.M.
Let's begin! So we will need: 1) Straight arms 2) GM steering column switches 3) Insert in helicopter 2108 4) wire 5) dads and moms small and large 6) heat shrinkage 7) a pair of relay pads for the relay 9) time
Well, now about the hands... knowledge of car electronics and hands growing from the right place is a must, otherwise a fire or something else is possible!
We go to the Korean spare parts store and buy left and right steering column switches (I took them from the Lacetti), then either use ours or buy a new helicopter insert 2108!
We use any wire you like!
dads moms small and large, you can use electrical tape instead of heat shrink, but I don’t recommend it!
process:
The original chips were cut off because I couldn’t find the original matching parts, both from the left and right switch!
Let's start with small chips: Left (turn signals-light) 1) Black - general 2) White - clearance 3) Green-black - low beam 4) Yellow - PTF 5) Red-yellow - PTF So what do we have, but we have a difference from switching circuits from the VAZ, since on the VAZ the power supply is low current and the size is divided into dimensions + it weighs constantly and for low current, after turning on the ignition, we will correct this matter with the help of a relay! It would also be advisable to hang a relay on the dimensions, since the output on the switch is low-current, but on the VAZ there are no relays and the entire load from the dimensions falls on the button! PTF can be hung here if desired + permanent can be from the dimensions or from the ignition, I will hang from the ignition!
Right (windshield wipers) 1) Blue - rear wiper + rear wiper washer 2) Black-red - rear wiper + rear wiper washer 3) White-green - duration of windshield wiper strokes 4) Black - duration of windshield wiper strokes So with the second one, we just break the wire responsible for the first operating mode (intermittent)! The principle is that the relay has a resistance that is responsible for the cycles of the purifier, and the regulator on the handle will increase this resistance, due to which the pause will increase... in fact, we’ll see what happens, but most likely I’ll resolder it to a lower value!
The easiest way to secure the steering columns in a helicopter is with self-tapping screws!
but first you need to file the tongue that throws off the turn signal!
To connect the switches from the Chevy to the VAZ block, pieces of wire were used! Better find native chips!
Now we need to make the side lights, low beam and fog lights work from the switches, for this we take the connectors to which the buttons were once connected! From the size button we take (I have it white) the wire coming from the button, when 12V is applied to it the dimensions start to light up, from the button with low beam we take (I have it green) the wire to which when 12V is supplied the low beam is turned on, not the fog light button from it (I have it yellow) there is a wire that actually goes to the PTF relay... Anyone here already has some imagination or do as I did, cut out all the chips and run the wires straight to the switch, or from the switch through to the chip and leave it in place!
We connect a constant plus to the common wire, the dimensions themselves to the output from the dimensions, to the near one, and then either connect it directly and then the near one will work constantly, regardless of whether the ignition is on or not, or as I did everything through a relay!
PTF is simple, if the plus is constantly connected, then the PTF will work regardless of whether the ignition is on, the dimensions are on or not! You can do it like the factory PTF will light up when the lights are on or like I started 12V from the ignition switch! That is, the PTF will only work when the ignition is on!
So, we've sorted out the left switch, now the right one!
Everything is similar to the left one, we also connect it according to the pinout, the current wire going to the 7th contact of the Chevy switch and contact J on the VAZ switch are passed through the windshield wiper clock regulator on the handle...
It remains to solve something with the rear wiper and washer, and remake the factory relay for adequate operation of the clock adjustment!
I’ll write back right away, I’m very pleased with their work, they’re quiet, they turn on easily and they look cool))))) It seems like I haven’t forgotten anything...
Here are the diagrams and appearance:
Video of work:
When copying, please indicate the source and this is either www.drive2.ru/users/theredline/ or my profile on this site! https://www.drive2.ru/l/5312798/ https://www.drive2.ru/l/5319283/ https://www.drive2.ru/l/5379092/ https://www.drive2. ru/l/5387276/