Heated rear-view mirrors are a necessary option in winter to improve driving safety and provide the driver with adequate visibility.
This feature is present in most modern cars, but owners of older vehicles should not be upset. You can make heated side mirrors yourself!
Types of heating
The need for this function became clear quite a long time ago. Just a few decades ago, some cars were equipped with simple devices designed to defrost viewing structures.
Installation involved installing incandescent lamps inside, which heated the part from the inside and the ice melted. In modern devices, the heating method has changed, but the function remains the same.
The existing types of defrosters should be considered separately:
- Wire - how heated mirrors on a wire base works is explained by its very name. Tungsten filaments are used as a heating element, placed on an insulating and heat-resistant base. When an electric current passes through them, they heat up, which leads to melting of the ice.
- Printed conductors – heated car mirrors using printed conductors are the most modern. You can buy boards at the car market or at a spare parts store. They are not made independently.
- A film heater is a film-based product with heating elements included in it.
- Lamp heater - this type of heating element is a low-power (10 watt) incandescent lamp. This technology is best suited for making heated mirrors with your own hands and is often used by owners of outdated models of domestic cars.
What you need
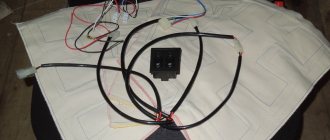
To make a heater you only need:
- Nichrome wire;
- Double-sided and regular tape;
- Wires;
- Sealant;
- Soldering iron;
- Multimeter;
A wire with a cross section of 0.4-05 mm and a length of 1-1.3 m is suitable for the heater. For normal functioning of the heating system, the resistance of the piece of wire must be 12 Ohms. This is exactly what a multimeter is for. That is, we took a section of 1.5 meters and measured the resistance. If it exceeds the specified value, cut off 10 cm and measure again. Thus, we select the desired segment.
Checking the presence of standard heating
The presence of a heated rear view mirror cannot always be detected at first glance. The fact is that there is often no separate button to turn it on, and many car owners wonder how the heated exterior mirrors are turned on. The function is activated automatically when the rear window heating is turned on. To check if the mirror heater is present:
- Start the engine;
- Turn on the rear window heating;
- Spray the mirrors with water or blow on them;
- Touch it with your hand.
When the heating is running, the water drops dry within 1-2 minutes; when you breathe, the mirror does not fog up, and it is warm to the touch. In the cold season, you can verify the presence of heating by simply observing how long it takes for the mirror to thaw after being parked overnight.
If a heating element is located underneath, the defrosting process takes only a few minutes.
Active (or adaptive) type
Adaptive cruise control is an advanced version of the active type. In addition to the ability to maintain the speed limit without pressing the gas pedal, cars with adaptive cruise control can calculate the distance to the car in front, and also reduce or increase speed depending on the situation on the road. That is, if the system determines that the distance to the car in front is decreasing, then the system slows down the speed. The speed is reduced until the gap between the cars, in the opinion of the system, becomes optimal. If the sensor no longer sees an obstacle ahead, the car picks up speed and maintains this speed limit.
Instructions for installing ready-made components
Installing commercial heated mirrors is a relatively simple operation. To carry it out, it is necessary to remove the part from the car and disassemble it. Glued products are heated with a hair dryer or by soaking in boiling water, after which the reflective overlay is easily removed. Products fastened with bolts are disassembled using the appropriate tool. Do-it-yourself installation of heated rear-view mirrors purchased in a store is permissible only on clean and dry surfaces.
Before starting the procedure, it is necessary to evaluate the dimensions of the heating element and housing. If printed circuit boards are used, it is possible to remove the stiffeners. The film is cut to size while retaining the heating strips.
The boards are glued to the inside of the case with glue, the films are fixed directly to the reverse side. In both cases, wires are soldered to the contacts of the thermoelement, which go to the power source.
The connection diagram for heated exterior mirrors may vary on different cars. Usually the wires are brought out and connected to the line that supplies the heated rear window. It is possible to install separate wiring using a relay and a fuse. In some models, auto wiring for the devices in question is provided with src=»https://znanieavto.ru/wp-content/uploads/2018/02/skhema-podklyucheniya-obogreva.jpg» class=»aligncenter» width=»500″ height ="600″[/img]
General information
Modern cars are mostly equipped with a heating system. But vehicles, such as the VAZ, for the most part lack this advantage. However, this does not mean that the situation cannot be corrected. Agree, home craftsmen already redo a lot of things in classic VAZ models. For example, the chassis, engine and much more are being modified. Compared to this, installing a heated mirror system seems like baby talk.
All you need is free time, desire and theoretical knowledge, which you will get from this article. In general, there are two ways to implement the plan. One of them is the installation of heating elements, the second - light bulbs. We will look at each of them, and you can decide which one you like best.
How to make heated mirrors with your own hands
It’s not difficult to make heated mirrors with your own hands. Most often, incandescent lamps or a wire-based heating element system are used for this. The cost of materials is minimal, but the work will take time.
What you will need
To make heated mirrors with your own hands, you will need a set of tools and materials. The list of consumables depends on what type of device the car owner wants to see.
| Lamp | Wire |
| lamp 10 watt | the basis |
| foil | tungsten filaments |
| heat resistant material | Double-sided tape |
| cartridge | wires |
| wires | soldering iron |
| soldering iron | sealant |
| sealant | |
| disassembly tools |
Cost of materials
Do-it-yourself heated rear-view mirrors require extremely low financial costs. So, an incandescent lamp costs about 20 rubles, a cartridge - 30 rubles, wires - 25 rubles / meter, sealant - 100 rubles, adhesive tape 40 rubles. Tungsten filaments can be removed for free from an old kettle, and a soldering iron and screwdriver for disassembling a mirror can be borrowed from friends.
Procedure
As in the case when ready-made components for heating are used, installation of the heater begins with disassembling, washing and drying the mirror. After this, the inside of the housing is lined with a heat-resistant coating and aluminum foil.
The cartridge is mounted in such a way that after installation it does not touch the structural elements.
A lamp is inserted into the socket, the wires are soldered to the contacts and insulated with sealant. Also, using sealant, insulate the holes through which the wiring comes out. The heating filaments are glued to the base, after which it is covered on both sides with heat-resistant material. The resulting structure is glued to the inner surface of the mirror, soldered to the contacts of the wires, which are brought out through specially made holes. All open heating elements are insulated with sealant.
An important question is how to turn on homemade heated mirrors. The best option is to have a separate button for this.
Connection to the rear window defrost system is not recommended, since the design should not operate for a long time. Both the lamp and the filaments become hot enough to cause overheating and damage to the housing during prolonged use.
Active stage of work execution
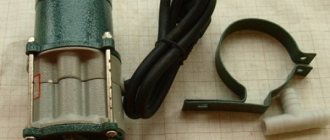
Often you have to face the fact that there is not enough space to place the appropriate socket under the lamp. In this case, there are only two options. One of them is to take a smaller light bulb, which is not recommended, the second is to use a heat-resistant clamp, which takes up virtually no space. Don't forget to solder the wires and carefully insulate this area. In any case, the most important thing is to prevent the lamp from touching the back of the mirror. This can lead to both damage to the latter and destruction of the heating element during movement.
Next, you should connect the heated mirrors to the vehicle's electrical network, for which you will need a pair of wires with a dense and flexible sheath
At this stage it is extremely important to ensure free adjustment of the mirror. To do this, you need to lay the wires correctly
They should not be stretched, nor should they bend in some areas.
Malfunctions of standard heating
Possible malfunctions and repairs of standard mirror heating are in the table below:
| Possible malfunction | How to repair heating |
| Heating element burnt out | Disassemble the mirror and replace the part |
| The integrity of the wiring is broken | Check the wiring with a multitester, clean, connect and insulate the wires at the damage site |
| The power button combined with the rear window heating is faulty | Check if the rear window heating works. If not, replace the button |
| Heating relay is faulty | “Ring” and replace the faulty relay |
| Fuse burned out | Replace fuse, check wiring for short circuit |
It’s not difficult to make heated mirrors with your own hands today. Heating components are sold in stores, so all the work comes down to assembling a simple structure and connecting it to the car's electrical network. An assembled and well-functioning device will significantly increase driving comfort in winter and make life easier for owners of any type of car.
Advantages
The reflector is in working order.
Some manufacturers offer heated mirrors as standard on their cars, thus attracting customers. But on older or economical modern models there is no such function.
Installing heated mirrors makes it easier to drive cars in winter. You will no longer need to waste time cleaning them manually. Some cars have a button for heated mirrors. Otherwise it will start. The heating element melts the snow, evaporates condensation moisture and makes driving much safer.
Manufacturers
If your heated side or rear view mirror suddenly comes unstuck, you can use these adhesives to glue it:
- Loctite 37438. It is a two-component liquid mixture (base and activator). The product in the package is enough to glue 2 components;
- Loctite 03346. Available in aerosol form. It is quite economical, because the mixture in it is enough for 15-20 parts. For this reason, the two-component mixture kit is suitable for use in car repair shops;
- Liqui Moly Ruckspiegel-Klebe-Set. Designed for gluing metal fasteners of heated components. It is presented with an anaerobic composition, which is characterized by high adhesive ability, as well as a nylon mesh, which acts as a catalyst and compensates for the expansion of materials as a result of high temperatures. They can be used to glue not only car parts, but also furniture components. This is what ensures the popularity of this composition. In addition, the glue hardens quickly and is resistant to mechanical damage;
If there is no heater
If the vehicle does not have heated side mirrors, you can install such a system by purchasing ready-made components. The process itself takes a little time. Any car enthusiast can handle the installation. The main thing is to follow the instructions:
- First you need to find the relay block. Just open the hood and find a black box. Such a box will contain several relays. There must be a diagram on the lid of the box. Thanks to it, you can determine what each relay is intended for. There's nothing complicated about it. Having found and removed the required relay, it must be replaced with what was included with the mirror element. Finally, connect all the wires and close the hood.
- The existing reflectors should be removed by unscrewing all the screws that hold them in place. Old components must be removed and the wires disconnected.
- After this, you should install new components, connect the heated side mirror wires, and then replace the inner cover by tightening all the screws.
Now you know how to connect heated mirrors. The process is simple, and there is no need to contact specialized services.
Procedure
Now you can begin installing the heater. First, remove the holder with the mirror from the case. On most cars, it is enough to pry it with a screwdriver or something flat from below and pull it towards you.
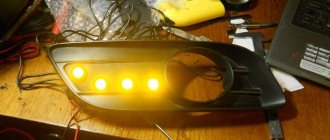
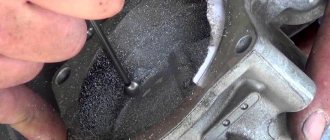
Based on the characteristics of the holder, we choose the method of fastening the wire. If the inner surface of the holder is smooth (as in the photo), then stick double-sided tape on it.
Then we lay a piece of wire on this surface. This can be done arbitrarily, for example, in a zigzag or something else. The main thing is to place it so that the thread covers as much of the surface of the holder as possible. In this case, the wire should not intersect anywhere. Scotch tape will hold the nichrome thread well.
If the inner surface of the holder has any protrusions or fastening elements, then it will not be possible to stick the tape. In this case, a soldering iron will help to secure the wire. Everything is simple here - we apply a nichrome thread to the surface and press it with a heated soldering iron. The plastic will begin to melt and the wire will sink into it. Once cooled, the plastic will become hard and it will hold the thread
But here it is important not to overdo it with heating the plastic, so as not to “push” it to the mirror. It is enough just to “drown” the wire in it a little and that’s it.
We recommend: Niva transfer case. Ways to eliminate vibration
In this way, we fasten the wire along the accessible surface of the holder without touching the fasteners.
When laying the wire, its ends should be placed towards the side of the holder that is closer to the door, and so that they do not touch each other. To these ends we solder terminals for connecting to the wiring or simply the ends of prepared wires. Then the resulting connections need to be insulated.
All that remains is to provide insulation. If the wire was secured with tape, then to insulate it you can simply stick several more layers of regular adhesive tape on top. This will provide thermal insulation and prevent the wire from peeling off and shorting.
As for the holder where the wire is secured with a soldering iron, you can simply fill the entire surface where the thread passes with sealant and wait until it dries. In this case, the fastening elements will not be affected, which will ensure ease of fastening, and the wire itself will be insulated.
Before installing the holder in place, we pull the wiring through the mirror body into the door, the wiring for powering the heaters. Only after this we assemble the mirror.
Security requirements
Independent heating equipment for side mirrors requires strict adherence to personal safety precautions for the car owner. First of all, you should remember that the connection to the network structure must be made through a fuse.
If there are holes in the side mirror housing, then they must be sealed, since moisture ingress can cause a short circuit in the electrical wiring. The heating switch is installed in a place convenient for the driver.
Safety at its core is an indicator of the carefulness of the vehicle owner. The insulation of exposed areas of the car's electrical wiring should not be neglected; it is necessary to periodically subject the system to a thorough inspection and examination for insulation violations.
A short circuit in the electrical network can cause the car to catch fire, both during the process of starting the engine and while driving. A vehicle is an object of increased risk; comfort and safety depend on the will of the owner.