VAZ 2106 owners know firsthand how many problems this car can cause. At the same time, a particularly large number of troubles are associated with the fuel pump: it either pumps, or does not pump, or becomes clogged with debris, or refuses to work for unknown reasons. Therefore, it is necessary to learn in advance about all the intricacies of the operation of the gasoline pump and be able to eliminate any malfunctions that may arise.
- Operating principle
Video: design and operation diagram of a gasoline pump
- Signs of a malfunctioning gasoline pump
What to do if the fuel pump does not pump
- The pump does not pump when hot
- Why does the pump hum but not pump?
- For what reasons can the fuel pump on the “six” fail?
- Drive faults
- How to remove a pump from a car
Video: dismantling procedure
- Video: fuel pump repair
- Video: how to quickly and correctly replace the pump
- Installation of an electric fuel pump
Video: electric pump for the “classic”
Fuel pump VAZ 2106
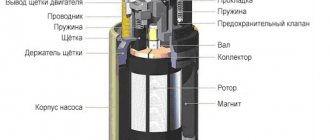
A car fuel pump is considered the most important element of the entire gasoline supply system. Actually, the pump is necessary in order to pump fuel from the gas tank to the carburetor. After all, it is in the carburetor unit that the air-fuel mixture is formed, which is then supplied to the engine.
The fuel pump supplies fuel from the tank to the engine through special hoses.
Principle of operation
The main task of the fuel pump is to generate excess pressure in the fuel system under any engine operating mode. It is necessary to ensure that there is always a sufficient amount of gasoline in the carburetor float chamber.
Video: design and operation diagram of a gasoline pump
Which fuel pump is better for the “six”
The standard equipment of the “six” is a gasoline pump produced by DAAZ (Dimitrovgrad Automobile Unit Plant). In terms of its structure, it is a mechanical unit, which is equipped with a diaphragm drive. Three diaphragms are built into the design of the DAAZ fuel pump to ensure uninterrupted operation of the device.
Find out what to do if the salon smells of gasoline: https://bumper.guru/klassicheskie-modeli-vaz/poleznoe/zapah-benzina-v-salone.html
The performance of a fuel pump of this brand is 60 liters per hour (on free drain). This volume is quite enough for optimal operation of the entire fuel distribution system on the VAZ 2106.
Initially, the “six” was equipped with DAAZ brand fuel pumps
A modern analogue of DAAZ is considered to be a petrol pump of the Pekar brand produced by the fuel equipment plant in Saratov. This pump has the same performance (60 l/h), but is considered more reliable due to its high tightness and resistance of the membrane elements to oil.
“Pekar” can be installed on a VAZ 2106 of any year of manufacture, but it became standard after 1990.
The Pekar fuel pump has the same performance as the DAAZ, but it is more modern and reliable
Thus, DAAZ and Pekar are the optimal equipment for the VAZ 2106 system, which allows the car to function without interruptions and breakdowns.
The gasoline pump on the VAZ 2106 is located under the hood. The device is fixed on the left side to the engine cylinder block. Fastening is carried out with studs with the obligatory use of a thermal spacer and an adjusting shim. This arrangement is very convenient, since if necessary, you can quickly find, remove and repair or replace the faulty part.
The fuel pump is located on the cylinder block on the left side
Signs of a malfunctioning gasoline pump
Interruptions in the fuel supply to the engine or engine failure to start are not always associated with malfunctions of the fuel pump itself. Of course, these signs are a clear fact that there is a failure in the fuel system, but in order to find out their cause, it is necessary to carry out diagnostics. However, according to statistics, most often problems arise precisely because of the fuel pump.
The following signs can be identified that indicate a possible pump malfunction:
- the engine does not start or does not start the first time;
- the engine “troubles” at high speeds and runs jerkily;
- humming sound when driving;
- noticeable loss of vehicle dynamics.
About other causes of engine failure: https://bumper.guru/klassicheskie-modeli-vaz/poleznoe/ne-zavoditsya-vaz-2106.html
What to do if the fuel pump does not pump
The most common sign of a pump failure is a lack of pressure in the fuel system, that is, the fuel pump simply does not pump fuel. The cause of such a breakdown may be:
- natural wear and tear of pump elements;
- cracks and ruptures in diaphragms;
- diaphragm spring extension;
- clogged valves;
- severe contamination of filter elements;
- cracks in the pipes and hoses of the fuel system.
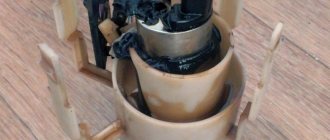
It is quite easy to see damage to hoses during a normal visual inspection. In all other cases, you will need to remove the pump from the machine and disassemble it in order to identify the faulty element and replace it.
In many cases, it is more advisable not to repair the old fuel pump, but to replace it
The pump does not pump when hot
In some cases, the pump on a VAZ 2106 may malfunction only in specific cases - for example, it works properly when starting the engine, but stops supplying fuel when it’s hot.
This is due to the fact that the gasoline in the tank and throughout the fuel system does not have time to cool. As a rule, the problem lies not in the pump itself, but in the drain pipe or fuel receiver. It will be necessary to check these elements so that the pump can operate smoothly.
remove the gas tank, check the blue drain tube for constriction, remove the fuel receiver, and also check if it is clogged
Artificial intelligence
https://otvet.mail.ru/question/60646959
Why does the pump hum but not pump?
VAZ 2106 owners may encounter a different kind of problem: the fuel pump turns on and hums, but does not supply fuel to the engine.
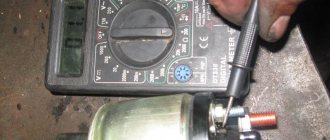
The pressure in the VAZ 2106 fuel system should be equal to 3 atmospheres. You will need a pressure gauge to check this indicator. If the pressure is significantly lower, the fuel pump requires replacement.
Gasoline may not flow into the engine even if the fuel pump is working. The reason in this case lies in the lack of tension. If you do not hear a characteristic buzzing sound when you turn the key in the ignition switch, then the problem lies in the relay, wires or connectors.
A working fuel pump should create a pressure of 3 atmospheres in the fuel line.
For what reasons can the fuel pump on the “six” fail?
As practice shows, the DAAZ fuel pump is more susceptible to wear and tear, and therefore fails much faster than the Pekar brand pump. However, for both models, the following reasons are equally sources of breakdowns:
- Gasoline pump rod. During vehicle operation, the pump rod inevitably shortens (natural wear). In this regard, the device stops supplying the required amount of gasoline to the engine. Only VAZ 2106 carburetor models are equipped with rod fuel pumps.
- Valve mechanisms. The valve is one of the fastest-wearing components in a pump. In this case, most often the sealing ring on the valve fails, which leads to incorrect operation of the opening mechanism.
- Low quality fuel. Gasoline used to power the engine of questionable quality can quickly damage the electric fuel pump. Electric pumps are installed only on injection models of the VAZ 2106.
To extend the life of the pump, you must:
- refuel only at proven gas stations;
- periodically clean the gas tank from dirt and impurities;
- monitor wear of pump parts;
- listen to the operation of the pump and carefully monitor the dynamic characteristics of the machine.
Checking, repairing and replacing a mechanical fuel pump
Methods for diagnosing fuel pumps for carburetor and injection engines of Zhiguli are also different. Checking a mechanical pump consists of determining its performance, as well as assessing the condition and performance of its component elements.
Replacement procedure
If you decide not to repair the fuel pump, but to replace it with a new one, it is even easier. The replacement process will not take more than 30 minutes. Tools you will need:
- crosshead screwdriver;
- key to 13;
- dry, clean rag;
- small capacity.
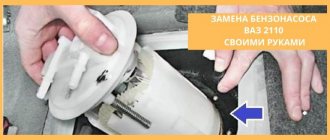
- In the engine compartment we find the fuel pump.
- Unscrew the screws of the clamps, loosen them, and remove both fuel hoses from the pump fittings.
Loosen the clamps, remove the fuel hoses from the fittings
Using a 13mm wrench, unscrew the pump mounting nuts
We dismantle the pump and drain the gasoline from it.
Assessment of the condition and performance of component parts
The following pump elements must be checked:
- intake and exhaust valves;
- mesh filter;
- diaphragms;
- pusher (rod).
- crosshead screwdriver;
- slotted screwdriver;
- key to 10;
- key to 13;
- caliper or ruler.
- Loosen the screws of the clamps of the inlet and outlet fittings of the pump, remove the hoses from them. We place a finger on the outlet fitting, and with the other hand we press the manual pumping lever several times. You should feel the air escaping under pressure with your finger. Next, plug the inlet fitting with your finger and pump it up manually again. A vacuum should be felt at the pump inlet, i.e. the finger should be sucked inside the fitting. If nothing like this happens, the valves of the device are faulty and must be replaced.
Checking the valves consists of determining the air pressure at the outlet fitting and the vacuum at the intake
The mesh filter should not show signs of damage or deformation
If the pump diaphragms are damaged or deformed, they must be replaced.
Checking the protection devices for the electrical circuit of the fuel pump on injection VAZs of the Zhiguli family
If there is a problem with the electrical equipment of the fuel pump circuit, it usually does not turn on at all. Turn on the car's ignition without starting the engine and listen. First, you should hear a click from the relay, and then a characteristic “squeal” emitted by the pump’s electric motor. If you don’t hear anything like this, start diagnosing with the electrical circuit of the device.
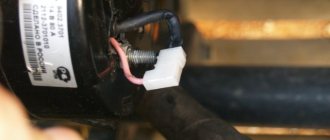
The pump circuit is connected to the on-board network via a separate relay, and its protection is provided by a fuse. Both of these devices are located in the vehicle's optional mounting block. You will find it under the glove box. It contains 3 relays and 3 fuses. The fuel pump relay (indicated R2 in the diagram) is located in the middle, and the fuse (F3) is to the left of it. We pull the fuse out of its seat and check it by “ringing” it with a tester. If a malfunction is detected, we replace it, not forgetting to comply with the rating (15 A).
READ Connecting the carburetor 402 GAZelle engine
You can check the functionality of the relay by installing a known working device in its place. Instead, replace it with the relay located to the right of the one being diagnosed, which is responsible for the radiator fan circuit. If this option does not suit you, turn on the ignition and measure the voltage between the pink wire going to the relay and the vehicle ground. The device should show 12 V. This means that the device is powered. After this, you need to connect the pink wire with the gray one at the relay terminals. So we will connect the fuel pump directly to the battery. If it works (that same “squealing” sound will be heard), simply replace the relay.
The fuel pump relay is located in the middle (R2), and the fuse is located to the left of it (F3)
Do-it-yourself repair of a mechanical fuel pump
It is not advisable to purchase faulty fuel pump parts separately. It is much more profitable to purchase a repair kit, which includes elements that may fail, namely:
- valves;
- set of diaphragms;
- pusher;
- thermal spacer;
- gaskets and washers.
Repairing a fuel pump involves dismantling and disassembling it. They are produced according to the same algorithm that was described earlier in the diagnostics section. If, after disassembling the fuel pump body, you find that there is dirty deposits or debris on its walls or on the inner surfaces of the fittings, clean them with carburetor cleaning fluid and a piece of coarse cloth. When removing plaque, use a small wooden spatula and toothpicks. It is highly undesirable to use metal objects for these purposes.
To replace the pump valves, they will need to be removed from their seats. To do this, using a thin slotted screwdriver or knife, you need to knock out three cored areas in each of the sockets, after which the valves will come out of them freely. Having installed new parts in place of the faulty ones, the sockets must be cored again by hitting the edge with a core (screwdriver) in three places.
Important: when replacing valves, do not confuse the intake and exhaust!
In order to replace the diaphragms, you need to unscrew the nut in the upper part of the rod on which they are mounted with a 10mm wrench, then remove them and install new ones in their place in a certain order. The lowest diaphragm is the safety diaphragm. This is followed by a small and large spacer, and on top of them are two other (working) membranes.
As for the thermal spacer, it rarely fails. More often there is a manufacturing defect, which manifests itself in the unevenness of the mating plane to which the pump housing is attached. This may cause oil leakage. To replace the spacer, remove the old one from its seat, remove the old gasket from under it, and install a new spacer with the corresponding gasket from the repair kit.
The DAAZ fuel pump repair kit includes three gaskets of different thicknesses:
- 0.27–0.3 mm (A);
- 0.7–0.8 mm (B);
- 1.1–1.3 mm (C).
Gasket “A” is installed between the cylinder block and the thermal spacer, and the other two are used to adjust the protrusion of the pusher (rod) above the mating plane of the spacer.
We install the new rod in place, and slowly turn the engine crankshaft (using the wrench on the pulley nut), select the position when the rod is extended to its minimum length. We place gasket “B” on the mating plane of the spacer and measure the amount of rod overhang above it with a caliper. It should be 0.8–1.3 mm. If the offset is greater, instead of spacer “B” you need to install spacer “C”, and if it is less, swap the first and second positions. Having achieved the result, install the fuel pump
into place and secure it with nuts. For greater tightness of the joint, the gaskets can be lubricated with a thin layer of automotive sealant.
How to check the performance of a mechanical fuel pump
The productivity of the DAAZ mechanical pump is 1 liter per minute. To check the amount of pumped fuel you will need:
- a piece of gas-resistant hose (50–80 cm);
- 2 clean containers with a volume of at least 2 liters (plastic bottles are acceptable);
- 1.5 liters of gasoline;
- watch with stopwatch;
- crosshead screwdriver;
- assistant.
- Using a screwdriver, unscrew the screw on the clamp of the pump outlet fitting. We remove the hose from it.
Remove the fuel hose from the outlet fitting
We estimate the amount of fuel pumped by the pump per minute
If the amount of gasoline is less than 1 liter, the fuel pump is faulty.
Fuel pump drive
The fuel pump drive for the “six” is a rod. Due to its translational movement of the pusher, gasoline is sucked in.
This movement is provided by the actuator cam and diaphragm return spring. When the membrane moves, pressure is created in the system. Immediately after the diaphragm stops, the exhaust valve closes, so the fuel flows into the opening inlet valve. Through it, with a new forward movement of the rod and membranes, the fuel is transferred to the carburetor.
The operation of the fuel pump is controlled by a pusher (2), which moves under the action of an eccentric located on the engine camshaft
On the VAZ 2106, to facilitate work with the fuel system, a lever is installed to increase the pressure in the system. With its help, the driver can artificially create pressure up to 30 kPa.
Drive faults
One of the most common causes of fuel pump failure is damage to the rod. Diagnosing this malfunction is very simple: its main symptom is the inability to accelerate the car even on a flat, straight road.
The rod is the steel rod at the base of the pump. During long-term use, it wears out, which leads to a malfunction in the drive part. As a rule, if the rod is worn out or bent, it is impossible to accelerate the car to a speed above 90 km/h.
The fuel pump rod is made of wear-resistant steel alloys, but during prolonged use it wears out and causes the part to malfunction
Replacing the rod mechanism involves simultaneously replacing two gaskets. When inserting a new rod into the pump body, you need to ensure that it protrudes beyond the spacer by a distance of no less than 0.8 mm and no more than 1.3 mm. That is, the optimal protrusion option is 1 mm.
In order to ensure this overhang, you will need to select gaskets of the required thickness. If the rod overhang is less than 0.8 mm, the engine will begin to experience difficulties when accelerating, and if it exceeds 1.3 mm, the diaphragms may break.
Read about the malfunctions of the VAZ-2106 GBZ: https://bumper.guru/klassicheskie-modeli-vaz/grm/poryadok-zatyazhki-golovki-bloka-cilindrov-vaz-2106.html
Self-diagnosis and repair
The simplest way to check the operating condition of the pump, proven by more than one generation of drivers, is to disconnect the hose from the outlet and manually pump it. Only on Honor, in order for the bleeding lever to move, the diaphragm must be at its highest point, and the pusher at the bottom of the eccentric.
If they are stopped in the reverse position, one turn of the manual winding handle will be enough to return the diaphragm and pusher to the desired position.
When manually pumping, fuel should be supplied from the pump in a stream in time with the movement of the hand lever. The main thing when carrying out this procedure is to place a rag on the engine so that gasoline does not splash around the engine compartment.
To correct internal defects, the pump must be dismantled. The procedure is not complicated. It is enough to disconnect the supply hoses of the fuel line and unscrew the two fastening nuts with a “13” wrench.
READ Peugeot Boxer won't start reasons
When removing the pump, be careful not to damage the gaskets. There are three of them under the fuel pump. First comes a gasket with a thickness of about 0.3 mm, then comes a gasket that provides thermal insulation of the pump from heating the cylinder block, after which a thin gasket-seal is laid again, but only 0.75 mm thick.
By selecting the thickness of the gaskets, the height of the pusher exit is determined, which should be within the range of 0.8 mm. up to 1.3 mm. But between the base of the gas pump and the thermal insulating gasket there should always be a gasket with a thickness of no more than 0.33 mm.
Beginning drivers need to remember that when the fuel pump on a VAZ 2106 does not pump and it has been disassembled for repairs, reassembly does not guarantee its functionality. For correct assembly installation of this part, certain experience and skills are required, especially in terms of removing gaps between mating parts.
Why doesn't it download?
After making sure that there is fuel, that the filters are clean and that the fuel line is clear, you can begin diagnosing the pump. The reasons for its failure can be caused by:
natural wear and tear from long-term use;
stretching of the spring and loss of its elastic properties;
loss of filter capacity due to clogging;
The owner of a VAZ 2106 is faced with a choice - which path to take in order to restore the functionality of the pump.
The first option is the simplest and most reliable, but expensive in terms of cost. Any decent service station has equipment that, in a minimum amount of time, will not only measure the pressure at the inlet and the vacuum at the outlet of the fuel pump, but also identify the part causing defects in the operation of the equipment.
The second option is not the simplest, not as fast, but practically free, except for the time spent on it - do all the diagnostic and repair work yourself in the garage.
The simplest way to check the operating condition of the pump, proven by more than one generation of drivers, is to disconnect the hose from the outlet and manually pump it. Only on Honor, in order for the bleeding lever to move, the diaphragm must be at its highest point, and the pusher at the bottom of the eccentric.
If they are stopped in the reverse position, one turn of the manual winding handle will be enough to return the diaphragm and pusher to the desired position.
When manually pumping, fuel should be supplied from the pump in a stream in time with the movement of the hand lever. The main thing when carrying out this procedure is to place a rag on the engine so that gasoline does not splash around the engine compartment.
To correct internal defects, the pump must be dismantled. The procedure is not complicated. It is enough to disconnect the supply hoses of the fuel line and unscrew the two fastening nuts with a “13” wrench.
When removing the pump, be careful not to damage the gaskets. There are three of them under the fuel pump. First comes a gasket with a thickness of about 0.3 mm, then comes a gasket that provides thermal insulation of the pump from heating the cylinder block, after which a thin gasket-seal is laid again, but only 0.75 mm thick.
By selecting the thickness of the gaskets, the height of the pusher exit is determined, which should be in the range from 0.8 mm to 1.3 mm. But between the base of the gas pump and the thermal insulating gasket there should always be a gasket with a thickness of no more than 0.33 mm.
Novice drivers need to remember that when the fuel pump on a VAZ does not pump 2106
and it was disassembled for repair, reassembly does not guarantee its functionality. For correct assembly installation of this part, certain experience and skills are required, especially in terms of removing gaps between mating parts.