Why would you need to replace an acoustic shelf?
If the sound quality of the speakers initially satisfied you, then the need to make an acoustic shelf with your own hands may arise for the following reasons:
- damage to the stock part;
- decision to increase the number of speakers;
- to improve sound quality;
- wear of a previously installed element.
Drivers often encounter breakage of shelf fasteners, which occurs while driving on a rough road. Most often, this malfunction is encountered by drivers who do not slow down in front of potholes or on rural rough roads.
However, the vast majority of VAZ-2115 owners replace the acoustic shelf in order to improve the sound quality of music inside the car.
In this case, the shelf should be made of plywood with your own hands or to order. This material will help make the speakers sound clearer.
Troubleshooting solutions
An excellent way out of their current situation is to install the rear shelf of the VAZ 2114 yourself. Today, on numerous websites dedicated to cars, you can find a lot of options for making the necessary design on your own. If you don’t have the skills to work or free time, then an excellent solution is to buy an acoustic platform at an auto supply store. It is possible to select several modifications that differ from each other both in design and in the materials used in manufacturing. The price of the accessory depends on its design and the specific store, on average it ranges from 1,200 to 3,000 rubles.
Benefits of replacing the rear shelf
The main thing that car enthusiasts notice after installing a new, modified element is a more confident design that does not bend under the weight of even the most impressive-sized sound speakers installed on it. In addition, the acoustic characteristics of sound transmission are noticeably improved. This happens due to the fact that wood is the best conductor of sound impulses generated by speakers. In addition, the strength of the shelf and the reliability of its fastening prevent the appearance of unnecessary deformations, looseness, annoying squeaks and extraneous noise.
Preparing to make a shelf
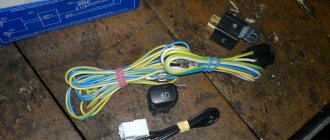
First of all, you will need to prepare the materials and tools that will be required to complete the work. Purchase in advance:
- plywood sheet;
- carpet for cladding;
- radio fabric;
- PVA glue;
- fabric glue;
- a box of self-tapping screws.
The tools that will be useful to you are a jigsaw, a drill or screwdriver, and a grinder.
Please note that the plywood must be at least a centimeter thick, otherwise the shelf will be no more effective than the standard one. Many people are interested in how to take the dimensions of a shelf correctly, so as not to make mistakes during manufacturing. To do this, experienced craftsmen recommend removing the standard shelf and using it for a pattern. In any case, you will have to dismantle it; it is better to do this before cutting the material. This way you definitely won’t go wrong with the size.
Removing the stock shelf is not that difficult. To do this you will need:
- Remove the rear seat.
- Locate the four main acoustic panel fasteners and remove them.
- It is important that the seat belt is fully extended while working. To prevent it from gathering into the tension mechanism, move the two latches and remove the belt guide.
- Unscrew all side frame fasteners.
After dismantling, parts of the old panel can be used as a pattern. In this case, a drawing will not be needed. To do this, first draw them on cardboard, and then transfer them to plywood. You have to prepare the following parts of the structure: main, decorative and adjacent. Next, prepare the side supports and grates.
On the side of the seats, on the main part of the panel, there is no need to make cutouts in the corners, since attaching a homemade shelf can be done differently than a stock one. From the old shelf, cut out the part that fits the rear glass and attach it to the new panel. You can also not take the side walls from the design of the old acoustic panel, but cut them diagonally yourself. By stitching, adjust them to the main part. Assemble the structure with screws. It is enough to screw in only a couple so that in case of a mismatch in size, dismantling can be done easily.
In the main part of the stock panel, two holes are usually pre-made for speakers. If necessary, you can make additional holes, for example, so that the shelf can accommodate several different speakers. In the decorative part, each of the holes should be several millimeters larger. Measure them against the speakers you plan to install. The heads must fit freely into the place prepared for them.
Manufacturing stages
You should start, like any serious business, with preparation. In this case, you need to remove everything unnecessary from the interior, and then remove the decorative shelf that was installed by the manufacturer and the insulation. We got it like this:
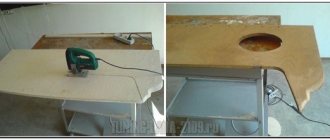
Stage 1. Applying markings. You can use wood, but in our version it is chipboard. The decorative shelf is used as a kind of template.
However, approximately 0.5 cm will need to be removed from each side in order for the shelf to fit into the space allocated for it.
Stage 2. Sawing. Of course, you can do this job manually, but it is better if you have a suitable power tool.
Performing preliminary fitting:
Stage 3. Holes are marked according to the size of the speakers
Now you need to carefully cut the holes, something like this:
Stage 4. Create a template. This way you can install the speakers at the desired angle. In addition, nothing will fall off the shelf. In our version it looked like this:
Now you need to turn it over to get the other half
Next, we lay the finished templates on the chipboard, trace and cut them out.
We glue the resulting second level of the acoustic shelf and further strengthen it with self-tapping screws.
Stage 5. Now you need to try it on again:
The next step is to cut a hole in the iron part of the shelf. Its diameter should be the same or slightly larger than that of the product being manufactured. To do this, you should use a grinder. If access to the trunk is not organized, then you shouldn’t even dream of normal bass sound. You also need to keep in mind that clutter in this cavity does not have the best effect on the sound quality.
Stage 6. We decided that one more level would not be superfluous. This is what it looks like:
And then we installed this:
Stage 7. Cut off all excess, grind and go through with sandpaper
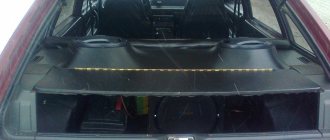
All that remains is to cover the product with a suitable material, in our case it is carpet.
There is no need to use vibroplasts or sound insulation on the acoustic shelf itself, but it is very advisable to cover the trunk with them. Stage 7. It is also the final stage. The almost finished product is installed in place.
In this image you can see that the sound from the speakers will be reflected from the rear window:
It will be useful: How to convert a carburetor to a VAZ-2109 injector with your own hands: instructions
The VAZ 2107 acoustic shelf with your own hands looks attractive and copes with its functions perfectly. Moreover, no special financial costs were required.
How to assemble correctly
The rear acoustic panel is quite easy to assemble:
- Once you have secured the side and main parts, place the speakers in place, secure them and cover them with radio fabric. You can use a grid instead.
- Make a frame from PCB or plywood and cover it with mesh or radio fabric. Glue the material and leave it to dry for several hours.
- Next, glue all the plywood parts and cover the acoustic element with carpet. You can secure the material with glue, but some use a furniture stapler for this purpose.
- A day later, after the shelf has completely dried, you can mount it using the corners. They will be located in the mounting areas of the rear seat of your car. This installation will not take much of your time and effort.
Such a panel will not irritate your ears with squeaks; even speakers that are not of the best quality will sound clearly in it.
Sources
- ladaautos.ru/tuning/kak-samostoyatelno-sdelat-akusticheskuyu-polku-vaz-2115.html
- zen.yandex.ru/media/thesoundteam/akusticheskaia-polka-dlia-vaz-2115-svoimi-rukami-i-kak-ee-izgotovit-5fc5d2b44fa3013b234efc1d
- drive2.ru/l/10564303/
- drive2.ru/l/5940465/
Ways to refine the product
Removing the shelf from the trunk of a Lada Priora takes no more than a minute. In hatchback and station wagon you need to pull it up and then remove it. In a sedan body the removal process is more complicated:
- you need to disconnect the wire block from the additional brake light and from the speakers (if any);
- pull the locking strap up and remove the back of the rear sofa;
- lower the armrest down and unscrew the fastening screws of the luggage compartment hatch;
- press the 4 locking elements;
- lift the front part a little and pull it towards you, overcoming the force of the seals until the latter come out from under the rear window.
To put the shelf in place, repeat all steps in reverse order.
The process of finalizing the shelf in a sedan
The standard design is not of good quality and most often begins to rattle and creak. If it is not possible to make a shelf yourself, modify the factory one.
To work you will need:
- polyurethane foam;
- scotch;
- noise and vibration insulation material;
- glue, preferably epoxy;
- silicone sealant.
The upgrade looks like this:
The standard shelf is removed from the car along with the speakers. All holes are sealed with tape - it is important to prevent polyurethane foam from getting into them. The bottom surface is moistened for better adhesion to the sealant. Polyurethane foam is applied to the lower part and after 40 minutes it is pressed down to increase rigidity. The sealant must be pierced in several places with a nail to expel excess air. You should wait until the foam has dried completely and treat all seams with silicone sealant. Noise-vibration insulation material is glued to the outside with epoxy glue. If desired, you can trim the product with textiles on top.. https://www.youtube.com/embed/c0cnnMVsYf0
This modification increases the rigidity of the structure, prevents squeaks, and improves sound quality.
To ensure that nothing interferes with the sound, no foreign objects are allowed on the acoustic shelf.
Improvement method without polyurethane foam
On Lada Priora hatchbacks and station wagons, using the method using polyurethane foam is undesirable. The thickness of the product is considerable, and for a large surface area this threatens sagging. For this reason, other materials are used for modification: modelin, anti-creak or vibroplast.
First you need to make the structure heavier. To do this, noise-vibration insulation material is glued to the bottom side. In this case, a construction hair dryer is used to heat the vibroplast and a tool for rolling out the insulation - any hard roller will do. Weighting will prevent rattling.
Then all surfaces that come into contact with each other are covered with modelin. This refers to the shelf holders on the sides and the contact points of the plastic linings with the luggage compartment pillars. Sealants for windows and doors, used in construction, may also be suitable for pasting. The purpose of this stage is to remove squeaks.
As additional measures, you can use components from foreign cars instead of standard rubber bumpers. They press the shelf more tightly to the trunk lid in the closed position and prevent it from moving and bouncing when driving on uneven roads.
Advantages of acoustic podiums
VAZ 2114 acoustic podium
Podiums allow you to qualitatively improve acoustics, raising the sound to a new level. At the same time, you can not be limited to the standard landing dimensions of 13 cm, as provided by the manufacturer of the VAZ 2114. Among the many advantages of the podiums, I would like to separately highlight the following:
Podiums allow you to install speakers (see How to choose speakers for a car radio yourself) in the car door. Thus, rear passengers no longer feel discomfort from strong sound, as was the case before. The sound will be evenly distributed throughout the cabin.
Podiums in the doors of VAZ 2114
- Podiums make it possible to create the correct direction of sound. As you know, sounds have a clearly defined direction. In other words, the higher the frequency of a sound, the more directional it becomes. This can explain the fact that the midrange and high-frequency speakers must be correctly directed.
- Podiums are always easy to install. Attaching them is quite simple and it is not necessary to cut through the metal of the door. Often acoustic podiums are firmly fixed to the skin.
Installing podiums is easy and simple
- Another advantage of the podium is the spaciousness of the “pocket” where a larger speaker can be inserted.
- Leather-wrapped podiums make it easy to remove dirt and dust.
- The podiums have petals on the base. This is also considered an advantage, since it will allow the element to be firmly fixed to the door.
- The podium will fit perfectly into the interior of the VAZ 2114, making the interior richer and more beautiful.